A TRIO OF LITTLE CAKES

Mini-cakes are cute from the get-go, in fact most desserts made in single serving are pretty adorable by default. But some details can raise their level of cuteness even higher. Today I share three ideas to make mini-cakes a little more special.

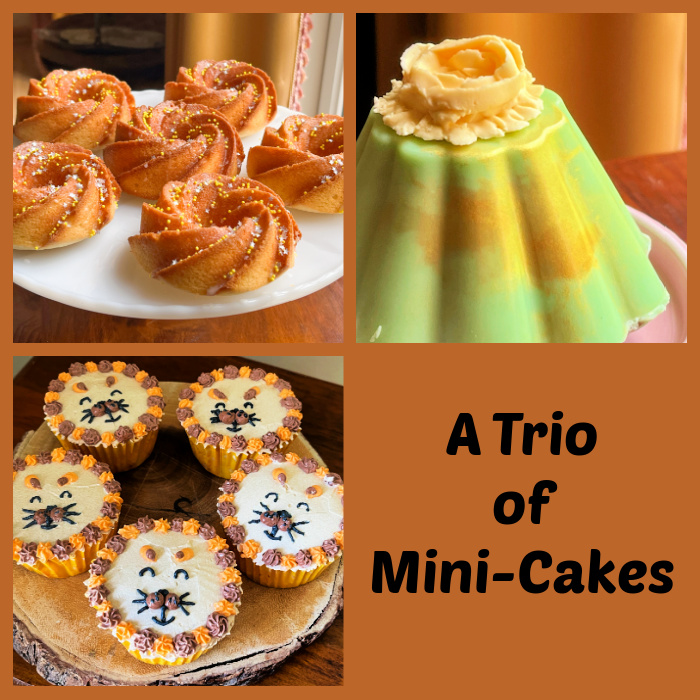
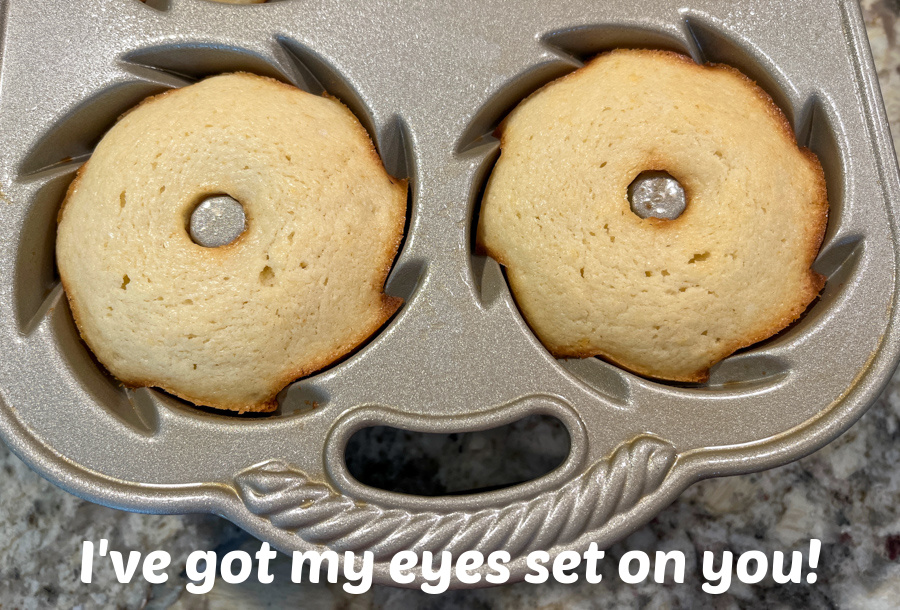
The first method to make cute cupcakes is using a different shape of pan. Like this pan from Nordic Ware. I think the quality of their pans is hard to beat, and totally worth the price tag. They are heavy, well-made and bake like a dream. I usually still spray the inside with PAM baking spray, a light coating ensures nothing will stick in the little crevices.

LEMON MINI-BUNDT CAKES

LEMON MINI-BUNDT CAKES
(adapted from several sources)

125g butter (I used Kerrygold)
150g sugar
zest of 1 lemon
2 large eggs (100g)
180 g all-purpose flour
1 + 1/4 teaspoon baking powder
Pinch of salt
½ cup milk
1 tablespoon freshly squeezed lemon juice
1 tsp lemon extract
for the glaze:
200g powdered sugar (1 cup)
Juice of 1 fresh lemon (amount adjusted for consistency)
sprinkles to decorate (optional)

Heat oven to 350 F. Rub the sugar with the lemon zest for a couple a minutes until very fragrant. Cream butter and lemon-infused sugar together. Add eggs one at a time, beating in slow speed until incorporated. Add the dry ingredients and milk. Mix well to combine, then add the lemon juice and extract, whisking gently.

Pour batter into the pan a little over 1/2 full in each cavity, but not quite reaching 3/4 of the capacity. Bake until a toothpick inserted in the cake comes out clean, about 22 minutes. Leave the cakes in the pan for 5 minutes than invert and cool them completely over a rack.

Make the glaze by mixing the ingredients. You want a pourable consistency, but not too thick so that the ridges of the cake still show. Pour over the cooled cakes. Decorate with sprinkles.

ENJOY!

to print the recipe, click here

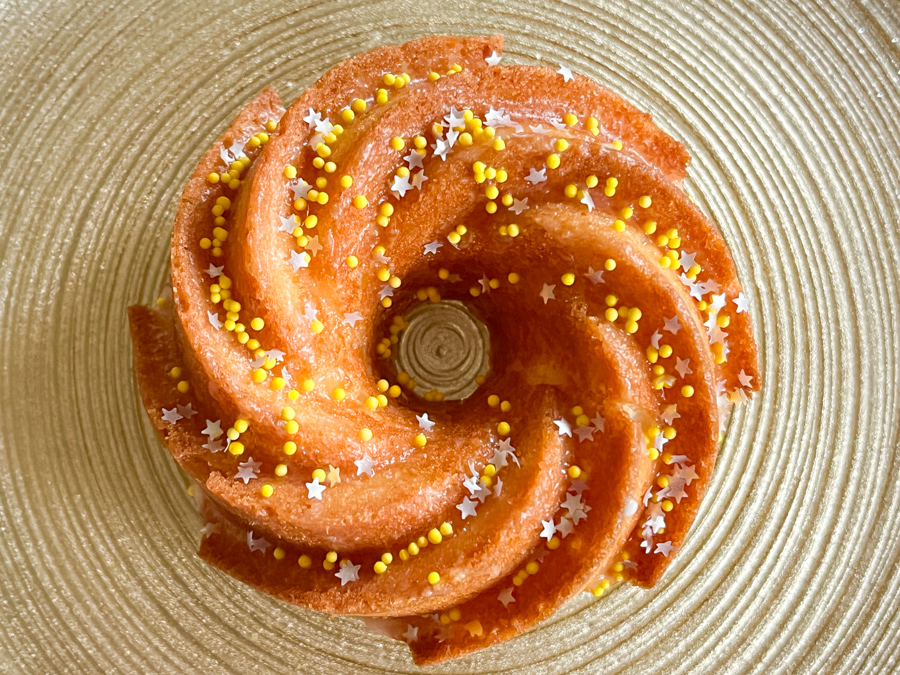
These lemon cakes are very moist, with intense citric flavor. I used a very thin glaze because I wanted the ridges to be evident. If making a regular cupcake, consider a much thicker icing that will stay on the surface a little better.

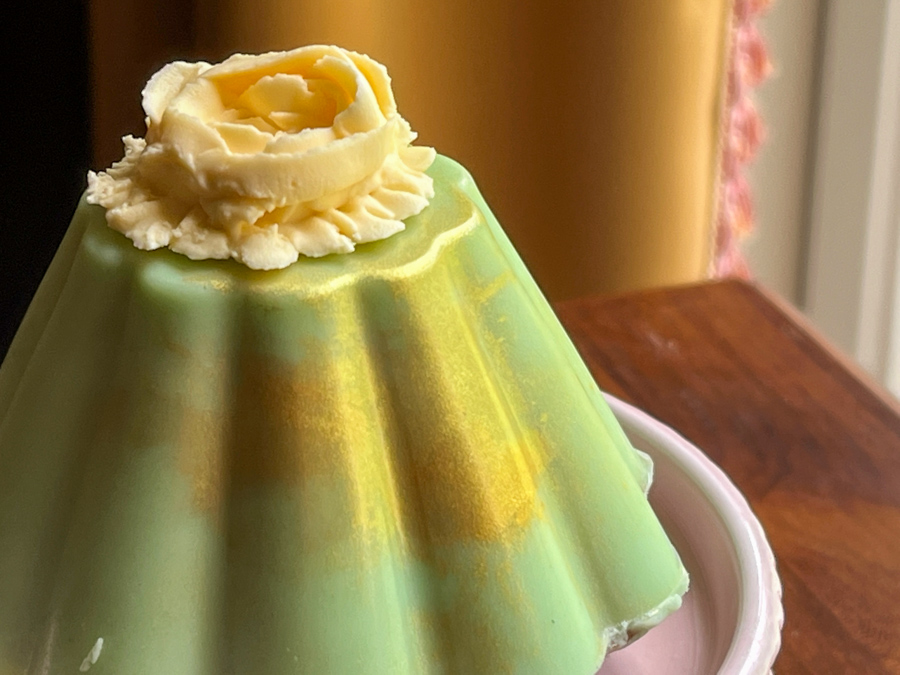
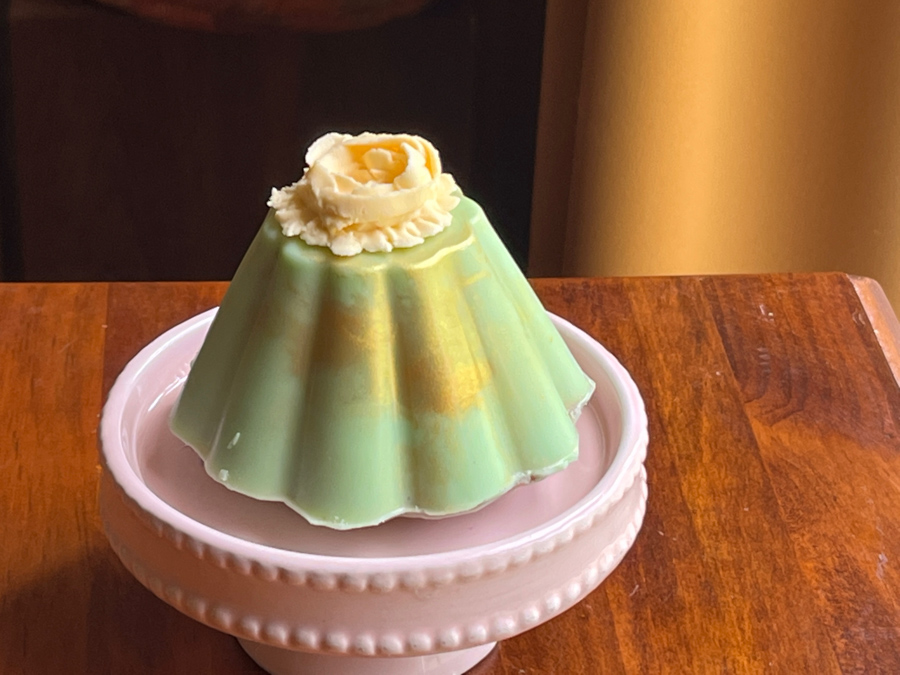
PISTACHIO-ROSE MINI-CAKES

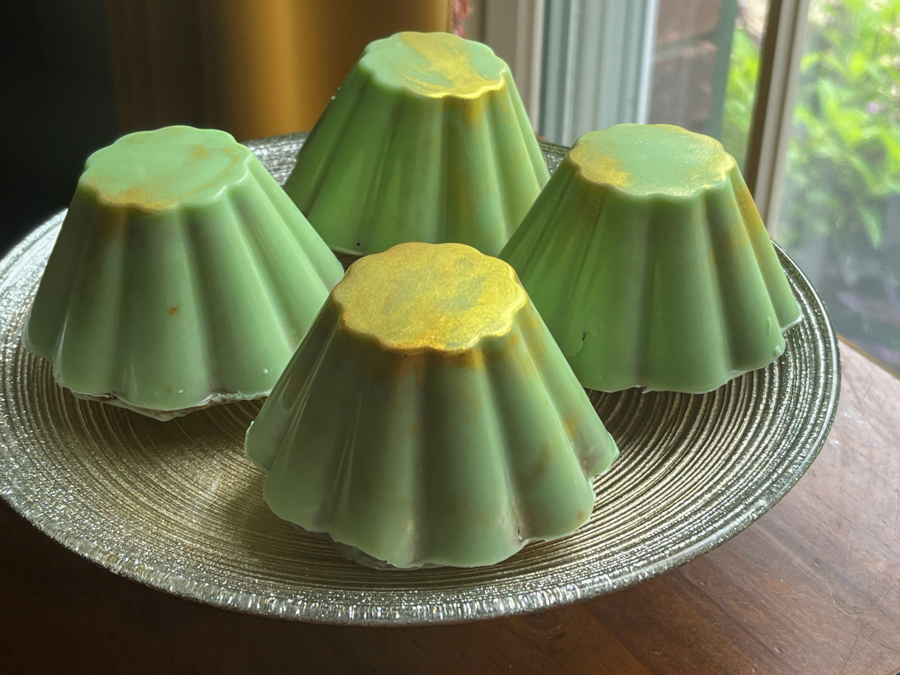
In this method, used by Sonali from sugaretal, you will need a silicone mold to bake the cakes. Then, after washing it well, the pan is used to apply the compound chocolate coating. The result is quite stunning, but the process pretty simple. I used this pan.

PISTACHIO ROSE MINI-CAKES
(recipe from Sonali)

To get the recipe, follow the link to her Instagram page.

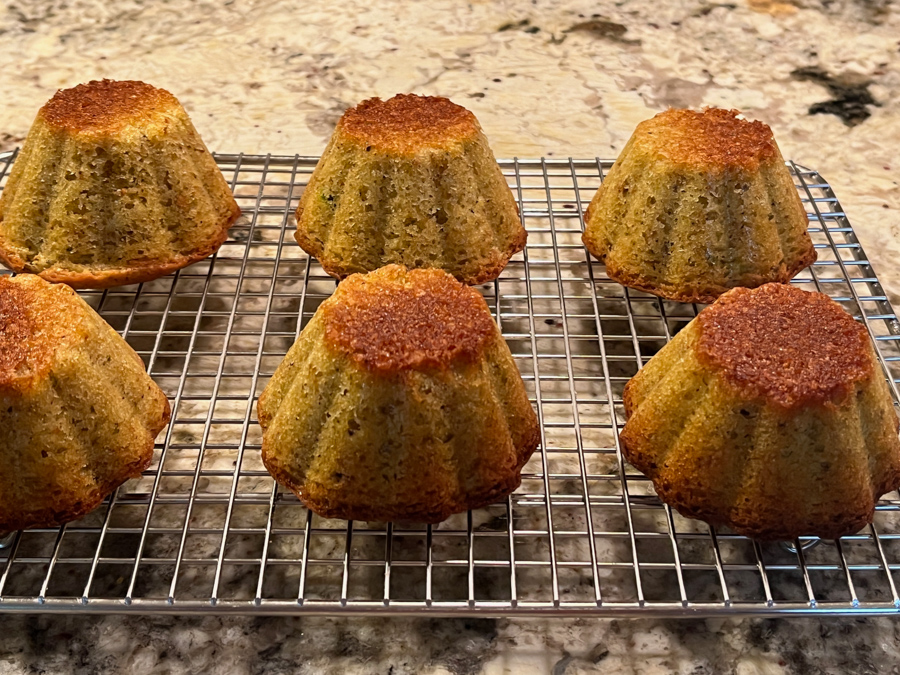
After baking the cakes….

The silicone pan is washed and dried very well. I used a little gold luster powder to brush the bottom of the pan, then poured Candy melts dyed light green. Carefully brushed that all the way to the sides of each cavity and placed the cake back, snuggly, so that it would get a smooth coating on the surface. Make sure to do one little cake at a time, so that the melted compound chocolate does not harden.

The pan is placed in the freezer for about 30 minutes, so that the shell is properly formed and the cakes will release fully coated.

I am totally in love with this combination of pistachio and rose. In fact, I urge you to visit Sonali’s blog, full of elegant ideas for all sorts of desserts.

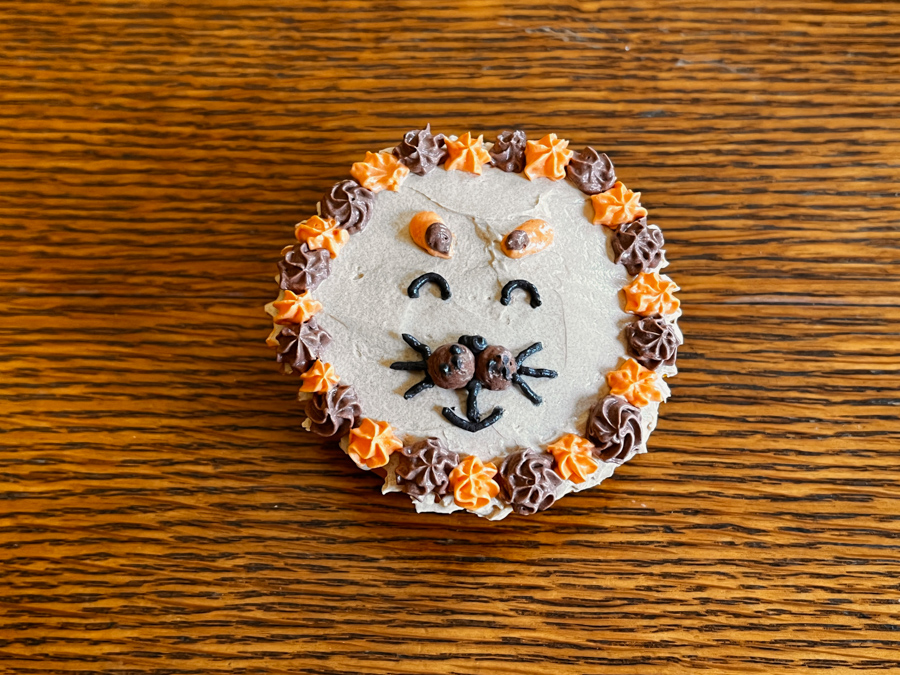
Finaly, the third way to dress up a cupcake, is making a few colors of Swiss meringue buttercream and creating a cute pattern on the surface. I followed the design of Liz Shim, available at Domestika.com

CUPCAKES DECORATED WITH SWISS MERINGUE BUTTERCREAM
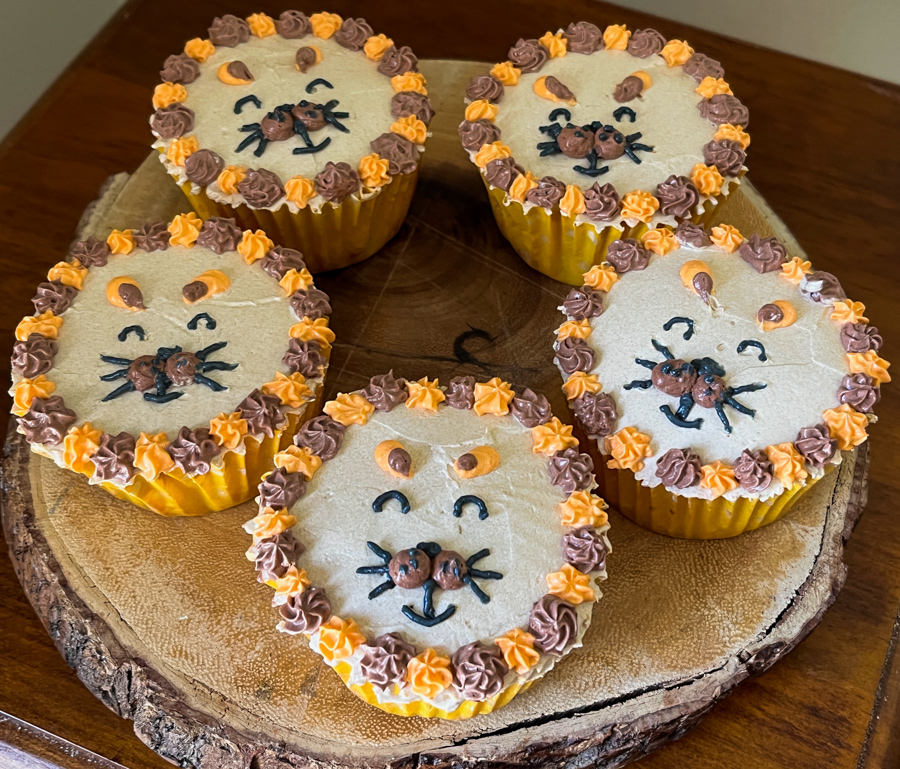
LION HEAD CUPCAKES
(design from Liz Shim)

I made a simple vanilla cupcake (recipe from America’s Test Kitchen), and a batch of Swiss meringue buttercream following the recipe provided by Liz Shim in her class. I coated the top of the cupcakes with buttercream, and separated small amounts to dye orange, brown, and black. Those were used to make all the details using star-shaped or round piping tips.

I hope you enjoyed this trio of cakes. There are many options for mini-cake pans at Nordic Ware, one more beautiful than the other: hearts, little houses, tiered little cakes, stars… just choose your favorite and play with cake flavors. I think the pan I used would be very nice with a red velvet cake too.

Coating a cake with compound chocolate is another great option to include in your repertoire, and Sonali is a pro at that. You might remember I’ve used her method in the past (click here).

As to piping designs with buttercream, it involves a bit of a learning curve. I am much more comfortable piping Royal icing, which stays put better and is less prone to melting with the heat of your hands in the piping bag. But I intend to keep practicing, so stay tuned!

ONE YEAR AGO: From our Garden to You

TWO YEARS AGO: Lady Bug Macarons

THREE YEARS AGO: Five-Stranded Braided Bread

FOUR YEARS AGO: Green Olive Salad

FIVE YEARS AGO: Coffee Macarons Dressed up to Party

SIX YEARS AGO: Blogging Hiatus

SEVEN YEARS AGO: Tomato Tatin

EIGHT YEARS AGO: Headed to Colorado!  

NINE YEARS AGO: Farofa Brasileira

TEN  YEARS AGO: Thai-Inspired Pork Tenderloin

ELEVEN YEARS AGO: A yummy Brazilian cake: Bolo de Fuba’

TWELVE YEARS AGO:  Summer’s Tomatoes

THIRTEEN YEARS AGO: Leaving on a jet plane… 

ONE BOWL, ONE WHISK CONFETTI CUPCAKES

Cannot get much simpler. These are egg-free cakes, easy and fast to prepare. The buttercream icing is a lot more involved than the cake, but if you prefer you can serve them with a dusting of powdered sugar, or a simple glaze. Many cookbooks and blogs have versions of these cupcakes, I based mine on smittenkitchen.com

CONFETTI CUPCAKES WITH VANILLA BUTTERCREAM FROSTING
(adapted from several sources)

200g all-purpose flour
160 grams granulated sugar
1 + 1/2 teaspoons baking powder
1/2 teaspoon salt
1 cup full-fat milk
1/3 cup grapeseed oil
1 tablespoon lemon juice
1 teaspoon vanilla extract
1/8 teaspoon almond extract
1/3 cup rainbow sprinkles

for the buttercream:
1/2 cup butter, at room temperature (1 stick, 113 g)
4 cups powdered sugar (32 oz)
1/4 cup milk
1 tsp vanilla extract
pinch of salt

Make the cupcakes: Heat oven to 350°F. Place cupcake liners in a 12-cup standard muffin tin.

In a large bowl, whisk flour, sugar, baking powder, and salt together. To the center, add the milk, oil, lemon juice, and flavoring extracts. Whisk very well until smooth. It will be very liquid. Add sprinkles, fold them gently. Using an ice cream scoop, fill each cupcake lines 2/3 full.

Bake for 15 to 20 minutes, until a toothpick inserted in the center comes out clean. Let the cupcakes cool before frosting.

To make the frosting, beat the butter with 2 cups of the powdered sugar, the milk, vanilla, and salt. Once that is smooth, keep adding the rest of the powdered sugar. You might not need it all, add it until you have the desired spreading consistency.

Frost the cupcakes using a Wilton 1M tip, then add confetti sprinkles, if desired.

ENJOY!

to print the recipe, click here

Comments: As I mentioned, these are probably the easiest cupcakes ever to make, even a cake-o-phobe will have no issues. They are tender, light, and delicate. Also festive, because rainbow sprinkles make anything festive… I like the addition of vanilla buttercream, even if it increases the complexity of the bake a bit. You can omit it, the cupcakes are delicious without it also.

ONE YEAR AGO: Incredibly Simple Times Four

TWO YEARS AGO: Phyllo Parcels with Moroccan Turkey

THREE YEARS AGO: Roasted Corn and Zucchini Salad

FOUR YEAR AGO: Fraisier Cake, A Celebration of Spring

FIVE YEARS AGO: Zucchini Frittata with Roasted Tomatoes and Goat Cheese

SIX YEARS AGO: Playing with Pectinase

SEVEN YEARS AGO: Poached White Asparagus with Lemon and Pistachios

EIGHT YEARS AGO: Dan Lepard’s Saffron Bloomer

NINE YEARS AGO: Fesenjan & The New Persian Kitchen

TEN YEARS AGO: Quinoa Salad with Roasted Beets

ELEVEN YEARS AGO: Pasta Puttanesca

TWELVE YEARS AGO: Miche Point-a-Calliere

MINI BLUEBERRY CAKES

I love all bakes by Sonali, a Bengali food blogger (site: Sugaretal) based in Australia. Her style is flawless, and her choice of flavors always pleases me. Not too long ago she shared these mini-cakes, loaded with blueberries, made even more special by the final touch of a shell of chocolate. To bake them, I used the Silikomart mold Parfum.

MINI BLUEBERRY CAKES
(very slightly modified from Sugaretal)

170g all-purpose flour
130g granulated sugar
1 + 1/2 tsp baking powder
1 egg, lightly whisked
1/2 cup milk
1/4 cup vegetable oil
1 tsp vanilla extract
1/3 cup fresh blueberries
1 cup white chocolate melts
pink oil-soluble food color
fondant decoration (optional)

Heat oven to 375 F. Lightly grease/spray 8 silicone molds.

Place flour, sugar and baking powder in a medium bowl. Add the egg, milk, vegetable oil and vanilla extract. Whisk to combine. Fold in the blueberries.

Pour batter into mold. Bake for 20 to 25 mins or until fully cooked through. A toothpick must come out clean when inserted in the center of the cakes. Remove from the oven, let the cakes cool almost completely before attempting to remove them from the silicone molds. Wash the silicone pan and reserve, while the cakes sit on a rack to get completely cold.

To the melted chocolate, add pink color, and brush the inside of the silicone pan. Carefully place a cold mini cake inside the cavity, so that the chocolate coats the surface. Place in the fridge for 45 minutes or the freezer for 15 minutes, then carefully remove the cakes. Decorate if so desired, with fondant or a Royal icing flower.

ENJOY!

to print the recipe, click here

Comments: So many possibilities with this technique! If you follow Sonali on Istagram (check her page here), you’ll see she has other variations using chocolate in the same basic approach. I can hardly wait to bake another batch. I will probably use my default recipe for brownie cupcakes, as it behaves well in different types of baking pans. The main thing to pay attention to is making sure the coating is fully set before the final un-molding. When in doubt, wait a little longer. It should come out very easily.

ONE YEAR AGO: Wood Plank Cookies, Learning from the Best

TWO YEARS AGO: OMG Spinach Pies

THREE YEARS AGO: Avgolemono Soup, My Way

FOUR YEARS AGO: Sourdough Chocolate Twist Bread

FIVE YEARS AGO: Dan Lepard Times Three

SIX YEARS AGO: Turkey Portobello Burger

SEVEN YEARS AGO: Raspberry Ricotta Cake

EIGHT YEARS AGO: In My Kitchen, April 2014

NINE YEARS AGO: Whole-Wheat Pasta with Lemony Tomatoes and Spinach

TEN YEARS AGO: Blood Orange Duck: A work in progress

ELEVEN YEARS AGO: Grilled Mahi-mahi with citrus marinade

TWELVE YEARS AGO: Memories of Pastéis\

SIMNEL CUPCAKES

I’ve wanted to make a Simnel Cake for the longest time, since it is such a classic, but baking a large cake is not something I do very often. Cupcakes are a different story, easy to share, great to include in my weekly box of donations. I made a few changes from recipes I found in my cookbooks and online, keeping the details that matter in the original, larger version.

SIMNEL CUPCAKES
(adapted from several sources)

100 marzipan
150g butter, softened
75g brown sugar
75g granulated sugar
2 large eggs, whisked
150g full-fat yoghurt
zest of 1 Lemon
170g mixed dried fruits
175g all-purpose flour
2 tsp baking powder
1/2 tsp salt

To decorate
200g marzipan
agave nectar to brush

Start by preparing the thin layer of marzipan that goes in the middle of the cupcakes. Divide the 100g in 12 little portions (about 8g each). Flatten them with your hands and stretch as a round that will fit inside your cupcakes. Mix the flour with baking powder and salt, reserve.

Heat the oven to 375F. Place paper liners inside the cupcake pan. Beat together the butter, sugars and lemon zest, until pale and light. Add the 2 eggs, slowly, whisking the batter well after each addition. Add the yoghurt, continue whisking. Add the flour mixture, incorporate gently, then add the dried fruit, folding until homogeneously mixed in.

Place a little cake batter in each cupcake liner, place the thin round of marzipan on top, press gently into the batter. Fill the cupcakes with more batter until 3/4 full. Bake for 20 to 25 minutes, until golden and a toothpick inserted in the middle comes out slightly moist, with some crumbs attached. Allow the cupcakes to cool for 5 minutes, then remove to a cooling rack.

When the cupcakes are cold, make the topping: roll out the fondant and cut rounds to cover the top. Make the layer as thin as possible. Use trimmings to make little balls. Attach the layer of marzipan to the cake by brushing a tiny amount of agave nectar on the cupcake, and pressing the marzipan over it. Place the little ball on top, using some agave nectar to help glue it in place. Run the cupcakes under a broiler to give some color to the marzipan. Pay close attention, because it goes from golden to burn a matter of seconds!

ENJOY!

to print the recipe, click here

Comments: This is a delicious cake. The trickiest part is dealing with the marzipan, other than that, the recipe is quite straightforward. The mixture of fruit with the cake and the marzipan is a total winner. I highly recommend you give it a try. Plus, don’t they look just adorable? The cake stays fresh for a few days at room temperature, which is another big plus in my book…

ONE YEAR AGO: Oat and Sesame Seed Sourdough

TWO YEARS AGO: Moroccan Turkey Pie with Olive Oil Crust

THREE YEARS AGO: Another Twisted Sister of the Shepherd’s Pie 

FOUR YEARS AGO: Cashew Chicken, My Way

FIVE YEARS AGO: Two Deliciously Simple Salads

SIX YEARS AGO: In My Kitchen, April 2016

SEVEN YEARS AGO: Spring has Sprung with Suzanne Goin

EIGHT YEARS AGO: Chai Brownies

NINE YEARS AGO: Pomegranate-Molasses Glazed Carrots

TEN YEARS AGO: Braised Brisket with Bourbon-Peach Glaze

ELEVEN YEARS AGO: The Real Vodka Sauce

TWELVE YEARS AGO: Spring Rolls on a Spring Day

HAPPY 4TH OF JULY!

In this post I share chocolate cookies and brownie cupcakes, all dressed up for the occasion. Recipe for cookies can be found here, and brownie cupcakes with a click here.

Four types of decorations, depending on how much icing and how much work you’d like to put into the cookies. The simplest is the chocolate star with the sprinkle border. All you have to do is pipe a little line of icing all around and then dip the cookie gently in sprinkles. The hexagons were featured recently on my baby blog.

These stars were inspired by Haniela. They started with a flooded white cookie, and then some were air-brushed with a combination of stencils (stripes and stars), and some were outlined with a three-color icing using a flat icing tip.

The 4th of July Hearts were inspired by something I saw on Instagram last year and saved for the future. And the future is now!

Cupcakes were made using 1/8 tsp of orange oil to flavor the cake batter. The icing was flavored with chai extract, as described in my post from a couple of months ago. Patriotic sprinkles complete the look…

I hope you are having a wonderful 4th, and please if you are into fireworks, think a little bit about all those pets getting terrified out there. If you can minimize your fun, or do it away from residential neighborhoods, please consider doing so.

ONE YEAR AGO: 4th of July Inspired Baking

TWO YEARS AGO: In My Kitchen, July 2019

THREE YEARS AGO: Brigadeiros for the 4th of July

FOUR YEARS AGO: Kaleidoscopic Macarons

FIVE YEARS AGO: Zucchini Noodles with Sun-dried Tomato Pesto

SIX YEARS AGO: In My Kitchen, July 2015

SEVEN YEARS AGO: Sous-vide Pork Chops with Roasted Poblano Butter

EIGHT YEARS AGO: Roasted Strawberry-Buttermilk Sherbet

NINE YEARS AGO: Amazing Ribs for the 4th of July!

TEN YEARS AGO: Baby Back Ribs on the 4th of July

ELEVEN YEARS AGO: Blueberry Muffins

TWELVE YEARS AGO: A Pie for your 4th of July