SARAH BERNHARDT’S COOKIES

Don’t you love a cookie with a nice story behind it? Sarah Bernhardt was one of the greatest French actresses of the last century. During a trip to Denmark at the height of her career she had a cookie from an upscale bakery and fell totally in love. She was so passionate about that delicacy that in 1911, after her memoirs were published in Denmark, Chef Johannes Steen named this spectacular chocolate cookie after her. Read more about it here. You will find many versions around, but count on Helen Fletcher to bring you the authentic. The cookie joins an almond base, and a chocolate truffle enrobed in a chocolate shell. Many versions cover the whole thing in chocolate, but if you want to do the real thing, cover just the truffle. You should still see the cookie underneath and it will be much more elegant to eat. Worthy of a dame like Sarah Bernhardt.

SARAH BERNHARDT’S COOKIES
(from Pastries like a Pro)

for the cookie base:
100g almond flour
150g granulated sugar
2 large egg whites
1/2 teaspoon almond extract

for the chocolate truffle topping:
1/2 cup cream
2 tablespoons unsalted butter (28g)
2 tablespoons sugar (25g)
140g semisweet chocolate
1 teaspoon vanilla

to coat the truffle:
114g semisweet chocolate (114 grams)
1 tablespoon shortening
Gold Leaf, optional

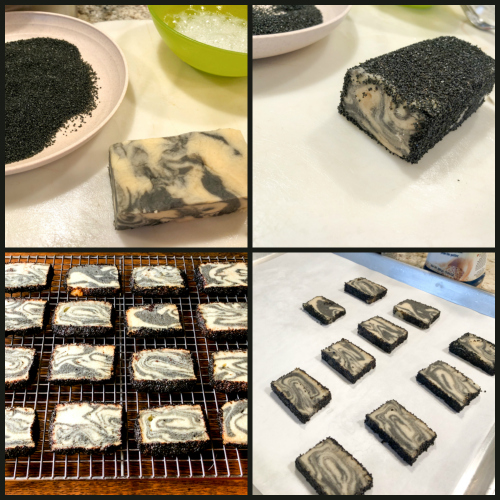
Make the cookie base. Draw a template with 1 in diameter circles on parchment paper to pipe the cookies, flip the paper so that you can pipe on the back.

Combine the almond flour and sugar in the bowl of a food processor, and run it for a few seconds to combine. Add the egg whites and vanilla, process until a paste forms. Place the mixture in a piping bag fitted with a 1/2 in round tip. Pipe rounds of cookie batter on the parchment paper, going just to the circle drawn. They will puff up during baking. Leave the piped cookie sitting at room temperature while you heat the oven to 300F. Bake the cookies for 20 minutes or until they just start to get some color on the edges. Let cool completely on the paper before removing to a cooling rack.

Make the chocolate truffles. Heat cream, butter and sugar until the butter is melted and the sugar is dissolved. The mixture should be very hot, but not boiling. Submerge the chocolate under the cream and let sit for 4 or 5 minutes. Whisk gently until smooth. Add vanilla.

pour it into a rimmed baking sheet, cover the top with plastic wrap and let it sit at room temperature until it sets up. If it is too soft to pipe and hold a shape, refrigerate briefly until it can be piped.

If making up to a week ahead, pour into a container, cover the surface with film and chill store in the refrigerator. Bring to room temperature to pipe. Follow the instructions above if it gets too soft.

Fit a pastry bag with a 5/8 inch tip. Fill the bag the truffle mixture. Pipe a kiss shaped mound in the center on top of each macaroon about 1” high and within about 1/4″ from the edge. If there is a pointed tip, press it gently with your finger to smooth the surface out.

Place in the freezer to harden. If not finishing within a day or so, place these in a covered container and keep them frozen for a month or so until time to finish.

Finish the cookies. Combine the chocolate and shortening in a short, wide mouth glass or other small container and microwave at 50% power for 1 minute.  Stir to mix. If the chocolate isn’t completely smooth, microwave for 10 seconds at a time.  Do not let it get too hot.

Remove the cookies from the freezer. Dip them upside down to cover the kisses, just short of their bottoms. Let the excess chocolate drip off. The chocolate finish should cover the kiss but not touch the cookie base. The fact they are frozen will stop the chocolate from running. If the kisses start to warm, pop them back into the freezer. Right after coating, add golden leaf decoration or sprinkles.

Cookies should be kept in the fridge and be brought to room temperature for serving. They can sit at room temperature for a few hours.

ENJOY!

to print the recipe, click here

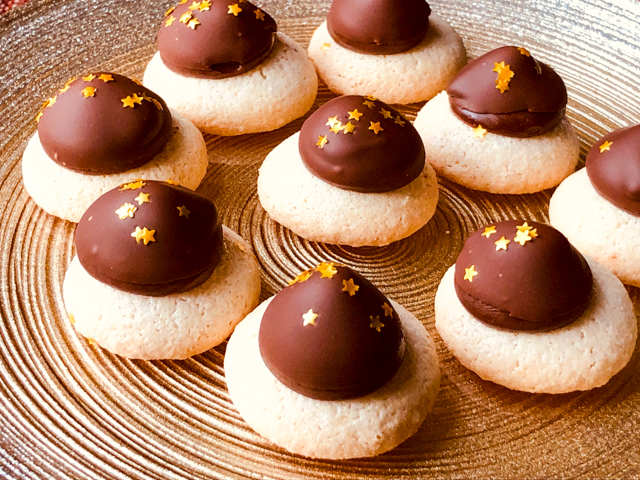
Comments: Helen’s post about these cookies is extremely detailed, so I recommend you visit her site if you’d like to bake a batch. She decorated them with gold leaf, I went the easier route and resorted to my trustworthy golden stars. You’ll need to work fast, because the chocolate coating sets almost immediately upon contact with the frozen truffle component.

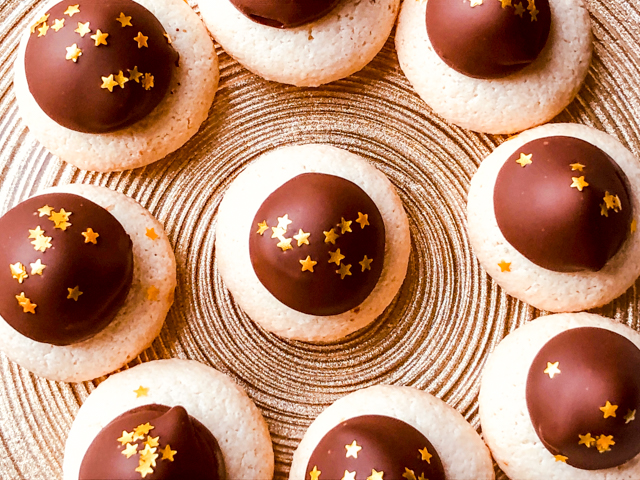
These are festive and luscious, the type of cookie that will brighten up any holiday table. There is something about the contrast of the cookie base with the melt-in-your-mouth truffle that explains why Ms. Bernhardt went crazy for them.

ONE YEAR AGO: A Really Big Announcement

TWO YEARS AGO: Stir-Fried Chicken in Sesame-Orange Sauce

THREE YEARS AGO: Monday Blues

FOUR YEARS AGO: A New Way to Roast Veggies

FIVE YEARS AGO: Two Takes on Raspberries

SIX YEARS AGO: Spice Cake with Blackberry Puree

SEVEN YEARS AGO: Own Your Kitchen with Cappuccino Panna Cotta

EIGHT YEARS AGO: Chicken Parmigiana, the Thriller

NINE YEARS AGO: Wild Mushroom Risotto

TEN YEARS AGO: Tartine Bread:  Basic Country Loaf 

ELEVEN YEARS AGO:  Pugliese Bread

A DIFFERENT KIND OF COOKIE SWAP

I like to keep the blog varied. Never two bread posts in a row. Never two savory recipes in a row. But never say never, as I am about to break my own rules. My latest post involved cookies, and here you have another one. But, but, but…. I got so excited about this, I cannot wait to share. A cookie swap that is not quite what you think: you swap portions of a stamped cookie dough, forming a totally new pattern. I keep thinking about all the possibilities of mixing and matching. Shapes, designs, colors, cookie formulas (think chocolate and vanilla for a shocking color contrast).

MIX-AND-MATCH LEMON SUGAR COOKIES
(inspired by several sources)

113g unsalted butter (1/2 cup)
30g egg (whisk one egg and measure the amount)
1/4 cup honey (about 60 mL)
zest of 1/2 lemon
1 teaspoon lemon extract
50g granulated sugar
1/8 teaspoon salt
320g all-purpose flour

to decorate (optional):
vodka or everclear or lemon extract
dust luster powder in gold, pearl white, or any desired color

Melt the butter and set aside to cool slightly, but do not let it get solid.

Beat the 30g egg in the bowl of a Kitchen Aid mixer bowl until the yolk and white are fully mixed.  Add the honey, and lemon flavoring. You can do this step by hand using a whisk.

In another bowl, mix the sugar with the lemon zest and rub the zest with your fingers to release all the oils. Add the salt, then incorporate the mixture into the egg using the flat beater of the Kitchen Aid in medium-speed. Beat well, then slowly add the melted butter, constantly mixing.

Add flour (reserve about 1/2 cup) in very low-speed and mix in until you have a dough that is solid enough to knead. Remove the dough from the Kitchen Aid and add the rest of the flour by hand, you may not need the full amount. Pat the dough into a disc, wrap in plastic and place in the fridge for 30 minutes.

Roll it out to a thickness compatible with your cookie press, then press two or three patterns using any type of design you like. Using a small round cookie cutter remove the centers and swap them, as shown in this picture:

Freeze the cookies on a baking sheet lined with parchment paper for 15 minutes while you heat the oven to 350F. To avoid distortion of the cookies during baking, transfer the frozen cookies to a room temperature sheet, using the parchment paper to move them.

Bake for about 12 minutes, until edges start to get golden, but do not over bake. Let them cool for a few minutes on the baking sheet, than remove to a rack to cool completely.

If desired, use luster dust powder mixed with vodka or lemon extract to paint the surface.

ENJOY!

to print the recipe, click here

Comments: I am over the moon with these! You don’t have to go through the additional step of painting them, the pattern looks nice even if the cookies are kept plain, but I love working with luster dust. There is no need for precision, each cookie turns out a little different.

You can use any recipe that keeps the shape during baking, and always freeze the cut cookies before sticking in the oven. Another thing to keep in mind is to transfer the frozen cookies to a room temperature baking sheet, because sometimes baking them over a frozen cookie sheet might cause warping. By transferring to a room temperature surface, you avoid that problem.

I cannot take full credit for this idea. I am a member of a great cookie group on Facebook (Molded Cookies of the World) and the moderator (Dawn Williams) has been playing with different cookie molds, joining them together. I decided to try it with the cookie stamps from Nordicware. They are sturdy, wonderful to use, and every single swap I did worked perfectly.

I am already planning my next batch… and the one after that…

ONE YEAR AGO: Scary Good Recipes for your next Halloween

TWO YEARS AGO: Pumpkin Sourdough

THREE YEARS AGO: First Monday Favorite

FOUR YEARS AGO: Secret Recipe Club: Paalak Paneer, a Farewell Post

FIVE YEARS AGO: In My Kitchen, November 2015

SIX YEARS AGO: Helen Fletcher’s Oatmeal Cookies

SEVEN YEARS AGO: Thai-Style Pesto with Brown Rice Pasta

EIGHT YEARS AGO: Shrimp with Spicy Orange Sauce

NINE YEARS AGO:  A Simple Appetizer (Baked Ricotta)

TEN YEARS AGO: Sour Cream Sandwich Bread

ELEVEN YEARS AGO: Pasta with Zucchini Strands and Shrimp

SPRINGERLE COOKIES


My love for macarons should be quite obvious, but there’s something about Springerle Cookies that speaks straight to my soul. These cookies, not unlike macarons, have been around for centuries. In terms of flavor, they are a lot more strict, as there is no filling to play with. But they are so elegant, so magical, and the anise oil makes them unique. Oddly enough I don’t like licorice but find the anise flavor of Springerle quite enticing. I share with you one authentic recipe for these cookies that is a bit of a labor of love, and also time-consuming, as the cookies have to dry for a couple of days before baking.  But, if you want to just use those beautiful molds in a simpler recipe, I’ll share my favorite also. A special thank you to my friend Margie, who sent me two beautiful molds, and perhaps not intentionally, turned me into a Springerle-mold-addict.

SPRINGERLE COOKIES
(traditional recipe, based on The House on the Hill)

for the cookies:
1/4 teaspoon baker’s ammonia (Hartshorn)
1 tablespoons milk
3 large eggs, room temperature
360g powdered sugar
57g (1/4 cup) unsalted butter, softened but not melted
1/4 teaspoon salt
1/4 teaspoon of anise oil
454g sifted cake flour (I used Softasilk)
grated rind of orange

for the glaze (optional):
240g powdered sugar
3 tablespoons water
1/2 teaspoon flavoring of your choice (I used vanilla)
pearl dust colors and lemon extract

Make the cookies: Dissolve baker’s ammonia in milk and set aside (avoid the temptation to take a sniff, you will regret it). Beat eggs until very thick, this will take from 10 to 15 minutes.  Slowly beat in the powdered sugar, then the softened butter. Add the the mixture of baker’s ammonia and milk,  salt, anise oil and orange zest.

Gradually beat in as much flour as you can with the mixer, then stir in the remainder of the flour to make a stiff dough. Turn onto floured surface and knead in enough flour to make a good print without sticking. Refrigerate for one hour, but keep in mind the dough can be refrigerate the dough for up to 3 days.

On a floured surface, roll dough depending on the depth of the carving in the cookie press you are using. Shallow carvings will need to be thinner while deeper carvings will need to be thicker. Flour your cookie mold for each and every pressing. Press the mold firmly and straight down into the dough, then lift, cut with the cookie cutter of your choice, and place the formed cookie onto a flat surface to dry.

Do not cover the cookies while they dry. The goal of drying is to set the design. Let the cookies dry at least for 24 hours. It is better to leave them alone for a couple of days, so the design will be better retained during baking.

On baking day, heat the oven to 255F to 325F (depending on the size of your cookie and how white you like to have them), for 10 to 15 minutes. Let the cookies cool and glaze or paint, if you so desire.

Make the optional glaze: Combine all ingredients and mix until well combined and smooth.
Add more water if necessary. Brush glaze on each cookie after baking. Paint with pearl dust alone or with the powder dissolved in a little lemon extract.

ENJOY!

to print the recipe, click here

Comments: The molds on the top left corner of the composite picture were a gift from Margie. Aren’t they gorgeous?  I love them!

 If you visit The House on the Hill  you can watch a very detailed video in which Connie, the author of the recipe, goes over all the minor details. Her recipe is for a really big batch, and I decided to make just half. I actually baked these back in December and took them to a departmental holiday party, but a full batch would be way too much. Keep in mind these cookies last forever, and although they can get a bit tough after a couple of weeks, the flavor keeps getting better (that’s what I heard).

Now, if you prefer to make a quicker version, and take it in different directions as far as flavor is concerned, I highly recommend King Arthur’s recipe.

SHORTBREAD SPRINGERLE-LIKE COOKIES
(slightly modified from King Arthur Flour)

227g butter, room temperature
106g brown sugar
2 teaspoons granulated sugar
1/2 teaspoon salt
1 large egg
1 teaspoon vanilla extract
1/8 tsp anise oil
360g all-purpose flour

Beat together the butter, sugars, and salt until light and creamy. Beat in the egg and vanilla, and fold in the flour. Divide the dough in half, shape both halves as disks, wrap in plastic, and refrigerate for at least 1 hour.

Heat the oven to 350F. Line with parchment) two baking sheets.

Working with one disk at a time, flour your work surface and roll the dough 1/4″ thick. To shape cookies using a springerle mold: Brush a very light coating of flour onto the dough and your springerle mold. Press the mold firmly into the dough, then remove and cut around the design with a cookie cutter.

Transfer the cut cookies to the prepared baking sheets. Freeze for 10 minutes. Bake the cookies for 10 to 12 minutes, until lightly golden around the edges. Remove them from the oven, and allow them to cool before painting, if so desired.

ENJOY!

to print the recipe, click here

Comments: It takes a little bit of patience to get these cookies right, and each mold is a slightly different universe. You need to get the thickness of the dough and the pressure you use with the mold just right, so that the full pattern is transferred.  The main thing to keep in mind is that you need a cookie recipe with a very small amount of leavening agent, or even without any at all. Be careful with baking powder, and make sure you use a recipe that someone had success with before. You can use the basic recipe from King Arthur and change the flavors, as they suggest in the site. I really like using Fiori di Sicilia, and added it to the heart-shaped batch.

I hope you’ll consider baking a batch of these cookies during the upcoming holiday season. I am sharing the recipes early enough, so you can browse the many wonderful sites that sell Springerle molds (like this one) and keep me company in my latest addiction.

ONE YEAR AGO: Chickpeas and Zucchini with Tahini Sauce

TWO YEAR AGO: Mokonut’s Rye Cranberry Chocolate Chip Cookies

THREE YEARS AGO: Incredibly Simple Times Four

FOUR YEARS AGO: Going naked, and my husband loved it

FIVE YEARS AGO: Cream Cheese Mini-Pancakes with Smoked Salmon

SIX YEARS AGO:  Star-Shaped Chocolate Brioche Bread

SEVEN YEARS AGO: Blueberry-Banana Bread 

EIGHT YEARS AGO: Into the Light Again

NINE YEARS AGO: Five Grain Sourdough Bread

TEN YEARS AGO: The Nano-Kitchen

ELEVEN YEARS AGO: Kaiser Rolls

MARBLED TAHINI COOKIES

These are the perfect cookies for grown-ups. Not too sweet, with a nice tahini flavor. They look stylish in their black and white nature, with the added bling of black sparkling sugar around the edges. I saw this recipe on the New York Times and made it the following day. But, guess what? I was not very happy with the outcome, because the cookies ended up too big. In their recipe, the full block is sliced to form the cookies. I changed things around a bit, and cut the block in half first. They turned out quite a bit more delicate. This version I am happy with, so I share it with you…

MARBLED TAHINI COOKIES
(adapted from The New York Times)

385 grams all-purpose flour
1 teaspoons kosher salt
½ teaspoon baking powder
Cooking spray
225 grams unsalted butter, softened
125 grams confectioners’ sugar
1 large egg, at room temperature, plus 1 egg white
1 teaspoon vanilla extract
¼ cup plain tahini
3 tablespoons black tahini
coarse black sanding sugar (optional)

In a medium bowl, whisk to combine flour, salt and baking powder; set aside. Coat a loaf pan (9 x 5) with cooking spray, then line with plastic wrap, leaving plenty of overhang. Set aside.

In the bowl of a stand mixer fitted with the paddle attachment, cream together butter and confectioners’ sugar on medium-high speed until fluffy, 2 to 3 minutes. Add the egg and the vanilla; beat on medium-high until combined, about 2 minutes. Add flour mixture; beat on low speed until combined; then increase speed to medium and beat until dough starts to clump together.

Remove dough from bowl, knead lightly and form into a fat log. Using a bench scraper or knife, cut into two pieces, one about 1/3 of the dough, and the other 2/3 of the dough. Return the larger piece to the bowl, add the plain tahini, and beat on medium speed until fully combined. Remove from bowl and set aside. Add the smaller piece and the black tahini to the bowl and beat on medium speed until fully combined.

On a floured surface, using a bench scraper or a knife, cut the white dough in half. Pat half the white dough into a 5-inch square. Cut the black dough in half, then pat half the black dough on top of the flattened white dough to match dimensions. Repeat with remaining white dough, then black dough, so you have four alternating layers of white dough and black dough. Cut in half crosswise, and gently knead and roll one piece to marble the two colors together. Repeat with the second piece of dough. Stack both pieces of dough together and briefly knead the pieces together to form one dough. The idea is to marble the colors, so do as much or as little as you like.

Press dough into prepared pan, and fold the plastic wrap over the top to seal. Gently press down to even out the surface as much as possible. Chill until firm,  at least a few hours or overnight.

Heat oven to 325 degrees. Beat the egg white with 1 teaspoon water to thin it out. Spread the sanding sugar out on a small baking sheet. Remove the block of dough from the loaf pan and unwrap it. Trim the slanted sides and the top if you want them really square. Cut it in half lengthwise, so that you’ll have two equal blocks of  cookie dough. Very lightly brush the outside of each block with the egg white mixture. Press  firmly to coat all sides (except the ends) with the sugar, sprinkling and pressing it on to cover any bare spots.

Cut each block into thin slices (less than 1/4 inch) and lay them out 1 inch apart on parchment-lined baking sheets. Freeze until firm, about 10 minutes. Bake until cookies are golden underneath, 14 to 16 minutes. Let cool a few minutes on the baking sheets, then transfer cookies to wire racks to cool completely.

ENJOY!

to print the recipe, click here

Comments: These are quite likely my favorite cookie of this crazy year.  Well, you know I am partial to macarons, but macarons are pretty sweet. Truth is, I like to dream about designs and flavors, bake them, but once I eat one, I’m satisfied. These cookies are quite a bit more dangerous… They have that savory-sweet quality that I find hard to resist. The black sparkling sugar is a nice touch, but you can skip that step with no major harm done. Halloween is approaching. I see no parties, no get-togethers, but I definitely see a batch of these babies, in orange and black. What do you think?

On the picture above you can see the first batch, slicing the full block of cookie dough to make the cookies. Maybe you would prefer them that way, but I definitely like the smaller better.

Each one, so unique!


ONE YEAR AGO: Twice-Baked Goat Cheese Souffle

TWO YEARS AGO: Strawberry-Mango Entremet Cake

THREE YEARS AGO: Hommage to the Sun

FOUR YEARS AGO: Tomato and Cucumber Salad with Almond Vinaigrette

FIVE YEARS AGO: Eggplant Tomato Stacks

SIX YEARS AGO: The Couscous that Wasn’t

SEVEN YEARS AGO: Apple-Cinnamon Bread

EIGHT YEARS AGO: Blueberry Galette

NINE YEARS AGO: In My Kitchen, August 2011

TEN YEARS AGO: Journey to a New Home

ELEVEN YEARS AGO: Friday Night Dinner


BISCOITINHOS DE CANELA

Free Portuguese lesson today on the blog: biscoitinhos de canela means little cinnamon cookies. The word “biscoito” means cookie (or biscuit if you are in the UK) and the addition of “inho” to the word immediately implies they are small.  And in this case, I believe also very cute. The recipe comes from Miuda’s bilingual blog (Russian and Portuguese), Verdade de Sabor. She is a professional baker with magical hands and a unique sense of style and elegance. I never miss her posts.
.
(say it like a native,

BISCOITINHOS DE CANELA
(from Verdade de Sabor)

170 g butter, softened
3/4 teaspoon cinnamon (or to taste)
40g eggs
a pinch of salt
80g powdered sugar
170g of all-purpose flour
1/2 teaspoon baking powder
gold dust and lemon extract for decoration (optional)

Beat the butter with the powdered sugar until it is white and fluffy. Add the egg and continue to beat. Sift the flour separately with the baking powder, cinnamon and salt and gradually add to the butter mixture. The dough will be thick, but still soft and flexible.

Transfer the dough to a pastry bag and fill small silicone molds. Hit the form on the table a few times to fill all the empty spaces. Smooth the surface with a spatula. Place in the freezer for 1-2 hours (or longer if desired).

Heat the oven to 350F.  Cover the baking sheet with parchment paper or a silicone mat. Remove the frozen pieces from the molds and distribute on the baking sheet. Immediately place in the oven and bake for 12 to 15 minutes, or until golden brown. Allow the cookies to cool completely on a rack.

Mix golden dust with lemon extract, and using a brush, paint the cookies to accentuate the design.

ENJOY!

to print the recipe, click here


Comments: Do you really need a mold to make those? Well, the cookie batter is soft, so if you want to do a more traditional roll out and cut, you would have to adjust and add more flour, which will change slightly their texture. Just keep that in mind. Miuda finished them with a coating of caramelized gold chocolate, covering just half of each “biscoitinho” but I did not want to risk the chocolate melting when I wrapped them, so I opted for a simple brushing with gold dust.  They are really delicious. As to the molds, I see myself using variations of this recipe, adding some cocoa next time, because I love the look the molds gave. The rectangular shape is nice but in the end I was pretty smitten by the slightly smaller, round one. The ones I used can be found here and they were sold in a set with those two together.

The cookies would be a nice addition to an afternoon tea party, if you are into that sort of thing. And don’t forget, you can have a party for you alone. Pamper yourself. You deserve it!

Miuda, thank you for another great recipe, I always look forward to your beautiful productions!

ONE YEAR AGO: Salmon Tacos

TWO YEARS AGO: The Chignon

THREE YEARS AGO: Rack of Lamb Sous-Vide with Couscous Salad

FOUR YEARS AGO: Focaccia with Grapes, Roquefort and Truffled Honey

FIVE YEARS AGO: Moroccan Carrot Dip over Cucumber Slices

SIX YEARS AGO: White Chocolate Macadamia Nut Cookies

SEVEN YEARS AGO: Cilantro-Jalapeno “Hummus”

EIGHT YEARS AGO: A Moving Odyssey

ELEVEN YEARS AGO:
 
Shrimp Moqueca