Note added after publication: I now tried the air-frying with whole corn cobs, and it worked great also! So if you are afraid to cut the cobs (I don’t blame you), go ahead and try it this way. I rubbed the cobs with the seasoned oil, placed at 390F for 16 minutes, turning them around every once in a while. Perfect! Not as cute as the ribs, but definitely safer.
Apparently this recipe went viral on TikTok. I can understand why – it is unusual, cute, and dangerously addictive. However, in my humble opinion, the videos showing how they prep the corn are misleading. It is a dangerous maneuver, and not at all easy to do. I modified the technique by microwaving the corn before cutting it into “ribs”. It did not harm the final product and made a very tricky step a little more user-friendly.
AIR-FRYER CORN RIBS (adapted from several online sources)
3 ears of corn 1/4 cup olive oil 1 tsp Southwest spices 1/4 tsp smoked paprika salt to taste squirt of lemon juice grated Parmigiano to serve
Wrap the corn cobs in plastic wrap and microwave for 5 minutes. Allow it to cool until you can handle.
Cut the corn cob lengthwise in ribs – you will still need a large knife and maybe use something to bang on the top of it to make it slice through. I have a lower-quality knife with a large blade that can take that abuse.
Whisk the oil, spices and lemon juice in a small bowl, then drizzle all over the ribs of corn in a large bowl. Make sure to rub the mixture well. Place in the air-fryer and set at 400F (or as high as your machine will go) for 10 minutes, moving them around half-way through frying time. Season with more salt if you like, and sprinkle cheese on top.
Comments: This is a real keeper of a recipe! The corn gets a perfect texture, and you can vary the spice mix to take it in any direction you like. Many versions will serve it with a sauce, often mayo-based, but we liked it plain. I don’t think you can pull the exact same quality without the air-fryer, but maybe if you roast it at 450F it might get close. Super delicious. Trust me. Prepping the corn is not fun but once you bite into these little morsels you will feel it was all worth it.
I cannot express how much I love them! I ate four, and went back for two more, which was pretty much half the amount prepared. We had no leftovers. I don’t think I ever consumed as much corn in a single sitting. Plus, I smiled and oohed and aaahed all the way through it.
We’ve had quite a few days with warm temperatures and that undeniable vibe of spring. This is a perfect light meal for the upcoming season. Simple, refreshing, full of flavors and textures. Make the salsa a few hours ahead if you have a chance.
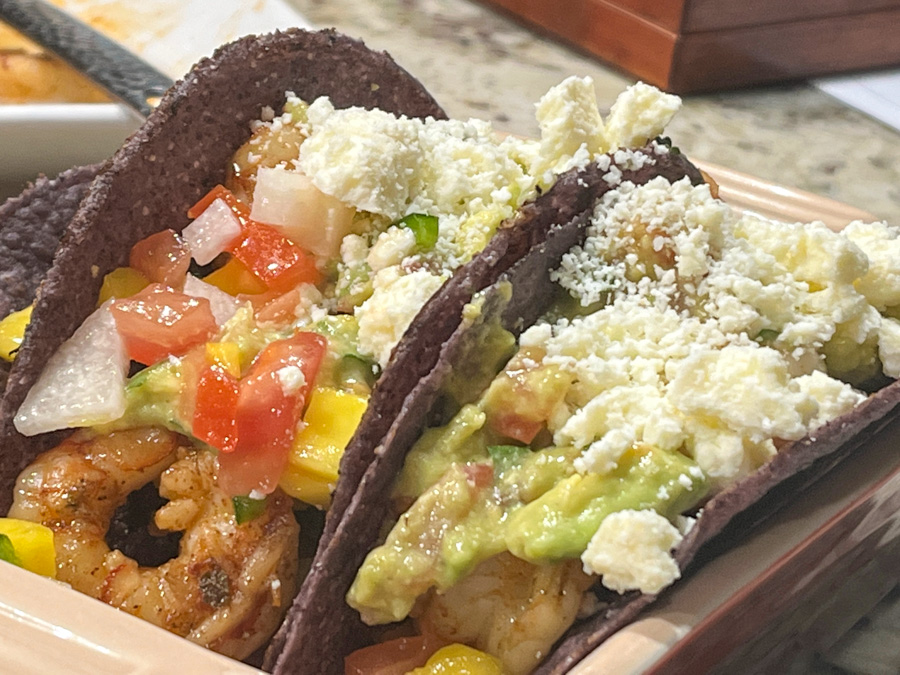
SHRIMP TACOS WITH JICAMA-MANGO SALSA (from the Bewitching Kitchen)
for the salsa: 1 mango, peeled and cut into cubes half a jicama, peeled and cut into small dice 2 Roma tomatoes, diced 1 large jalapeños, seeded, deveined and finely minced juice of half a lime drizzle of olive oil salt and pepper to taste
for the shrimp: 1 pound large shrimp, peeled and deveined 1 quart water 1/4 cup salt 1/4 cup sugar juice of half a lime 1 tablespoon grape seed oil 2 teaspoons chipotle chili powder 1 teaspoon oregano 1/4 teaspoon ground cumin salt and pepper to taste (go easy on salt, as the shrimp will be brined)
to serve: tortillas, taco shells, guacamole, Cotija cheese
For mango salsa, combine mango, jicama, tomatoes, and jalapeño in a bowl. Add the lime juice, olive oil, and season to taste with salt and pepper. Refrigerate for a couple of yours if you have the time.
Prepare a mild brining solution mixing 1 quart water with 1/4 cup kosher salt and 1/4 cup sugar, plus the juice of half a lemon. Submerge the shrimp in the solution for about 20 minutes. Remove shrimp from brine, rinse briefly and dry on paper towels.
In a small bowl, mix together chipotle, oregano, cumin, salt and pepper until evenly mixed. Sprinkle over shrimp, rubbing on both sides. Heat the oil on a large nonstick skillet, when really hot add the seasoned shrimp in a single layer. Cook until shrimp are opaque and sides are browned. Cut the cooked shrimp into pieces for serving, if you like, or leave them whole.
Arrange the shrimp inside tacos or over tortillas, spoon the salsa, and if desired, add guacamole and Cotija cheese.
Comments: This salsa is a winner. Make it, serve it with any kind of protein you like. I admit that prepping jicama is not my favorite pass time, but it was worth it. As always, most important thing is to not overcook the shrimp, but the brining step helps with the texture, and will allow a little more room for error in that step. I can hardly wait to bring this back to our table!
If you follow my cookie blog, maybe you’ve read a recent post in which I played with Chocolate Royal icing? I used fat-free cocoa powder (click here to get some) and they worked extremely well not only in icing but as I show today, to make cocoa-flavored macaron shells.
CHOCOLATE PEANUT BUTTER MACARONS (adapted from this post)
For the shells: 200g Icing/powdered sugar 115 g ground almonds/almond meal 7g fat-free cocoa powder 115 g egg whites at room temperature (approx. 4 eggs) 1/8 tsp of cream of tartar (optional) 100 g granulated sugar ¼ tsp vanilla paste or extract 1 drop brown food gel 1 drop red food gel
Line 3 heavy baking sheets with parchment/baking paper or Silpat mats. Layer the powdered/icing sugar, ground almonds/almond meal, and cocoa powder in a food processor. Pulse until the mixture looks like fine meal, about 12 pulses. Pass through a sieve and transfer to a small bowl or to a sheet of parchment/baking paper. Set aside.
Place the egg whites and cream of tartar in the bowl of a stand mixer fitted with the whisk attachment. Make sure that the bowl and the whisk are impeccably clean. Starting on medium speed, whip the whites with the cream of tartar until they look like light foam. The whites should not appear liquid. The foam will be light and should not have any structure.
Slowly rain in the granulated sugar in five additions, trying to aim the stream between the whisk and the side of the bowl. Turn the speed up to high. Continue to whip the meringue until it is soft and shiny. It should look like marshmallow creme (marshmallow fluff). Add the vanilla. Whip the egg whites until the mixture begins to dull and the lines of the whisk are visible on the surface of the meringue. Add the drops of food color and continue whisking. Check the peak. It should be firm. Transfer the whites to a medium bowl.
Fold in the ground almond/almond meal mixture in two increments. Paint the mixture halfway up the side of the bowl, using the flat side of a spatula. Scrape the mixture down to the center of the bowl. Repeat two or three times, then check to see if the mixture slides slowly down the side of the bowl. Put the mixture in a piping bag fitted with your choice of piping tip (round, ¼ or ½ inch in diameter or 6 – 12 mm). If you don’t have a macaron mat, draw circles on baking/parchment paper about 2inches/5cm in diameter & turn the paper over before placing on the baking sheets. Pipe shells, I like to count numbers in my head and use the same count for each shell so they end up similar in size.
I pipe inside the circles to about 1 ¾ inches/4.5cm but you can go to 1 ½ inches (3.8cm) & the macarons will spread & fill the circle while drying.
Slam each sheet hard four to six times on the counter/worktop. Let the unbaked macarons dry until they look dull but not overly dry. Drying time depends on humidity. In a dry climate, the macarons can dry in 15 to 20 minutes; in a humid climate, it can take 35 to 40 minutes.
While the macarons are drying, heat the oven to 300 F (150 C/130C Fan oven/Gas Mark 2). Bake one sheet at a time on the middle rack. Check in 11 minutes. If the tops slide or move (independently of the ‘feet’ when you gently twist the top), then bake for 2 to 3 more minutes. Check one or two. If they move when gently touched, put them back in the oven for 1 to 2 more minutes until they don’t move when touched. Let the macaroons cool for 10 minutes before removing from the pan. The macarons should release without sticking.
Assemble the macarons: find two macarons similar in size and add a good amount of filling to the bottom of one of them. Place the other on top and squeeze gently to take the filling all the way to the edge. Store in the fridge for 24 hours for perfect texture.
PEANUT BUTTER BUTTERCREAM
65g smooth peanut butter (Jiffy is fine) 50g cream cheese, room temperature 30g butter, room temperature 250g powdered sugar milk or heavy cream to adjust consistency, if needed
Place the peanut butter, cream cheese, and butter in the bowl of an electric mixer. Cream until light, about 2 minutes. Add the powdered sugar and whisk on low-speed. Once the powdered sugar is incorporated, increase the speed to medium-high and whisk until very creamy. Adjust the consistency if needed with powdered sugar or milk. Place in a piping bag fitted with your choice of tip, and use to fill macaron shells.
Optional decoration: drizzle of Chocolate Royal icing or melted chocolate plus sprinkles of your choice.
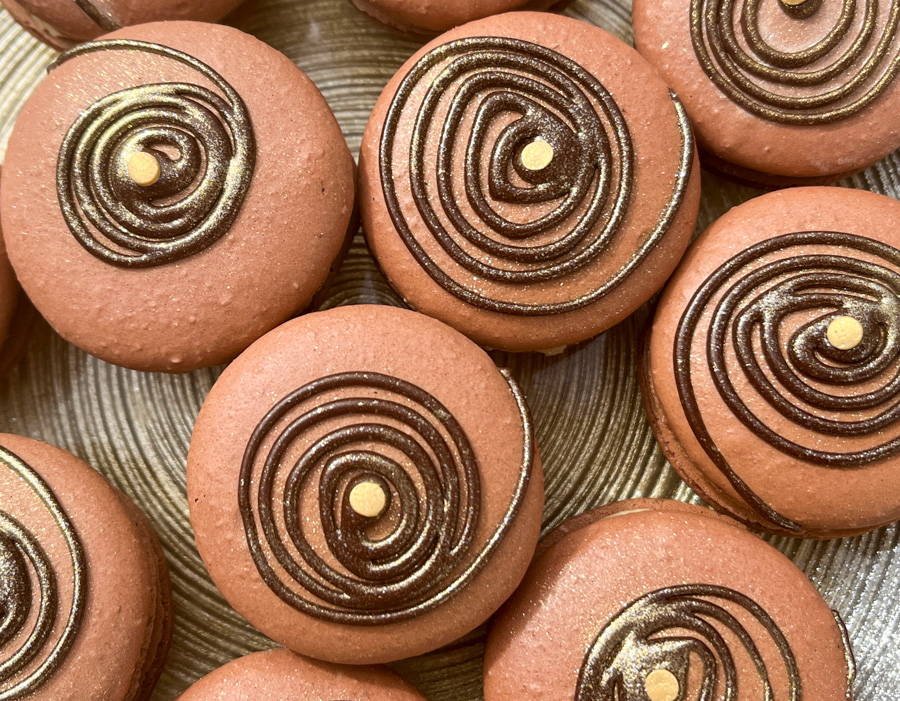
Comments: In the past, more often than not I would get wavy shells when adding cocoa powder to the macaron batter. I was very pleasantly surprised by how smooth these turned out. And with a nice chocolate flavor. I did add a touch of brown and a touch of red because the amount of cocoa I added was not enough to darken the shells the way I wanted.
I thought it would be fun to couple the Chocolate Royal icing made with fat-free cocoa powder with the macarons made with the same product. I had some leftover from cookie decorating, so I just added a swirl, the a golden sequin type sprinkle, and while the icing was still soft, a dusting with gold.
The peanut butter filling was perfect for my taste. Using cream cheese cuts a little bit the sweetest, and the natural saltiness of the peanut butter takes it into a salted caramel territory I love. I highly recommend this recipe.
Are you familiar with Mexican mole sauces? Well, this is not it. It goes in that direction, but it is much, much simpler. Moles are notoriously complex to make, requiring hours of simmering and a long list of ingredients. This sauce is very simple by comparison. I was inspired by a few recipes from Pati Jinich of PBS fame, and cooked it under pressure. You can use an Instant Pot or simply braise it for a longer time.
CHICKEN WITH PASILLA-PECAN SAUCE (inspired by Pati Jinich)
2 tablespoons grapeseed oil 8 boneless, skinless chicken thighs 3 cups chicken stock 3/4 cup pecans 4 prunes 2 pasilla dried chilis, stemmed and seeds removed 1 medium shallot, peeled, cut in half 1 cup strained tomatoes (I used Pomi) salt and pepper to taste
Start by making the sauce. Add the dried pasillas to a super hot skillet and dry cook them on both sides until they get soft and fragrant. Reserve. Broil the shallot or dry roast it in the pan together with the pepper.
Heat the chicken stock in a saucepan, add the pasillas, broiled shallots, pecans, and prunes. Season lightly with salt and pepper. Simmer gently for 10 minutes. Add the contents of the pan to a high-power blender (I used a Vitamix), and process until full smooth.
Heat the oil in your pressure cooker or instant pot, season the chicken pieces with salt and pepper, and brown them on both sides, four pieces at a time. Remove to a bowl as they are done. When they are all browned, remove the excess oil from the pan, leaving about 1 tablespoon behind. Add the chicken back to the pressure cooker, pour 1 cup strained tomatoes and 1 cup of the pasilla sauce. Close the pan, bring to full pressure and cook for 20 minutes. Release the pressure (quickly is ok), and if needed, simmer down the sauce. Adjust seasoning, and serve with your side dishes of choice, or shred the meat and wrap in tortillas.
Comments: We both loved this take on chicken thighs. You can serve this with rice and beans, you can serve it with tortillas and some salsa, but I opted for a simple sweet potato puree and broccoli. The sauce is super flavorful, so it will go well with pretty much any side dish you want: couscous, rice pilaf, even pasta or polenta. Don’t worry, call it fusion cuisine. The pasilla-pecan sauce will make more than you need for this recipe, so you can freeze it for later.
If you don’t own a pressure cooker, just brown the meat, add the sauce, cover tightly and simmer gently until cooked through, probably 50 minutes or so, depending on how tender you like it. I have not tried it with chicken thighs on the bone and with the skin on, but if you brown the skin well, I don’t see any problems. It will have a lot more fat in the end, though.
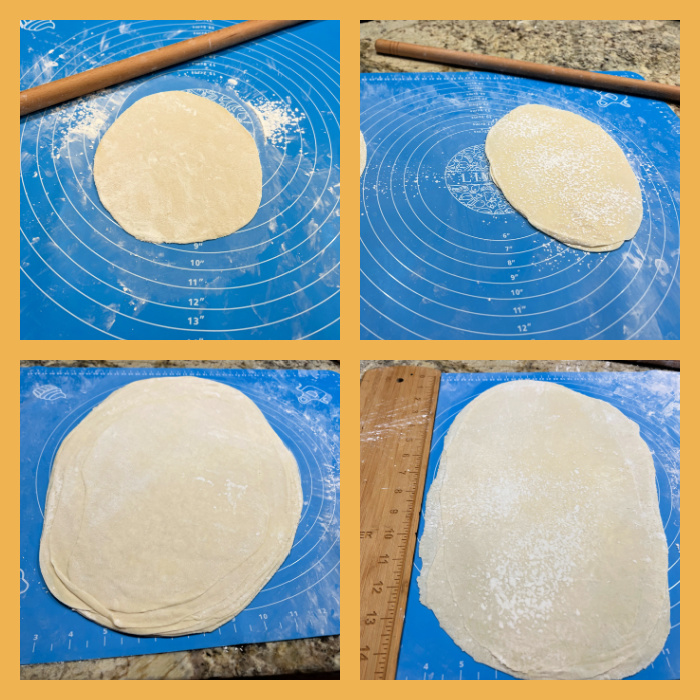
Have I totally lost my mind? No, not answering that. It turns out that I’ve always wanted to try making phyllo from scratch. When I was preparing for the Great American Baking Show, I had this annoying suspicion that it could be a technical challenge, but once you get accepted there is absolutely NO WAY to try to bake anything apart from the required, known bakes (signature and showstopper for every single episode). So I put it on the back burner ever since. But my friend Caro sent me the perfect rolling pin for the job, and it was the little nudge I needed. I tell you one thing, making phyllo is not for sissies. But I managed to have quite a bit of fun that weekend…
353 grams all purpose flour (3 cups) 1 teaspoon kosher salt 1 teaspoon baking powder 1 tablespoon olive oil 2 teaspoons white distilled vinegar 3/4 cup – 15 tablespoons warm water corn starch – to roll out and dust the dough
Make the dough by adding all ingredients and HALF the amount of water to a KitchenAid type mixer fitted with the dough hook.
Knead for a few minutes, then start adding the other half volume of the water, tablespoon by tablespoon until the dough starts to clean the sides of the bowl. Once a smooth dough forms, remove it from the machine, knead it by hand for a couple of minutes, form a smooth ball and place in a large oiled bowl for one hour.
Divide the dough into 20 equal pieces (mine were 28g each). Place each little ball over a parchment covered baking sheet. Leave for one hour at room temperature.
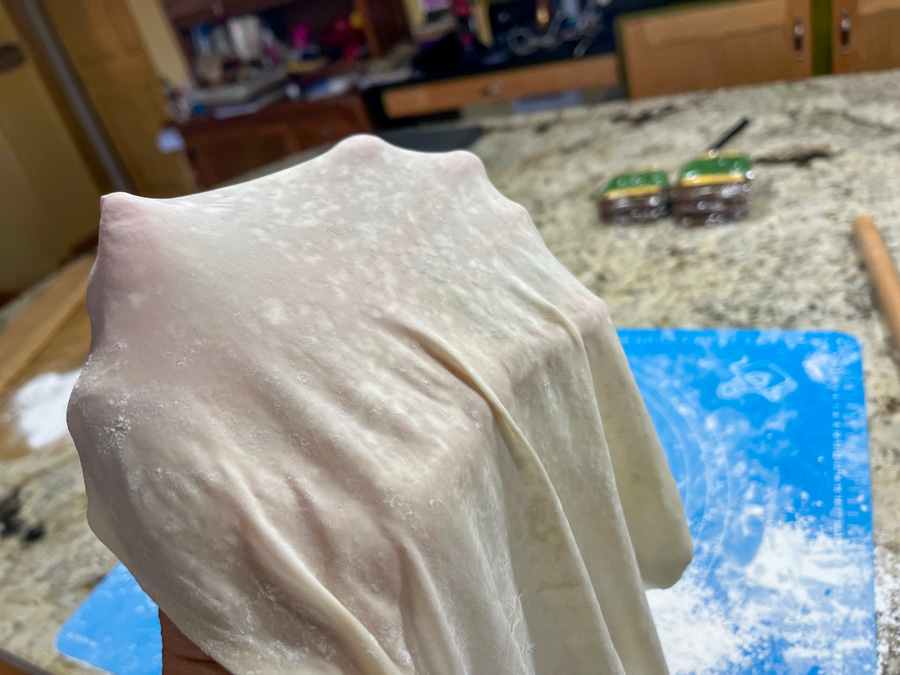
Start working the dough, first one little ball at a time, following her instructions on the video. My main change was to work with FOUR sheets at a time instead of TEN. I had too much trouble keeping them easier to separate, and decided ten was just too much for a first time. Four sheets at a time worked very nicely. That required 5 full cycles of rolling out to work on all 20 balls of dough. Another change I did was to separate each two sheets of phyllo fully rolled out with parchment paper, because I was afraid keeping them all together would result in severe sticking. I kept them in the fridge for a couple of hours before proceeding with the spanakopita and the crackers.
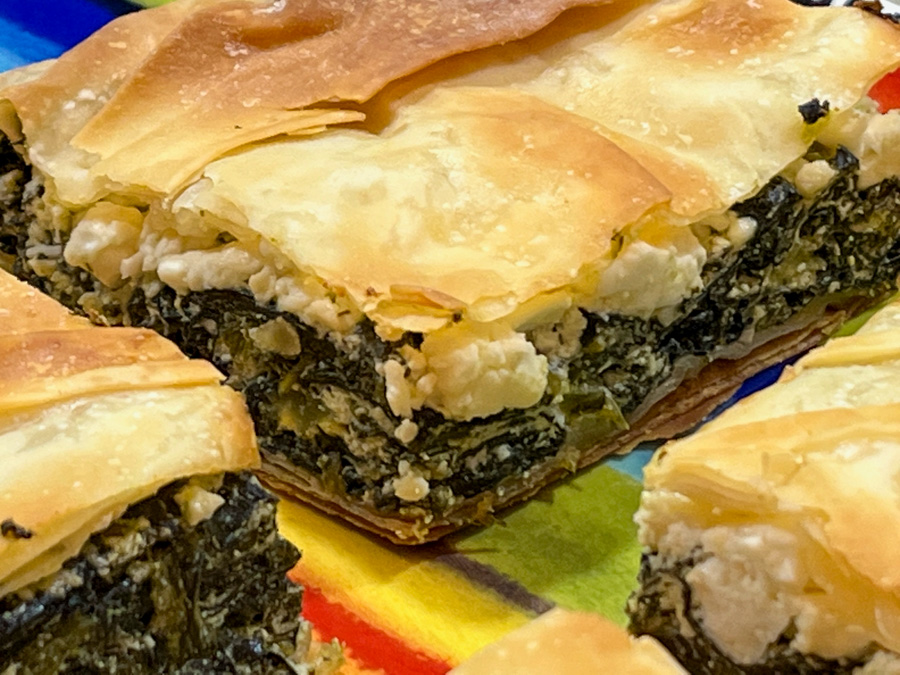
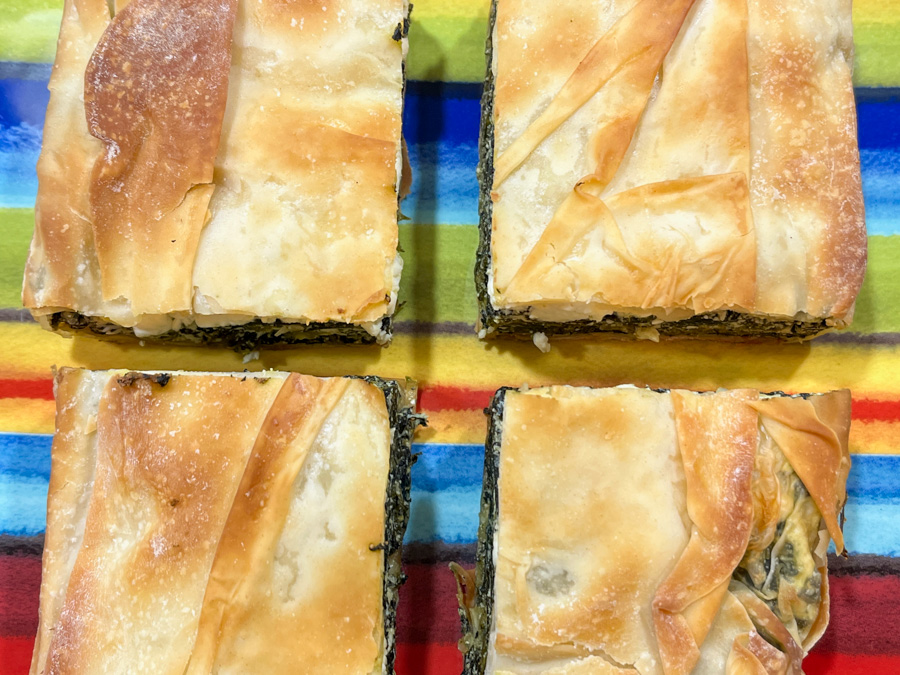
SPANAKOPITA (adapted from several sources)
8 sheets of phyllo dough (if using commercial you probably get by with 6) 500 g spinach (preferably not baby spinach) 1 tablespoon olive oil 2 ribs of celery, finely diced 1 shallot, finely diced salt and pepper to taste nutmeg to taste 200 g full-fat ricotta cheese 100 g feta cheese, crumbled in large pieces 1 egg, beaten olive oil spray
Boil water in a very large pan, add the spinach and press it down with a wooden spoon until the leaves wilt, 30 seconds or less. Drain into a large colander and place under running cold water to cool quickly. Drain well – squeeze out any excess water by pressing the spinach down with the wooden spoon, then squeezing with your hands. Using kitchen paper, pat the spinach dry into a compact shape, lay it on a board and roughly chop, then set aside.
Heat the olive oil in a large non-stick frying pan. Add the shallot, celery, and fry over a high-ish heat for 3-4 mins, stirring often, until softened and just starting to brown. Lower the heat, add the chopped spinach and stir for a few minutes to finish drying. Season with salt, pepper and nutmeg, and leave to cool.
Heat oven to 375F and put a baking sheet in to heat up. In a bowl, stir the ricotta into the beaten egg and season with pepper and a pinch of salt.
Lightly oil an 8 inch square baking pan. Lay one or two filo pastry sheets over the pan, spray with olive oil, and att two more, leaving a nice overhang on all sides. The pan should be completely covered, with a pastry overhang all round. Repeat the criss-cross layering with 2 more oiled filo sheets.
Stir the ricotta mixture into the spinach, then crumble in the feta. Lightly stir it in so you leave a few chunky pieces. Spoon this filling into the pan and level it. Bring the pastry sides up and over the filling, then brush a little oil over them. Add one or two more sheets sprayed with olive oil to top the spanakopita.
Bake for 30 to 35 mins until the pastry is crisp and golden. Leave to cool for 10-15 mins. Carefully remove from the pan, slice and serve.
Comments: The most “traditional” way to roll out phyllo is going for a very large and thin sheet, patiently rolling and stretching the dough over a lightly floured cloth. I watched videos, read articles, and decided to go for a ‘beginner’s friendly” method, in which you divide the dough in small pieces and roll them thin, but to a smaller final size. The other change is that the sheets are stacked as you roll. The video advised to stack 10 sheets but I could not make it work. I went for 4 sheets at a time, and rolled them to 9 x 13 inches. Don’t expect to get phyllo as thin as the one you can buy at the store, particularly not on your first time. But I was pretty happy with the overall outcome. Very rewarding!
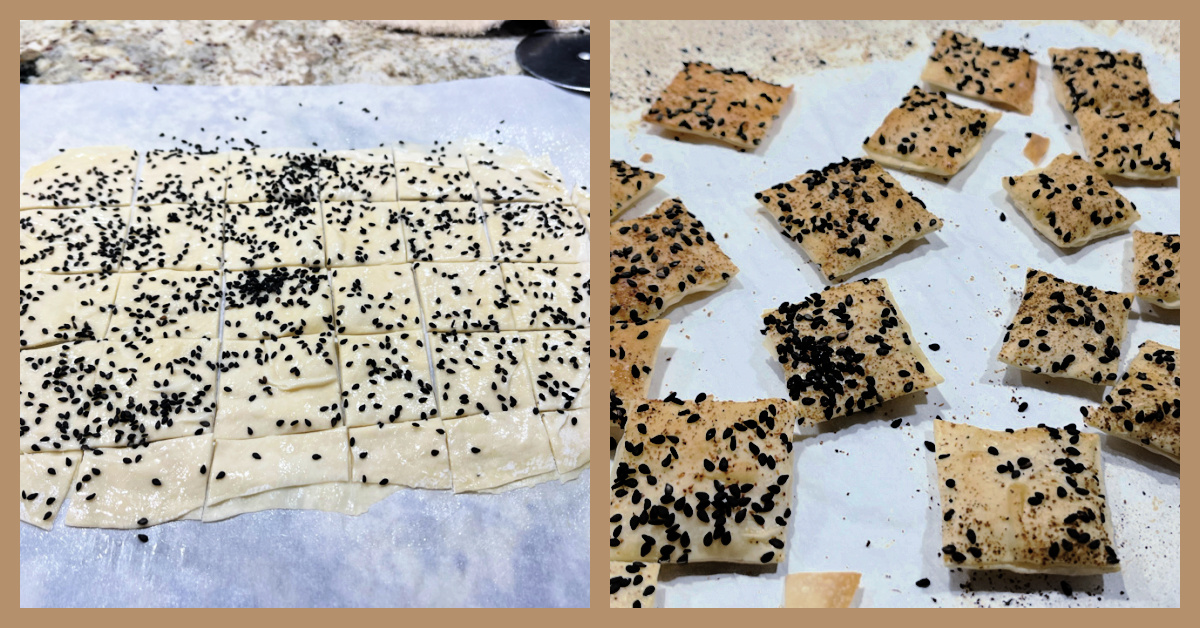
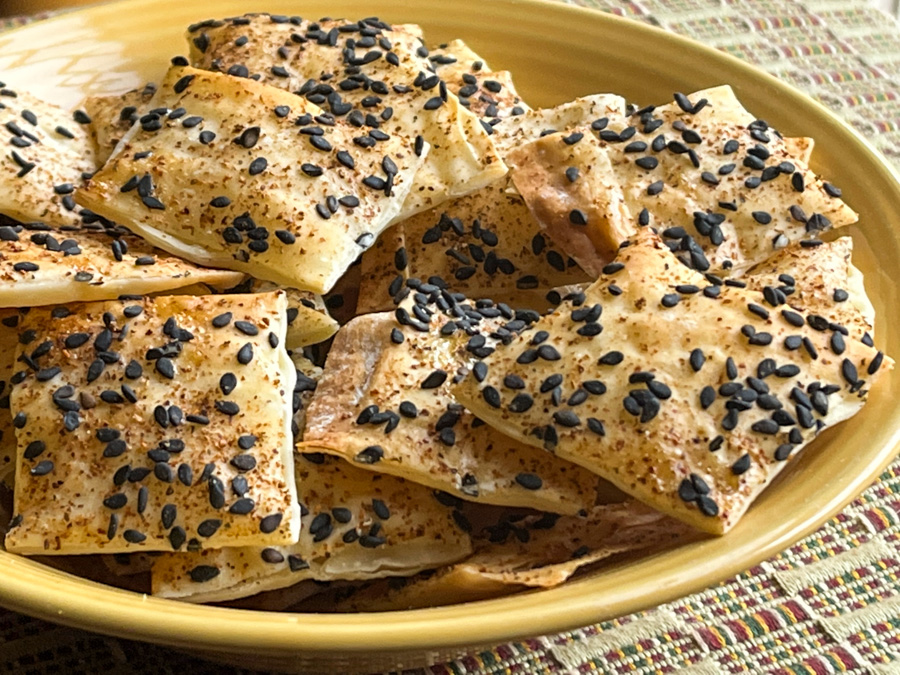
I also made crackers, using 4 of my precious sheets of home-made phyllo… Super simple. Stack the four sheets with a good spray of olive oil over each one. When you place the last sheet on top, brush some beaten egg white and add the toppings of your choice, so they will glue to the phyllo. I used black sesame seeds and Southwest spice from Penzey’s. Cut with a pizza roller and bake.
The crackers were absolutely delicious, and hubby thought I was a genius, crackers worth it of a Paul Hollywood handshake (allow me to dream, as I totally missed my chance, will you?)
I cannot lie to you, making phyllo from scratch is quite involved. I’ve found cornstarch in amazing places over the next couple of days. Things got wild, my friends… But how else can you have spanakopita made TOTALLY from scratch?
Caro, thanks so much for the thoughtful gift! I intend to make phyllo again, might even try the traditional approach and get a table cleared for the next adventure…