A TWIST ON PESTO

Even though I know that the word “pesto” refers to pounding ingredients into a paste (preferably using a mortar and pestle), I tend to associate it with basil – the classic pesto Genovese. So, this recipe using cilantro as the main herb perked my interest. I found it in the latest issue of Bon Appetit, and it seemed perfect for this time of the year, in which the temperature approaches 100 F every day, with no rain in the horizon.   Not that there’s anything wrong with it… 😉

LINGUINE WITH CILANTRO-LIME PESTO & SHRIMP
(adapted from Bon Appetit)

1 pound large shrimp, peeled and deveined
1 pound linguine
1 + 1/2 bunches fresh cilantro leaves
1/4 cup green onion, cut in large pieces
1/2 serrano pepper, seeded, quartered
1 garlic clove, minced
3 Tbs lime juice
salt and pepper
1/2 cup olive oil
3 Tbs tequila
cotija cheese to taste, grated (or crumbled feta)

To make the cilantro pesto:
Place the cilantro leaves in the bowl of a food processor and process it for a few seconds. Add the green onion, jalapeno pepper, lemon juice, garlic, salt and pepper, and process for 30 seconds. With the machine on, pour the olive oil until a thick paste forms – you may need a little more or a little less olive oil. (I usually opt for a lot less than recipes call for).

Cook the pasta until al dente. While the pasta cooks, heat 1 Tbs olive oil in a large skillet, add the shrimp and cook until it just starts to get opaque. Remove from heat, add the tequila, bring back to the stove and cook for about 30 seconds, until the tequila achieves a syrupy consistency. Add the pesto to it, cook a few seconds to warm it up. Add the cooked pasta and mix everything together until shrimp, sauce and pasta are well blended. Grate some cotija cheese on top and serve.

ENJOY!

to print the recipe, click here

Comments: Cilantro haters will have to forgive me, but this pesto rocks! At first I thought this recipe could end as a major gastronomic disaster, due to cilantro overload, but its taste mellowed down in the final sauce. I had never tried cotija cheese, and did not particularly cared for its texture, but grated over the pasta it worked very well. Many people dislike adding cheese to seafood dishes, but I don’t have a problem with it: it definitely embellished this pasta.

One year ago: WHEN LIFE GIVES YOU CHARD…

Add to FacebookAdd to DiggAdd to Del.icio.usAdd to StumbleuponAdd to RedditAdd to BlinklistAdd to TwitterAdd to TechnoratiAdd to Yahoo BuzzAdd to Newsvine

MELLOW BAKERS: PIZZA! PIZZA!

My second recipe for the month of June in the Mellow Bakers Challenge is Hamelman’s pizza dough. I was anxious to try this one, to compare it with my favorite recipe, that you can find here. Hamelman’s dough uses a biga – a pre-ferment of flour, water, and yeast – that is incorporated in the final dough, together with a small amount of additional yeast. Apart from that, the recipes are quite similar.

Last week we had a small pizza party at home, and Hamelman’s method was put to the test. It passed with flying colors, or… should I say… ballooning colors!

In the Summer, we avoid turning the oven on, so we use our grill as an improvised oven, placing unglazed tiles over its grids, and cooking the pizza on them. This is not a grilled pizza, simply a regular pizza baked inside the grill. Once you get the temperature right, it works like a charm, each pizza will be ready in about 7 minutes. My husband was the one who had the idea for this “oven-grill-method”, yet another evidence that I won the jackpot when I married him.

So, what’s the verdict? This dough deserves to share the first prize with my default recipe – excellent texture and flavor. The only thing that prevents me from placing it ahead of Fine Cooking, is the 2 hour rise with a folding cycle after 1 hour. That makes it slightly more complicated to have pizza on a weeknight. But, it is a minor detail, and I will definitely be making this recipe again and again during the weekend.

I remind everyone that we are not supposed to share the recipes for our Mellow Bakers Challenge, so if you are interested, consider buying Hamelman’s book “Bread”, where all these recipes will be waiting for you… 😉

That evening, we made 8 pizzas, this one was particularly tasty: sauteed cremini mushrooms, roasted yellow bell peppers, and smoked mozzarella. Pizza parties are a lot of fun!

Many Mellow Bakers have already enjoyed their pizzas, if you want to see their report, jump here.

Add to FacebookAdd to DiggAdd to Del.icio.usAdd to StumbleuponAdd to RedditAdd to BlinklistAdd to TwitterAdd to TechnoratiAdd to Yahoo BuzzAdd to Newsvine

One year ago: From Backyard to Kitchen….

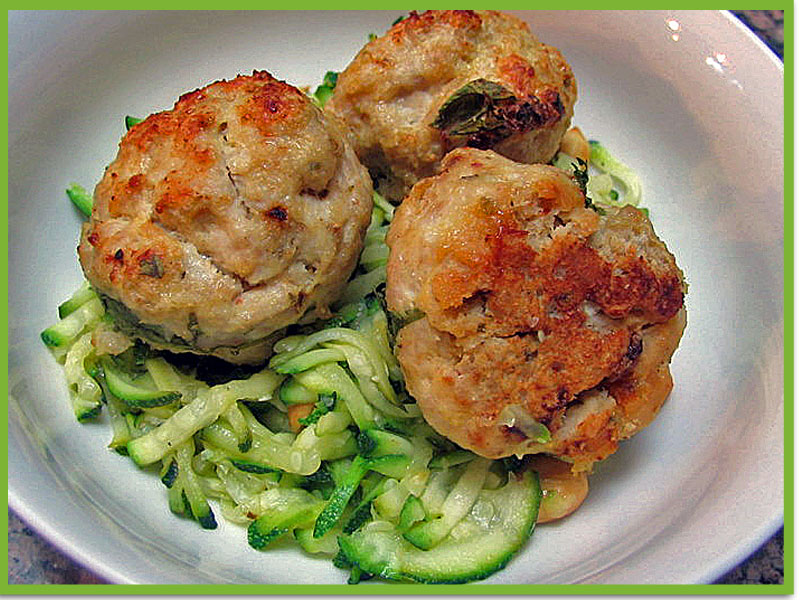
TURKEY MEATBALLS: HEALTHY, QUICK, AND TASTY

Every Tuesday at 7:30 pm I meet with my wonderful Chinese tutor. So, dinner and the dishes must finish in time to drive to her home.  Ideally,  I plan the meal the preceding weekend, but sometimes the ideal and the real diverge.  This past week I was eating a rushed lunch in the office when panic hit: what am I going to cook tonight? Without cookbooks handy, the internet came to the rescue.  I had some ground turkey in the fridge, so I “googled” it and found a recipe in The Perfect Pantry.  If you don’t know this blog, make sure to stop by, it’s a life-saver for designing meals with ingredients that are often in your cupboard.


TURKEY MEATBALLS

(adapted from The Perfect Pantry)

1+ 1/4 lb ground turkey
1/2 cup bread crumbs (I used Panko)
1/2 cup plain Greek yogurt (full fat)
1 large egg
1 Tbsp lemon zest
1/2 tsp kosher salt
1/2 tsp fresh black pepper
2 Tbsp flat-leaf parsley, chopped

Heat oven to 425°F. Line a rimmed baking sheet with parchment paper (do not omit this step!), and reserve.

Combine all ingredients in a large bowl, working the mixture well with your hands until thoroughly combined. Wet your hands with cold water and form the mixture into balls, either as bite size (for appetizers), or larger (for a main dish). Place them on the prepared sheet and bake for 15 to 25 minutes, depending on their size. When done, they’ll be a nice golden brown on the surface.   You can carefully move them around after they’ve been baking for 10 minutes or so. Cut through one of them to judge if they are fully cooked, and serve.

ENJOY!


to print the recipe, click here


Comments:
In her post, Lydia mentions that she prefers roast chicken to roast turkey. However, she’d rather use ground turkey than ground chicken. I’d never considered it in those terms, but… I’m on the same team!

The addition of yoghurt is a great twist on this simple recipe, giving it moisture and a tangy flavor. A quick saute’ of shredded zucchini with a salad and a slice of bread was all we needed for a delicious Tuesday dinner, even if it was a little rushed.

Note added after initial publication:  It is a good idea to spray the parchment paper with some olive oil, as the meatballs can stick to the paper and be hard to move around (see comment by E Brandler below).

Note to self:  spinach might be excellent mixed in with the ground meat.

One year ago….  Focaccia

Add to FacebookAdd to DiggAdd to Del.icio.usAdd to StumbleuponAdd to RedditAdd to BlinklistAdd to TwitterAdd to TechnoratiAdd to Yahoo BuzzAdd to Newsvine

LOCAL BREADS: AUVERGNE RYE WITH BACON

Auvergne rye, also known as “baguette aux lardons” is, simply put, bread with bacon bits all through the crumb. Bread… and…. bacon. I know, I know… unless you are a very committed vegetarian you are salivating already.

The recipe comes from Daniel Leader’s Local Breads, and requires the preparation of a very stiff sourdough starter made with both whole wheat and regular flour, and a final dough with a small amount of rye, which, in my opinion, always gives a sourdough bread a touch of depth hard to achieve with any other flour.

Yes, those brown spots are pieces of bacon….  😉


AUVERGNE RYE WITH BACON

(Local Breads)

Sourdough starter build

45 g stiff sourdough starter
50 g water
95 g bread flour
5 g whole wheat flour

Mix everything together, forming a stiff dough.  Allow it to ferment at room temperature for 8 to 12 hours, until doubled in volume.


Final dough

280 g thick cut bacon
350 g water
450 g bread flour
50 g white rye flour
125 g starter (you will not use the full amount made)
10 g salt

Cut the bacon in 1/2 inch pieces and cook over medium heat.  Do not let it brown, just cook until most of the fat is released.  Drain over paper towels and dice finely.

Mix the water, bread flour, and rye flour in a large bowl, let it stand for 20 minutes.  Add the sourdough mix (remember: only 125 g of it!), bacon, and salt.  Knead with a Kitchen Aid type mixer on speed 4 for about 8 minutes.  Ferment the dough for 1 hour, fold it a couple of times, place it to rise for another 2 to 3 hours.

Cut the dough in 4 equal pieces, shape as baguettes, and retard them in the fridge for 12 to 24 hours.

Remove the baguettes from the fridge 3 hours before baking.  Heat the oven to 450F, slash the baguettes and bake them with initial steam, for 20 to 25 minutes.  Cool over a rack for a couple of hours before slicing them.

ENJOY!

to print the recipe, click here

Comments: The recipe makes 4 baguettes, but I chose to make two baguettes and a larger, batard-type loaf. I haven’t yet perfected the shaping of my baguettes, in part because I end up baking round loaves a lot more often, and rarely practice this elusive shape. But, what really matters – the taste – was superb! You would think that so much bacon in the dough could be overpowering, but quite the contrary, they had a very mellow taste.   I was pleasantly surprised by how copper-colored the crust turned out, probably due to the bacon fat playing its magic.   The smell was intoxicating, even our dogs were restless…    😉

Note to self:  This bread would be a very good match for a bowl of chili…

I am submitting this post to Susan’s Yeastspotting….

Add to FacebookAdd to DiggAdd to Del.icio.usAdd to StumbleuponAdd to RedditAdd to BlinklistAdd to TwitterAdd to TechnoratiAdd to Yahoo BuzzAdd to Newsvine

BEWITCHING BIRTHDAY!

One year of blogging! It passed with astonishing speed, proving that time flies when you’re having fun!   It’s surely been fun, sharing what happens in our kitchen with friends, family and lots of other folks, and getting acquainted (at least virtually) with new people and bloggers through comments and emails.

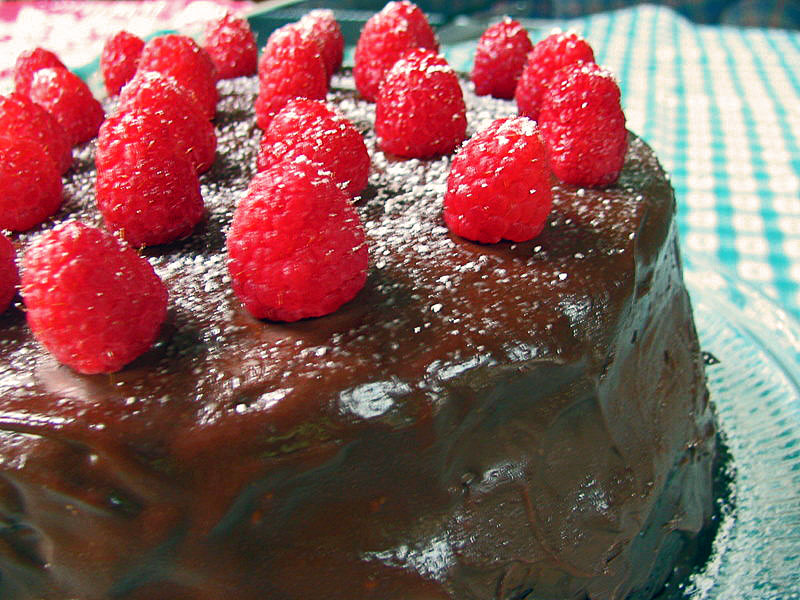
A cake is a mandatory birthday celebration!  Unfortunately,  cake and Sally don’t make a good match.   But in the name of this special occasion I faced my demons and baked a cake. Choosing the recipe wasn’t easy, but I decided by elimination: genoise was out of the question, I’d rather be tortured.   Any recipes involving the instructions “cream the butter with the sugar” were also excluded.  Then, browsing the latest issue of Bon Appetit, I spotted a layered chocolate raspberry cake and I was smitten: that was it! Luscious, beautiful, perfect… would you believe  that the recipe didn’t need an electric mixer?  Instead, two bowls and a whisk…. my kind of recipe!  Even the layering didn’t bother me (although it should have, … but  ignorance is bliss).

So, here it is, my first layered cake, in honor of my baby blog…
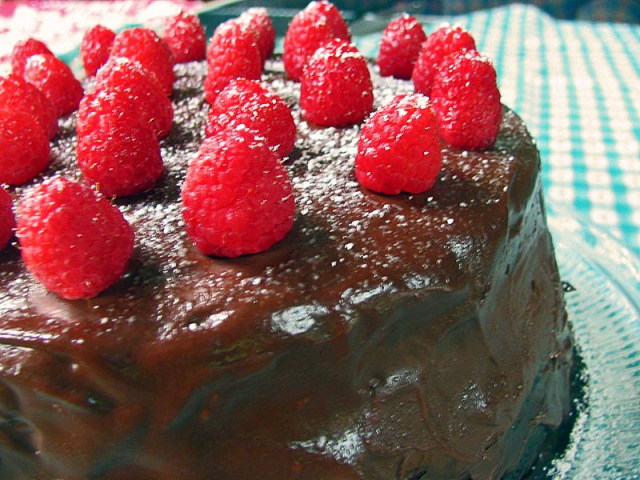
CHOCOLATE-RASPBERRY LAYERED CAKE
(from Bon Appetit, June 2010)

2 cups unbleached all purpose flour
1 + 3/4 cups sugar
3/4 cup unsweetened cocoa powder
2 teaspoons baking soda
1/4 teaspoon salt
1 cup water
3/4 cup buttermilk
3/4 cup vegetable oil
3 large eggs

18 ounces bittersweet chocolate (maximum 61% cocoa), chopped
2 + 1/4 cups whipping cream
6 tablespoons seedless raspberry jam, divided
resh raspberries
powdered sugar

Heat the oven to 350°F. Coat two 9-inch-diameter cake pans with nonstick spray. Line their bottoms with parchment paper rounds and spray the rounds. Sift the flour, sugar, cocoa powder, baking soda, and salt into a large bowl; whisk to blend and form a well in the center. Whisk 1 cup of water, buttermilk, oil, and eggs in a medium bowl to blend. Pour the wet ingredients into well in dry ingredients; whisk just to blend. Divide the cake batter between the prepared pans.

Bake the cakes for 30 minutes or until a toothpick inserted into center comes out clean.  Cool completely in pans on cooling racks.

for the ganache and raspberry topping;
Place the chopped chocolate in a medium bowl. Bring the cream to a boil in a heavy medium saucepan. Pour it over the chocolate.  Let stand for 1 minute, then stir until the ganache is melted and smooth. Transfer 1 + 1/4 cups of the ganache to a small bowl. Cover and refrigerate until the ganache is thick enough to spread, stirring occasionally, about 1 hour. Let the remaining ganache stand at room temperature to cool until  lukewarm.

Invert one cake onto a cardboard round or the bottom of 9-inch-diameter tart pan. Peel off the parchment paper and spread 3 tablespoons of raspberry jam over the top, then spoon dollops of chilled ganache over the surface, spreading it around.   Invert the second cake onto another cardboard round or tart pan bottom.  Peel off  its parchment paper. Carefully slide the cake off its round and onto the frosted cake layer.  Spread the remaining 3 tablespoons of raspberry jam over top of the second cake layer, and pour half of the lukewarm ganache over the cake, spreading it over the sides to cover.  Place the cake in the freezer until the ganache sets, about 30 minutes. Pour the remaining ganache over the cake, allowing it to drip down sides and spreading over the sides if needed for even coverage and smooth edges. Freeze again to set the ganache, about 30 minutes.

Arrange the raspberries in concentric circles atop the cake, then sift powdered sugar lightly over raspberries and serve.

ENJOY!

to print the recipe, click here
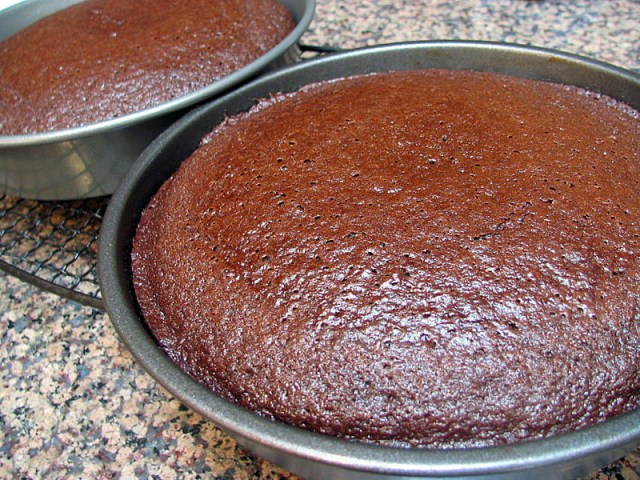
Comments: I wish that my cake-phobia was cured, but now I have a few more reasons to stick with breads and pizzas.   At first  my confidence grew as the batter behaved exactly as anticipated, filling two 9-inch cake pans and baking into beautiful brown cakes with only a slight dome in the center.  But the Cake Gods  weren’t quite finished with their conspiracy against me.   Spreading the ganache was nightmarish, to put it mildly. Thinking back, I realize that it wasn’t quite  hard enough to spread, so instead of forming a nice thick layer, it ran down the sides, but my cake-naivete made me go on, thinking  that eventually everything would be OK.

When I placed the second cake on top of the first, once all the slippage-fiesta stopped, the ganache layer had a big gap all around the edges, that stubbornly resisted my attempts to fill it.  In despair, I checked my cake pans, and was shocked and appalled to realize that they were not identical in size – a small difference from one brand of pan to another, which made my layers unequal. My last hope was that the “lukewarm icing” would solve all the problems and make a beautiful, smooth covering of all the boo-boos. But, this was not the case.  Not a chance.  To make a  long story short, my cake ended a bit like the Leaning Tower of Pisa in Italy.  Its sides had nothing to do with the “picture perfect” look in the magazine.    I had hoped to post a picture of my cake on a gorgeous stand with a nice candle in the center, but I settled instead for the only photo that showed more cake than boo-boos.

Cake, my friends, is not for sissies…But, even if its looks were not picture-perfect, it disappeared in an afternoon, devoured with gusto by hungry grad students!  The flavor was amazing: deep chocolaty, with a tangy background of raspberries, not overly sweet, but decadent.  I guess there might be hope for next year… 😉

Add to FacebookAdd to DiggAdd to Del.icio.usAdd to StumbleuponAdd to RedditAdd to BlinklistAdd to TwitterAdd to TechnoratiAdd to Yahoo BuzzAdd to Newsvine

One year ago…. Welcome to my blog!