A NEW WAY TO ROAST VEGGIES

Fine Cooking is my favorite cooking magazine. I do like Saveur, but for some odd reason never cook anything from it, I like Food and Wine a lot, and have mixed feelings about Bon Appetit. In some ways, I think the magazine is going a bit heavy on the trendy, fashionable, hip. Maybe hip is a dated term already, but you catch my drift. Fine Cooking focuses on recipes, good cooking, tips and advice that help not only the novice cook, but those who feel comfortable around the kitchen. My success rate with Fine Cooking recipes is pretty close to 100%, so what’s not to like, right? The latest issue had a nice article on “A New Way to Roast Vegetables” and it’s at the same time simple and clever. They offer many examples of veggie combinations, but the basic idea is that whatever veggie you intend to roast, first you place it in the oven covered with aluminum foil, that will essentially steam the veggie and partially cook it. Next, you remove the cover foil and proceed with the roasting.  To make clean up even easier,  it is a good idea to line the baking sheet with aluminum foil too, so that during roasting whatever could stick to the pan will stick to the foil instead. Of course, you could steam the veggies in a regular pan first, or even pre-cook them in a microwave, but the simplicity of this method won me over.  I did not follow their recipe for carrots, but if you own the magazine take a look at it. They use smallish carrots with the tops still on, and serve them as the appetizer course with a yogurt-spice sauce drizzled all over. I opted for a more austere version, pairing carrots with paprika, not much else.

roasted-carrots

STEAM-ROASTED CARROTS WITH PAPRIKA
(inspired by Fine Cooking)

5 large carrots, cut any way you like
drizzle of olive oil to coat them
1/4 teaspoon paprika
salt and black pepper to taste

Heat the over to 440 F.

Place the cut carrots in a large bowl, drizzle with the olive oil, and sprinkle spices all over.

Mix well to coat.

Line a baking dish with aluminum foil to allow for easier cleaning later. Make sure to use a rimmed baking sheet, not a baking utensil with tall sides, that will prevent proper browning.  Arrange the carrots on a single layer, cover the baking sheet with a second sheet of aluminum foil, and place in the oven for 15 minutes.

Carefully remove the top aluminum foil (use tongs), and leave it in the oven for 20 to 25 minutes more, moving the pieces around after 10 minutes.  Serve right away.

ENJOY!

to print the recipe, click here

roasting

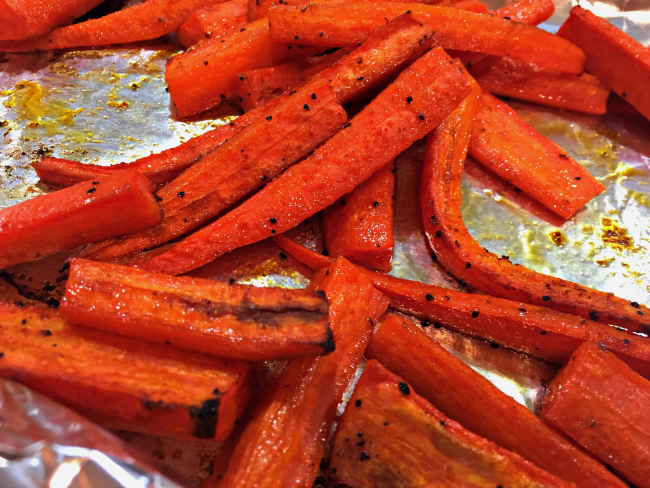
Comments: We absolutely loved the texture of these carrots. I normally find that roasted carrots need to be cut pretty small to allow for homogeneous cooking at high temperature, and even doing that I end up with some pieces that are too hard, some too soft.  This method delivers on all counts, texture and flavor. Of course, you can use all sorts of spices, maybe a bit of maple syrup or Sriracha together with the olive oil (I’ll be trying that combo soon),  and serve the carrots with a yogurt-based sauce, with tahini, lemon, whatever you crave at the moment.   As I mentioned, I opted for a very basic version, which is a real test for the method, no distractions. Cauliflower, potatoes, eggplant, turnips, they can all be roasted this way, for the most part all veggies have enough moisture to steam while covered.

roasted-carrots-with-paprika


Add to FacebookAdd to DiggAdd to Del.icio.usAdd to StumbleuponAdd to RedditAdd to BlinklistAdd to TwitterAdd to TechnoratiAdd to Yahoo BuzzAdd to Newsvine

ONE YEAR AGO: Two Takes on Raspberries

TWO YEARS AGO: Spice Cake with Blackberry Puree

THREE YEARS AGO: Own Your Kitchen with Cappuccino Panna Cotta

FOUR YEARS AGO: Chicken Parmigiana, the Thriller

FIVE YEARS AGO: Wild Mushroom Risotto

SIX YEARS AGO: Tartine Bread:  Basic Country Loaf 

SEVEN YEARS AGO:  Pugliese Bread

FORGIVE ME, FOR I HAVE SINNED

The perfect food blogger would never resort to using pre-washed greens, buying instead produce exclusively from the farmer’s market,  each leaf washed with loving care. However, I am not ashamed to confess this particular sin. Quite the contrary, the bag of organic  “mixed greens” found in most grocery stores is one of my best friends, because it makes life so much easier.  To my delight, the latest issue of Fine Cooking had an article devoted to redeeming sinners like me: it offered  several options of salad recipes that,  starting from those handy bags, turn them up into something special. I intend to try all of them, but my first choice was the one featuring a ginger-yogurt dressing and fresh cucumber. I can never resist the call of ginger.  😉

MIXED GREEN SALAD WITH CUCUMBER, ALMONDS, AND GINGER-YOGURT VINAIGRETTE
(adapted from Fine Cooking magazine, July 2012)

1-1/2 Tbs. rice vinegar
1 Tbs. finely chopped shallot
2 tsp. freshly grated ginger
2 tsp. thinly sliced mint leaves
salt and black pepper to taste
1/3 cup plain non-fat yogurt
1 Tbs. extra-virgin olive oil
5 oz. (5 cups) mixed baby greens
1 small English cucumber, peeled, sliced
1/4 cup toasted slivered almonds

In a small bowl, combine the vinegar, shallot, ginger, mint, salt, and black pepper.  Stir in the yogurt and olive oil.

In a large bowl, season the greens and cucumbers with a pinch of salt and a few grinds of pepper and toss with enough dressing to lightly coat. Sprinkle the toasted almonds on top, and serve right away.

ENJOY!

to print the recipe, click here

The original recipe called for sesame seeds instead of almonds, but I like to have extra crunch in my salad, and felt that the sesame seeds would more or less disappear through the mix.  I also used non-fat yogurt in place of low-fat, because that’s what we had laying around in the fridge.  The dressing turned out light, with the mint and ginger bringing a nice zing to it.   Great, simple salad, perfect way to doctor up those bags that may find their way into your grocery cart… 😉  Extra-vinaigrette keeps well for a day, the flavors intensify a bit.

Because Fine Cooking doesn’t make their recipes available online for non-subscribers, a while ago I contacted the magazine to know their thoughts on copyright issues. Here’s the deal: they don’t mind bloggers publishing any of their recipes, as long as full credit is given and a link to the magazine is included, so that’s what I’ve been doing, without guilty feelings.  Except, of course, the guilt of buying that eventual bag of salad greens. Pre-washed.  😉

ONE YEAR AGO: Cracked Wheat Sandwich Bread

TWO YEARS AGOAu Revoir, my Bewitching Kitchen

THREE YEARS AGO:  French Bread

ORANGE POMEGRANATE CHICKEN: A WORK IN PROGRESS

This recipe, from a recent compilation in Fine Cooking called “One Pot Meals”, went from the page to a pot in the blink of an eye.  It called for all kinds of goodies that I love: chicken, root veggies, pomegranate and the perfect spices to tie them together.  The glaze roasted into a sexy ruby color, and the skin of the chicken will make anyone smile.  So, why is it a work in progress, you might ask?   Read on….

ORANGE POMEGRANATE CHICKEN
(adapted from Fine Cooking magazine)

1 large orange, zested and juiced
1 cup pomegranate juice
1-1/2 tsp dried thyme leaves
1/8 tsp. ground cinnamon
Freshly ground black pepper
6 tsp. olive oil
Kosher salt
3/4 cup chicken broth
2 sweet potatoes, peeled and cut into 1-inch pieces
2 medium parsnips, peeled and sliced 1/4 inch thick
2 leeks, white part only, cut in 1/4 inch slices
4-lb. chicken, cut into 8 serving pieces
1 cup coarsely chopped walnuts

Heat the oven to 400°F.

In a medium saucepan, Combine the orange juice and pomegranate juice in a saucepan, bring to a boil and reduce it to 1/4 cup (about 20 minutes). Add half of the thyme (eye balling is fine), all the cinnamon, and black pepper (about 1/4 tsp or according to your taste). Divide the mixture between two small bowls. To one bowl add 2 tsp. of the oil and 1/2 tsp. salt. To the other add the chicken broth, all but 1 tsp. of the orange zest, and 1/4 tsp. salt.

Scatter the sweet potatoes, parsnips, and leeks over the bottom of a dish that measures about 10 x 15 x 2 inches. Toss with the remaining 4 tsp. of oil and the rest of the thyme.  Arrange the chicken pieces, skin side up, on top of the vegetables and brush with all of the juice-oil mixture. Roast for 30 minutes.

Remove the pan from the oven and reduce the temperature to 375°F. Pour the reduced pomegranate-chicken broth mixture around the chicken pieces and scatter the walnuts around them.  Return the pan to the oven and roast until the vegetables are tender and an instant-read thermometer registers 165°F in several pieces of chicken, 20 to 30 minutes.

Transfer the chicken to a serving dish.  Remove the veggies and walnuts with a slotted spoon, season them lightly with salt, sprinkle the remaining orange zest all over the meat and veggies. Pour the liquid from the roasting pan in a pyrex type container, remove as much fat as possible.  Season the sauce to taste with salt and pepper and pour into a pitcher to serve with the food.

ENJOY!

to print the recipe, click here


Comments:  Make sure you use pure pomegranate juice (yes, it is expensive compared to blends, but  worth it in this case, because you will concentrate it quite a bit).  I’d love to give this recipe two thumbs all the way up, but it had some problems.  Many of the pieces of sweet potatoes and parsnips were not completely cooked: their centers were still hard.  I tested some with a fork before removing from the oven, but as Murphy’s Law would have it, those were perfect… (sigh).  Next time I’ll cover the dish with foil during the first 30 minutes, then pour the liquid all over it and roast it uncovered, perhaps adding a little more water if the veggies dry up during the final roasting.  I suspect that with this minor change it will be a winner.

One pot meals are such life-savers for a busy cook, and this recipe, apart from reducing the pomegranate/orange juice, doesn’t require much work. Even better, the reduction could be made a couple of days in advance.  With a nice loaf of bread or a green salad, dinner is ready!

ONE YEAR AGO: A Message from WordPress

TWO YEARS AGO: Turkish Chicken Kebabs

Add to FacebookAdd to DiggAdd to Del.icio.usAdd to StumbleuponAdd to RedditAdd to BlinklistAdd to TwitterAdd to TechnoratiAdd to Yahoo BuzzAdd to Newsvine

ANCHOVIES, THE FINAL FRONTIER

This is my 300th post!

While growing up I was a picky eater.  The list of things I avoided was huge, including most vegetables (except for tomatoes and potatoes) and all kinds of seafood.   Invitations for dinner at a friend’s home made me worry for days, thinking about what to do if they served such or such an item. When my friends suggested a night out for sushi, I made sure that the restaurant had other choices (and I don’t mean miso soup or tempura!  ;-)).  But, in my twenties the food aversions started to bother me.    Even though I had trouble admitting it, I wanted to be a person who could appreciate any type of food that a host served me, and stop worrying about my humongous list of neurotic restrictions.

Slowly but surely I experimented  with things I disliked: a small bite here, a taste there, and to my surprise, I found that the worst part of the experience was not the food itself, but its anticipation, … the fear of it.  When I was 30 I’d overcome almost all my food aversions, and each one felt like a small victory. Nevertheless, one item stubbornly refused to capitulate: anchovies.  I recently set on a mission to change that.  Following  Jeffrey Steingarten in his great book “The Man Who Ate Everything,”   I’ll slowly  introduce anchovies in my cooking.  This recipe is my first step on the path to  enjoying them.

PASTA PUTTANESCA
(adapted from Fine Cooking, October 2010)

salt
3 Tbs. extra-virgin olive oil
2  cloves garlic, minced
2-3 oil-packed anchovy fillets, finely chopped
1/4 tsp. red pepper flakes
One 28-oz. can crushed tomatoes
1 lb. dried spaghetti
1/2 cup pitted brine-cured black olives, such as Kalamata, coarsely chopped
2 Tbs. nonpareil capers, rinsed and drained
1 Tbs. chopped fresh oregano or marjoram
Freshly ground black pepper

Bring a large pot of well-salted water to a boil.

Meanwhile, heat 1 Tbs. of the olive oil with the garlic in a saucepan over medium heat. Cook, stirring frequently, until the garlic is fragrant, but not too dark, about 2 minutes.  Add the anchovies and red pepper flakes and cook for a couple more minutes. Add the tomatoes,  increase the heat to medium high, bring to a boil, and then simmer gently for 10 minutes.

After adding the tomatoes to the pan, add the pasta to the boiling water and cook according to the package directions until al dente.

When the tomato sauce is ready, add the olives, capers, and oregano and stir. Simmer until just heated through, about 2 minutes. Stir in the remaining 2 Tbs. olive oil and season the sauce to taste with salt and pepper.

When the pasta is ready, reserve 1/2 cup of the cooking water and drain well. Return the pasta to the pot, set it over medium-low heat, pour in the sauce, and toss, adding cooking water as needed for the sauce to coat the pasta. Serve immediately.

ENJOY!

to print the recipe, click here

Comments:  Pasta puttanesca was a perfect option for anchovies, because it has so many other flavors in the sauce: capers, black olives and herbs.  I felt a little uneasy opening the can of oil-packed anchovies, took a careful sniff and tried to concentrate on “umami” instead of “impossibly fishy.”  I had no idea that they would splatter so much in the pan, loudly announcing their presence  and making  a mess on the stove.  Next time I’ll be better prepared!

The verdict?  I detected a hint of the salty, smoky flavor of the anchovies, but nothing offensive.  This time I only used two filets, just to be safe, but the next time I’ll  add three.   Some day I want a slice of pizza with one of those small fish laying defiantly on top, but it may take more time!

Puttanesca is a hearty dish that will stand on its own as a meal, but because I wasn’t sure about it, I also prepared plan B: grilled flank steak.   It was really a tasty match!

ONE YEAR AGO:  Hoisin Explosion

Add to FacebookAdd to DiggAdd to Del.icio.usAdd to StumbleuponAdd to RedditAdd to BlinklistAdd to TwitterAdd to TechnoratiAdd to Yahoo BuzzAdd to Newsvine

SPRINGTIME SALAD

The moment I saw this recipe in the latest issue of Fine Cooking, I knew I had to make it right away.  First, because it involves asparagus.  Secondly, because they are prepared in a novel way  – the spears are shaved as ribbons.    I am already quite fond of thinly sliced raw asparagus as in this farro salad, so I looked forward to trying this new (to me, anyway ;-)) method to serve them.

SHAVED ASPARAGUS SALAD
(adapted from Fine Coking magazine)

for the vinaigrette:
3 tablespoons rice vinegar
2 tablespoons lemon juice
2 tablespoons extra-virgin olive oil
2 teaspoons agave nectar  (or 1 Tablespoon honey)
1 tablespoon finely chopped shallots
salt and  black pepper to taste

for the salad:
1/2 lb. thick asparagus, trimmed
2 cups baby arugula
1/3 cup toasted cashew nuts
2 oz. thinly shaved aged Gouda

Make the vinaigrette by whisking together the vinegar, lemon juice, olive oil, agave nectar, shallots in a small bowl. Season with salt and pepper.  Refrigerate if not using right away.

Remove the tips of the asparagus and put them in a large bowl. Using a vegetable peeler, shave a stalk discarding the first shaving, which will contain only the thick outer layer.  When shaving the first side becomes awkward, turn stalk over and repeat. Add all shavings to the bowl with the tips. Repeat with remaining stalks. Toss asparagus with 1/4 cup of vinaigrette and let sit for 10 to 15 minutes.  Add arugula and toss, adding more dressing if needed to coat the leaves.  Top with the shaved cheese and cashews, adjust seasoning and serve right away.

ENJOY!

to print the recipe, click here

Comments:  This salad dressing is very close to perfection.  The original recipe used honey, but I’m so fond of agave nectar that whenever I have the opportunity, I use it instead.  Once you add the dressing to the shaved asparagus, the transformation is quite obvious: within a few minutes the ribbons start to soften up.   Don’t do it too early, or they will get mushy.   For obvious reasons, the salad won’t keep at its best for very long, so if you are serving it at a dinner party, keep that in mind.    The asparagus tips will retain most of their bite, adding a nice texture together with the cashew nuts.

At first, I thought about substituting parmiggiano or ricotta salata for the cheese component of this recipe. Aged Gouda is not a cheese we normally buy, but its slightly smoked taste worked surprisingly well with the arugula and asparagus.  We gave it two thumbs up!

I can see many variations of this recipe during Spring and Summer months.  And, I was not the only one who enjoyed it: browsing through “One Perfect Bite” the other day, I noticed that Mary also loved it.  Check it out by jumping here.

ONE YEAR AGO:  Indonesian Delight

Add to FacebookAdd to DiggAdd to Del.icio.usAdd to StumbleuponAdd to RedditAdd to BlinklistAdd to TwitterAdd to TechnoratiAdd to Yahoo BuzzAdd to Newsvine