I cannot say I’ve been in macaron withdrawal syndrome, because I’ve been baking them quite regularly. But the blog has not featured a mac post in a while, so here I am to fix the problem with a batch of my obsession in almond form. Let’s suppose you love coffee, and maybe tiramisu is one of your favorite desserts. It’s settled then, you need these in your life. However, if you’re afraid of baking such temperamental creatures, please consider at least making the roasted coffee butter. Please. You can thank Philip later. He came up not only with the filling but the whole design of these lovely cookies.

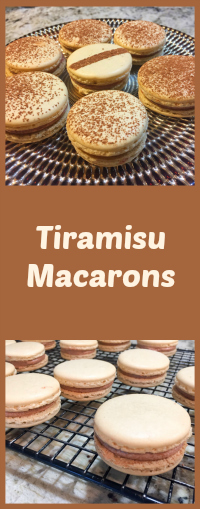
TIRAMISU MACARONS
(from Baking Fanatic)
for the shells:
125g ground almonds
125g icing sugar
100g granulated, superfine sugar
100g egg whites at room temperature
about 1/2 teaspoon instant coffee powder
for the filling:
60g mascarpone cheese
70g roasted coffee butter, softened (or use unsalted butter with coffee extract to taste)
50g icing sugar
2 tablespoons Marsala wine (optional)
for the roasted coffee butter:
250g unsalted butter
50g roasted coffee beans, ground to a coarse texture
Make the shells: Put the confectioner sugar, almonds and instant coffee into a food processor and pulse for about 10 seconds until perfectly uniform. Sift into a large bowl. If only a few large bits remain in the sieve you can discard them, or you can add them back to the processor and grind them again.
In a clean, dry bowl whisk the egg whites and the superfine sugar until you get a thick, glossy meringue. With an electric hand whisk this usually takes about 3 minutes. The meringue should have soft peaks so when you lift the whisk out of it, the peaks just holds their shape. Avoid stiff peaks or you’ll get hollow shells later.
Add the meringue to the dry almond/icing sugar mixture. Stir together gently, patting down the meringue into the dry mixture against the side of the bowl as you go, stopping as soon as most of dry mixture is no longer visible. The mixture will feel a little stiff at this point. Continue to fold and pat the mixture together gently until the mixture starts to loosen up. This macaronage stage is a critical part of the process and you don’t want to over-loosen the mixture so that it feels too runny and at all liquid. To test it is ready, lift up the spatula and let some of the mixture on the spatula drops back into the bowl, leaving a trail or ribbon on the surface. This trail should gently merge back into the mixture, disappearing within about 30 seconds. Pour the mixture into a piping back fitted with a round tip maximum 1/2 inch in diameter.
Pipe macarons onto Silpat or parchment paper, aiming at similar sizes. Lift each baking sheet a few inches off the work surface and drop this flat onto the work surface several times, keeping the tin as flat as possible as you drop it. Leave the macarons to rest at room temperature for about an hour or so, until a very thin skin forms on the surface and the surface does not stick to your finger. During this time preheat the oven to 300 F.
Bake the macarons for about 12-14 minutes, depending on the size, turning the trays around after 7 minutes. Remove from the oven and leave to cool for a few minutes on the trays before carefully lifting them to a rack for matching and filling when completely cool.
Make the filling: To make the filling, start by making the roasted coffee butter (you can make it in advance). Put the butter and the coffee beans in a pan and heat gently until the butter has melted. Bring to a simmer and let the mixture simmer very gently for about a minute. Remove from the heat and leave to infuse for about 30 minutes. Strain it through a fine sieve into a bowl and press as much butter out of the sieve as you can. Refrigerate until set and use what you need in a recipe. You will have some of the grounds in the bottom of the coffee butter but keep them there. If you want to distribute them more evenly, give the butter a mix when it has started to set.
Finalize the filling by beating the mascarpone, roasted coffee butter and powdered sugar together to give a smooth mixture. Beat in the Marsala, a little at a time. Spoon or pipe it onto the macaron shells and dust with cocoa powder. Place in an airtight container in the fridge ideally at least overnight for them to “mature”: the filling.
ENJOY!
to print the recipe, click here

Comments: I’ve been following food blogs for more than a decade, I subscribe to more feeds than I have time to read. So don’t take my next statement lightly: Philip’s site – Baking Fanatic – is THE best food blog for all things baking. Period. When I grow up, I want to be like him. Wait, I am old enough to be his Mom? Bummer. Still, the sentiment holds. Everything he bakes is picture-perfect, worthy of the window of the best patisseries in Paris. Or London, New York, Saint Petersburg, Vienna. But what’s even more amazing, he tells you exactly how to make every one of his delicacies, so once you visit his site you get this feeling of “maybe I can do that too.” I know, who am I fooling? But still… his instructions make it all seem approachable. That is the mark of a great baking teacher. He will not scare you, he will tease you into baking along. If you’ve never visited his blog, I urge you to do so. For starters, take a look at his tutorial for making macarons with a click here. Then, just to be a bit more amazed, see how he tackled for the first time one very challenging recipe for an Italian classic, sfogliatelle. I was in complete awe! Have been dreaming about attempting those ever since that post was published. Did you know sfogliatelle was a technical challenge at the Great British Bake Off?

Back to macarons. I would like to share with you a bit of meringue wisdom coming from my friend Gary, Pâtissier Extraordinaire.
Egg whites from a freshly laid egg are very difficult to whip into a foam – a problem if whipping by hand. As the egg white ages, it tends to thin out as the main protein, ovalbumin, is altered to S-ovalbumin (if interested in some heavy scientific info about it, click HERE) which makes the egg whites less viscous. This process is greatly accelerated at room temperature. As a result of these chemical changes, aged egg whites are easier to whip into a foam, however, the S-ovalbumin diminishes the foam stability.
Interestingly, the volume of egg white can be increased by adding up to 40% additional water before whipping without reducing the foam stability. So much for the old wives tale of aging egg whites to dehydrate them; it’s really for the chemical composition changes which makes them easier to whip by hand. In today’s world, the eggs you buy in a store have already aged enough to make it easy to whip the egg whites into a foam. Moreover, the use of an electric mixer makes this a moot point anyway.
So there you have a clear explanation why you can grab your eggs from the fridge, separate the whites, let them equilibrate to room temperature and go have fun making macarons. Not need for aging. No excuses. You can bake macarons on a whim!
And yes, I made this batch on a serious whim. Just 24 hours after I finalized a batch of these. It turns out that Alex was with us and was supposed to fly to meet his brothers and respective wives in California a couple of days later. So I had this crazy idea of sending a box of macarons with him. And that’s what happened. I don’t know how the decoration held, it was probably not the best choice for macarons that were packed inside a suitcase. If you make them, sprinkle with the cocoa right before serving, just to be safe. The taste of the coffee buttercream is simply amazing. Obviously, both Phil and I tasted one before taking Alex to the airport. For quality control. There are no limits to the level of my self-sacrifice in the name of food blogging.
Philip, thanks for all your help, advice, and encouragement over the net… On a side note, I just got a certain square cake ring… See what you did?
😉

ONE YEAR AGO: Cider Mini-Cheesecakes with Caramel Sauce
TWO YEARS AGO: Rustic Ciabatta and Mini-Meatloaves
THREE YEARS AGO: Green Rice
FOUR YEARS AGO: Potato-Crusted Italian Mini-Quiches
FIVE YEARS AGO: Beetroot Sourdough for the Holidays
SIX YEARS AGO: Cod Filet with Mustard Tarragon Crust
SEVEN YEARS AGO: Soba Noodles: Light and Healthy
EIGHT YEARS AGO: Potato-Rosemary Bread
SaveSave
SaveSave
SaveSave
SaveSave
SaveSave
SaveSave
SaveSave
SaveSaveSaveSave
SaveSave
SaveSave
SaveSave
SaveSave
SaveSave
SaveSave
SaveSave
SaveSave