A SPINACH SALAD TO WRITE HOME ABOUT

I know, spinach salad is not the most exciting item in the culinary world. I admit it. But this one got two very enthusiastic thumbs up from the husband, who prefers to reserve his excitement for things like a juicy T-bone steak, or falling-off-the-bone barbecue ribs. Every component helps the other one shine. Give it a try.

SPINACH SALAD WITH PEARS AND WALNUTS
(from the Bewitching Kitchen)

for the salad:
a bunch of spinach leaves, preferably baby spinach
a handful of walnuts, lightly toasted with a touch of salt
one or two Bartlett pears, peeled and thinly sliced
feta cheese, crumbled, amount to taste
pomegranate seeds, sprinkled with abandon

for the dressing:
3 tablespoons grape seed oil
2 tablespoons apple cider vinegar
1 teaspoon honey
a touch of mustard
salt and pepper to taste

Make the dressing by whisking all the ingredients together. I actually prefer to add everything but the oil, so that the salt dissolves well into the vinegar. Whisk the oil, make a nice emulsion and reserve.

Add the spinach leaves to a platter, place all other components on top. Add the dressing, toss the leaves very gently to coat.  Serve right away.

ENJOY!

to print the recipe, click here

Comments: I confess to having a problem with pomegranate seeds. I cannot stop grabbing the cups full of them, sold at Dillon’s.  I know, who needs to buy that when you can get the fruit and whack it yourself? I can tell you one thing, if you could watch me performing the maneuver of getting seeds off the fruit, you would understand why I avoid doing it. Yes, I’ve tried every single “easy and efficient” method published in magazines, books, and websites. Even the one describe as “The Ultimate Trick for Pomegranate Seeds Removal.” Thanks, but no thanks.  But, whatever your method of choice, try this salad, it is really delicious, and elegant enough for company. The juicy pears, the salty feta, the nutty nuts, well… you get the picture.

ONE YEAR AGO: Karen’s Four Hour French Country Bread

TWO YEARS AGO: The Siren’s Song of the Royal Icing

THREE YEARS AGO: Blog-worthy Roasted Butternut Squash

FOUR YEARS AGO: Chocolate Currant Sourdough Loaf & Roasted Beet Hummus

FIVE YEARS AGO: Sesame and Flax Seed Sourdough

SIX YEARS AGO: Spanakopita Meatballs

SEVEN YEARS AGO: Saturday Morning Scones

EIGHT YEARS AGO: Pain de Mie au Levain


SaveSave

SaveSave

SaveSave

SaveSave

SaveSave

SLOW-COOKED CHICKEN MEATBALLS

A little note added after publication: today is the first Monday of the month, so let me tell you which was my favorite post of January: Happy New Year in My Kitchen!  If you’ve missed it, here is the link.  But come right back, ok?  To see what many of my virtual friends pick as their best post, visit Sid’s blog.

Sometimes a dinner makes me so happy I cannot stop smiling. This was one.  Not only because it was delicious, but because I made it all in advance and we arrived home to a dinner ready and waiting, without that “crock pot taste” that so often is present when recipes take the “dump it and forget it” approach. Basically, not every type of meat shines during long cooking. These meatballs do. And they even hide a little surprise inside…

SLOW-COOKED CHICKEN MEATBALLS
(from the Bewitching Kitchen, adapted from many sources)

1 pound ground chicken
1/2 pound mild Italian sausage (casings removed)
1 Tablespoon coconut oil (or olive oil)
1 bunch kale, stems removed, coarsely chopped
1 small shallot, finely minced
1 egg + 1 egg yolk, lightly beaten
1/4 cup almond meal
salt and pepper to taste
1 large can (28 oz) crushed tomatoes
1/2 stick unsalted butter
1/3 cup water (or chicken broth)
1 tsp Herbes de Provence
small mozzarella balls, one per meatball

Start by sauteing shallots in coconut oil in a large skillet until translucent and fragrant. Season lightly with salt and pepper, then add the kale. Cook until wilted, transfer to a bowl and allow it to completely cool. If you like to cool it faster, add it to a baking sheet on a single layer.

In a large bowl, add the two types of meat, the sautéed kale, egg and egg yolk. Season with a little salt (the sausage is already seasoned), then add the almond flour.  Mix gently and form into large balls, incorporating a small mozzarella ball in the center. You should have enough for 8 to 9 chicken meatballs. Refrigerate them for one hour or more to firm them up. You can make this the day before.

Pour the crushed tomatoes in the bowl of a crock pot, add the water (or stock) and the butter cut into large pieces. Season with some salt and pepper, add the Herbes the Provence. Place the meatballs gently inside. Cook on low for 5 hours. If you have a chance, flip the meatballs after a couple of hours.

Serve right away or save in the fridge for next day, when flavors will be even better.

ENJOY!

to print the recipe, click here

Comments: I prepared the chicken meatballs on Sunday, stored them in the fridge, started them cooking next day during our lunch break. My slow-cooker keeps the food warm for a couple of hours, so we don’t have to worry about rushing home in that type of situation. Mondays are usually tough. You’d think that we would be all relaxed after the weekend, but truth is there is so much to do around the house that by the time Monday comes we are seriously hoping it would be Friday instead… For that reason I try to plan a very easy dinner for the first evening of a working week.

Now, of course, not everyone is as spoiled as we are, having the chance to go home for lunch. Keep in mind you can always do the slow-cooking part in the evening, then enjoy them for dinner the day after, they only get tastier. I was thrilled that Phil decided to stick with his smoothie and cereal bar for lunch later that week. I did not have to share the leftovers…  Yes, he is a keeper. But I suppose I’ve mentioned that a few times.

ONE YEAR AGO: Zesty Flourless Chocolate Cake

TWO YEARS AGO: Maple Pumpkin Pecan Snacking Cake

THREE YEARS AGOSilky Gingered Zucchini Soup

FOUR YEARS AGO: Sweet Fifteen!

FIVE YEARS AGO: Sesame and Flaxseed Sourdough

SIX YEARS AGO: Green Beans with Miso and Almonds

SEVEN YEARS AGO: Saturday Morning Scones

EIGHT YEARS AGO: White Bread

SaveSave

SaveSave

SaveSave

SaveSave

SaveSave

SaveSave

SaveSave

SaveSave

SaveSave

SaveSave

SaveSave

SaveSave

CARAMEL CHOCOLATE TARTLETS


With this post I become a life-time member of The Craftsy Cheerleading Club.  Quite likely the oldest member of the organization, but my enthusiasm matches that of a sophomore. This class in particular Pies and Tarts for Every Season, is taught by  Gesine Bullock-Prado. I’m a bit distant from TV (except for binge watching stuff like Broadchurch, Outlander, Black Mirror) so I had no clue she is such a hot commodity in the media. Deservedly so. Teaching is a bit of a performing act. You need to capture the attention of your students and at the same time convey your message in a clear and efficient way. Lightening up a lecture using jokes and funny analogies is a nice way to make sure your audience stays with you. However, balance is everything. There is a delicate line to negotiate between lightness and solid info, and she really shines at it. I learned a lot about pie crusts, how to manipulate each kind, how to choose which crust to bake depending on the type of filling. All in a fun, relaxed way.  I am always amazed at the quality of online classes offered by Craftsy, and the reviews by users are for the most part spot on. Before buying any class, you can browse through to see exactly what you’ll be getting, and the feedback from other users. A win-win situation. Now, for the bit of bad news. I could not get permission to publish the recipe, so if you are interested in the exact formula Gesine used for crust and filling, you’ll have to get it from the site.

OVERVIEW OF THE RECIPE

It all starts with the crust. You have several options. You can make a single larger tart, or shape about 50g of dough per tartlet, using muffin rings or a tartlet pan like I did. Compared to a muffin ring, my tarts were a tad bit bigger, so I used 60g of dough for each one. Her recipe has some cute twists, like using condensed milk in the dough. It gives not only a more intense sweetness, but it browns nicely in the oven.  Following her detailed instructions, I was happy to get all tarts to bake evenly, no soggy bottoms (who wants to have that? not me!), and basically zero shrinkage (scary thought).

I added my own little twist to the preparation by placing the pie weights (and dried beans) into the shells using food grade plastic wrap instead of parchment paper. It does not melt in the oven, as long as you crumble it on top preventing it from touching the metal of the pan, you’ll be fine.  I love the way it allows the beans and ceramic balls to reach the edge of the tart. As long as you don’t bake the shells in a higher than 400F oven, no problem.  After the initial baking with weights, I removed them, got the shells back in a baking sheet and baked with the bottoms up in the air as shown in the photo. I just wanted to prevent any soggy bottom phenomenon (watching Great British Bake Off made me traumatized about those).

For her caramel recipe, she uses a bit of maple syrup in addition to usual suspects. Any caramel recipe you enjoy will do, make sure to cook it to the correct temperature, 240 F, that will provide the perfect texture. No caramel running out when you slice the tartlet, no biting into a rock either.  It hardens very quickly, but I still allowed the filled tartlets to rest at room temperature for a good 45 minutes before adding the chocolate ganache.  Again, any recipe will do, but you need to have it almost cool to room temperature, so that it pipes nicely using a 1/4 inch piping tip.

You can be creative, do swirls, waves, fill it solid and play with the surface using an off-set spatula. Once it’s set, sprinkle Graham cracker crumbs on top, or anything else you might like. A drizzle of white chocolate? Oreo crumbs? Gold leaf in pieces? Or as Gesine does in the video,  top with toasted mini-marshmallows and call them Caramel Smore’s Tarts.   Brilliant!  You can probably see a picture on Craftsy. Adorable stuff.

I had a blast making these… and the taste? Spectacular, even if I say so myself

That’s what you want… A nice layer of caramel in between the crunchy crust and the luscious chocolate ganache. Next time I will use muffin rings, so that the top of the crust will be leveled with the chocolate. If you have muffin rings, give them a try as tartlet containers.

Did I mention these would be amazing on Valentine’s Day?

Gesine, thank you for your helpful comments,
I have quite a few of your projects on my list of stuff to try soon….  

ONE YEAR AGO: Chicken Korma-ish

TWO YEARS AGO: Sunday Gravy with Braciola

THREE YEAR AGO: In My Kitchen, February 2015

FOUR YEARS AGO: Avocado and Orange Salad with Charred Jalapeno Dressing

FIVE YEARS AGO: Green Olive, Walnuts and Pomegranate Salad

SIX YEARS AGO: Romanian Flatbreads

SEVEN YEARS AGO: Ziti with Artichokes and Meyer Lemon Sauce

EIGHT YEARS AGO: Blasted Broccoli, Stove-top version

SaveSave

SaveSave

SaveSave

SaveSave

SaveSave

SaveSave

SaveSave

INCREDIBLY SIMPLE TIMES FOUR – JANUARY 2018

It’s done. I  just added a new category of recipes to the blog, entitled Incredibly Simple.  You can find it on the right side, scrolling past Blogroll. Under this new category I list recipes that are almost effortless to put together. In the near future I will also make a separate category in the index page, so they are not only easy to make, but also easy to find in the site. For this round-up I share four side dishes, one uses the air-fryer. I am aware that not many people own one, but I was so amazed by the outcome that I had to include it. You can of course make it in a regular oven… it will just take a bit longer to reach the dinner table, and the texture won’t be quite the same.

INCREDIBLY SIMPLE #1

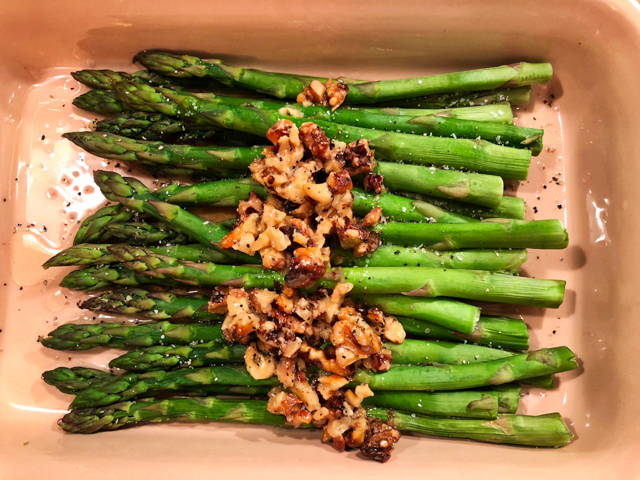
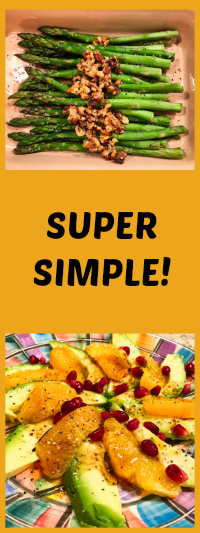
MICRO-STEAMED ASPARAGUS  

Inspiration for this recipe came from seriouseats

The simple part of this method is the steaming.  I’ve been using it all the time now. Place asparagus in an even layer on a large microwave-safe plate and season with salt and pepper. Lay a double layer of damp paper towels on top of the stalks, completely covering them. Microwave on high for about 3 minutes. Check with a fork, if necessary add another 30 seconds to 1 minute. That is it. You can dress them super simply with a mixture of olive oil and lemon juice, or if you have a bit more time, go for this simplified walnut vinaigrette. 

Toast half a cup or so of walnuts in a skillet or oven. Coarsely chop them and place in a small bowl. Add 2 tablespoons of a mild vinegar, 1 tablespoon of water, a very light drizzle of honey or maple syrup. Whisk 1/4 cup olive oil, until it all emulsifies. The walnuts will help the process. Season with salt, and add on top of the asparagus fresh from the microwave step.  That is all. You want to know a little secret? The exact same method works well for broccolini too, you might have to slightly increase the steaming time.

INCREDIBLY SIMPLE #2
 .
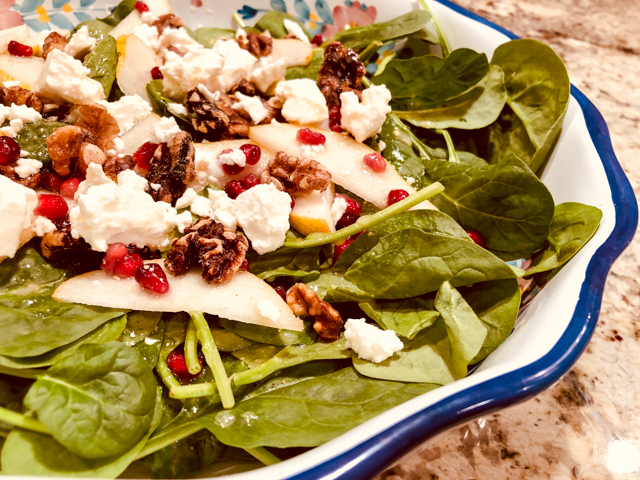
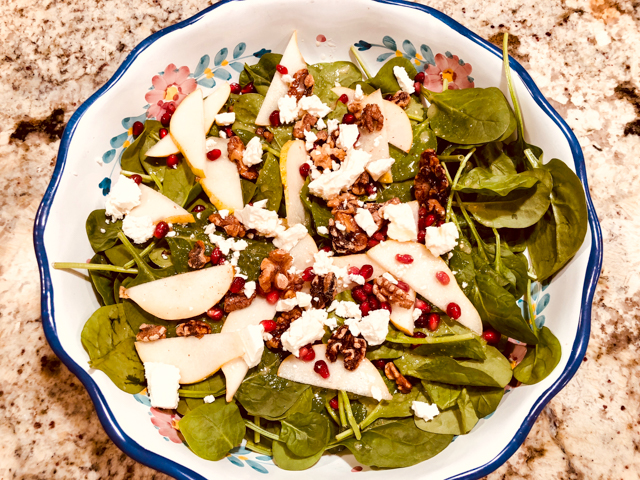
AVOCADO AND ORANGE SALAD  

Inspiration for this recipe came from Geoffrey Zakarian on a recent episode of The Kitchen.

Don’t let the simplicity of this non-recipe fool you. The result goes well beyond expectations. As GZ put it on the show, the combination of orange and avocado is a complete winner, and we agree. The only work involved is segmenting the orange. Distribute the slices of avocado on a plate, add orange segments on top. Squeeze all the juice left from the orange in a small bowl, season with salt and pepper, whisk a small amount of olive oil to emulsify it. If you like your dressing on the sweet side, a touch of honey will do.  Drizzle on top of the salad, and sprinkle pomegranate seeds on top. You can also substitute toasted slivered almonds or walnuts in case you don’t have pomegranate around.  I’ve made it twice in the same week, and intend to keep bringing this to our table. Blood oranges would make it even more special, so keep that in mind.

INCREDIBLY SIMPLE #3

ROASTED BROCCOLINI WITH LEMON AND PARMIGIANO CHEESE

Inspiration for this recipe came from Dining In: Highly Cookable Recipes, by Alison Roman.

Put a baking dish in the oven and heat it to 425 F. You will need broccolini, one lemon, and freshly grated Parmigiano cheese.

Add one or two bunches of broccolini to a large bowl, add to it very thin slices of one lemon. Drizzle olive oil all over, just enough to coat the veggies and lemon slices. Season with salt and pepper.

Place the broccolini on the hot baking sheet in one layer, add a small coating of grated Parmigiano cheese and roast for 10 to 15 minutes, until it all starts to get golden, and the broccolini is cooked through.

The cheese will more or less disappear, but you will notice its sharp bite as you bite into the broccolini.  Super simple indeed, and absolutely delicious.


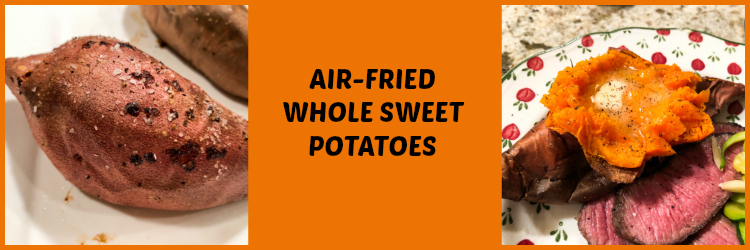
INCREDIBLY SIMPLE #4

This is really a non-recipe if I’ve ever seen one.  Fork the skin of the sweet potato a few times. Rub it with olive oil, season with salt.  Place in the air-fryer set at 390 F or the highest temperature your machine will go.  Cook for 35 minutes, turning it once or twice during frying.  Remove from the fryer, cut the skin open, add some butter, salt and pepper. That’s all.

What amazed me about this recipe is that you won’t have to wait for the oven to heat to high temperature to start roasting. The air-fryer needs no advance notice. You turn it on, in a minute or so you are right where you need to be. For whole potatoes or sweet potatoes, it’s hard to beat the convenience of using the air-fryer. And the texture turned out perfect, I think better than a regular oven. We would need a blind test to be sure, but I tell you, this was really really good. Apparently regular potatoes can be prepared exactly the same way and won’t take more than 40-45 minutes to be done. They are on my list for the near future.

So that’s all for now… Four recipes that are so easy to put together, no matter what happened at work, you can face their preparation with a smile. Making life simple is always a good move.

ONE YEAR AGO: Two Salads and a Blog Award!

TWO YEARS AGO: When Three is Better than Two

THREE YEARS AGO: Somebody Stop Me!

FOUR YEARS AGO: Zucchini Pasta with Cilantro-Cashew Pesto

FIVE YEARS AGO: Bran Muffins, Take Two

SIX YEARS AGO: Brown Butter Chocolate Chip Cookies

SEVEN YEARS AGO: Mogo Mojo

EIGHT YEARS AGO: Slow-Roasted Chicken Thighs: an Ice-Breaker


SaveSave

SaveSave

SaveSave

SaveSave

SaveSave

SaveSave

SaveSave

SaveSave

SaveSave

SaveSaveSaveSave

SaveSave

SaveSave

SaveSave

SaveSave

SaveSave

SaveSave

MAPLE GRILLED PORK TENDERLOIN OVER LEMONY ZUCCHINI

After the caloric content of my previous post, it’s time to get back to our regular routine. Pork tenderloin is a favorite of ours, we like the texture, the subtle flavor, and the fact that it’s quite lean, which obviously poses problems for the cook.  This recipe is super simple, if you have time to marinade the meat hours in advance do it, but if not, offer it a 30 minute marinade-party, and move on. Or rather, grill on. You could go all fancy and put the meat on skewers, but this time I just laid every little morsel of goodness on the grill grates. I like the way those grill marks work on the flat surface of the meat. And, contrary to what most chefs recommend, we like our pork cooked past medium-rare.  Adjust your cooking time according to your personal preference.

MAPLE GRILLED PORK TENDERLOIN OVER LEMONY ZUCCHINI
(from the Bewitching Kitchen)

for the pork:
1 pound pork tenderloin, cut in 1/2 inch slices and lightly pounded
3 tbsp maple syrup
3 tbsp extra virgin olive oil
1 tbsp balsamic vinegar
1 tsp paprika
1 tsp sal
1/2 tsp black pepper

for the zucchini:
4 small zucchini, shredded on a food processor
1 tablespoon ghee (or olive oil)
1/4 cup slivered almonds
salt and pepper
juice and zest of one lemon

Make the marinade by combining all the ingredients in a small bowl. Add the pieces of pork to a plastic bag or small dish, and pour the marinade all over. Leave it in the fridge for 30 minutes to overnight.

Heat the grill.  Remove the pork from the bag, letting the marinade drip off. Lightly pat the pieces with a piece of paper to avoid excessive moisture to stay on the meat.  Grill the pieces to your preference, we like about 5 to 6 minutes per side on a very hot grill.

Prepare the zucchini.  Heat the ghee or olive oil on a large skillet. When very hot, add the shredded zucchini, season with salt and pepper. Leave undisturbed for a couple of minutes so that the layer in contact with the skillet will get brown. Move it around gently, keeping the heat high at all times. When the zucchini is almost done, make a small opening in the center of the skillet, add the almonds, let them saute for a couple of minutes, then mix them with the zucchini.  Squirt some lemon juice, add the zest, incorporate and serve immediately, with more lemon slices on the side.

ENJOY!

to print the recipe, click here

Comments: If you are looking for a low-carb meal that satisfies, this is a good option.  Zucchini – either shredded, simply sautéed, or the more elaborate spiralized version – is a perfect match for pork tenderloin. Especially if you add a lemony touch to it, and a few nuts for a bit of texture. I was patting myself on the back after this dinner. Simple, quick to prepare, and mighty tasty. I hope you give it a try.


ONE YEAR AGO: Danish Rye Bread

TWO YEARS AGO: The Best Sourdough Recipe

THREE YEARS AGO: Mini-Quiches with Duxelles and Baby Broccoli

FOUR YEARS AGO: Quinoa and Sweet Potato Cakes

FIVE YEARS AGO: Pumpkin Bolo de Fuba’ Cremoso

SIX YEARS AGO: Citrus-crusted Tilapia Filets

SEVEN YEARS AGO: Bran Muffins, not just for Hippies

EIGHT YEARS AGO: Flourless Chocolate Cake


SaveSave

SaveSave

SaveSave

SaveSave

SaveSaveSaveSave

SaveSave

SaveSave