BRAISED FENNEL WITH SAFFRON AND TOMATO

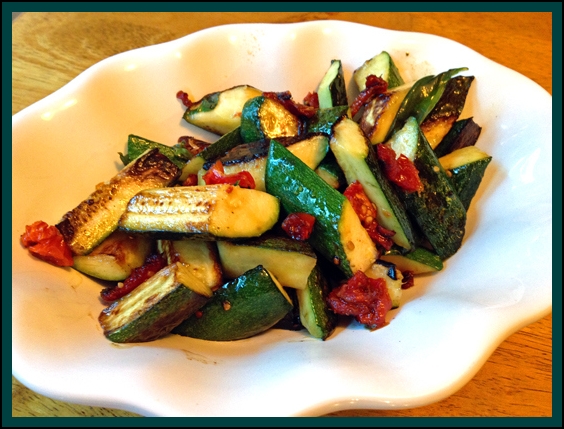
This side dish is elegant and luscious. Perfect to pair with chicken, pork or a mild fish like cod or sea bass. But, if you prefer to walk the vegetarian path, enjoy it over farro, barley, or as we did, a colorful quinoa.  Add a hearty loaf of bread, and you will be all set…

Fennel with Tomato Saffron1

The recipe is published in  Vegetable Literacy  the latest cookbook from Deborah Madison. Lisa  from “Lisa is Cooking” wrote a great review about the book a few months ago, and shared a recipe from it, check it out by jumping here. Deborah Madison has the amazing ability of bringing the best out of the most humble vegetable. I do not own a copy of this particular book (bravely resisted so far), but her classic Vegetarian Cooking for Everyone is part of our collection.

The recipe is available online, just click here.

composite

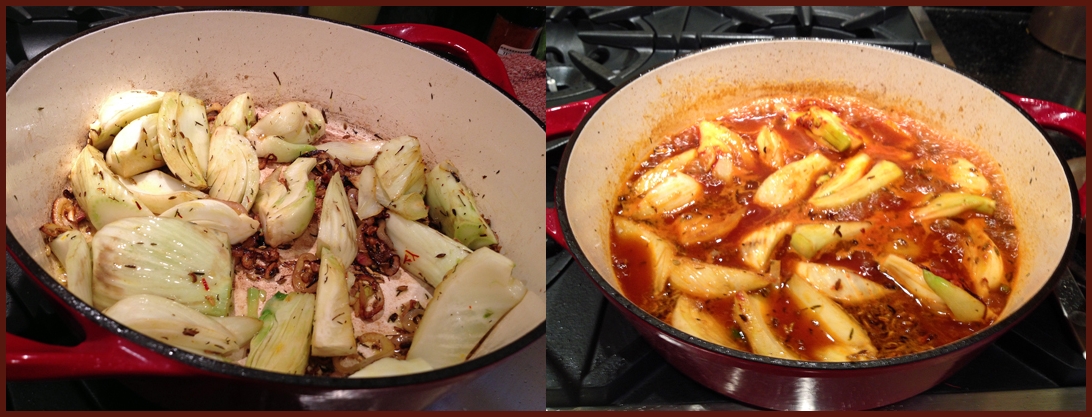
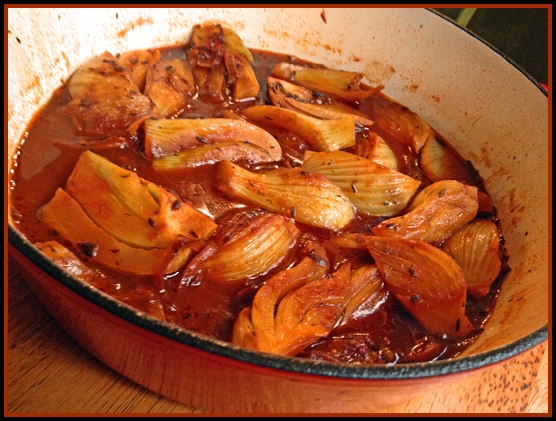
Definitely the most important advice is to take the time to brown the fennel well, that will ensure a deeper flavor in the end.  I don’t recommend this dish for those who have issues with fennel, because its flavor is very prominent.  I crumbled goat cheese over the braise, allowing it to melt down in the liquid, and right before serving added the greens from the fennel, minced. As the recipe states, if your fennel bulbs came without the tops, use parsley instead. My main modification from the published recipe was to squeeze a little lemon juice all over, and reduce slightly the amount of tomato paste. I thought three tablespoons seemed excessive, so I added only two.  Capers and saffron are fantastic together, by the way.

Served
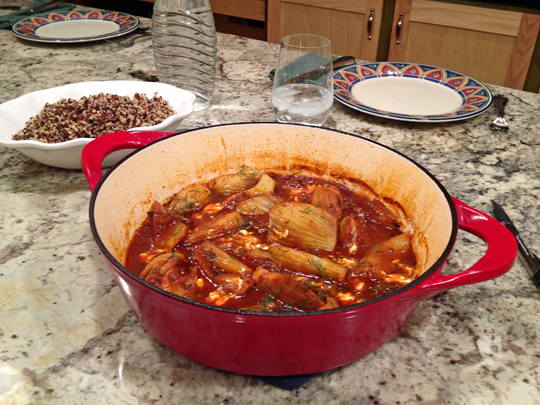
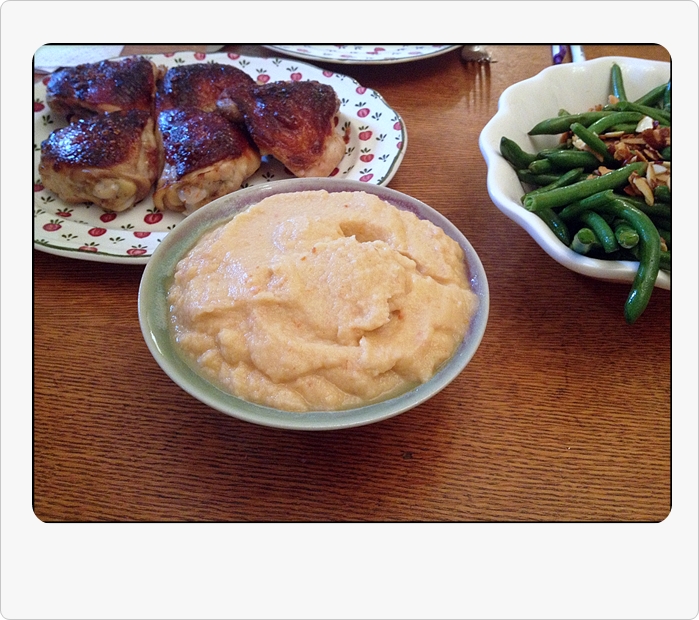
Because we have nothing against a little meat with our veggie goodness,  a boneless, grilled chicken breast was part of our dinner too.  As far as looks are concerned, I suppose a fully white quinoa would have been better, but the bag of tricolor quinoa acquired months ago at a Trader Joe’s was winking at me from the pantry.  I spooned a little of the braising sauce over the chicken, so that it all got tied together in a beautiful caper & saffron glory!
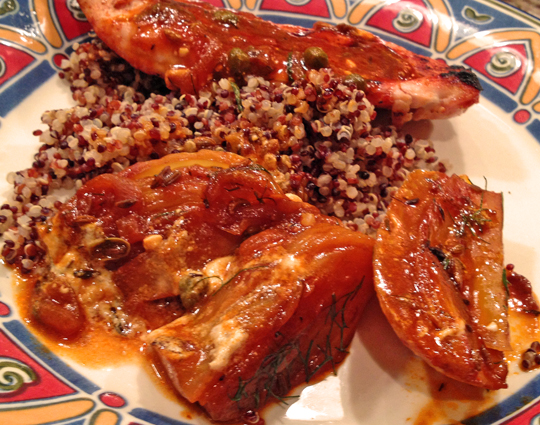
platedDinner is served!

ONE YEAR AGO: Revenge of the Two Derelicts

TWO YEARS AGO: Grilling Ribbons

THREE YEARS AGO: Peppery Cashew Crunch

FOUR YEARS AGO: Baked Shrimp and Feta Pasta

SILKY CAULIFLOWER PUREE WITH ALMOND MILK

I am not sure why it took me so long to try almond milk, but  I fell in love with it the moment I tasted it.  This one is my favorite, the plain and lighter version made by Silk.   It is part of my daily routine now, half a glass of almond milk right before going to work, and another half after lunch.  Shockingly cold is best, by the way.   Phil used it in his lunch smoothies in place of  yogurt and loved it too. My passion for almond milk started me on a virtual expedition in the internet chasing for recipes using it in cooking.   I was pleasantly surprised to find quite an extensive number of possibilities.  My first adventure with Silk was a winner:  cauliflower puree.  I share with you the recipe,  inspired by Food and Wine.

AlmondCauliPuree1

SILKY CAULIFLOWER PUREE WITH ALMOND MILK
(from the Bewitching Kitchen)

1 medium-sized head of cauliflower
1 tbsp grapeseed oil
1 celery stalk, diced
1/2 red bell pepper, diced
1 shallot, diced
Half gallon Light Almond Milk (or slightly less)
salt and pepper

Prepare the cauliflower by removing the outer leaves and the central core.  Cut the florets off, slicing the large ones in two or three pieces.

Heat the oil on a skillet. Saute the celery, onion, and red bell pepper until the onion is golden, and the mixture is very fragrant. Season with a little salt and black pepper.   Add the cauliflower to the skillet and cook it on high heat for a couple of minutes, stirring often.  Transfer the mixture to a saucepan so that the cauliflower fill it no more than halfway up.   Add almond milk to the saucepan and bring the mixture to a boil.   Reduce the heat, cover the pan keeping the lid slightly ajar, and simmer for 15 to 20 minutes, until the cauliflower is tender.

Transfer the cooked cauliflower to the bowl of a food processor, keeping the almond milk in the pan.  No need to drain it completely, the amount of liquid that stick to the florets will help ensure a nice texture.   Process until smooth.  If necessary, add a little more warm almond milk.   Test for seasoning.   Serve warm.

ENJOY!


to print the recipe, click here

As I said, my first adventure with almond milk in cooking won’t be the last. In fact, I have this recipe on my “to try soon” folder, and hope I can actually switch it into the “tried and true”  in the near future.  One store in town normally carries Marcona almonds, which is the only tricky ingredient to find. With that in hand, I should be good to go.

Probably because I used light almond milk instead of full fat, the liquid seemed to separate a little as the cauliflower cooked. It definitely did not harm the dish, so if you use the light version, ignore its looks.  It will all come together in a silky happy ending!

dinner

Our dinner felt quite special, considering it took place at the height of our kitchen renovation. Here is the full menu for that evening:  roasted chicken thighs marinated in beer-soy-orange (marinade to be blogged about soon), green beans with almonds, and the cauliflower puree.  Mr. Hamilton roasted the chicken thighs, Mr. Breville broiled the skin for a couple of minutes, and our single burner induction stove took care of the rest.  A few sautéed almonds on top of the puree tied both side dishes together quite nicely… even if I say so myself…   😉

plate

.
THREE YEARS AGO:
Popeye-Pleasing Salad
.
FOUR YEARS AGO: Summer’s Finale

SAUTEED ZUCCHINI WITH SUN-DRIED TOMATOES AND BASIL

zucchinifc11
I’m always trying to find different ways to prepare zucchini, as we both love it so much. One of my favorite recipes is a simple stir-fry like this one, but the timing (and the size of your pan) must be just right, as a slight variation will result in overcooked, limp zucchini, with no bite whatsoever.  This recipe from Fine Cooking follows a totally different path to the stir-fry happy-ending.  Pieces of zucchini are lightly salted and sit for 10 minutes, a process that will draw out a lot of moisture and the bitterness that might turn some people off.  After that, you will be on your way to a tasty side dish.

SAUTEED ZUCCHINI WITH SUN-DRIED TOMATOES AND BASIL
(adapted from Fine Cooking magazine #65)

2 medium zucchini
1/2 tsp. Kosher salt + more for seasoning
2 Tbs. extra-virgin olive oil
1 clove garlic, smashed and peeled
3 oil-packed sun-dried tomatoes, drained and finely diced
6 fresh basil leaves, torn into large pieces
Freshly ground black pepper
1/2 lemon, juiced

Wash the zucchini and dry them with paper towels. Trim off the ends and quarter the zucchini lengthwise. Arrange the zucchini, cut side up, on a baking sheet lined with paper towels. Sprinkle with the salt and set aside for 10 minutes. Blot the quarters dry with the paper towels. Cut each quarter on the diagonal into 3/4-inch-thick pieces.

Heat a large skillet over medium-high heat for 1 minute. Pour in 2 Tbs. of the oil. When the oil is hot, add the zucchini and garlic, and sauté, stirring occasionally, until the zucchini browns and softens enough that you can cut through it with the side of a fork, about 5 min. Take the pan off the heat, toss in the sun-dried tomatoes and basil, and season generously with salt and pepper. Drizzle with the lemon juice and  serve immediately.

ENJOY!

to print the recipe, click here

composite111
Comments:  I have a bit of a troubled relationship with sun-dried tomatoes.  The ones that come packed in oil are often too greasy for my taste, but their texture is much better than the dry-packed ones. My approach is to buy the ones in oil, and before incorporating in the dish let them rest on a piece of kitchen paper to blot the excess oil away.

Fresh tomatoes would not deliver the same punch of flavor.  Sun-dried tomatoes are similar to red pepper flakes, instead of having their flavor uniformly diluted across the dish, they give you little spikes of heat.  Perfect!

This was a delicious way to prepare zucchini, yet another recipe that can be adapted in many ways.  Try adding roasted red bell pepper in place of sun-dried tomatoes, cilantro instead of basil, a bit of mint…  Don’t omit the lemon juice, though.  It is a must!

ONE YEAR AGO: Orzo with Heirloom Tomato Relish

TWO YEARS AGO:  Headed to Brazil!

THREE YEARS AGO: The Rhubarb Brouhaha: Revelation Compote

FOUR YEARS AGO: Love me tender…

SECRET RECIPE CLUB: CARROT FLAN WITH GREENS AND LEMON VINAIGRETTE

flanJune, folks. We are in June. That means half of this amazing year is pretty much over.  Carpe diem. The months always end on a nice note for me, because the last Monday brings Reveal Day of The Secret Recipe Club.  I was paired this month with Dena from Oh! You Cook!”. Dena describes herself as a librarian by day, recipe blogger by night, except on nights in which she works as a librarian…  Not only she works around books, but she is an author herself, having published last year “The Everything Kosher Slowcooker Cookbook”.  Check it out here.  Reading her blog is a lot of fun! She is quite witty, and often opens her articles with remarks that will bring a smile to your face.  For instance, the recipe I chose, carrot flan, is under a post entitled “Go Forth on the Fourth…”  I quote straight from her blog:

Go Forth on the Fourth…  and barbecue, of course! 

Steaks… check!

Skewered chicken… check!  

Carrot flan… huh?   🙂

So there you go. Whether you are making this dish as a side for a barbecue or as a light meal, it will turn your day into something unique. Elegant, light, sophisticated, and the best part: it’s actually quite simple to make.

top

CARROT FLAN WITH GREENS AND LEMON VINAIGRETTE
(adapted from “Oh! You Cook!”)

Makes 6 individual servings.

for the flans:
12 ounces carrots (enough to make 2 1/2 cups of chopped pieces)
4 eggs
4 ounces (1/2 cup) heavy cream
1/2 teaspoon sea salt
1/4 teaspoon ground black pepper
pinch of grated nutmeg

for the vinaigrette:
1/4 cup olive oil
3 tablespoons fresh lemon juice
1 teaspoons Dijon mustard
1/2 teaspoon grated lemon peel
1/2 teaspoon honey

Make the flans: Heat the oven to 325 degrees F. Butter 6 ramekins (3/4-cup size). Cook the pieces of carrots in boiling salted water until tender, about 8 minutes. Drain and puree in a food processor or blender until smooth, and let cool slightly.

Whisk the pureed carrots together with the eggs, heavy cream, salt, pepper, and nutmeg. Divide the mixture among the buttered ramekins, and place the ramekins in a baking pan. Add enough hot water to the baking pan so that the water goes halfway up the sides of the ramekins. Cover the pain with foil and bake until the custards are set and a knife inserted near the middle of one comes out clean. (In my pathetic oven it took almost 1 hour, but you should start checking it at 40 minutes, normally it should take around 45 minutes). Remove the ramekins from the baking dish and let cool slightly before unmolding.

For the vinaigrette:  whisk together the lemon juice, lemon peel, mustard, and honey. Stream in the olive oil, whisking constantly, until an emulsion forms. Season well with salt and pepper,  and store in the refrigerator.

Final assembly of the dish:  Place a handful of salad greens of your choice for each serving of flan in a large bowl. Drizzle some vinaigrette over the greens, season with coarse salt and freshly ground black pepper, and toss to dress. Run a knife around the inside of the ramekins to loosen the flans, then invert them over a plate to unmold. Serve the flans with the salad  and an additional drizzle of the vinaigrette.

ENJOY!

to print the recipe, click here

composite-001
Comments: This might be a bold statement, but I’ll go ahead with it: I think this was my favorite recipe of all the “Secret Ones” I’ve made in the year and a half participating in the event.  Phil raved about it from the first bite, and said that these flans could be served on the best bistrots of Paris. How’s that for a compliment?  The leftover flans were warmed in a microwave for 40 seconds, and they unmolded perfectly then.  So, this recipe is a wonderful option for a dinner party.

tiediePolishing off the meal with non-stop compliments: Nice! Wearing a tie-die shirt with more colors than the dinner plate? Optional, but so very cool… 😉

If you want to see what my friends from Group D cooked up for this Reveal Day, click on the blue frog at the bottom of the post…. have fun!

ONE YEAR AGO: The Secret Recipe Club: Granola Bars

TWO YEARS AGO:  Awesome Broccolini

THREE YEARS AGO:  A Twist on Pesto

FOUR YEARS AGO: Ciabatta: Judging a bread by its holes


QUINOA WITH CIDER-GLAZED CARROTS

A note to subscribers:  Google Reader will shutdown on July 1st, 2013. If you have a subscription to this blog through Google Reader, please sign up for email notifications, or switch to another reader. I recommend Feedly or Bloglovin.  They will automatically retrieve all your Google reader subscriptions. 

I’ ve had plenty of versions of quinoa in the past, but this one takes the number one spot. The carrots added a sweet-sour note, the thinly sliced almonds a delicious crunch, and the quinoa married them together with its light and refreshing nature. Cannot praise this dish enough. I was inspired by this recipe from Bon Appetit, and decided to come up with a version to be served hot instead of cold, but with similar flavors. If you are searching for a recipe to please vegetarians or a perfect side dish for pork, poultry,  perhaps a thick slab of grilled salmon, look no further. This is perfect!

served22

QUINOA WITH CIDER-GLAZED CARROTS AND ALMONDS
(from the Bewitching Kitchen, inspired by Bon Appetit)

1 cup quinoa, very well rinsed and drained
salt
3 medium carrots, thinly sliced at an angle
2 Tbsp apple cider
2 Tbsp agave nectar
1/4 cup sliced almonds
2 Tbsp olive oil, divided
1 Tbsp cider vinegar
2 Tbsp lemon juice
zest of 1 lemon

Heat oven to 450°. Bring quinoa and 4 cups lightly salted water to a boil in a medium saucepan. Cover, reduce heat, and simmer until quinoa is tender, 10-15 minutes. Drain; return quinoa mixture to saucepan, cover, and let sit for 10 minutes. Fluff with a fork and transfer to a large bowl; let cool.

Meanwhile, lightly coat a large rimmed baking sheet with oil (or cover it with parchment paper). Whisk cider and honey in a large bowl to blend; season with salt and pepper. Add carrots and toss to coat. Transfer to prepared baking sheet and roast until tender, 15-20 minutes. Let cool.

Heat 1 tablespoon of olive oil in a small skillet. Add the almonds and cook over low heat until fragrant.  Set aside, keeping it warm.

Whisk vinegar, lemon zest, lemon juice, and remaining tablespoon of olive oil in a small bowl.  Season with salt and pepper.

Add carrots and almonds to quinoa mixture and toss to coat. Drizzle the vinegar & lemon mixture and mix well tp combine all ingredients.  Adjust seasoning if needed.

ENJOY!

to print the recipe, click here

Comments: If you are new to cooking the seeds of Chenopodium quinoa, please remember to rinse them extensively.  The seeds  have a natural coating of saponins that taste very bitter.  Processing the seeds for sale includes pre-washing, but you will notice that the water still foams slightly once you soak the seeds.  A couple of years ago, I read somewhere that quinoa goes rancid very easily, so the advice given was to store it for  no more than 6 months (or freeze it).   I tried to find a source for this information,  but now I find plenty of sites stating that it lasts for several years in the pantry.  Oh, well. I guess one can always open the bag and do a sniff test.

Cooked quinoa freezes very well, so you can prepare a full bag and portion it in the freezer for later. I actually cooked it on a Saturday and made this recipe for our dinner on Tuesday.  Pork tenderloin kebabs completed the meal, but the truth is we both raved about the quinoa a lot more.  Bonus:  we got our intake of carrots all taken care of!  😉

ONE YEAR AGO: Celebrate Wednesday: Heirloom Tomatoes Steal the Show

TWO YEARS AGO: Pain de Provence

THREE YEARS AGO: Golspie Loaf, from the Scottish Highlands