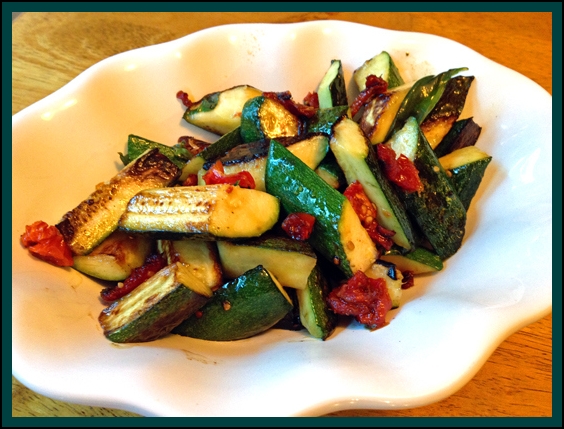
SECRET RECIPE CLUB: CARROT FLAN WITH GREENS AND LEMON VINAIGRETTE

flanJune, folks. We are in June. That means half of this amazing year is pretty much over.  Carpe diem. The months always end on a nice note for me, because the last Monday brings Reveal Day of The Secret Recipe Club.  I was paired this month with Dena from Oh! You Cook!”. Dena describes herself as a librarian by day, recipe blogger by night, except on nights in which she works as a librarian…  Not only she works around books, but she is an author herself, having published last year “The Everything Kosher Slowcooker Cookbook”.  Check it out here.  Reading her blog is a lot of fun! She is quite witty, and often opens her articles with remarks that will bring a smile to your face.  For instance, the recipe I chose, carrot flan, is under a post entitled “Go Forth on the Fourth…”  I quote straight from her blog:

Go Forth on the Fourth…  and barbecue, of course! 

Steaks… check!

Skewered chicken… check!  

Carrot flan… huh?   🙂

So there you go. Whether you are making this dish as a side for a barbecue or as a light meal, it will turn your day into something unique. Elegant, light, sophisticated, and the best part: it’s actually quite simple to make.

top

CARROT FLAN WITH GREENS AND LEMON VINAIGRETTE
(adapted from “Oh! You Cook!”)

Makes 6 individual servings.

for the flans:
12 ounces carrots (enough to make 2 1/2 cups of chopped pieces)
4 eggs
4 ounces (1/2 cup) heavy cream
1/2 teaspoon sea salt
1/4 teaspoon ground black pepper
pinch of grated nutmeg

for the vinaigrette:
1/4 cup olive oil
3 tablespoons fresh lemon juice
1 teaspoons Dijon mustard
1/2 teaspoon grated lemon peel
1/2 teaspoon honey

Make the flans: Heat the oven to 325 degrees F. Butter 6 ramekins (3/4-cup size). Cook the pieces of carrots in boiling salted water until tender, about 8 minutes. Drain and puree in a food processor or blender until smooth, and let cool slightly.

Whisk the pureed carrots together with the eggs, heavy cream, salt, pepper, and nutmeg. Divide the mixture among the buttered ramekins, and place the ramekins in a baking pan. Add enough hot water to the baking pan so that the water goes halfway up the sides of the ramekins. Cover the pain with foil and bake until the custards are set and a knife inserted near the middle of one comes out clean. (In my pathetic oven it took almost 1 hour, but you should start checking it at 40 minutes, normally it should take around 45 minutes). Remove the ramekins from the baking dish and let cool slightly before unmolding.

For the vinaigrette:  whisk together the lemon juice, lemon peel, mustard, and honey. Stream in the olive oil, whisking constantly, until an emulsion forms. Season well with salt and pepper,  and store in the refrigerator.

Final assembly of the dish:  Place a handful of salad greens of your choice for each serving of flan in a large bowl. Drizzle some vinaigrette over the greens, season with coarse salt and freshly ground black pepper, and toss to dress. Run a knife around the inside of the ramekins to loosen the flans, then invert them over a plate to unmold. Serve the flans with the salad  and an additional drizzle of the vinaigrette.

ENJOY!

to print the recipe, click here

composite-001
Comments: This might be a bold statement, but I’ll go ahead with it: I think this was my favorite recipe of all the “Secret Ones” I’ve made in the year and a half participating in the event.  Phil raved about it from the first bite, and said that these flans could be served on the best bistrots of Paris. How’s that for a compliment?  The leftover flans were warmed in a microwave for 40 seconds, and they unmolded perfectly then.  So, this recipe is a wonderful option for a dinner party.

tiediePolishing off the meal with non-stop compliments: Nice! Wearing a tie-die shirt with more colors than the dinner plate? Optional, but so very cool… 😉

If you want to see what my friends from Group D cooked up for this Reveal Day, click on the blue frog at the bottom of the post…. have fun!

ONE YEAR AGO: The Secret Recipe Club: Granola Bars

TWO YEARS AGO:  Awesome Broccolini

THREE YEARS AGO:  A Twist on Pesto

FOUR YEARS AGO: Ciabatta: Judging a bread by its holes


KINPIRA GOBO AND JAPANESE HOME COOKING

burdock2_opt

Of all types of cuisine, Japanese is the one that intimidates me the most. Making sushi at home is out of the question for me, but even other types of Japanese cooking give me pause.  In a recent trip to California, we met a wonderful couple who takes a different approach: they are both Americans, but mostly cook Japanese food at home and are really serious about it.  Their bookshelves are loaded with cookbooks devoted to Oriental (and vegetarian) cooking, their pantry stocked with the most exotic ingredients.  They mentioned a dish they love so much that it’s not uncommon to have it twice in the same week.   It uses a strange-looking root called “gobo“, also known as “burdock“.   They gave me the perfect spice mix to season this traditional Japanese dish (see my previous post) and wished me luck finding gobo in Manhattan, KS.   I was very optimistic, though. It turns out “The Little Apple” is home to one of the most amazing food stores I’ve ever been to, called quite simply “Asian Market“.    I could not wait to get there to search for the elusive root.  Not only they had a ton of it, but the owner said it’s always in stock.   Call me a happy camper. And call this dinner one of the healthiest meals I’ve ever put together.   And very delicious too!
served1

KINPIRA GOBO (Sautéed Burdock)
(adapted from Hiroko Urakami Japanese Family-Style Recipes)

1 medium gobo root
2 carrots
1 Tablespoon sesame oil
1/2 Tablespoon grape seed oil
2 Tablespoons mirin (or sake)
1 + 1/2 Tablespoons sugar
2 Tablespoons soy sauce
1 + 1/2 Tablespoons sesame seeds, toasted
Nanami togarashi to taste

Set up a large bowl with cold water. Peel the carrots and cut in julienne strips. Peel the outer dark skin of the gobo root, and working quickly, cut it in julienne strips.  Soak the gobo and the carrots in water for 10 to 20 minutes.  Drain well, and dry the strips using a kitchen towel.

Heat the sesame and grape seed oil on a large skillet.  Add the carrots and gobo root, and sautée them together for about 4 minutes, until they are tender.  Add the mirin, sugar, and soy sauce, and cook over medium heat until all the liquid has been absorbed.  Transfer to a serving bowl, add the sesame seeds and the nanami togarashi right before serving.

ENJOY!

to print the recipe, click here

composite

I have a bit of  trivia about gobo for you:  in the 40’s, a Swiss inventor called George de Mestral was walking his dog through some woods and noticed that the seeds of a particular plant glued to everything, from his clothes to his dog’s fur. He collected some seeds, and inspected them under the microscope. He was amazed by its hooks and loops, and thought that it could be the basis of a new material. From that observation, Velcro was born.  The plant was burdock. Apart from its technological impact, gobo is considered by the Japanese as one of the healthiest types of food, that they claim to “purify the blood”.   It contains a lot of minerals (including iron),  it is high in fiber, low in calories, and has a very unique taste.  The soaking in water is necessary to get rid of tannins that can give it a harsh taste.
soakingI love to find a new ingredient to play with!   Our kinpira gobo was served as a side dish for boneless chicken thighs on the grill (marinated with yogurt and a few spices), snow peas, and brown rice.  It was the type of meal that makes you feel healthier with each bite.  I hope you can find some gobo and give this recipe a try, it’s a keeper…  😉

ONE YEAR AGO: Walnut Sourdough

TWO YEARS AGO: Thai Chicken Curry

THREE YEARS AGO: Zen and the art of risotto

EVERYBODY LOVES CARROTS!

And to prove my point, a photo straight from one of my favorite websites, Dogshaming.com (published with permission)

Carrots Phil and I try to eat a varied diet.  We don’t exclude fats or  carbs, only moderate the intake of overly caloric stuff. Over the years we made some changes in our nutrition that we follow as strictly as possible.  We do the seafood at least once a week, often more.  We limit red meat to once a week. We save desserts for special occasions. Recently we decided to increase our consumption of carrots. Our goal is to have them as a side dish twice/week. Carrots are a fantastic source of beta-carotene, a compound that is metabolized into vitamin A and retinal in humans and other vertebrates. Retinal (vitamin A-aldehyde), is a key compound in the vision process.  Interestingly, carotenes are poorly absorbed from raw carrots. For optimal absorption, the carrots should be cooked, and preferably consumed with a little oil, as carotenes are oil-soluble.  I am sure the cute dog above compensates the poor absorption by maximizing uptake and grabbing each root available in the backyard…   😉  This recipe solves the problems for H.sapiens, as the carrots are roasted with a bit of olive oil. Plus, to pump the “good-for-you” index even further, they are mixed with pomegranates, themselves chock full of nutrients.  Interestingly enough, did you know that both carrots and pomegranates originated in Afghanistan?  That may be why they go so well together!

served1

POMEGRANATE MOLASSES GLAZED CARROTS
(adapted from Bon Appetit)

8 carrots (any color), halved lengthwise, cut crosswise into 2-inch pieces
1 tablespoons olive oil
Salt and freshly ground black pepper
1 tablespoon honey
1 tablespoon pomegranate molasses

Heat oven to 425°. Combine carrots and oil in a medium bowl. Season with salt and pepper and toss to coat. Transfer to a rimmed baking sheet, spreading out in an even layer. Clean any excess oil left in the bowl and reserve it. Roast carrots, turning occasionally, until just tender, 12-15 minutes. Meanwhile, whisk honey and pomegranate molasses to blend in reserved bowl.

Transfer carrots to bowl with honey mixture; toss to coat well and spread out on baking sheet, scraping out any remaining glaze from bowl. Roast  until glaze is reduced and sticky and beginning to brown in spots, 5-8 minutes longer.

ENJOY!

to print the recipe, click here

I loved this recipe not only for its flavor, but also its simplicity.  At first, I thought that the honey would make it overly sweet, because molasses sound sweet enough to start with. Not the case. The pomegranate component of the molasses wins the battle and the honey is needed to compensate its sharpness.  Since the final roasting takes less than 10 minutes, you can pre-roast the carrots in advance, and finish the dish right before sitting down to eat. I am all for easy during weeknights.

Note to self: make a lot more carrots than you think you’ll need. Yeah, they are that good…  😉

Note to readers:  if you are a dog lover and have not been introduced to Dogshaming.com,  make sure to stop by.  My day is not complete without a visit!

ONE YEAR AGO: Codruta’s Rolled Oat Sourdough Bread

TWO YEARS AGO: Roasted Corn and Tomato Risotto

THREE YEARS AGO: Light Rye Bread

SECRET RECIPE CLUB: PORTOBELLO CAPS STUFFED WITH GOAT CHEESE AND PROSCIUTTO

servedThe month of March brought a little too much snow and cold to The Little Apple, but we escaped to warmer weather for a week, arriving from Brazil right before the last Monday of the month.  Why is the last Monday of the month so important in the food blogging world?  Well, by now you should  know it’s The Secret Recipe Club Reveal Day!  This month, with all our activities and travel, it was a bit of a stretch to participate, but I’m very glad I did.  I was paired with a blog I had not visited before, The Saturday Evening Pot.   The host is a trained chef, and that immediately got the adrenaline pumping in my system as I browsed his site in search of recipes.  He cooks for a family of four: himself, his wife, and two kids, but to make things a lot more interesting they have food sensitivities that need to be taken in account. Not an easy task.  He does so beautifully, though, and in his site you will find extensive nutritional information for all recipes and plenty of advice for adapting recipes in case you face similar issues.  I highly recommend a visit to The Saturday Evening Pot.   It did not take me very long to choose a recipe, because I’ve been thinking of trying stuffed Portobello mushrooms for quite some time.  Great opportunity to go for it, wouldn’t you say?

served2
PORTOBELLO MUSHROOM CAPS STUFFED WITH GOAT CHEESE AND PROSCIUTTO
(from The Saturday Evening Pot)

3-4 large Portobello mushroom caps
olive oil
balsamic vinegar
4-6 ounces crumbled goat cheese
3-4 slices prosciutto

Heat oven to 350 degrees. Using a small dinner spoon, remove stems from mushroom caps and scrape out brown ribbing on underside of mushroom caps. Lay mushroom caps, stem side up, on sheet pan.  Brush each lightly with olive oil. Bake approximately 10 minutes or until mushroom browns lightly.

While mushrooms are baking, take each slice of prosciutto and cut using a chiffonade pattern.  Set aside.

Remove mushrooms from oven and turn oven setting to broil. Drizzle each mushroom cap with a small amount (approximately 1/4 teaspoon) of balsamic vinegar.  Spread vinegar evenly with the back of a spoon over inside of mushroom cap. Place one slice shredded prosciutto in each mushroom cap and sprinkle goat cheese on top of prosciutto. Place sheet pan under broiler and melt cheese until lightly browned.  Remove and serve immediately.

ENJOY!

to print the recipe, click here

cleanprepared

Delicious recipe, we will definitely be making this over and over and over, adding all kinds of goodies on the Portobello base.  My only modification was to use fig balsamic vinegar, but other than that, I followed his recipe to a T. Three mushrooms were more than enough for Phil and I, we even had half of the small one leftover.  We enjoyed them as our main dish, next to a little spaghetti with olive oil and lemon zest.  You may notice there is no salt in the recipe. Both goat cheese and prosciutto can be very salty, particularly when you roast them, so make it as written and see how you like it.  I love salt, but did not miss it.  For a full vegetarian version, sun-dried tomatoes could replace the prosciutto, or a mixture of black olives, roasted red bell peppers…  this is a nice basic method to improvise according to your mood.

If you want to see the other recipes made by friends in my group, click on the blue frog that is smiling at you at the bottom of the post.

ONE YEAR AGO:  Orange and Rosemary Pork Tenderloin

TWO YEARS AGO: Pistachio-Walnut Sourdough Bread

THREE YEARS AGO: Cottage Loaf and Yeasty Dogs


BROCCOLI-WALNUT SOUFFLE FROM A SPECIAL COOKBOOK

served1Last month I got a wonderful gift from Fer, my virtual friend who hosts the blog “Chucrute com Salsicha“.   She sent me a cookbook:  The Vegetarian Epicure Book Two, written by Anna Thomas.  Anna’s family was originally from Poland, but she was born in Germany, and moved to the US as a young child. While in college at film school in UCLA, she wrote a masterpiece of a cookbook, The Vegetarian Epicure, at a time when avoiding meat was not very common.  I enjoyed my gift so much that I could not resist getting her most recent book, Love Soup. It will have a special spot in our home, as the first cookbook I bought this year. By exercising considerable restraint, I lasted through the first week of February. I certainly make  my readers proud!  ;-)Fer’s thoughtful gift arrived at our doorstep on a Thursday.  Forty eight hours later, we enjoyed this very delicious souffle.

BROCCOLI-WALNUT SOUFFLE
(reprinted with permission from Anna Thomas)
Original recipe in  The Vegetarian Epicure Book 2, published by Alfred Knopf, New York, 1988

4 Tbs butter
4 Tbs flour
1 + 1/2 cup hot milk
5 egg yolks
1 + 1/2 cups chopped cooked broccoli
1/2 cup finely chopped walnuts (I lightly toasted them first)
2 Tbs minced onions
2 Tbs grated Parmigiano cheese
1/2 tsp salt, ground black pepper to taste
7 egg whites
pinch of cream of tartar

Butter a 2-quart souffle dish and tie a buttered “collar” made of parchment paper if you want (I omitted this step).

Melt the butter in a saucepan and stir in the flour. Cook the roux over medium heat for a minute or two, stirring constantly. Then add the hot milk and stir with a whisk as the sauce thickens.

When the sauce is smooth, remove it from the heat and whisk in the egg yolks, one by one. Then add the cooked broccoli, the walnuts, the onions, and the cheese. Stir well and season with salt and pepper.

In another bowl, add a pinch of cream of tartar to the egg whites and beat them with a clean whisk or beater until they are stiff enough to form peaks.  Stir about 1 cup of the beaten egg whites into the warm sauce. Now add the remaining egg whites and gently fold them in, making sure not to lose the air incorporated into it.

Pile the souffle into the prepared dish, place it in the middle of a 375 F oven, and bake it for 40 to 45 minutes.

Serve immediately. Remember, a souffle waits for no one…  😉

ENJOY!

to print the recipe, click here

before

Comments: We always alternate cooking days. One day I’m in charge, the other day it’s Phil.  That Saturday, mid-afternoon, Phil looks at me and asks “Am I cooking tonight?”  Before I could answer, he remembered that no, it would be me.  He quickly changed the question to “What are we having tonight?”  I tried to be as nonchalant as possible, “We are having a souffle“.    Oh, the big smile that I love so much!  But, how could a souffle not bring a smile?  It makes any meal special…

This version is heartier than your regular cheese souffle, with the broccoli and the nuts.  It is satisfying, creamy, and delicious to the last bite!  It won’t rise as lightly as a cheese-only, as the eggs need  to carry heavier stuff with them. But, what it might lack in airy nature, it compensates with flavor.   I think it is wonderful as a full meal, served with a salad and a piece of bread.  But, if you absolutely must have some  meat with it,  a simple roast chicken will do.  French home-cooking at its best!

Double thank you is in order:  Fer, thanks for sending me this book, and Anna, thank you for your kind emails, and giving me permission to publish your recipe in my blog!  Your Love Soup is such a great book, I already have 5 or 6 recipes fighting to be prepared first… 😉

ONE YEAR AGO: Voila’ les baguettes!

TWO YEARS AGO: Cornmeal English Muffins

THREE YEARS AGO: Butterflied Cornish hens with apricot-pistachio dressing