SECRET RECIPE CLUB: BUCKLE UP FOR RASPBERRIES

First Monday of the month, it’s time to share with my readers one more post as part of The Secret Recipe Club. If you don’t know what it’s all about, the club joins two food bloggers in secret, one is the stalker, the other the stalkee… When Reveal Day comes, everyone blogs about a chosen recipe at the exact same time. A virtual thrill like no other, right?  The blog I was assigned to this month was Things I Make (for Dinner), hosted by Sarah from Ontario. I’ve only been to Canada once and fell in love with it and its people, although the snowstorm in the middle of the summer trip was a bit uncalled for. I am sure I told this story before, but for newcomers, here we go with the short and sweet of it: the late June snowstorm caught me wearing shorts and a tank top. My mood dropped to what in temperature would be approaching zero Kelvin. Anyway, I digress. Sarah has a great sense of humor, her posts are a delight to read. I found myself smiling and nodding my head all the way through the lengthy stalking process. Keep in mind she’s been blogging since 2007, so there’s a ton of stuff to choose from in her fun site. Obviously, I had a hard time settling on a recipe.  Take a look at my “short” list: Chicken Tikka Kebabs, Soft Pretzels (I cannot believe I still haven’t try to make those, they’ve been on my to make soon list for a decade!), Spicy Chicken Skewers, Thai-Style Steak Salad,  Lemon Bonbon Cookies (I actually bought all ingredients for it), Blueberry Cheesecake, Nutella Ice Cream (triple sigh of pure desire), Upside Down Black Forest Cake (yes, you read that right). So, what do I have for you? A Raspberry Buckle. Love the name.  Buckle is a dessert that has been around for centuries, very popular in New England. It refers to a coffee cake in which fresh fruit is mixed with a yellow cake batter. Very easy to make and I tell you it was a huge success in one of the several receptions we hosted last month. Believe it or not, I made it after arriving home from work, still had time to clean up the kitchen and serve it for the reception at 8pm. I felt like Super Woman after a successful mission. And, that – quoting Martha Stewart – is a good thing.
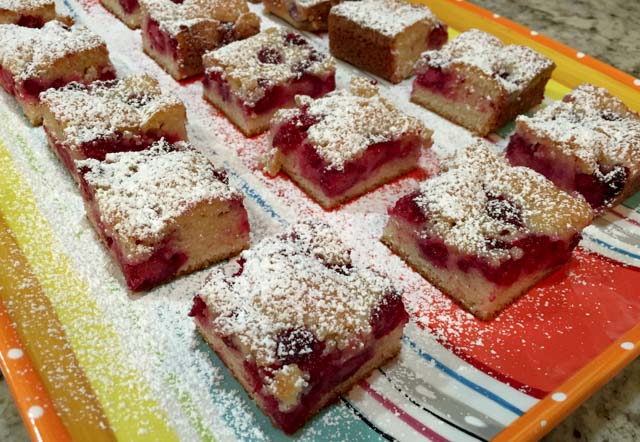
Raspberry Buckle1

RASPBERRY BUCKLE
(from Things I Make for Dinner)

1/2 cup butter
1 cup sugar
3 eggs
1 cup flour
1/2 tsp salt
1/2 tsp baking powder
1 pint fresh raspberries
Heat oven to 350F. Grease a 9″ square baking pan. Clean raspberries. Stir together flour, salt and baking powder in a small bowl and set aside.

Cream butter and sugar with an electric mixer. Add eggs, one at a time, until well incorporated. Gradually add flour mixture, being careful not to over mix. Spread in prepared pan, and scatter raspberries over the surface. Bake at 350 for 35 minutes, or until golden brown and a tester comes out clean.

Cool 20 minutes, sprinkle with icing sugar and serve with whipped cream, if so desired.

ENJOY!

to print the recipe, click here

bucklecomposite

Comments: Life has been busier than ever for us. For those who do not know, when we moved from OU to KSU four years ago, Phil became the Head of the Department of Biochemistry and Molecular Biophysics. With that, commitments and challenges intensified more than we anticipated. Not only he has our research lab to consider in his professional life, but all the other things associated with running a department, from budget problems to teaching issues, from hiring new faculty to personnel evaluations. The list is huge, and the deadlines and pressure just keep building up. It is challenging for both of us, but I must say we enjoy it all.  The underlying feeling that we are trying to accomplish something on several fronts pump us up, keeps us on our toes. Recently he went through an intense process to hire a director for a particular center at KSU. Every candidate’s visit involved a reception in our home. I wanted to prepare something special for each of the three candidates, and this Raspberry Buckle was my best choice ever. If you need something simple and delicious, look no further. Sweet, tart, melt-in-your-mouth good…

Sarah, thanks for a great recipe that pleased all the guests who had a chance to try it. Nothing was left next morning to take to the department, which is a huge compliment to your Raspberry Buckle!

baked2

As usual, I invite my readers to click on the smily blue frog at the end of this post. She will direct you to a list of blog posts published by my virtual friends at The Secret Recipe Club.  Enjoy the ride!

Raspberry Buckle


ONE YEAR AGO: Seafood Gratin for a Special Dinner

TWO YEARS AGO: Cooking Sous-Vide: Sweet and Spicy Asian Pork Loin

THREE YEARS AGO:  Farewell to a Bewitching Kitchen

FOUR YEARS AGO: In My Kitchen. June 2012

FIVE YEARS AGO: Goodbye L.A.

SIX YEARS AGO: 7-6-5 Pork Tenderloin


SECRET RECIPE CLUB: CHOC-ORANGE MINI CAKES & A BONUS RECIPE

13082596_1327954120553739_3054889855668038106_n(Reprinted with permission from Adrienne Hedger)

And here we are landing firmly in the month of May. This year is flying by, if you ask me… First Monday of the month means fun. It is Reveal Day for The Secret Recipe Club, that event in which bloggers are paired in secret and cook a recipe from their assigned site.  This month I got a food blog that was new to me: Chit Chat Chomp, hosted by Leigh, who blogs from Melbourne, a place I would love to visit one day. Leigh’s site is a thing of beauty, very stylish, elegant, amazing photos, and great prose. Basically, a must-read food blog!  She summarizes her approach to cooking in a delightful way:

Recipes inspired by my travels through France, adapted for everyday simplicity and filled to the brim with nutrition.  Mostly gluten and refined sugar-free, my recipes lean towards food that inspires, heals and nourishes, but above all else, it’s fresh, organic and simple.

Recipes inspired by my travels through France… She’s got my full attention!  In fact, she describes herself as a lover of all things French. You can imagine the smile I opened when I read that line, right?  I spent quite a bit of time stalking her blog, but jumped on a recipe right away for a reason I will classify as “The Swedish Effect.” Small parenthesis is needed.  We have an undergraduate student from Sweden in our lab called Olivia. She happened to mention that April 15th was her “name day” back home.  I was puzzled, but then learned that in Sweden each day of the year is associated with a particular name, as you can see in this site. April 15th is the name day for Olivia (girls) and Oliver (boys). Olivia said that her Grandma always gave her a nice card on that day to celebrate the occasion. So, I thought it would be cool to bake something starting with the letter O and bring to the lab on that day. Orange-Chocolate mini-cakes seemed perfect! Obviously, I jumped on the recipe with no hesitation whatsoever. But, my decision had a small problem associated with it, which led me to make a second recipe for today’s reveal. Read on…

Choc Orange Mini Cakes
ORANGE-CHOC MINI CAKES
(from Chit Chat Chomp)

Makes 6 mini-cakes

1 orange
1 cup almond meal
1 tsp baking powder
2 large eggs
1 Tbsp raw cacao powder
1 Tbsp rice malt syrup or raw honey
handful of raw cacao nibs
handful of sunflower seeds (I omitted for lack of sunflower seeds)

Heat oven to 320 F and line a mini cupcake pan with 8 cupcake papers

Place the orange in a pot and cover with water. Bring to the boil then reduce the heat to low and simmer for 1 hour. Allow to cool.

Chop the cooked orange into chunks and place in a blender and blitz until smooth. Add all other ingredients (except cacao nibs and sunflower seeds) to the blender and pulse until combined.

Divide the batter between your cupcake papers, filling close to the top as they will not rise by much, and top with the cacao nibs and sunflower seeds. Pop into the oven for approximately 30 to 40 minutes, or until a skewer comes out clean when inserted in the middle.

ENJOY!

to print the mini-cake recipe, click here

orangecakecomp
Comments: As Leigh mentioned, the only tricky part of this recipe is to boil the orange. Tricky in the sense that you need to dedicate one hour for that step. Essentially hands-free, though. The smell in the kitchen as the orange simmers…. wonderful!  Once the orange is ready and cooled down, the batter will be ready in minutes. Now, let’s talk about the “small problem.”  The recipe made six cupcakes, enough for each of our lab members to enjoy, but Phil and I could not have any. In short, I made a recipe for The Secret Recipe Club, but never got to taste it. I had only one way to restore my dignity as a blogger: choose a second recipe from Chit Chat Chomp, and make it too… and that’s what I did, so today you get two recipes instead of one. How’s that for problem solving?

Without further ado… my bonus recipe from Leigh’s great blog:

Veggie Bread

VEGGIE BREAD
(from Chit Chat Chomp)

1 + 1/2 cup almond meal
3/4 cups arrowroot flour
1/2 teaspoon sea salt
1/2 teaspoon baking soda
5 eggs
1 + 1/2 teaspoon apple cider vinegar
1 large zucchini, grated
1 large carrot, grated
1/2 cup finely grated Parmesan cheese
2 tablespoons pepitas.

Heat the oven to 325 F and line a standard loaf pan with parchment paper.

In a large bowl, mix together the almond meal, arrowroot, salt and baking soda. In a separate bowl whisk the eggs lightly with the apple cider vinegar. Add zucchini, carrot and cheese and mix well.

Add the egg mix to the dry ingredients. Mix to combine. Pour the dough into the prepared loaf tin and sprinkle with pepitas.

Bake for 35-40 minutes or until the top starts turning golden and a skewer comes out clean. Remove from the oven and transfer to a wire rack. Allow to cool for five minutes before cutting into slices.

ENJOY!

to print the Veggie Bread recipe, click here

veggiecomposite

Comments: We loved this bread! It is obviously gluten-free, no regular flour, but the texture reminded me of quick breads, except that this had considerable more moisture. Not too dense like some gluten-free breads turn out.  Leigh said it freezes well, but we did not get to test that, in three days it was gone. I enjoyed a slice at lunchtime, and was surprised that Phil did that too, he prefers his bread to be loaded with gluten. This one had so much flavor that the lack of wheat flour was not a big deal.  Once it sits in the fridge for a while, the best way to bring it back to life is toasting it…  paired with juicy tomatoes, it was out of this world delicious!

toasted

I wanted to try to make croutons out of it.  Not sautéed because I am afraid they would crumble, it is a very delicate bread. But maybe spraying the croutons with coconut or olive oil then toasting them in the oven. I bet they would turn out amazing on a kicked-up version of Caesar salad, or over a massaged kale concoction. Definitely a bread to play with.

I must say it was not easy to decide on which recipe to make as the bonus.  I really wanted to make her Savoury Muffins, not only because the recipe enticed me, but for the write-up about it. You gotta go and read it… it has to do with France…   And, if the weather was a little more appropriate, I would love a bowl of her luscious Carrot Soup… Another heavy contender was the Zucchini Noodle with Kale Pesto, which is pretty much my favorite type of meal these days.

Leigh, I loved getting your blog as my assignment this month, and feel sorry I could not taste those cute mini-cupcakes… Thinking back, I should have made a double batch, but I only thought about it after they were all baked and I had no time to boil another orange and start over. It was getting close to bedtime then… oh, well. Such is life!

Please make sure to click on the blue frog sitting patiently at the end of this post, so you can marvel at the posts that my virtual friends from Group A made for their assignments.

Adrienne, thank you again for allowing me to share your cartoon on the blog!
I love your work!

ONE YEAR AGO: In My Kitchen, May 2015

TWO YEARS AGO: P90X3, a Review of Tony Horton’s Latest Fitness Program 

THREE YEARS AGO: Pasta and Mussels in Saffron Broth

FOUR YEARS AGO: Triple Chocolate Brownies

FIVE YEARS AGO: Shanghai Soup Dumplings

SIX YEARS AGO: Bite-sized Chocolate Pleasure

SECRET RECIPE CLUB: CHICKEN KORMA & A BONUS RECIPE

Another month begins, a favorite of mine because April means winter is OVER! I survived another  meteorological ordeal, and must confess it wasn’t that bad. HA!  Am I getting tougher or what?  The first Monday of the month brings Reveal Day of Group A from The Secret Recipe Club, so here I am to divulge which blog was my assignment.  Drum roll, please…. I got the amazing Thyme for Cooking blog, hosted by Katie.  Now, for a shocking statement: I would cook ANY of her recipes, each and every one appealed to me. She is one eclectic cook, having lived in several countries (Ireland, Andorra & France), but not only that, her writing captivates you.  I opened a huge smile when I read her About page, and stumbled on this simple paragraph:

From learning about French paperwork (exhausting) to French chickens (of course they come with feet, Duh!) it’s a constant, often / usually entertaining challenge.

Well, I love France, don’t even think I don’t. But until you face the convoluted French bureaucracy, you’ll know nothing about paperwork hell. Unless of course, you’ve lived in Brazil… Those two beautiful countries could compete to see which bureaucracy would drive a foreigner crazy first. I have a tough time deciding the “winner.”  But, I digress… Her site kept me glued to the computer for many hours on many evenings. I blamed it for preventing me from sitting down with Phil to watch the news. “Are you coming, Sally?”  “I can’t… I can’t…  I have Thyme for Cooking, so No Thyme for News.”  Just to give you an idea of her level of sophistication, she’s got 9 recipes for cornish hens.  Nine. I almost lost my mind trying to decide what to cook, here is a very short list: Ham, Spinach and Avocado Clafoutis…. Shrimp and Spinach Pie...  Chicken with Chickpeas and Preserved Lemon….  Zucchini-Courgette Gratin... Chicken with Tarragon Cream…  Slow-cooker Coq au Vin...  (almost made it for this reveal day, as I also got a slow-cooker recently).  And so many more, I simply had to stop bookmarking them. I had no choice but to make two, one savory, one sweet.  For savory I went with her Chicken Korma, and for dessert (well, not quite, I made it one week later), her Absolute Best Brownies.

Chicken Korma3

CHICKEN KORMA WITH APRICOTS AND ALMONDS
(slightly adapted from Thyme for Cooking)

3 chicken breasts, boneless, skinless, cut into slices 3 pieces
1/2 cup ground almonds
1 shallot, chopped
1 piece of ginger, about 1/2 inch long, finely minced
1 tbs olive oil
2 bay leaves
5 cardamom pods
4 whole cloves
1 inch of a cinnamon stick
1 tsp ground cumin
1 tsp ground coriander
2 tsp tomato paste
1/2 cup Greek yogurt
3oz (90gr) dried apricots, cut in half
1/2 cup  chicken stock

Heat 1 tablespoon olive oil in a large skillet over medium-high heat. Add bay leaves, cloves, cardamom, cinnamon and stir-fry 10 seconds. Add shallot and fry until tender and starting to brown. Reduce heat to medium, add ginger, cumin, coriander and stir-fry 2 minutes longer. Add tomato paste and stir well to combine.

Add chicken pieces, ground almonds, chicken stock and heat to simmering. Reduce heat to low, cover and simmer for 15 minutes. Add yogurt to chicken and stir well to combine. Add apricots, cover and simmer for 10 minutes longer.

Serve over white rice.

ENJOY!

to print the recipe, click here

kormacomposite

Comments: We loved this recipe! The magical ingredient is definitely cardamon. Every time I open the bottle of cardamon pods I get mesmerized by the smell. The delicate taste they impair to any dish, savory or sweet, is hard to beat. The ground almonds (or almond meal, depending on what is available to you) give the sauce extra body and make it feel substantial and filling. Finally, the apricots bring the bit of sweetness and a pleasant chewy texture. Three chicken breasts were enough for our dinner and lunch a couple of days later. I should add that the sauce was even more flavorful the second time around, although the texture of the meat was better right after cooking.  Overall, this korma is not spicy, just very aromatic.  We enjoyed it over white rice with snap peas alongside. Delicious dinner!

served

Just make sure you don’t bite into the cloves! Find them and put them aside…

And now, for the bonus recipe: 


Brownies Glazed

ABSOLUTE BEST BROWNIES
(from Thyme for Cooking)

for the brownie:
6 tbs butter, plus a bit more for the pan
8oz dark chocolate, in chunks
3/4 cup sugar
1 tsp vanilla
2 eggs, room temperature
1/4 cup flour
1 cup walnuts, chopped

for the glaze:
4oz (120gr) dark chocolate, in chunks
1/2 cup heavy cream

Heat the oven to 350°F (175°C).
Line the inside of an 8-inch square pan with 2 lengths of foil, laying them perpendicular to each other and folding the edges over to form handles. Lightly butter the foil.

In a medium saucepan melt the butter over low heat, add the chocolate. Stir constantly until melted.
Remove pan from heat, add sugar, vanilla and stir well. Add eggs and beat well with a medium-size wooden spoon.
Add the flour and beat vigorously for 1 1/2 – 2 minutes. Better should be shiny and smooth. Stir in the nuts, and pour the batter into the pan.

Bake for 30 minutes. The center should be almost set. Do not over-bake. Cool brownies completely in the pan. As the brownie cools, make the glaze by heating the cream in a small saucepan over low heat. Add the chocolate and stir until just melted.

Lift the brownies out of the pan and loosen the foil on the sides and bottom. Transfer to a plate. Pour the glaze over the top and smooth to the edges. When the glaze is cool, cut into small squares and serve.

ENJOY!

to print the recipe, click here

compositebrownie

Comments: You will find this to be a very popular recipe (original from David Lebovitz). Many bloggers have made it, not always successfully, in the sense that for some these did not turn out as “absolute best.”  Well, it is all in the technique. For this recipe to work its magic you absolutely MUST beat the batter for at least a full minute, probably two minutes is better.  I considered adding the batter to a KitchenAid but ended up beating by hand. Good workout for the right arm, I can tell you that…  The brownies turned out great, I think the walnuts worked perfectly well with the chocolate, but if you do a google search you’ll find that the basic recipe can be adapted to all sorts of add-ons, one that seems quite popular is mint.  Just crush some mint candy and add to the batter after you beat it into submission. I took the brownies to our department on a foggy and a bit chilly Monday morning. They made many colleagues forget the Monday blues.

Katie, I will be a faithful follower of your blog, and hope you had as much joy with your assignment this month as I had with mine… 

For my readers, make sure to click on the blue extra-terrestrial looking frog at the end of this post, so you can marvel at the productions of my fellow secret recipe friends.

ONE YEAR AGO: Josey Baker’s Olive Bread

TWO YEARS AGO: Almonds, A Cookbook Review

THREE  YEAR AGO: Pomegranate-Molasses Glazed Carrots

FOUR YEARS AGO: Codruta’s Rolled Oat Sourdough Bread

FIVE YEARS AGO: Roasted Corn and Tomato Risotto

SIX YEARS AGO: Light Rye Bread

SECRET RECIPE CLUB: OVERNIGHT COFFEE CAKE

Here I am to share with you my second participation in Group A of The Secret Recipe Club, the monthly event in which two food bloggers are paired in secret, and pick a recipe to cook and blog about exactly at the same time of Reveal Day. I’d been a member for over 4 years with Group D, and loved every minute of it! This month’s assignment was the blog Bcmom’s Kitchen, hosted by  Anna. I love the quote she’s got on the front page to describe her kitchen:

Where towels are for drying, and the white spoons don’t go in the tomato sauce!

Clearly, we have a lot in common, as I can be very protective of my kitchen towels. Just ask Phil… Come to think of it, I don’t own any white spoons, but if I did, they would never be allowed near a tomato, a beet, or a raspberry.  Apart from keeping her kitchen pristine, Anna is a busy bee, and focuses on recipes that are easy to bring to the table and also delicious. Pretty much the way I cook most of the time.  I bookmarked A LOT of recipes from her site, including her Slow Cooker Mac and Cheese,  her Apple Bread with Pecans and Dried Cranberries (wow!), her Rum Raisin Ice Cream (I absolutely must make this when the weather is right), her Snickerdoodle Bars (because anything Snickerdoodle makes my heart miss a beat), and her Crockpot Beef Carnitas Tacos (if you did not guess yet, the Bewitching Kitchen recently welcomed a slow cooker).  But, in the end I could not stop thinking about her Overnight Coffee Cake, perfect for making departmental colleagues happy!

And now that the Reveal Day took place, can you believe that Anna got my blog? So we pretty much exchanged sites this month!  She picked a favorite recipe of mine, and composed a wonderful write up!  Check it out here… Thank YOU, Anna!

baked
OVERNIGHT COFFEE CAKE
(from Bcmom’s Kitchen)

for cake:
2/3 cup butter
1/2 cup white sugar
1/2 cup brown sugar
2 eggs
1 cup buttermilk
2 cups flour
1 tsp. baking powder
1 tsp. baking soda
1 tsp. cinnamon
1/2 tsp. salt

for topping:
2 bananas, sliced
1/2 cup brown sugar
1/2 cup chopped nuts
1/2 tsp. cinnamon
1/4 tsp. nutmeg

Cream butter and sugars until light and fluffy. Add eggs, one at a time, beating well. Stir in buttermilk. Mix flour, baking powder, baking soda, cinnamon and salt. Stir into butter/sugar mixture and mix well.

Spread batter into greased 13×9″ pan. Mix all ingredients for topping and reserve. Spread the slices of bananas over the batter, and sprinkle the topping all over the surface. Refrigerate overnight or for at least 8 hours.

Bake at 350° for 45-50 minutes, until a toothpick inserted near the middle comes out clean.

ENJOY!

to print the recipe, click here

compositecoffeecake


Here is what Anna had to say about the cake:

 I’ve been making this coffee cake for a long time.  It’s so convenient – mix it up the day or night before, refrigerate it overnight, and bake it in the morning.  Warm fresh-baked coffee cake for breakfast or brunch.  What could be better than that?

Well, I sign below. And of course, her improvement to the basic by adding bananas on top was a strike of genius… As usual, this type of goodie is not easy to take a picture, but trust me, the taste is out of this world delicious!  The bananas pretty much melt on top, forming a gooey entity with the sugar, but then the nuts add that pleasant crunch and next thing you know, the universe is smiling at you…  What better way to start the day?

pieces


This cake is a perfect complement to a cup of coffee or tea, either one will do. Our colleagues seemed to love it, as only crumbs were left over the platter when I went back to the mail room around 10am that morning. It always gives me a wonderful feeling when that happens… a sort of “sweet mission accomplished.”

Anna, I loved to “meet” you through SRC this month, and hope you had a lot of fun stalking your assigned blog too. For those interested in what my fellow secreters cooked up, please click on the blue frog at the end of this post, and have a blast!

closeup

The corner piece with the extra crunch on the sides… irresistible!

ONE YEAR AGO: Zucchisagna: A Twist on a Classic

TWO YEARS AGO: Night and Day

THREE YEARS AGO: Farro Salad with Roasted Leeks

FOUR YEARS AGO: Watercress Salad

FIVE YEARS AGO: Carrot and Sweet Potato Puree’

SIX YEARS AGO: Croissants: Paris at home on a special day

SECRET RECIPE CLUB: SUNDAY GRAVY WITH BRACIOLE

New Year, New Life, New Secret Recipe Group!

Those who follow my blog might be used to my Secret Recipe Club participation on the fourth Monday of each month. However, I’ve been a member for so long that it seemed like a good idea to move to a new group in the club. So, I switched to Group A, and my SRC posts will fall instead on the first Monday of each month.  Of course it is a bit sad to leave the comfort of my old group, where so many ties were made, but I know they won’t be broken. Actually, if I may share something special, take a look at this post written by our wonderful moderator, Sarah Ellis. What a nice surprise it was! She does that type of Gold Member post on a regular basis, but it was my first time in her spotlight… Felt great!

Obviously, I was anxious to get my first assignment of the year, and was overjoyed when I got the email. Why? Because I was assigned to Sid’s site, a blog I’ve been following for a long time, so it felt like the warmest possible welcome for me…  Sid has been blogging since June 2011 (see her first post here), although in fact she used to have another blog earlier, dedicated to pictures and crafts. Then she decided to start Sid Sea’s Palm Cooking to concentrate on food blogging. Well, I am thrilled she did it!  One of the things  I love the most about her site is her energy, upbeat mood, and wit. Every post gives me a big smile. Plus, she cooks amazing stuff all the time. Two features are quite interesting in her site, the “Tapas” and “Boat Club” posts, organized together in a page you can access here.  Those are monthly events she participates (in real life), and then shares with her readers. If you need inspiration for a tapas or cocktail type party, look no further! I had quite a few recipes selected as possibilities for this assignment like her Yorkshire puddings, her Sweet Potato Samosas, her Sweet and Sour Chicken Meatballs, her elegant Leek Pancakes, but ended up settling for the Sunday Gravy with Braciole because it seemed perfect for the weather: luscious, filling, very complex flavors.  Of course, brown food is not very camera-friendly, but it is fantastic for the taste buds. So there!

Braciole with Sunday Gravy


SUNDAY GRAVY WITH BRACIOLE
(slightly modified from Sid’s Sea Palm Cooking)

for Sunday Gravy:
1/4 cup olive oil
6 mild Italian Sausages, cut in thirds
1/2 large onion, finely chopped
2 cloves garlic, minced
1 (5 oz) can of tomato paste
1/2 cup dry red wine
3 (28 oz.) cans Italian Plum Tomatoes (San Marzano if possible)
2-3 Tbsp. of equal parts of dried basil, thyme, sage and oregano
1/4 cup rye whiskey (optional, I used regular whiskey)
 .
for Braciole: 
4 slices of round steak 1/2 inch thick pounded to about 1/4 inch thick
4 slices of bacon
2 tbsp chopped parsley
2 tbsp bread crumbs
1 clove finely minced garlic
salt and pepper to taste.
olive oil for browning
.
Make the gravy: Heat olive oil in a heavy-bottomed 6 quart pot, preferably non-stick, brown sausages on all sides.  Add onion and garlic and saute until just soft.    Don’t burn the garlic.   Stir in tomato paste and cook gently 15 minutes being careful not to burn or have mixture stick to pot. Deglaze pot with the red wine and reduce out alcohol.Process in blender the tomatoes with their liquid until slightly chunky and puree like.   Add tomatoes to the pot and bring to a simmer.    Stir in seasonings and herbs.  Adjust to taste, especially the salt.  Add whiskey if using. This will cut acidity and make a slightly sweeter sauce.  Simmer partially covered for about 3 hours, stirring occasionally. Sauce can be made in advance.
.
Make the braciole: Mix the parsley, bread crumbs, cheese, garlic, salt and pepper in a small bowl. Lay 1 strip bacon on each braciole, sprinkle cheese mixture evenly over braciole, roll up and tie securely with string.   Heat oil in skillet and brown meat evenly on all sides.   Transfer to the simmering ‘gravy’ and cook at least 2 hours.
.
My modification: I simmered the gravy for 2.5 hours.  Used 1/3 of it to cook the braciole under pressure for 35 minutes, after browning them. Froze the leftover gravy for later, in two portions.  Sprinkled grated Parmesan cheese over the braciole when serving.
 .
ENJOY!
to print the recipe, click here

braciolecomposite

Comments: I’ve always wanted to make Sunday Gravy. The name promises something delicious, don’t you think? Something that cooks slowly for hours… But, I confess I messed it up really bad. Sorry, Sid, I did. I made it on a Saturday. I know, I know, what was I thinking?

Apart from that, I followed the recipe to a T, and loved the outcome! The change in the sauce as it simmered down for 3 hours was a pleasure to witness. I made the gravy on Saturday, saved it in the fridge, removed the congealed fat from the surface on Sunday, and made the braciole that afternoon. Most important step? Browning them well before simmering with the sauce. A process that should not be rushed, allow the browning to take place and it will reward you with amazing flavor later. I promise.

braciole3


Another small change I made was to cook the braciole in the pressure cooker. I had the gravy ready, so after browning the little rolls of meat I transferred them to the pressure cooker, added the sauce and cooked under pressure for 35 minutes. After cooking I tasted the sauce and adjusted seasoning just lightly with a bit of salt and pepper.

There you have it, a fantastic meal, meat falling apart tender, a sauce that tastes almost sweet from the long simmering. Comfort food, all the way…

Braciole with Gravy Served


I enjoyed it with some spaghetti squash, but of course you can go the more authentic route of polenta, mashed potatoes, pasta, risotto…  I prefer to balance a heavy dish with a lighter side. Do what feels right for you.

closeup

Dinner is served! You won’t even need a knife….


Sid, I had a great time stalking your site, it was a thrill to get your blog as my first assignment with the new group… I hope you had as much fun as I did this month!
To see what my new friends cooked up this month, click on the blue frog at the end of this post.


ONE YEAR AGO: In My Kitchen, February 2015

TWO YEARS AGO: Avocado and Orange Salad with Charred Jalapeno Dressing

THREE YEARS AGO: Green Olive, Walnuts and Pomegranate Salad

FOUR YEARS AGO: Romanian Flatbreads

FIVE YEARS AGO: Ziti with Artichokes and Meyer Lemon Sauce

SIX YEARS AGO: Blasted Broccoli, Stove-top version