BANANA LAYER CAKE WITH MERINGUE ICING

If you need a festive cake that is not that hard to make (trust me, as a former cake-o-phobe, I know what I’m talking about), look no further. Inspiration came from several sources: cake from one cookbook, icing from another, filling from my own imagination, based on my Mom’s “doce de banana”. It was one of the very few sweets she made regularly, as both my Dad and I were crazy about it. I had to control myself not to say we went bananas for it. There, I just said it. Good memories.

BANANA LAYER CAKE WITH MERINGUE ICING
(adapted from Sprinklebakes)

for the cake:
113 g butter, softened (1 stick)
350 g sugar
3 eggs at room temperature
1 tsp vanilla paste
270 g all-purpose flour
3 + 1/2 tsp baking powder
1/2 tsp salt
1 + 1/4 cup milk, at room temperature (about 290 g)
for the frosting:
150 g sugar
2 tablespoons all-purpose flour
1 egg
1 egg yolk
1 cup milk (230 g)
1 tsp vanilla paste
1/4 pound butter (1 stick), softened
2 Tablespoons icing sugar
for the filling:
4 medium bananas, cut into slices
2 Tablespoons butter
1/4 cup brown sugar
1/4 cup whipping cream
pinch of salt
2 bananas, sliced, sprinkled with lemon juice
for the frosting:
3 cups granulated sugar
1 cup egg whites

Make the cake. Heat oven to 350 F. Grease the center and perimeter of three 8 inch round cake pans and line the bottom with parchment paper. Grease the center of the paper.  In the bowl of an electric mixer, cream the butter and sugar, add the eggs, one at a time, and the vanilla paste, beat until combined.

In a large bowl, sift the flour, baking powder, and salt. Add to the mixer in three additions, alternating with the milk, beginning and ending with the flour. Beat on high-speed for 3 minutes, cleaning the bowl midway through.  Divide the batter in the three pans, bake for 30 to 35 minutes, until a toothpick comes out clean when inserted in the center of the cake. After the cakes cool in the pan for 10 minutes, invert them on a rack and allow them to completely cool.

Make the custard frosting. Mix the sugar and flour inside a saucepan. Add the egg and egg yolk, whisk vigorously. Add the  milk and vanilla and mix very well. Heat gently over medium-low heat until the mixture boils and thickens. The goal is to have the consistency of pudding. Let it cool completely.

Beat the butter and icing sugar in an electric mixer using a wire whisk. When they are very well combined and creamy, add the cooled custard prepared before. Beat on high-speed for 7 minutes, until it thickens.

Make the filling. Melt the butter in a large non-stick skillet, add the brown sugar and cook until it starts to dissolve. Add the slices of banana, the heavy cream, and cook everything together until the bananas start to get golden brown and the cream thickens slightly.  Cool and reserve.

Assemble the cake.  Toss the fresh slices of banana with lemon juice and reserve in a small bowl. Place one cake layer over a cake stand, and spread with a very thin layer of custard frosting. Add half the caramelized bananas, and half the fresh banana slices. Set the second cake layer on top. Add a thing layer of custard, and the remaining of bananas, caramelized and fresh. Top with the final cake layer, bottom side up.

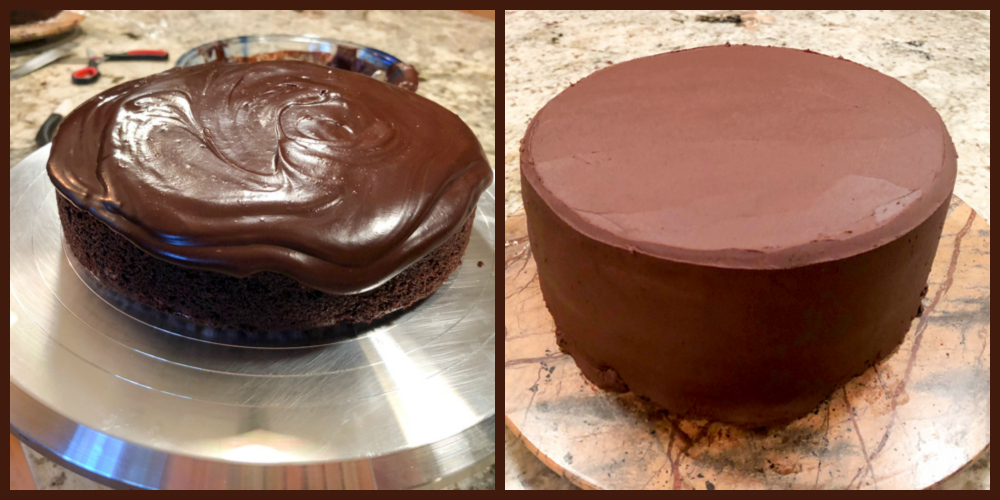
Coat the whole cake with frosting, make it a thin layer, no need to worry about covering the surface, because the meringue icing will take care of that.  Keep in the fridge until frosting, for at least a couple of hours.

Make the meringue icing. In the bowl of an electric mixer, mix the egg whites with the sugar and place over a pan with simmering water. Heat until the sugar is fully dissolved and the mixture feels warm to the touch. Immediately hook the bowl to the mixer and beat in high-speed until stiff peak forms.  Remove the cake from the fridge and add a thick coating of the meringue frosting. You can then add all sorts of swirls and spikes to the surface, using either your bare fingers (a bit messy), or the back of a spoon. Have fun with it.  Torch the surface to give a nice effect all over. Don’t burn  it to the point it gets black, because then the sugar will taste bitter.

Slice and serve!

ENJOY!

to print the recipe, click here

Comments: I have four tips for you when it comes to cake baking.

Tip #1: Get that mis-en-place going. When you measure all the ingredients and lay them up spatially in the order they will be used, your life will be a lot easier. And the probability that you will forget the melted butter in the final stage of genoise preparation will be considerably reduced.

Tip #2: Have all ingredients at room temperature, eggs, milk, oils, butter. They incorporate better that way, and you will have a smoother batter. You can soak eggs in warm water for 5 minutes in case you forgot to remove them from the fridge.

Tip #3: Sift the leavening agent with other dry ingredients. This will disperse the powder (baking soda, baking powder) uniformly, ensuring that your cake will rise evenly.

Tip #4: For cake layers that are perfectly leveled, spray or coat just the center of the pan with your greasing agent of choice (Pam, butter), and a light coat on the sides. Amazing how well that works. If you look at the composite picture, I included a shot of one of the cakes when I just inverted it out of the baking pan. No trimming was needed in any of the three cake layers. I cannot take credit for this baking tip, it’s something I saw over at Pastries Like a Pro and have been using for a long time now. Always works. Thank you, Helen!

Some bakers recommend those Wilton bands that go around the cake pan to ensure even baking. I’ve tried them, and found that the cake ended up with a sort of “steamed” quality I did not care for. Maybe that could be fixed with a slightly longer bake, but to me nothing beats the trick of greasing just the center of the pan. It’s so much easier than messing with those bands soaked in water.

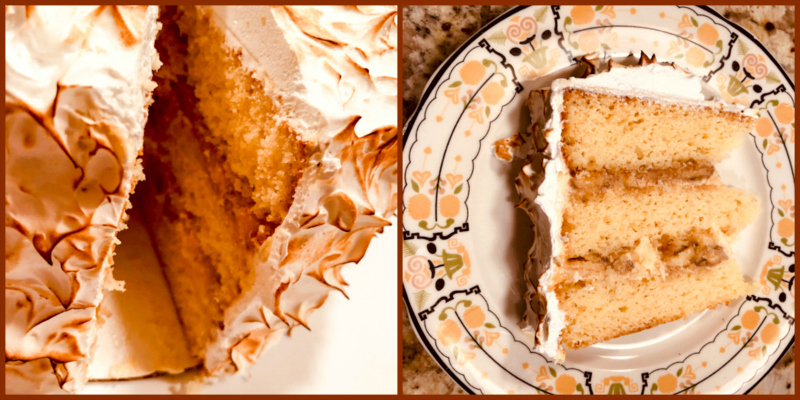
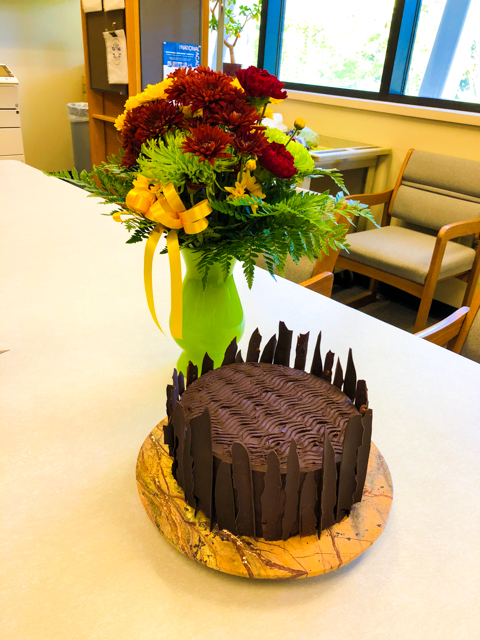
This is a big, hearty cake, a small slice will be enough, but you will be tempted to go back for another little sliver. The contrast of caramelized bananas with a few bites of fresh fruit made the cake even more flavorful and cut through the sweetness of the filling.  For the future, I would reduce the amount of icing (maybe start with 3/4 cup of egg whites and decrease the sugar proportionally), as it made way too much.  It was a recipe from Fine Cooking and they said it would be enough to cover one 9-inch round cake. In my opinion, that amount would be enough to cover two of those with some to spare and flick at drooling dogs standing nearby.

I made the cake on Sunday but added the frosting Monday morning just before taking it to the department. I don’t think meringue icing holds up very well and was afraid it would be compromised after a night in the fridge.  It was a ton of fun to torch it, maybe next time we should try to make a video.  Everybody loved this cake, even though it was massive, it was gone before 11am. I call that a successful Mondays with Sweetness deal!

ONE YEAR AGO: Mini-Frittatas with Broccoli and Cheese

TWO YEARS AGO: Pumpkin Brownies with Cream Cheese Frosting

THREE YEARS AGO: Anne Burrell’s Focaccia

FOUR YEARS AGO: Double Chocolate and Mint Cookies

FIVE YEARS AGO: Cappuccino Panna Cotta

SIX YEARS AGO: Chicken Parmigiana, the Thriller

SEVEN YEARS AGO: Wild Mushroom Risotto

EIGHT YEARS AGO: Tartine Bread:  Basic Country Loaf 

NINE YEARS AGO:  Pugliese Bread


WHITE CHOCOLATE MINI-MOUSSE WITH SUGARED CRANBERRIES

Sometimes dessert seems excessive after a hearty meal. But then again, who would think of skipping dessert on a special occasion like Thanksgiving and all those end of the year festivities? If you face such gastronomic conundrum, I am here to help you out. These cute little morsels of mousse are about 2 tablespoons each. Topped with a single cranberry, they are easy to make, festive, and as far as dessert is concerned, pretty light. That is if you don’t inhale four of them…

WHITE CHOCOLATE MINI-MOUSSE WITH SUGARED CRANBERRIES
(inspired by several sources)

makes about 10 small portions, served in ramekins like these

4 oz white chocolate, chopped
1/4 cup whole milk
1 T light corn syrup
1/2 cup heavy cream
fresh cranberries (about 1/2 cup)
1 cup sugar, divided
1/2 cup water

The day before, prepare the cranberries. Mix 1/2 cup water with 1/2 cup granulated sugar, boil for a couple of minutes until sugar is fully dissolved. Reserve at room temperature, let it cool for 5 to 10 minutes.  Add the syrup to a bowl and dump the fresh cranberries into it, mix to coat the surface with the syrup. Place in the fridge overnight. Next day, drain the syrup, and add to the cranberries 1/2 cup granulated sugar. Coat them well, then place over kitchen paper to dry for 2 hours. They will be ready to decorate the dessert then.

Make the mousse. Melt the chocolate with the milk in the microwave or in a double boiler over gently simmering water. Add the corn syrup and mix well.  Let it cool slightly while you prepare the cream. Whip the heavy cream until it reaches the consistency of melted ice cream. Add to the chocolate base in three portions, mixing well but gently, you don’t want to deflate the mousse.

Add small portions to very small ramekins and cool for 6 hours in the fridge. Top with the sugared cranberry, and sprinkles of your choice.  Serve straight from the fridge.

ENJOY!

to print the recipe, click here

Comments: These adorable baby-mousses deliver the perfect amount of sweetness when a slice of pie, cake, or even a piece of brownie might seem like overkill. Of course, you could make a regular portion if you prefer.  Instead of 10 individual tiny amounts, make 4 portions for indulging with abandon. What I love about this recipe, apart from its simplicity, is that it uses exactly one bar of Lindt white chocolate. Open it, dice it, you are done. No need to get your scale or anything.

Now, if you want to serve bigger portions, it might be a good idea to add a bit of gelatin. White chocolate does not hold as well as dark. In a very small ramekin it wont’ be a problem, but when scaling up, it’s probably better to ensure some additional structure by incorporating gelatin. I suggest 1/2 tsp for the 4 oz of chocolate, blooming it in some of the milk, then heating it very very gently before adding to the melted chocolate. Proceed with the recipe as described.

I used two kinds of sprinkles with a Christmas feel that went well with the cranberries. Different toppings and sprinkles would be a lot of fun to try to. A dark chocolate mousse with toasted hazelnuts and golden sprinkles? White mousse with silver sparkling sugar, a fresh blueberry surrounded by purple nonpareils? Or how about getting your hands on some Ruby chocolate? I need that in my life. I really do. If you haven’t heard about it, google Caillebaut Ruby. And dream, my friend, dream…

Ruby, dark, white… it does not matter to me. I want them all…

ONE YEAR AGO: You Say Ebelskiver, I say Falafel

TWO YEARS AGO: Happy Thanksgiving!

THREE YEARS AGO: Two Takes on Raspberries

FOUR YEARS AGO: Spice Cake with Blackberry Puree & The Global Pastry Review

FIVE YEARS AGO: Own Your Kitchen with Cappuccino Panna Cotta

SIX YEARS AGO: Chicken Parmigiana, the Thriller

SEVEN YEARS AGO: Wild Mushroom Risotto

EIGHT YEARS AGO: Tartine Bread:  Basic Country Loaf 

NINE YEARS AGO:  Pugliese Bread

COFFEE-CARAMEL ENTREMET CAKE

I don’t know what happened to the cake-o-phobe that used to live inside me. Creaming sugar with butter was a phrase that inflicted pure terror. Genoise-baking and torture seemed like stuff cut from the same cloth. Nowadays, there is nothing I enjoy more than baking entremet type cakes, which can be a bit intimidating. So many things can go wrong, and often do, especially when you are trying to learn by yourself, with the help of cookbooks, videos, and great virtual friends with endless patience (thank you, you know who you are).  My most recent adventure coupled entremet and mirror glaze. Mirror mirror on the wall? No, thanks. I’d rather have it on the cake!

COFFEE-CARAMEL ENTREMET CAKE
(adapted from Keren’s Kitchen)

for the sable biscuit:
75 g unsalted butter, room temp
75 g dark brown sugar
¼ tsp salt
1/2 tsp instant coffee
2 egg yolks
100 g flour
100 g finely ground hazelnuts
6 g baking powder

for the ganache layer:
75 g dark chocolate (70%)
12 g unsalted butter
6 g honey
1 tsp vanilla extract
72 g heavy cream

for the caramel mousse:
7 g gelatine
37 ml water
150 g sugar
52 g glucose or corn syrup
67 ml water
¼ tsp salt
190 g  + 375 g heavy cream
2 egg yolks

for the mirror glaze (adapted from Phil’s Home Kitchen):
2½ sheets (4g) of Platinum grade sheet gelatine
120ml water
150 g liquid glucose
150 g granulated or caster sugar
100 g condensed milk
150 g white chocolate, chopped fairly small
gel food colouring
1 tsp coffee extract

Make the sable biscuit component. Heat oven to 350 °F and line a baking pan with parchment paper. In your stand mixer with beater attachment, beat together butter, sugar, salt and instant coffee. Mix until smooth. Add yolk and mix until combined. Then add flour, ground hazelnut and baking powder. mix until just incorporated. Divide the dough roughly in two pieces and roll each into a 3mm thick layer that you will cut as a circle, 5.5 inches in diameter. 

Transfer the dough to a baking dish lined with parchment paper and bake for 10 to 15 minutes. While still warm, cut two 5.5 inch circles. Set the circles aside. Enjoy the trimmings, or save them for other uses (great crumbled on yogurt).   

Chop the chocolate into small pieces and place in a bowl. Warm the cream in a small saucepan, until bubbles appear on edge of the surface. Pour over the chocolate, and let sit for 5 minutes. Combine the honey and butter and heat in the microwave until just melted. Mix to combine and set aside. Using a spatula, mix the chocolate in circular motion, then, add the melted butter and honey and mix to combine. 

Let the ganache cool to room temperature until it’s quite thick, then add a layer to each reserved sable cookie.  Refrigerate for 2 hours minimum.

Make the mousse. In a small bowl, mix gelatine and water (37ml) together and leave for 5 to 10 minutes until set. Meanwhile, in a sauce pan, mix together sugar, glucose (or corn syrup), water (67ml) and salt. Cook on medium high heat until you achieve a caramel syrup with deep amber color. Do not allow it to smoke or burn. Meanwhile, in another sauce pan, slightly the heat the 190 grams heavy cream, so when the caramel is done you can pour the cream right away. Carefully pour it in and mix well until fully combined 

In another bowl, whisk the egg yolks. Then add a third of the caramel to the beaten yolks and beat quickly together to temper the yolks. Pour the mixture back into the caramel and stir well to combine. Continue stirring until it reaches 180-182 °F. Heat the gelatine in the microwave for 20 seconds until melted (do not boil it, if needed reduce the power of your microwave to 70% or so) and mix into the caramel cream. Pass the cream through a fine mesh strainer, and set it aside to cool to 113 F (about 45 C).  When cooled, whisk the remaining heavy cream (375 g) into a stable, yet soft consistency (like yogurt). Then fold it in two additions into the caramel cream, until well combined. 

Assembling the cake. Set the bottom part of your Silikomart mold (white part) on a baking dish that will fit in your freezer.  Pour a third of the mousse into the Silikomart mold and tap it on the table to level the surface and destroy large air bubbles. Carefully insert one of the cookies right in the middle, with chocolate side facing down. Add the upper part of your Silikomart mold and make sure it’s locked in place.  Add the rest of the mousse on top of that, but reserve some to fill in the sides and top. Place the second cookie, chocolate side down on the top and pipe the remaining mousse around the edges. Use a small spatula to secure the cream on top. Freeze overnight.

Make the mirror glaze. Put the water, sugar and liquid glucose in a small pan and bring to simmering point, stirring occasionally to dissolve the sugar. Remove from the heat and let it stand for about 5 minutes. This is the base syrup for the glaze.  Meanwhile, soak the gelatine in some cold water for about 5 minutes. Squeeze out the excess water and stir into the hot water, sugar and liquid glucose mixture to dissolve. Stir in the condensed milk and the coffee extract.

Put the chocolate in a medium bowl and pour this hot mixture slowly over the chocolate, stirring gently to melt it, avoid making bubbles. A stick immersion blender works great, but you must keep the blades fully submerged at all times. If bubbles are present, pass the mixture through a fine sieve.

Leave the glaze uncovered for an hour at room temperature for the glaze to cooled and be slightly thickened: if it is too runny you will get too thin a layer on top, colours will not blend well and less glaze will cling to the sides of the cake. The ideal temperature to pour the glaze is 92 to 94 F. Once it is slightly above that (around 97 F), remove a small portion and add dark brown gel color to it, mixing well. Pour the un-dyed portion in a large measuring glass with a spout, add the dark brown mixture to it, mix with a chopstick just barely.  Make sure it is at the correct pouring temperature. Remove the cake from the freezer, place on a rack over a baking sheet. If you like to make it easier to save leftover glaze, cover the baking sheet with plastic wrap, so that you can lift it and pour easily into a container.

Take a deep breath, and pour the glaze in a circular motion, starting at the center, making sure it flows homogeneously on all sides. Tap the rack gently to settle the glaze, and very gently and quickly run an off-set spatula on top of the cake to force excess glaze to run down the sides. Do that just once, or you will ruin the marble effect. Drips under the cake can be cleaned with a spatula or sharp knife. Let the glaze set at room temperature for 15 minutes, then place the glazed cake in the fridge for 2 to 3 hours. Use a hot knife to cut slices without compromising the glaze.

Leftover glaze can be frozen and re-used. The colors will obviously mix together, so you wont’ be able to repeat a similar marble pattern.

ENJOY!

to print the recipe, click here

Comments: At the risk of getting some serious hate mail, I must tell you that entremets seem a lot harder to make than they are.  Can you bake a cookie? Can you make a mousse? Well, that’s all you need to make this entremet in particular. The components are simple, most can be made in advance, then it’s just a matter of putting it all together, paying attention to a few details.

Let’s talk cookie base: In her recipe, Keren baked a single round sable cookie and sliced it in the middle, to form two layers. That in itself proves that she is a much MUCH more skilled baker than I am. That was simply not happening in the Bewitching Kitchen. Between you and me, confession: I did try it. It was a disaster, and I had to start all over and use a more straightforward method, baking two independent sables. When I do it again, I will make the cookies slightly thinner, for a cake with a higher proportion of mousse. The fact that the cookie dough takes a bit of baking powder makes them puff a little bit, so rolling the dough to about 3mm thickness should be perfect. You will end up with a bit more scraps of cookie dough left. They are great to nibble on, and even recalcitrant dogs will do amazing tricks for a little bite.

The mousse component: My biggest mistake until now was over-whipping the cream. Intuitively, I felt that beating the cream to a certain point (pretty well-formed peaks) was important to make sure the mousse would hold. Not the case. Watching the pros do it in videos was an eye-opening experience. The cream is whipped to the point of “melted ice cream” and that’s it. If you over-beat it, it affects the final structure once frozen and you might have some cracks and problems when un-molding the cake. Plus, the mouthfeel will be compromised, a perfect mousse texture needs the cream to be whipped just to that stage. Live and learn.

The Silikomart Eclipse Mold: I think it’s a great investment (and for 9 bucks, not at all bad) if you want to take your dessert-making up a notch. It is pretty straightforward to use. Keep in mind you will always be assembling the cake upside down, so what’s at the bottom of the mold ends up on top. There is a solid, white base, you fill it almost to the top with your layers of mousse, cake, biscuit, then place the top part over it. Then the final bits of mousse and a solid base will be added (although you can do a mousse-only concoction). The main thing to keep in mind is to make sure your mousse does not have air pockets near the surface that touches the mold. Go with the back of a spoon and delicately make sure to push the mousse on the sides. Another thing to keep in mind, is that your first layer of biscuit or cake will float on the mousse at the bottom – you must be gentle not to push it too hard down, or it will show on the surface of the cake. And do your best to keep it leveled. These are small details, but each one will affect the end result. It’s not easy to end up with a perfect entremet like the pros do at the drop of a hat. But it’s a fun adventure to tackle. Link to amazon here (I am not affiliated, will make no money from your purchase).

The mirror glaze: I am absolutely in love with this technique, and should thank Philip from Phil’s Home Kitchen (former Baking Addict) for his detailed tutorial and fail-proof recipe. Mirror glazes rely on gelatin to set. Gelatin is a tricky ingredient because you must use the right amount. A little less and your glaze won’t set. A little more and it will have a very unpleasant, rubbery texture. You also need to use the right gelatin – they all have a particular “bloom number” which is a measure of its strength or gelling power. Bloom numbers vary on a range of 30 to 325. Powdered gelatin is usually around 200, and sheet gelatin like Platinum is around 235. Obviously, the higher the bloom number, the less gelatin you need. But most recipes will tell you exactly which one to use, and there is some flexibility. For instance, in most applications, 180 and 200 can be used interchangeably.

The glaze is so much fun to work with! Two details are very important, though. Minimize bubbles when mixing the glaze, and use it at the right temperature over a frozen, very smooth surface. Mousse cakes are the top choice, as they are smooth by nature. To minimize the bubbles, one trick is to pass the glaze through a sieve before using. You can do it several times, actually, each time the bubbles will be popped as they go through the sieve. And then, the fun begins, with the endless possibilities to use colors and patterns.  I used a two color glaze, most of it kept without any dye (the color was given by the coffee extract only) and a very small amount I colored dark brown with Americolor gel. Then I simply poured both in the same container, barely mixed them, and poured. It is magical… I am fully mesmerized by the process. Be prepared for additional mirrors showing up in the future.  No, not on the wall…

What really matters in a cake is the taste, and I must say this one delivered big time! I was a bit worried about the coffee extract in the glaze, because those ingredients can have a pretty artificial taste. However, I did not want to mess too much with the formula, adding real coffee to it in a larger volume. I was pleasantly surprised by the result, though. Perfectly balanced, not a hint of artificial taste to it.

As you can see, it all worked reasonably well inside the Eclipse mold. My only issue is the thickness of the sable layer. Ideally, I would like to have it maybe 3/4 of that size, so that it would be more harmonious with the ganache layer and also the cake would slice better. Keep in mind that the mousse is delicate, so if you need to use too much force to cut the slice (because your biscuit layer is too thick or too hard), the whole structure will suffer. I think my favorite part of the cake was the caramel mousse. Once glazed, the cake must sit in the fridge for about 3 hours before serving. Yes, it is a labor of love, but without love, what’s the point?

ONE YEAR AGO: Fennel Soup with Almond-Mint Topping

TWO YEARS AGO: Eataly

THREE YEARS AGO: Spaghetti Squash Perfection

FOUR YEARS AGO: Skinny Eggplant Parmigiana

FIVE YEARS AGO: Supernova Meets Wok

SIX YEARS AGO500 Posts and The Best Thing I ever made

SEVEN YEARS AGO: Back in Los Angeles

EIGHT YEARS AGO: White House Macaroni and Cheese

NINE YEARS AGO: Korean-Style Pork with Asian Slaw


SaveSave

SaveSave

SaveSave

SaveSave

SaveSave

SaveSave

SaveSave

SaveSave

SaveSave

SaveSave

SaveSave

SaveSave

SaveSave

SaveSave

SaveSave

SaveSave

SaveSave

SaveSave

SaveSave

SaveSave

SaveSave

SaveSave

SaveSaveSaveSave

SaveSave

SaveSave

DEVIL WEARS CHOCOLATE (AND A COOKBOOK REVIEW)

Back in 2006-2007 I used to follow a food blog called Cafe Fernando. The absolute majority of food bloggers are female, so I’ve always been fascinated by men who food blog. And you cannot get more fascinating than Cenk Sönmezsoy, from far away, exotic Istanbul. He is a fantastic baker, very talented, and comes across like a super nice human being. For one reason or another, I lost track of his blog. I think in those days I did not subscribe to anything, just had some sites bookmarked and whenever the craving for novelty hit me, I would browse a few blogs. Fast forward to 2017, amazon.com hit me with a suggestion for a cookbook. You know, “based on your purchases, we think you might also like this.”  That’s how the cookbook The Artful Baker jumped into my virtual basket. Only after I bought it, it hit me. Cenk was THAT Cenk, the blogger from my past, who – much to my surprise – is still food blogging today, 12 years later! I share with you today a recipe from his cookbook, in fact it is the cake he chose for the cover. A complete dream for the chocolate lover!

DEVIL WEARS CHOCOLATE

This recipe is a re-make of one Cenk’s recipes, in which he coupled chocolate cake with a Biscoff filling. You know, Biscoff, that spread that makes angels sing and have naughty thoughts. Cenk decided he could improve on it, because the devil should in fact wear chocolate head to toe. Who am I to disagree? It makes perfect sense. So, instead of Biscoff, or fancy pralines, he coupled chocolate ganache with… water!  Yes, you read it right. He makes a water-chocolate-ganache, because it allows the full flavor of chocolate to hit you in full force, no distractions. I tell you one thing: it works.

Recipe Overview

His chocolate cake uses the creaming method, butter and sugar together as the basis for the cake. Then, eggs are beaten into it. To that, a suspension of cocoa powder in boiling water and yogurt is added alternating with flour and leavening agents.

For the ganache, chocolate, sugar, cocoa powder and salt, are first combined with boiling water, only after fully dissolved, some butter and heavy cream are added to the mixture, that then sits in the fridge for one hour for perfect spreading consistency.

Why am I not giving you the full recipe? Cenk was a total sweetheart when I got in touch with him and asked for some advice on the decoration of the cake. I told him I wanted to blog about it, and he said he would be honored if I did so. But, I just don’t feel it’s right to share the very recipe that is on the cover of his book, so I prefer to publish a brief overview. As a teaser, I will show you how the chocolate shards are done, such a cool method! No tempering of chocolate involved, which makes it doable by common mortals. In fact, tempered chocolate will not work for this design, it does not break the proper way for the effect.

You simply spread the right amount of melted chocolate on parchment paper (dimensions recommended by Cenk to get the right thickness), place another parchment on top, smooth it well, and roll it. Cool it completely in the fridge. Unroll, which breaks in the chocolate into nice, curved shards. And that is all it takes.

It is basically the coolest thing you can do on a Sunday afternoon. I made a double batch to make sure I would have enough big shards to decorate my cake. They can be saved in the fridge or even frozen, and any leftovers used to decorate cupcakes, enjoy over ice cream, or sneak a bite or two as Netflix entertains you through the evening.

The filling/frosting is shiny and creamy at first, once you frost the cake it gets a more dull appearance. It is the most chocolate-y frosting you will ever taste. Basically, this is a cake for choco-holics at peace with their affliction.  Cenk offers an alternative idea for decorating the cake, in case making the shards seems like too much work. Just make a double batch of the water-ganache and frost the cake with a thicker layer, making designs with the back of a spoon.  Simple and elegant. Now, for some confession. I messed up the top of the cake a little bit. First I was going to do the same that Cenk did for his in the book: adding little bits of shards all over the surface. But, as I started to do so, I just did not care for the way it looked. So I stopped, removed the choc bits, and went with a wavy fork design.  The only problem is that I had already compromised the surface a little bit by inserting the pieces of chocolate and the fork design did not go as smoothly as it should have. I considered a little hairdryer action, but I already had the shards placed around the cake. No major harm done, but another little lesson learned. I go through them often (sigh).

The cake was served for our department colleagues, in a farewell party for two wonderful staff members.

And now, allow me to show you why you need The Artful Baker in your bookshelf… I will walk you through the different chapters.

Cookies… Not sure how to break this for you. I’ve never had a cookbook in which every single recipe of a chapter appeals to me. This was it. Every. Single. One. He opens the chapter with Cenk’s House Cookies, a recipe that was born out of a kitchen problem with his food processor. You know a baker is great when boo-boos turn into culinary masterpieces.  Then he proceeds to temp you with all sorts of amazing delicacies:  Vanilla Bean Meltaways (his version of the Turkish un kurabiyesi), Pistachio and Matcha Sables, Lime and Ginger Cookies (with good advice on zesting citrus), Hazelnut and Caramel Cookies (OMG), Macarons… macarons so exotic they left me dreaming. The one that made my heart stop used kaymak in the filling. Many years ago, 1986 to be precise, I happened to travel to Yugoslavia and one morning, in the island of Krk, I had kaymak for the first time. Unforgettable. One of those perfect gastronomic moments. Of course, it is impossible to find in the US, and he suggests mascarpone as an alternative. Still, it’s nice to see he designed a macaron with kaymak in mind. Cocoa and Chestnut Macarons, Sour Cherry and White Chocolate Macarons, Chocolate and Lavender Macarons… I am in love.

Brownies… Have you heard of leblebi? Probably not. Intriguing ingredient. He uses that in a brownie that is, simply put, drool-inducing. But nothing beats his “Brownie Wears Lace.”  I so wish I could try it, but my artistic skills are definitely not up to that challenge, just looking at the design my hand starts to shake. I will share a picture of this beauty since it’s in his blog anyway.

Have you ever seen a more beautiful brownie in your life? I swear, I cannot stop staring and dreaming…

Cakes, Muffins, Cheesecakes and Meringues… There are 21 recipes in this chapter. Honestly, I have a hard time deciding which could be my top five to share. The three madeleines call my name loudly: Sakura, Lemon Verbena, and Lavender. Three flavors I adore.  The cake featured in this post comes from this chapter too, Devil Wears Chocolate. Matcha and Pistachio No-Bake Cheesecake and Monte Bianco would probably be the other favorites. Just an amazing collection of goodies. In this chapter he also writes about his first day in San Francisco. I will never forget my first day in California, when I landed also in San Francisco and then went to my first home away from home, in Mountain View. Life changing experiences.

Tarts, Galettes, Pie, Quiche, Cobbler & Crumble…  Blanche is a fruit tart that opens the chapter. It is a masterpiece. It seems almost doable, because his instructions are so detailed, but I am not sure I’m ready to face it quite yet. My experience with tarts and pies is a bit limited.  Chocolate and Salted Caramel Tart (seems like every nice cookbook has one, but his version as usual, takes it a step higher). Peel-to-Stem Apple Pie has a very interesting ingredient that totally changes the game in terms of texture. Just like the Devil Wears Chocolate Cake, this pie maximizes the apple component. I need to give it a try. Lemon Meringue Tarts and Fig, Thyme & Blue Cheese Galette make my personal favorite list too.

Breads and Pastries… Another total winner of a chapter. Have you heard of Simis? They are Turkish breads shaped as a ring and encrusted with sesame seeds. I need them in my life.  Whole-Wheat and Kefir Pullman Loaf, Croissants & Pain au Chocolat, Profiteroles, Mocha Eclairs (so so cute).

Ice Creams, Frozen Yogurts, and Sorbets… I have to quote his opening paragraph: Ice cream is to me what water is to you. Your body weight is 60 percent water; mine is probably 60 percent ice cream. About 70 percent of the earth’s surface is covered with water; more than 70 percent of my tongue’s surface is regularly covered with ice cream.  When you take those words in account, you know you can trust his taste in the subject. He starts with Chocolate, moves to Three-Bean-Vanilla, and gets to Salted Caramel Ice Cream right away. But the Roasted Strawberry captured my imagination. Strawberry is a very tricky fruit to use in desserts in general, because it has such a big water content. His trick to roast the fruit makes sure the ice cream will deliver intense flavor.  Blackberry Swirl Frozen Yogurt makes this list also.

Confections and Drinks…  He shares recipes for caramels (like Passion Fruit Caramels!), Fernando Rocher (a labor of love, recipe he carefully crafted using home-made sour cherry liqueur),  Elderflower Syrup, Hot Chocolate, are all very tempting to try.

Jams and Jellies… Well, I have to admit I am not crazy for jams to try and make my own. But I know lots of cooks have a fascination for this type of endeavor. Those will be mesmerized by the chapter, that starts with detailed instruction to make your own apple pectin, apparently an ingredient that will take your jam-making experience to very high levels. But there are two recipes in the chapter I could happily try: Dulce de Leche and Cajeta

Base Recipes… Pretty much everything you need to pull any of the recipes in the book and also to design your own. It includes ingredients like Vanilla Wafer Crumbs, Cocoa Wafer Crumbs, Cinnamon and Ginger Wafer Crumbs, for those times in which you are ready to go the extra mile. Recipes for several kinds of pastry cream, and doughs (pies, tarts, pate a choux).

So, what’s so special about the book? Definitely the author behind it, and his commitment to making his recipes work in your own kitchen, no matter your baking comfort level. He skips no details, he carries no hidden cards up his sleeves. As I try to improve my baking skills and attempt more elaborate desserts, I notice how often quite reputable cookbooks have omissions (and even mistakes!) that can be fatal to the outcome. I won’t name names, I realize writing a flawless cookbook is a daunting task. But The Artful Baker is just that: flawless. And the talent (and humbleness) of Cenk is evident all the way through the book. I cannot recommend it highly enough. It is wonderful that he’s getting all the praise and recognition he deserves.

Cenk, thank you for a fantastic cookbook! I am so glad I reconnected with your blog…

ONE YEAR AGO: Slow-Cooker Pot Roast with Potatoes, Carrots, and Fennel

TWO YEARS AGO: The Best, the Very Best Hummus

THREE YEARS AGO: Cheddar Cheese Crackers

FOUR YEARS AGO: A New Take on Cauliflower Puree

FIVE YEARS AGO:
 In My (NEW!) Kitchen

SIX YEARS AGO:
 
The Lab Move and New Beginnings

SEVEN YEARS AGO:
 Honey-Oat Pain de Mie

EIGHT YEARS AGO:
 Carrot and Leek Soup

NINE YEARS AGO:
 Chicken Parmigiana 101


ON A HALLOWEEN ROLL

It’s the season of pumpkin and warm spices, of sweaters and scarves. This pumpkin cake roll would shine in any Halloween party, perhaps with a side of appropriately decorated macarons

PUMPKIN ROLL WITH HONEY CREAM CHEESE FILLING

Full recipe is available at Bluprint.

My modifications:

I used 1.5 teaspoons of a Speculoos spice mix (awesome stuff!) in place of cinnamon, ginger, and nutmeg.

I omitted the nuts on the topping, and just added colorful sprinkles.

To print the recipe, visit Bluprint.


Comments: This recipe was brilliantly demonstrated by Abby Dodge in her Craftsy class called “Beyond Grandma’s Cake Roll: One Pan, Six New Cakes.”  I loved it, and want to make every single concoction she shared, including pretty cool “wrapped cakes.”  Clever idea with very adorable results.  I know I sound like a broken record, but I am always happy with Craftsy baking classes, every single one has superb, often unexpected gems of wisdom.  In this particular case, Abby’s method to roll, unroll, and fill the cake is outstanding, I feel totally confident I can pull it (or maybe I should say roll it) without fear from now on. Of course, I shall regret these very words in the near future (sigh). Baking has this amazing way to throw you some curve balls.

I used speculoos spice mix, something I impulse-bought a while ago and cannot live without, the smell is amazing, it’s just that perfect combination of spices found in my very favorite cookie in the known universe. Yes, I know I could make my own mix, but there’s something sexy about that bottle, ready and waiting for me.

You can roll the cake in two different ways, from the long end you will end up with more slices and less roll. Perfect if you need to feed a crowd. But, if you are going for the most harmonious look when sliced, roll from the short end. Smaller cake, more roll.

The filling, a honey-cream cheese mixture, is absolutely delicious, goes perfectly well with the flavor of the cake. The icing is a white chocolate ganache, but you could serve the cake just with a light coating of powdered sugar, for a more austere look (and considerably less calories). It’s your kitchen, it’s your call… Roll the way you see fit (somebody stop me now).

Pumpkin Macarons

ONE YEAR AGO: Pumpkin Macarons

TWO YEARS AGO: Zucchini, Lemon & Walnut Cake

THREE YEARS AGO: Paleo Energy Bars

FOUR YEARS AGO: Pecan-Crusted Chicken with Honey Mustard Dressing

FIVE YEARS AGO: Mozzarella Stuffed Turkey Burgers

SIX YEARS AGO:  Cashew Chicken Lettuce Wraps

SEVEN YEARS AGO: Clay-pot Pork Roast

EIGHT YEARS AGO: Panmarino

NINE YEARS AGO: A Classic Roast Chicken