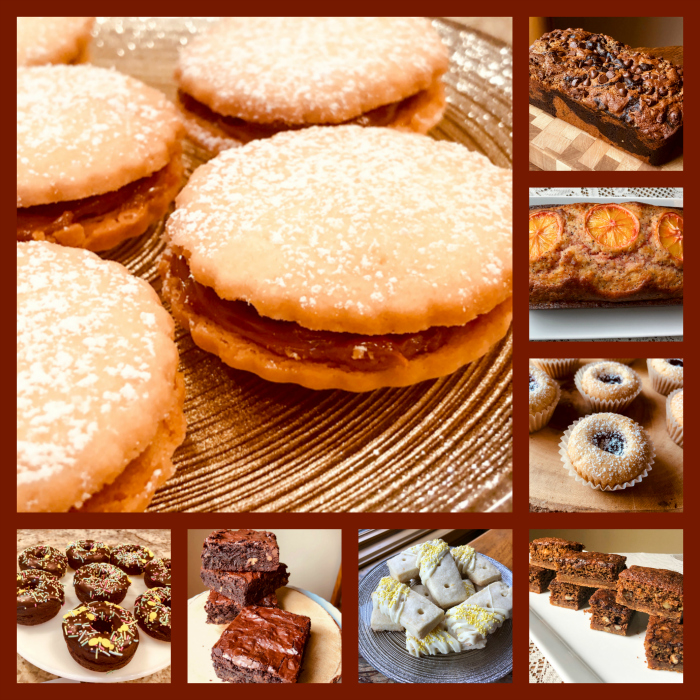
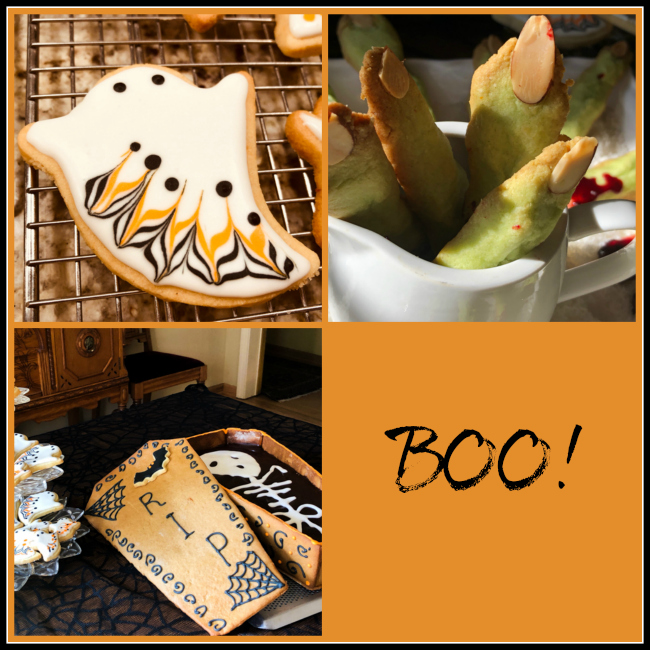
Halloween will be back in only 361 days, so I am here to help you get into proper mood for it. Truth is, I had so much fun making these recipes, I cannot stand the idea of waiting for months and months to share. Let me introduce you then to some Friendly Ghost Cookies, Witches’ Fingers, and a Gingerbread Coffin with a chocolate cake inside so delicious that a dead body will rest forever happy.

FRIENDLY GHOST SUGAR COOKIES
(from the Bewitching Kitchen)
360 g all-purpose flour (about 3 cups)
2 teaspoons baking powder
215 g granulated sugar
2 tsp orange zest
¼ tsp salt
227 g cup butter, cold and cut in pieces
1 egg
3/4 tsp Fiori di Sicilia extract
1/2 tsp cardamom
for icing:
4 Tablespoons meringue powder
½ cup water
1 pound powdered (confectioner’s) sugar
1 tsp light corn syrup (such as Karo)
a few drops of almond extract
Heat oven to 360F. Make the cookie dough. Combine the flour, baking powder and salt, set aside. Cream the sugar and butter. Add the egg, Fiori di Sicilia, orange zest and cardamom, mix well. Scrape the sides of the bowl. Add the flour mixture and beat just until combined.
Dough can be rolled right away in between sheets of parchment paper. Roll to about 1/4″ thick, and cut into shapes. Place on parchment-lined baking sheets, freeze for 5 minutes. Bake for about 12 minutes. Transfer to cooling rack and cool to room temperature before icing.
Make the Royal icing. In the bowl of a KitchenAid type mixer, with paddle attachment the water and meringue powder for a couple of minutes. Add the powdered sugar (sift over the bowl), corn syrup and almond extract. Beat on high speed for about 5 minutes.
Divide the Royal icing in three portions, one large will be left white. Two small portions will be dyed black and orange. Flood the cookies with white icing and decorate with black and orange details as shown in the pictures. Allow to fully dry before serving them.
ENJOY!
to print the recipe click here
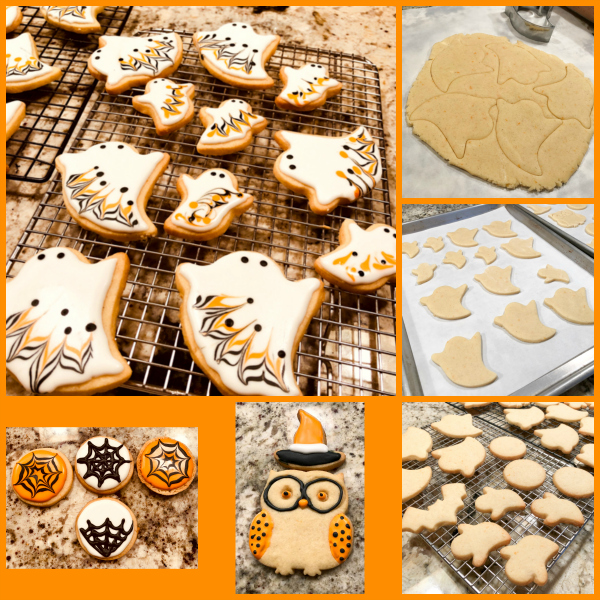
Comments: The recipe makes quite a bit of cookies, feel free to halve them if you prefer. Rolling the dough and baking is not a big deal, but of course the decoration demands a bit of time. I made them one evening after work and had this little voice talking to myself “why didn’t you make just half?”
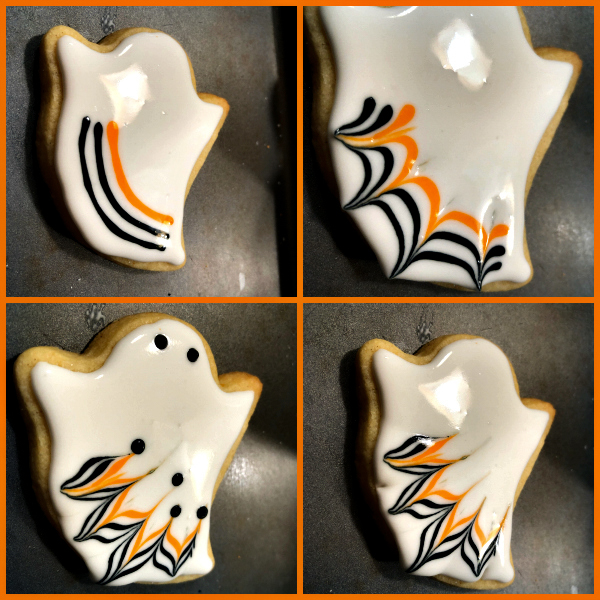
The composite picture below shows you how easy it is to make the decoration for the little ghosts. Three lines, wet on wet, and a needle to pull the lines through, first in one direction, then in the opposite direction. I cannot take credit for it, I saw a similar design somewhere in Pinterest world.
The combination of orange zest, fiori di Sicilia and cardamon is really wonderful. I need to think about those flavors for macaron filling.
Moving on……

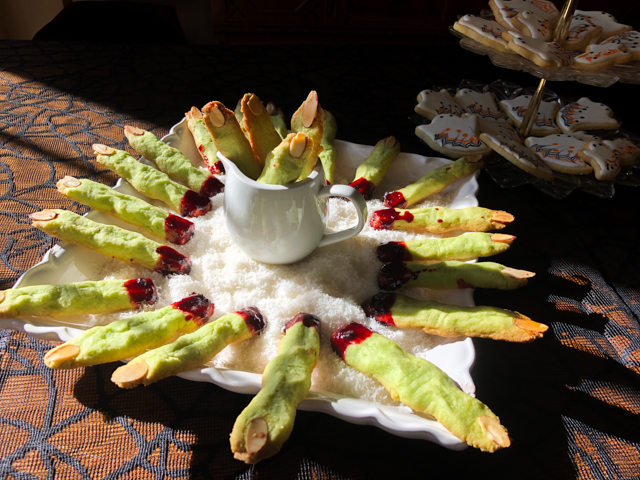
WITCHES’ FINGERS
Recipe from my friend Karen over at Karen’s Kitchen Stories. Click here to get all the details.
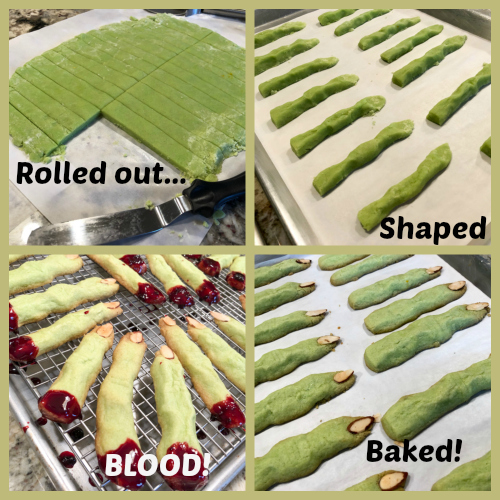
RECIPE STEPS IN PICTURES

Comments: At first I was a bit insecure about how much green dye to use (secret is to use less than you think you need), and how to exactly shape the fingers. Well, don’t worry too much about it, no matter how you do it, the result will be gruesome and horrific. Which is pretty much the goal of the bake, right? They taste delicious, and the nails almonds add a nice flavor to them. As to the jam, I used raspberry jam with a tiny drop of red food color to intensify the effect. The jam by itself was not as red as I wanted.
Moving on to the final bake…

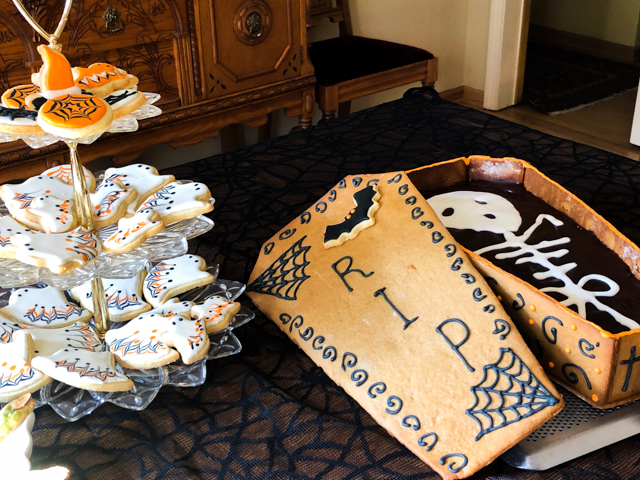
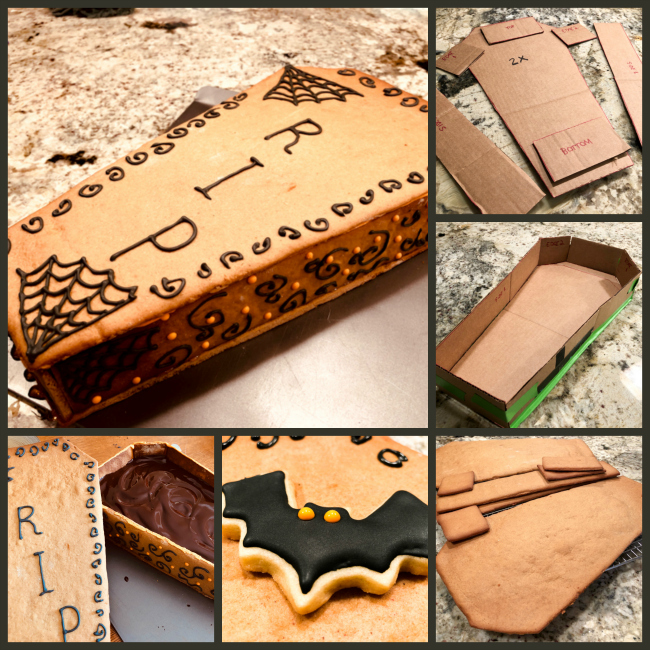
GINGERBREAD COFFIN WITH CHOCOLATE CAKE
(from Bewitching Kitchen, inspired by many sources)
for the gingerbread dough:
660 g all-purpose flour
1 teaspoon Kosher salt
1/2 teaspoon baking soda
4 teaspoons ground ginger
2 teaspoons ground cinnamon
1 teaspoon freshly grated nutmeg
1 teaspoon ground cloves
2 sticks (227 g) unsalted butter, room temperature
200 g granulated sugar
2 large eggs
3/4 cup honey
3/4 cup unsulfured molasses
for icing:
4 Tablespoons meringue powder
½ cup water
1 pound powdered sugar
1 tsp light corn syrup
a few drops of almond extract
for the caramel glue:
200 g sugar
60 mL water
1 tsp corn syrup
1/2 tsp lemon juice
for the chocolate cake:
463 g sugar
1/2 teaspoon salt
70 g Dutch process cocoa powder
1 teaspoon baking soda
1 cup (237 g) water
3/4 cup canola oil
2 teaspoons vanilla paste
220 g all-purpose flour
4 large egg yolks
2 large eggs
1/4 cup buttermilk
for the chocolate icing:
8 ounces bittersweet chocolate (I used Lindt 70%)
1/2 cup unsalted butter
1 Tablespoon light corn syrup
for the Royal icing decoration:
(same recipe as sugar cookies)
Make the gingerbread dough. In a large bowl, whisk together flour, salt, baking soda, and spices. In another large bowl, with an electric mixer on medium-high, cream butter and sugar for about 3 minutes. Beat in eggs, one at a time, then honey and molasses.
Slowly add the flour mixture until well combined. Divide the dough into 3 pieces, wrap each in plastic wrap, and refrigerate for about one hour.
Heat oven to 350°F. Working with a third of dough at a time, roll out to ¼-inch thickness on parchment paper well dusted with flour. Cut the pieces you need for the coffin, and transfer the cut pieces to the freezer for about 10 minutes. Bake cookies for 12 to 15 minutes. They must be crisp and dry but not getting dark.
Cool them completely before icing and once the icing is dry, assemble the coffin using caramel.
Make the caramel. Put the sugar and water in a large, low-sided frying pan over a medium-high heat. Without stirring, bring to 320 F. If you don’t have a thermometer, the syrup is ready when the sugar has dissolved and it turns a golden color, not too dark. Swirl the syrup gently in the pan to even out the color. Take the pan off the heat and leave to cool for a few moments to thicken slightly to the consistency of honey. Dip the edges of the pieces you intend to glue and assemble them. Drizzle additional caramel if needed using a small spoon.
If the syrup begins to harden in the pan, put it back over a gentle heat until it has returned to the required consistency.
Make the chocolate cake. Heat oven to 350F. Spray a 13 x 9 pan with nonstick cooking spray. Line the pan with parchment paper, extending the paper out of the pan to facilitate removal of the cake after baking.
In a saucepan, stir together the sugar, salt, cocoa, and baking soda. Add to it 1 cup of boiling water, stir well and let it sit for 15 minutes.
Pour the hot cocoa mixture into a mixing bowl, add the oil and vanilla and beat on low speed until combined. On low speed, mix the flour into the batter and then add the eggs, egg yolks and buttermilk. Do not over-mix. Pour the very thin batter into the prepared pan.
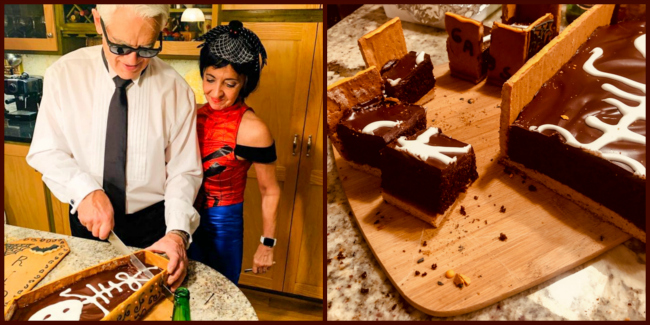
Bake for about 35 minutes, rotating the pan after 15 minutes. A toothpick should come out clean when tested in the center of the cake. Allow to cool in the pan for about 10 minutes on a rack. Run a thin knife around the edge and jar the edge of the pan to loosen. Invert onto the serving platter. Cool completely, then cut in pieces to fit inside the gingerbread coffin. You will have to do some assembling to fit some of the cut pieces in the bottom of the coffin.
Make the chocolate icing. Place the chocolate and butter in the top of a double boiler. Add corn syrup and set over a pan of simmering water. Stir occasionally until melted and smooth. use immediately, pouring it gently over the cake, once it’s inside the gingerbread coffin. Allow it to set for a few hours at room temperature. Use Royal Icing to draw a skeleton inside, if you so desire, or use powdered sugar and a stencil.
ENJOY!
to print the recipe, click here

Comments: Your cake will be baked in a 13 x 9 rectangular pan. You should draw a design for the coffin that makes the lid no bigger than 12.5 inches in length. The sides should be 2.5 inches in height. It is a pretty easy design, I made the pieces in cardboard and used those to cut the gingerbread dough. The recipe has a reasonably small amount of baking powder, so that the dough does not change much during baking, but you can always use a Microplane grater to bring the edges into better shape.
Most gingerbread sculptures are assembled with very thick Royal icing. It has its problems – I will discuss those a bit more in a future post. Caramel sounds dangerous because it’s so hot and if you burn yourself it’s not fun at all, but the advantage is that it glues quickly and you don’t have the white stuff joining every piece. That is nice for a house or other structures, but I prefer the coffin to be more austere. Apart from having to clean the pan after making the caramel, I liked the method better than Royal icing for assembling. Live and learn.

The cake was absolutely wonderful even next day, moist, intense, it gave a bit of moisture to the gingerbread base, which I did not roll as thin as I should have. I need a lot more practice with this type of dough, and find that particularly to roll large pieces, I have issues keeping it thin and uniform. At any rate, Karl Lagerfeld did not seem to mind cutting pieces for Spider Woman. And she was delighted for catching him in her dangerous web. They do make a nice match, even if I say so myself. Biased, who moi?

I hope you enjoyed this little roundup of Halloween recipes. It is a scary job, but someone has to do it.

ONE YEAR AGO: Devil Wears Chocolate
TWO YEARS AGO: Slow-Cooker Pot Roast with Potatoes, Carrots, and Fennel
THREE YEARS AGO: The Best, the Very Best Hummus
FOUR YEARS AGO: Cheddar Cheese Crackers
FIVE YEARS AGO: A New Take on Cauliflower Puree
SIX YEARS AGO: In My (NEW!) Kitchen
SEVEN YEARS AGO: The Lab Move and New Beginnings
EIGHT YEARS AGO: Honey-Oat Pain de Mie
NINE YEARS AGO: Carrot and Leek Soup
TEN YEARS AGO: Chicken Parmigiana 101