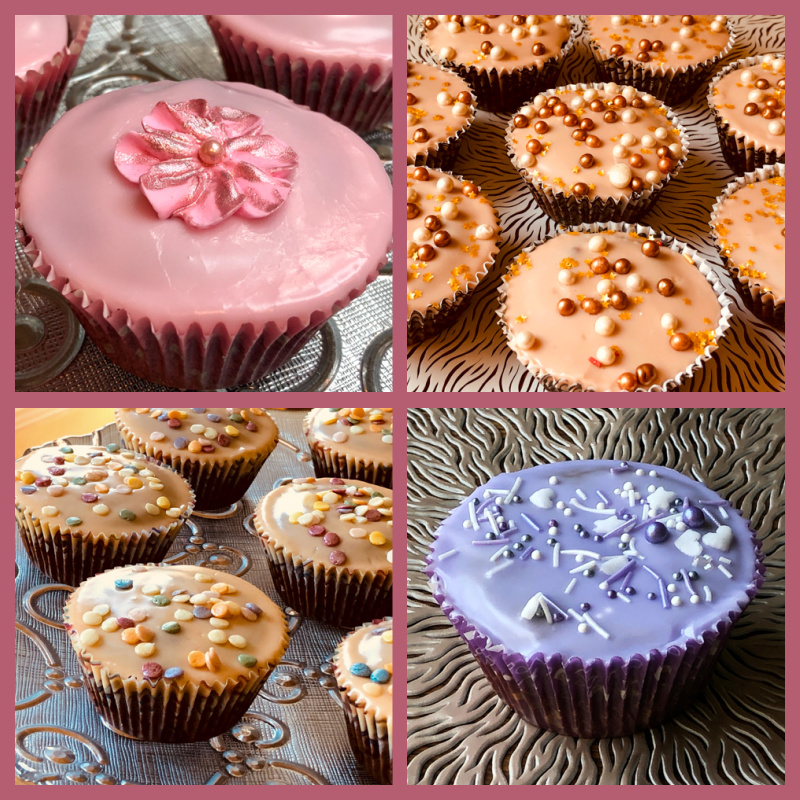
One basic recipe, several ways to dress it up. I adapted the basic brownie and icing recipes from a version found in Martha Stewart’s Cupcakes. Clockwise from top left: Rose-Mint, Chai, Lavender and Orange-Ginger Brownie Cupcakes. I started making them in August last year and they’ve been a regular component of my weekly donations. Once iced and set, they stay good for a couple of days at room temperature.
Place 12 cupcake liners in a baking sheet, and heat the oven to 350F.
Chop the chocolate and butter in pieces, place them in a microwave-safe bowl and melt at 50% power just until the chocolate is almost fully melted. Finish melting by whisking gently until smooth. Allow it to cool for 5 to 10 minutes.
In another bowl, mix flour, salt and baking powder. Reserve.
To the melted chocolate, add the sugar and mix with a handheld mixer, when the sugar is incorporated (it won’t be smooth), add the eggs, one at a time, then the vanilla extract. Whisk until smooth, for a couple of minutes medium-speed. Gently sift the flour mixture on top, whisk just until the flour is incorporated and no dry bits can be found.
Fill each cupcake 3/4 full with the batter. Bake for 20 to 25 minutes, until a toothpick inserted in the center comes out slightly moist. Cool completely before icing.
1/3 cup milk (you won’t use it all) 1 bag Bigelow Rose Mint Tea 1/8 tsp rose water (I used Nielsen-Massey) 180g (1 + 1/2 cup) powdered sugar
Infuse the milk with the bag of tea by bringing it almost to a full-boil in a small saucepan, turning off the heat, adding the tea bag, closing the pan and leaving undisturbed for 10 minutes. Squeeze the tea bag. If you want a little more pink color, add a touch of food gel (I used fuchsia from Sugarflair, added with a toothpick).
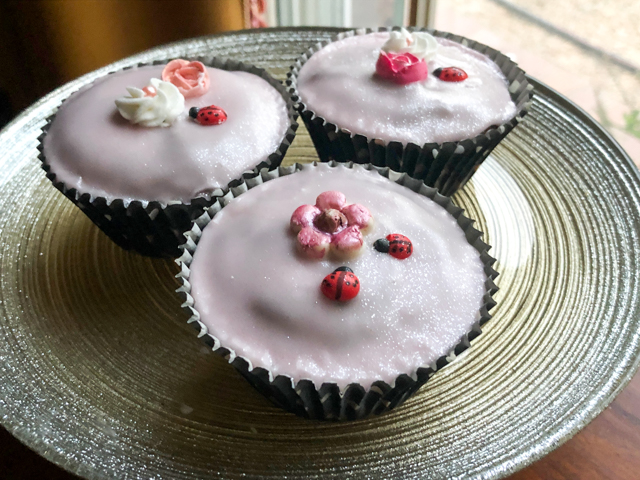
Place the powdered sugar on a large bowl and add half the amount of infused milk, whisking gently until fully dissolved. Adjust with enough additional milk to make a spreadable icing that will not pour freely from the sides of the cupcakes, but instead be thick enough to form a stable layer. Decorate with sprinkles, or flowers made from Royal icing or molded chocolate, as in the picture below.
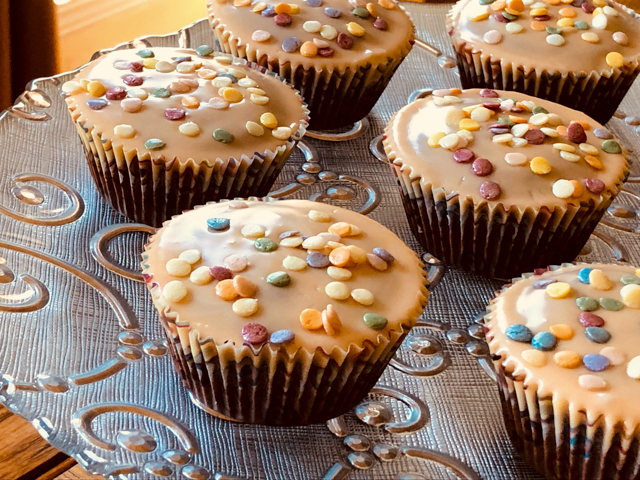
CHAI BROWNIE CUPCAKES
1/3 cup milk (you won’t use it all) 1 bag Double Chai Stash Tea 180g (1 + 1/2 cup) powdered sugar sprinkles (I used this one, a favorite)
Infuse the milk with the bag of tea by bringing it almost to a full-boil in a small saucepan, turning off the heat, adding the tea bag, closing the pan and leaving undisturbed for 10 minutes. Squeeze the tea bag to release flavor and reserve the milk.
Place the powdered sugar on a large bowl and add half the amount of infused milk, whisking gently until fully dissolved. Adjust with enough additional milk to make a spreadable icing that will not pour freely from the sides of the cupcakes, but instead be thick enough to form a stable layer. Decorate with sprinkles, Royal icing flowers, or molding chocolate details.
LAVENDER BROWNIE CUPCAKES
1/3 cup milk (you won’t use it all) 1/4 tsp dried lavender flowers 180g (1 + 1/2 cup) powdered sugar sprinkles
Infuse the milk with the dried lavender by bringing it almost to a full-boil in a small saucepan, turning off the heat, closing the pan and leaving undisturbed for 10 minutes. Pass the milk mixture through a fine sieve to remove the lavender. Reserve the milk. If desired, add a tiny drop of purple food gel dye.
Place the powdered sugar on a large bowl and add half the amount of infused milk, whisking gently until fully dissolved. Adjust with enough additional milk to make a spreadable icing that will not pour freely from the sides of the cupcakes, but instead be thick enough to form a stable layer. Decorate with sprinkles.
ORANGE-GINGER BROWNIE CUPCAKES
1/3 cup milk (you won’t use it all) 1 bag Orange-Ginger tea (I used this one from Republic of Tea) 180g (1 + 1/2 cup) powdered sugar sprinkles
Infuse the milk with the bag of tea by bringing it almost to a full-boil in a small saucepan, turning off the heat, adding the tea bag, closing the pan and leaving undisturbed for 10 minutes. Squeeze the tea bag to release flavor and reserve the milk. If desired, add a very tiny amount of orange food gel dye.
Place the powdered sugar on a large bowl and add half the amount of infused milk, whisking gently until fully dissolved. Adjust with enough additional milk to make a spreadable icing that will not pour freely from the sides of the cupcakes, but instead be thick enough to form a stable layer. Decorate with sprinkles.
Comments: My main modification of the recipe was to use the full package (4 oz) of the unsweetened chocolate, adjusting the flour and butter amounts, so that you are not left with a tiny bit of chocolate hanging around. The cupcakes bake without doming too much, perfect to have a flat layer of icing on top.
In this post I used tea to flavor most icings but you can also use orange or lemon zest, omit the decorations, or flavor the basic icing with any extract you like. They are super versatile. If you use molded chocolate to decorate and the room is too warm, the chocolate might get slightly soft, but it won’t lose its shape. To make decorations with molded chocolate I used mini silicone molds, and later painted them with luster powder + vodka.
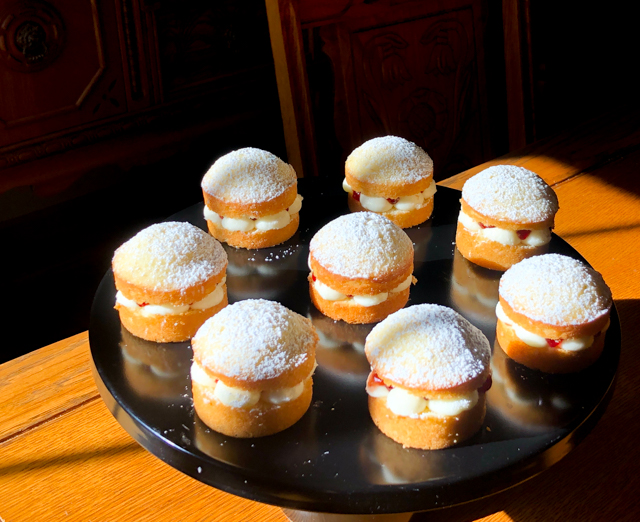
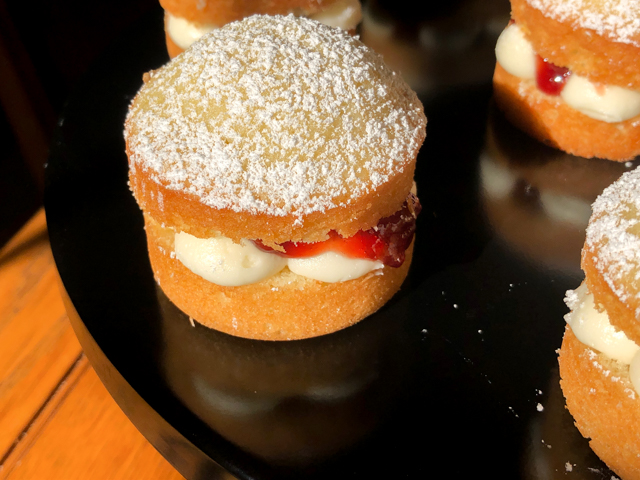
I made these cakes in November 2019, if you can believe it… Sometimes things take their sweet time to go from a folder with pictures to the blog post. Victoria Sponge is a true classic from the UK, named after Queen Victoria, because it was her favorite sweet to enjoy during afternoon tea. It is a sandwich type cake with strawberry jam, often whipped cream, and usually not iced, the top and sides left naked. Many variations exist, I am sharing a version that makes them in individual format. I find them irresistibly cute.
VICTORIA SPONGE MINI-CAKES (adapted from this article)
175g unsalted butter, at room temperature 175g granulated sugar 3 large eggs, beaten 1 tsp vanilla extract 185g all-purpose flour 1 + 1/8 tsp baking powder Pinch of salt
whipped cream lightly sweetened strawberry jam
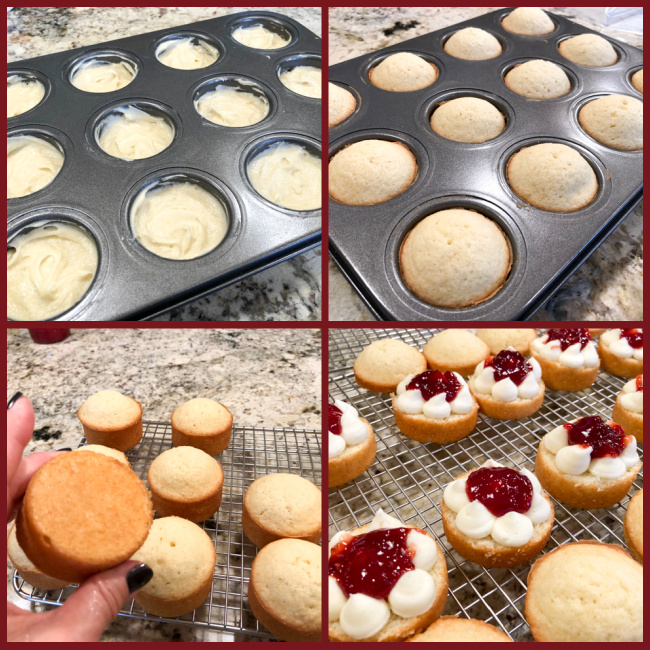
Heat the oven to 350°F. Very lightly grease the molds of a mini-cake pan.
Sift together the flour, baking powder and salt. Reserve.
Cream the butter and caster sugar together until the mixture is pale and light. Gradually add the beaten eggs, mixing well between each addition and scraping down the sides of the bowl from time to time. Add the vanilla extract and mix again.
Add the flour mixture to the batter, mixing gently until smooth. Fill the mini-cake mold, each cavity 3/4 full, no more than that. You should have enough for 12 mini-cakes. Bake on the middle shelf of the oven for 15 to 20 minutes until golden, well risen and a wooden skewer inserted into the middle of one of the cakes comes out clean.
Leave the cakes to cool in the tin for 5 minutes and then ease out onto a wire cooling rack and leave until completely cool. Cut each cake in half, and pipe the whipped cream onto the bases, in dots. Drizzle the jam over the buttercream dots, place the sponge tops on and lightly dust the cakes with icing sugar.
Comments: I had to play around with the recipe a bit to get it right, adjusting the baking powder amount and not filling the mold to the top, so that the doming was just right. It was a huge hit with our departmental colleagues, I got several emails about it. The cake is tender and moist. The original recipe called for American buttercream for the filling, but I decided to go with whipped cream, stabilized with gelatin. Follow the recipe from this link. For the pan, I used this one. At the time I bought it on ebay, but could not find it available right now.
I think whipped cream is less sweet and makes the cake feel a bit lighter, but if you prefer to go with buttercream, follow the original recipe in the link I included.
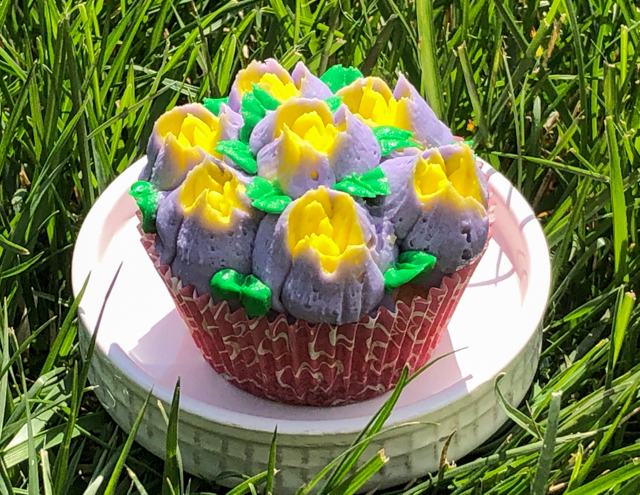
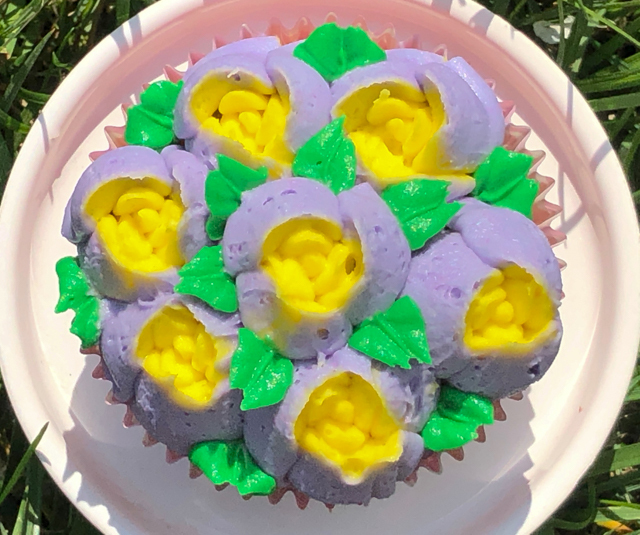
I’ve had a set of Russian icing tips for years. They were sitting in a drawer, minding their own business, not harming anyone. What possessed me to grab them to decorate some vanilla cupcakes? I have no idea. All I know is that I managed to produce ONE cupcake. Let’s call him Neo. Never again, my friends. Never again. A few more months of my life expectancy are gone.
NEO CUPCAKE WITH BUTTERCREAM FLOWERS (from the Bewitching Kitchen)
1 recipe for yellow cupcakes (for ATK recipe, click here)
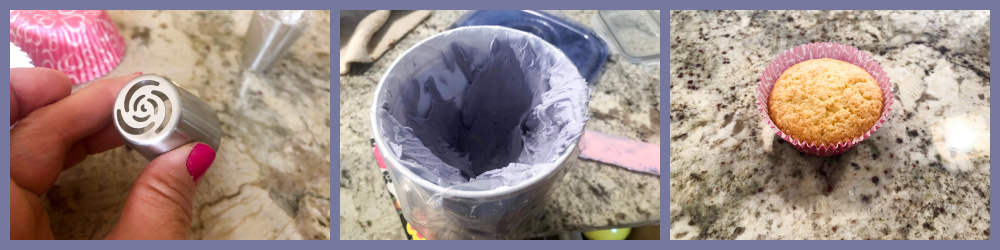
buttercream: 1 cup butter, slightly softened (I used Kerrygold) 1 pound icing sugar 1/8 tsp salt 1 + 1/2 tsp vanilla extract 1 to 2 tablespoons milk purple, yellow, and green food gel dye Russian piping tip 1M piping tip (optional)
Make the cupcakes according to the directions from America’s Test Kitchen recipe. It is a very simple and straightforward method that works great, I highly recommend it.
Make the buttercream: add the butter to the bowl of a KitchenAid type mix, fitted with the paddle attachment. Mix for a couple of minutes until the butter is creamy and lighter. Add the salt and vanilla, beat a little more. Turn the mixer off, add the powdered sugar and turn it on the lowest speed.
Once the risk of powdered sugar explosion is over, increase the speed, and beat for a couple of minutes, until very creamy, adding milk just to have the perfect piping consistency.
Separate a small amount (1/4 cup maximum) to dye green to pipe leaves. The rest of the buttercream divide in two, one large portion for purple, one smaller portion for yellow. Fit a large piping bag with the Russian tip of your choice, add the purple icing to the sides of the bag, leaving the center empty. Fill the center with yellow buttercream. Close the bag, pipe small amounts of buttercream on a piece of parchment paper until you are sure the yellow is showing through in the center. Pipe flowers on the surface of the cupcakes.
Add green buttercream to a small piping bag fitted with a leaf tip. Pipe leaves around the flowers.
Comments: Don’t you think that icing tip looks like the most innocent gadget in the universe? If you watch youtube videos teaching the secrets of the Russian tips, they make it all seem like the most peaceful walk on the most beautiful tropical beach. They are not telling you the truth. Not the full truth. I advise you to go for a tip that does not need a clear separation between the two colors. I wanted the yellow to be at the center, and the purple around it, and yes, I managed to do that in this single cupcake.
But as you go along, the colors tend to mix, the buttercream also gets a bit less firm, and instead of keeping open like a flower, the outer edge collapses in, and you are left with an “almost flower” next to a blob of undefined shape, next to another blob of even worse shape, and pathetic color. Accordingly, my reaction went from “ooops” to “what the heck is this?” to words unfit to print.
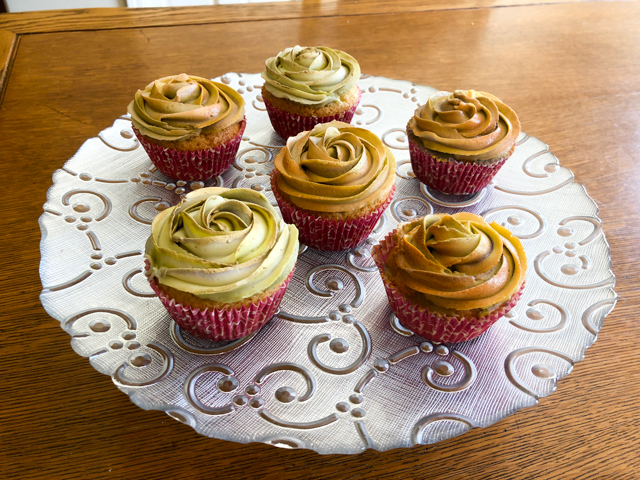
As I mentioned, I could only pull one cupcake decorated with “the Devil’s tip.” I had to scrape all the blobs, mix the icings together, spoon them in another bag fitted with my trustworthy 1M tip, and call it a day. It’s a good thing I don’t drink, because the tequila bottle winked at me. Twice.
As the road to get to the final icing was quite rocky, I was not too fond of the resulting color. If you mix yellow and purple, you’ll see what I mean (don’t do it). So I air-brushed some with a rose gold dye, and painted edges with gold luster. I am happy with the way they turned out, and for that my husband is elated.
Now, if you like to live dangerously and want to try “the Devil’s tips”, I advise you to pick one that you can use either with a single color or that would work well with a marbled design. You can then add two shades of the same color to the bag, so that mixing during piping won’t be a problem. Thinking back, I think it would be possible to add the yellow color to the center enclosed in a second bag, and spoon the purple around it. I might give it a try, but not in the near future. I need to recover from this adventure first… It’s not as if I am a young puppy with plenty of life expectancy to waste.
Halloween is such a nice theme for baking! Unfortunately, it is coming to an end, so I will share my last round up of all things spooky for 2020, the spookiest year ever. Cookies, cakes, eclairs, all frightfully delicious.
I will start with a very special recipe that reconnected me with a food blogger from my past, Helen Rennie. I used to read her food blog, called “Beyond Salmon” long before I considered starting my own site. The other day I was discussing eclairs with my tent-baker friend Carlos, and he told me his default recipe comes from a chef called Helen with a very popular youtube channel. That Helen is the same Helen from Beyond Salmon! She quit blogging years ago and now concentrates on her tutorials on youtube and her cooking school in Boston. She is a wonderful person, and her videos on all things cooking from baking to sous-vide are a fantastic source of information. I followed her recipe for eclairs to make my mummies. Quite an odd statement, I admit. But aren’t they cute? I particularly love the wonky-eyed.
MUMMY ECLAIRS (recipe and method from Helen Rennie)
for the pate a choux: 120g water 120g whole milk 1/2 tsp table salt 1 tsp sugar 113g butter at room temp, cut into 8 pieces 142g bread flour, sifted 230g eggs beaten with a fork
for diplomat cream: (best made the day before) 100g eggs 32g cornstarch 242 g whole milk 242 g heavy cream 100g granulated sugar 1/2 tsp vanilla paste pinch of salt 40 g unsalted butter, cut in pieces whipped cream, amount to taste
for icing decoration: 250 g Icing Sugar 15-25 ml water candy eyes
Make pate a choux: Mix water, milk, salt and butter in a saucepan with a heavy bottom. Heat until the butter melts completely and the mixture comes to a full boil. Remove from the heat and add the flour all at once. Mix until the flour is all incorporated, put it back into the heat, and set your timer for 5 minutes. Cook moving the dough constantly. At the end of 5 minutes you should see a film forming in the bottom of the pan.
Transfer the dough to a food processor, blitz for 10 seconds to allow steam to escape. With the process running, add the eggs in a stream, and process for 30 more seconds. The dough will be ready to use, but it’s best to place it in a piping bag and wait until it cools to around 80F, then it will be very easy to pipe in a baking sheet lined with parchment paper.
Pipe lines with the size you like. Spray the surface with a little water and bake in a 375F oven, but reduce the temperature to 350F as soon as you place the sheet in the oven. Bake for about 40 minutes, do not open the oven door during baking. Eclairs should be fully firm and golden brown. Cut small holes in the bottom to fill them later.
Make diplomat cream. In a medium bowl, whisk eggs with cornstarch until fully combined. Place milk and heavy cream in a saucepan. Remove 1/4 cup of this mixture and add to the eggs (this helps the cornstarch dissolve).
Add vanilla, sugar and pinch of salt to the saucepan with the milk/cream mixture. Bring to a full boil, add a few tablespoons to the egg mixture to temper it, whisking it well. Place the saucepan back in the stove, then add the tempered egg mixture to the saucepan. It should thicken very quickly. Make sure it is at full boil, then cook for 30 seconds longer. You need that to deactivate amylases present in the egg yolks, that would thin the sauce once it’s refrigerated.
Pass the cream through a sieve into a bowl, add the butter, and allow it to cool completely. To make diplomat cream, simply fold whipped cream, very cold, into the cold pastry cream and use it to fill the eclairs. You can vary the amount, I like around 25% whipped cream, but you can go 50:50 if you prefer. Fill the eclairs.
Make the icing decoration: sift the icing sugar into a bowl wide enough to allow you to dunk the eclairs. Add the water gradually until you have a thick consistency, you might not need all of the water, you don’t want it too thin. Dip the tops of the eclairs, place them in a rack and immediately add the eyes. Wait for 30 minutes or so before drizzling with the icing (place in a piping bag, no need for an icing tip, simply cut a small opening).
Comments: Helen’s video is very detailed, so if you’ve never baked eclairs (or choux pastry in general) and would like to give it a go, sit down with a cup of tea and you will soon be baking perfect examples of this classic French delicacy. You don’t need a star shaped piping tip, but I like the ridges they generate. I also followed her tutorial for pastry cream, which deals with two of the main issues when making it: grainy texture and thinning after refrigeration. When I had to prepare choux buns for the Great American Show, my worst fear was to see Paul or Sherry bite into one and have pastry cream dripping down the chin. But I was eliminated before that stressful situation ever materialized. Silver linings… (wink, wink).
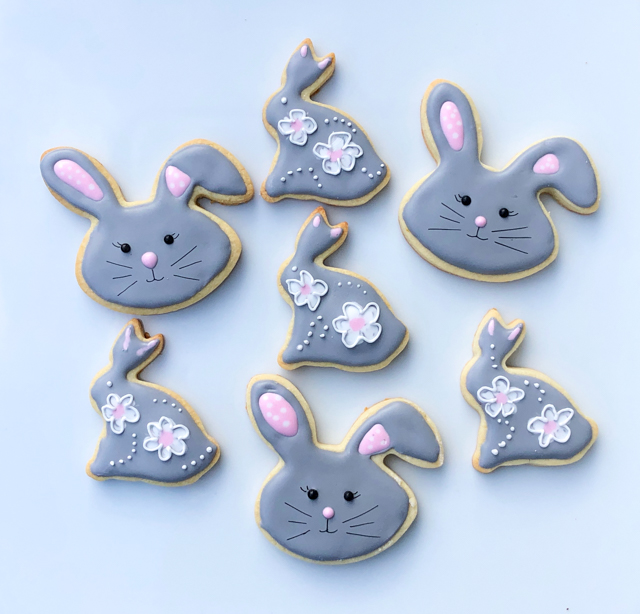
SPOOKY SPICED SUGAR COOKIES (from the Bewitching Kitchen)
Mix the flour with salt, baking powder and all the spices and reserve. Cream the butter with both sugars in the bowl of a Kitchen Aid type mixer. Add the egg slowly and mix until incorporated. Add the flour and mix until a dough starts to form.
Remove from the mixer, pat into a disc and roll out to your desired thickness, depending on the type of cookie you intend to bake. Cut the cookies and freeze them for 10 minutes (or several hours) before baking.
Bake at 350F for about 12 minutes, until edges start to brown. Cool on a rack before decorating.
Make Royal Icing in black and orange colors. My favorite recipe can be found at Tanya’s site with a click here.
To make the stenciled cookie, I flooded the whole cookie with orange Royal Icing, and allowed it to fully set for a couple of hours. I don’t have one of those magnetic gadgets to hold the stencil firmly on top of the cookie, so I improvised. I placed a cookie cutter on top of the stencil, and that was enough to get a sharp design with the air-brush, using black dye. Allow the design to dry for a couple of hours and you’ll be ready to enjoy your spooky cookie!
All other designs were made with regular flooding and piping with small size tips.
Moving on…. CUPCAKES!
SPOOKY CARROT CUPCAKES (adapted from several sources)
to decorate: very small amount of buttercream (store-bought or home-made) fondant stencil of your choice + airbrushing (optional)
Heat oven to 325°F. Line standard muffin tins with paper liners. Whisk together carrots, eggs, buttermilk, sugar, oil, and vanilla. In another bowl, whisk together flour, baking soda, baking powder, salt, and spices. Stir flour mixture into carrot mixture until well combined.
Divide batter evenly among lined cups, filling each three-quarters full. Bake until a toothpick inserted in the center comes out clean, 25 to 30 minutes. Cool cupcakes in the pan for 10 minutes then invert them out to cool completely.
Roll out fondant, decorate with the stencil of your choice, or generate a pattern with a rolling pin. Use a cookie cutter to make circles large enough to coat the top of each cake. Spread a very thin coating of buttercream on the top of each cupcake, then place the circle of fondant on top.
Comments: Two details matter in using marzipan on top of cupcakes. First, you must roll it thin, so that it won’t be a heavy layer on top. Second, you must cut it large enough to wrap all the way to the edges. I had never attempted to air-brush marzipan, and ran into some problems. It was hard to place the stencil firmly on top without it glueing on the surface and making a mess when lifting it. I probably should have allowed the marzipan to dry a little more before decorating it, but I was afraid it would then crack when I tried to top the cake with it. That led me to switch to plan B: I gathered the messed up marzipan discs, re-rolled them and used a patterned rolling pin to decorate. I like the way it turned out, the little bit of orange dye from the air-brushing ended up as a marbled effect. As you can see in the photo above, I managed to get one cupcake with the stencil in reasonable good shape.
120g all-purpose flour ½ teaspoon baking powder ½ teaspoon salt 120g unsalted butter 113g (4 ounces) unsweetened chocolate, finely chopped 250g granulated sugar 2 eggs, room temperature 1 teaspoon vanilla paste
for the icing: 50g whole milk zest from one orange ½ teaspoon orange extract (I use Olive Nation) 175g confectioners’ sugar, sifted drop of orange food color (optional)
tempered dark chocolate to decorate
Heat oven to 350°F. Line muffin tins with paper liners. Whisk together flour, baking powder, and salt. Melt butter and chocolate over a pan of simmering water; stir until smooth. You can also use a microwave at 50% power. Remove from heat, and let cool slightly.
With an electric mixer on medium speed, beat chocolate mixture and sugar until combined. Add eggs, one at a time, beating until each is incorporated, then add the vanilla paste. Add flour mixture, and beat until just combined.
Divide batter evenly among lined cups, filling each two-thirds full. Bake until a toothpick inserted in centers comes out clean, about 25 minutes. Transfer to wire racks to cool completely.
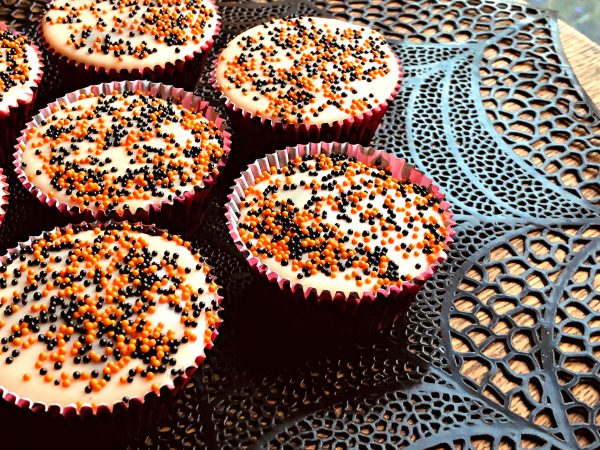
Make the icing: Bring milk and orange zest to a simmer in a saucepan. Turn off the heat, cover the pan and let milk infuse for 10 minutes with the zest. Add orange extract, and pass the milk through a sieve into a bowl. Add the powdered sugar to get a thick enough consistency to cover each cupcake with a thin layer, and a drop of orange color if you so desire. Let it set completely for a couple of hours, then add a spider web made in tempered chocolate on top. Alternatively, you can use Royal Icing to draw a web, or simplify it and add just some sprinkles, orange and black.
Comments: These brownie cupcakes are extremely versatile, in fact I am planning a full post about them. They bake flat, which makes it easy to decorate with this type of simple icing that you can take in several directions. You can infuse flavors into the milk such as tea, lavender, or other extracts. Tempering chocolate is a bit involved, so if you prefer to simplify, just add halloween sprinkles. It will be totally fine.
FRIENDLY GHOST PUMPKIN CHOCOLATE MARBLED CAKE (adapted from Recipe Girl)
for the pumpkin batter: 85g cream cheese, at room temperature 1 tablespoon unsalted butter, at room temperature 100g granulated white sugar 1 large egg 80g canned pumpkin puree 1 teaspoon vanilla extract 1/2 teaspoon ground cinnamon 1/2 teaspoon ground ginger 1 tablespoon all purpose flour
for the chocolate batter: 150g semisweet chocolate, chopped 170g unsalted butter, cut into pieces 4 large eggs, at room temperature 250g granulated sugar 1 teaspoon vanilla extract 1/4 teaspoon salt 170g all-purpose flour
to decorate: fondant 1/4 cup powdered sugar warm water, just enough to make a thick paste with the sugar
Heat the oven to 350°F. Spray a 13×9-inch baking dish with nonstick spray and coat with parchment paper.
Make the pumpkin batter: In a small bowl, use an electric mixer to combine the cream cheese with the butter until smooth. Beat in the sugar until well incorporated. Beat in the egg, and then add the pumpkin puree, vanilla, cinnamon and ginger. Stir in the flour. Reserve.
Prepare the chocolate butter: In a medium bowl, combine the chocolate and butter. Set the bowl over a saucepan with 1-inch of simmering water and stir occasionally until melted. Remove from heat. In a separate bowl, combine the eggs with the sugar, vanilla and salt. Beat at low speed until light and fluffy, about 4 minutes. Fold in the melted chocolate. Sift the flour over the batter and fold it in just until combined.
Spread the chocolate batter evenly in the bottom of the prepared pan. Using a tablespoon, drop dollops of the pumpkin batter all over the top. Using chopsticks, wirl the pumpkin batter slightly into the chocolate. Bake for 25 to 30 minutes until a toothpick inserted into the center comes out clean. Let the brownies cool completely, then cut into squares.
To decorate, roll out fondant very thinly. Cut ghost shapes with a cookie cutter, then draw eyes with a black food pen, or royal icing. Make a little paste with powdered sugar and water, then use it to glue the decoration on each piece of cake.
Comments: Fondant is not a crowd-pleaser, but I wanted something as white as possible, so marzipan was not the best option. I decided that fondant haters could always peel the decoration off and enjoy the cake without it. The cake is very delicious, moist and tender, quite simple to prepare.
That’s all for now, my friends… I really had a lot of fun with Halloween-baking this year, and it’s a bit sad to see it end. Let’s hope 2021 will bring a bit of normalcy to our lives, with in-person trick or treating, Halloween parties, and a certain virus as a scare of the past.