SECRET RECIPE CLUB: LEEK AND CHEESE TART

tart1

One more month flew by us! Last Monday of April, first Secret Recipe Club of a favorite season, Spring!  I was paired with the blog Food Baby Life, and had a blast browsing Susan’s site. She has a well-organized index which makes life a lot easier for the stalker.  Being a busy mom, many of her recipes are compatible with our own life style. You know, that life style in which the day doesn’t seem to have enough hours, and each night we ask ourselves “why isn’t tomorrow Saturday instead of Tuesday?”   😉    I had quite a few recipes on a list of favorites to choose from, including her  Spiced Meatball Wrap, but settled on this tart because of the unusual crust: instead of butter, olive oil. Instead of white flour, a combination of 50/50 white and whole-wheat. A few modifications of my own for reasons specified in the comments, and there you have it: a Leek and Kale Tart with Olive Oil Crust!

LEEK AND KALE TART WITH OLIVE OIL CRUST
(adapted from Food Baby Life

for the filling:
2 large leeks, washed and sliced thinly
1 small bunch kale, sliced thinly
1 tbsp olive oil
1 clove garlic, crushed
dash of nutmeg
salt and pepper to taste
4 eggs
1 cup (250ml) evaporated milk
125g cheddar cheese, grated (see comments)
for the crust:
125g plain flour
125g whole -wheat flour
1 ts salt
60 ml olive oil
100-120ml cold water
Lightly grease a 28cm (11 inch) tart dish, preferably one with a removable bottom, but a Pyrex type will work too.  Heat  the oven to 390 F  (200 degrees Celsius).
To make the pastry, place the flours and salt in a large bowl and whisk to combine. Pour in the oil and stir with a fork. Add the water and continue to stir with a fork until it is just absorbed then start to knead with your hand, until the dough forms a ball and comes away from the sides of the bowl.

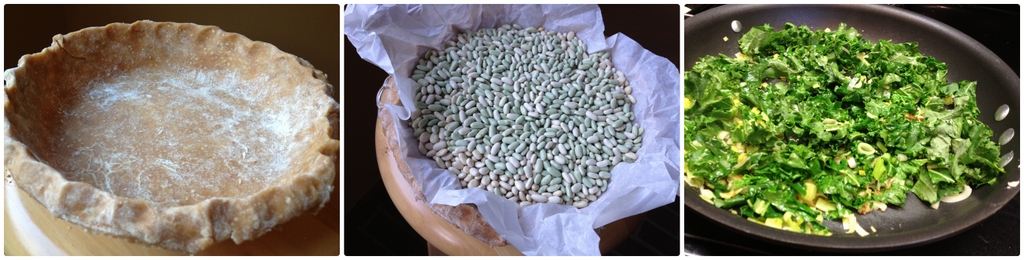
Turn the dough out onto a floured surface and roll out to fit the tart pan. Transfer the dough to the pan, trim the edges and place in the fridge for 30 minutes.

While the pastry is chilling, make your filling. Melt the olive oil in a large saucepan over medium heat. Add the leeks and garlic and cook, stirring often for about 10 minutes, then add the kale and cook for a few minutes more, until wilted. Season with nutmeg and remove from the heat and allow to cool for 10 minutes or so. In a separate bowl whisk together the eggs and milk along with salt and pepper to taste.

Blind bake the pastry for 10 minutes lining it with parchment paper and filling it with beans. Remove the beans and paper and bake for a further 10-15 minutes or until the edges are golden and the base is totally dry to the touch. Remove and allow to cool for 10 minutes.

To assemble the tart, fill the pastry shell with the cooked leek and kale mixture, sprinkle over the cheese and then pour over the egg mixture. Bake for approximately 25 minutes. The filling should be just set and the edges of the pastry a deep golden brown. Cool for at least 15 minutes before serving.

ENJOY!

to print the recipe, click here

composite
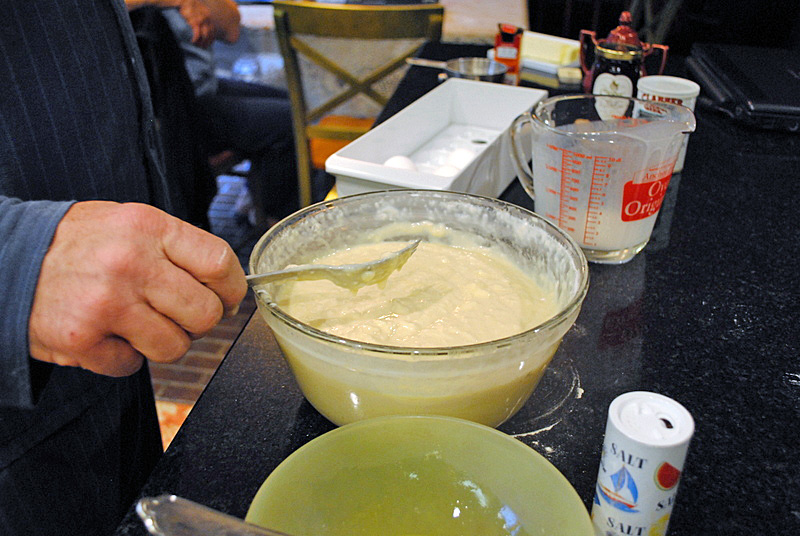
Comments:
What’s life without a little adrenaline rush? You would think that by staying away from cakes I’d be safe, right?  Not so fast.  Things were going quite well up to the moment of adding evaporated milk to the game. I grabbed my can opener, a little gadget that works like a charm, smooth, graceful, leaving no sharp edges. It usually performs a little magic around the edges, so that you cannot quite tell the can is open, but it is.  Or is it really?  Something about the edge of the can of evaporated milk simply would not cooperate and it refused to open.  I had a second can in the pantry, tried to work on it,  again no luck. I searched everywhere for an old-fashioned type can opener, but apparently ours was lost during the move.  A few slammed doors and drawers, a few words not fit to print, I finally had the brilliant idea of pairing an oyster knife with a hammer.  Punched a square hole on top of the can, and back in business I was.  (BTW, I don’t recommend doing that, it is both messy and dangerous).

IMG_1627
To add a little more emotion to the day, I forgot to buy Cheddar cheese for the recipe!  I had no cheese around, except for three little triangles of “Laughing Cow Light Original Swiss Cheese”.   I ended up mixing it as well as I could to the evaporated milk, and that was that. Finally, If you followed the original link to Baby. Food. Life, you will notice that she removed the excess dough after covering her tart pan, for a very polished look. I don’t know what I was thinking, but obviously I went into a different direction.  Oh, well…   What matters is that this crust might very well become my default recipe from now on.  We both absolutely loved it, it does have a more rustic quality thanks to the whole-wheat flour and the olive oil.  Plus, making it in a bowl using just a fork and your hands was awesome!

Susan, it was great to meet you and your blog through The Secret Recipe Club, we loved this recipe, enjoyed it three days in a row, it only got better and better!

slice

For those who want to see what my fellow friends from group D cooked up this month, don’t be shy, just click on the blue frog at the very end of my post, and happy browsing!  And those who are curious to see which recipe was chosen from my blog, and who had it, jump here for a fantastic article by Fran!  She made a favorite of ours, Vietnamese Spring Rolls.

ONE YEAR AGO: Secret Recipe Club; Triple Chocolate Brownies

TWO YEARS AGO: Shaved Asparagus Salad

THREE YEARS AGO: Indonesian Ginger Chicken


JAMMIN’ BLUEBERRY SOUR MILK PANCAKES

Once again, a guest post by Phil, my husband, best-friend, and labmate!  😉

closeup

This delicious recipe goes back to another era, back to Sunday Mass at St. Casimir’s  in Lansing MI, when I was 8 or 9 and each week mom and dad dragged us in our Sunday best to the 8 or 9 am mass, about which I most remember kneeling for extended periods with my head buried in my clasped hands on the pew, thinking about playing baseball or slot cars.   The only “redemption” from that experience was the batch of sour-milk pancakes  my mom often whipped up afterwards.   I liked them so much that after a while I began to help her, and eventually took over the Sunday morning cooking duties.   Since then I made these pancakes for my housemates, girlfriends, wife, siblings, sons and visitors to our home.    They are so simple that I never forgot them.  The key component is a now seldom-used or seen ingredient, sour milk.  In those days it was easy to come by, probably from less efficient pasteurization or fewer preservatives.   But, you can still let a quart of milk go sour, or you can buy a quart of buttermilk,  an adequate substitute.

Of course, I try to make them in a way that duplicates my mom’s,   and also my grandma’s and aunt Mildred’s pancakes.  The recipe became so popular in our family that everyone from Detroit to Chicago knew it, and they both made them for us when they visited.   However, because they all departed this world before I thought to question them about their excellent techniques, my recipe has a few of my own modifications.  I’m still wondering why my grandma’s rose less during the cooking.  I’m working on that.
pancakes1

SOUR MILK PANCAKES
(a family recipe)

Ingredients:
1 Tablespoon butter
2 Tablespoons sugar
1/2 teaspoon salt
1 large egg
7/8 cup flour (see recipe for details)
1/2 teaspoon baking powder
1 cup sour milk (or buttermilk)
1/2 teaspoon baking soda

Method:
1.  In a large bowl cream 1 T butter, 2 T sugar, ½ t salt.

2.  Beat in 1 large (or extra-large / jumbo) egg.

3.  To the flour  (cake, unbleached, whole-wheat, buckwheat or my favorite: half unbleached/half whole-wheat flour) mix in ½ t baking powder; add it to the egg mixture.

4.  To 1 cup sour milk (or buttermilk) in a 2-cup measuring container add ½ t baking soda; whip by hand with a fork until the sound deepens when the milk thickens; add to the batch and fold until fully mixed.

5.  Rub a gas or electric griddle (at 375 F) with a small tab of butter on a paper towel.  Use an ice-cream scoop to deposit the pancakes; sprinkle in blueberries if you like; cook until the bubbles pop and then flip them for a couple of minutes.

6.  Splurge and serve with real maple syrup.  No need to butter them.   Skip the blueberries on half the batch and  top a couple of  pancakes with  eggs fried over-easy…that’s breakfast, baby.

ENJOY!

to print the recipe, click here

composite

Sally’s comments: I find it hard to believe that this blog is approaching its 4th year of life, and I had not yet shared Phil’s recipe for blueberry pancakes. It is outrageous! One important thing to consider: these pancakes must be made by a man still wearing his pajamas. It is part of the deal. They taste much better this way…  😉

battertable

ONE YEAR AGO: Scallops with Black Pasta in Orange Cream Sauce

TWO YEARS AGO: Stir-fried Chicken with Creamed Corn

THREE YEARS AGO: Potato, Cheddar, and Chive Torpedo

BRAN MUFFINS, TAKE TWO

Bran muffins make Phil very very happy, so I tried a new recipe for his favorite morning treat.  On a whim, I went with the “back of the bag” recipe in the Bob’s Red Mill Wheat Bran product.  I reasoned that they probably tested and re-tested the recipe to make sure whoever baked a batch would love it and buy another bag. 😉  I also thought that using applesauce in the batter would make it moist and flavorful. I was right.
muffin2
MOLASSES BRAN MUFFINS
(from Bob’s Red Mill)

1 cup wheat bran
1 1/2 cups whole-wheat flour
1/2 cup raisins
1 tsp. baking powder
1 tsp. baking soda
1 cup milk
1/2 cup molasses (or honey)
3/4 cup applesauce
1/4 cup chopped walnuts (toasted is best)
2 Tbsp. oil
2 eggs, beaten

Heat the oven to 400°F. Combine wheat bran, flour, baking soda and baking powder. Stir in nuts and raisins. In a separate bowl, blend applesauce, milk, molasses, oil and egg. Add to dry ingredients and stir just until moistened. Spoon into a muffin pan lined with paper muffin cups) and bake for  20 minutes. Makes 12 regular-size muffins.

ENJOY!

to print the recipe, click here

composite

Comments:  Between these bran muffins and the first one I blogged about, I think I prefer this batch because of the prominent apple taste that mellows the “hippie factor” of the wheat bran.  Did I hit the jackpot with them?  And by jackpot I mean bran muffins that match the ones of Phil’s past. Not quite yet there.  However, after almost 13 years of marriage, I finally got a hint on one of the issues: size.  The muffins he loved so much were bigger.  Size does matter after all!  A shocking realization.   But, here is the tricky part, in those days they did not make them gigantic. They were just slightly bigger. So, now I am on a mission to find a pan that will make a muffin somewhere between “regular” and “jumbo”.   As to taste, I am on the right track.  Raisins and walnuts, yes.  But next time, less apple, and honey instead of molasses.

I do not go down without a fight, my friends! One day, I will bake the bran muffin of his dreams…

ONE  YEAR AGO: Brown Butter Chocolate Chip Cookies

TWO YEARS AGO: Breville Sourdough

THREE YEARS AGO: Vienna Bread

MERRY CHRISTMAS!

For those who celebrate, we wish you a Merry Christmas!  In proper holiday spirit, I will share with you a recipe that has festive written all over it: Sourdough Popovers!  They were described quite appropriately in the King Arthur website as “High, Wide, and Handsome”    😉
baked222

SOURDOUGH POPOVERS
(from King Arthur website)

1 cup milk (full-fat, reduced-fat, or skim)
3 large eggs
1/2 cup sourdough starter, fed or unfed
3/4 teaspoon salt
1 cup unbleached all-purpose flour

In the microwave or in a small saucepan, warm the milk until it feels just slightly warm to the touch. Combine the warm milk with the eggs, sourdough starter and salt, then mix in the flour. Don’t over-mix; a few small lumps are OK. The batter should be thinner than a pancake batter, about the consistency of heavy cream.

Heat a muffin or popover pan in the oven while it’s preheating to 450°F. Carefully remove the hot pan from the oven, and spray it thoroughly with non-stick pan spray, or brush it generously with oil or melted butter. Quickly pour the batter into the cups, filling them almost to the top. If you’re using a muffin tin, fill cups all the way to the top. Space the popovers around so there are empty cups among the full ones; this leaves more room for expansion.  Bake the popovers for 15 minutes, then reduce the oven heat to 375°F and bake for an additional 15 to 20 minutes, until popovers are golden brown.

Remove the popovers from the oven and serve immediately.

ENJOY!

to print the recipe, click here

Comments:  Popovers might be the easiest thing in the world to make! In this case, the sourdough doesn’t act as the leavening agent, it is there exclusively for taste, so don’t worry if your starter is not at its peak of activity.  A big bowl, a wire whisk, and a few minutes of preparation is all you’ll need. The real magic happens in the very hot oven.  If you have kids around, let them peek as the popovers rise up and up and up, it’s fun to follow their baking.

Enjoy the popovers as soon as they are out of the oven, because they will deflate somewhat.  Break each one open, and dig in!
goodie111
They are perfect with roast meats.  We enjoyed these babies with roast turkey, gravy, and the most delicious cranberry sauce with dried Mission figs and Port wine.  Recipe to be featured soon, stay tuned… 😉
plateddd

I am submitting this post to Susan’s Yeastspotting….

ONE YEAR AGO: Merry Christmas!

TWO YEARS AGO:  Sourdough Focaccia, with a twist

THREE YEARS AGO: Merry Christmas!

PUMPKIN ESPRESSO LOAF

Baker Street strikes again!  For the most part, I want to make everything she blogs about, but my frantic life gets in the way.  One of the things that happens as you accumulate more experience in the kitchen, is a certain “feeling” for a recipe.  I usually spot a winner just by reading the ingredients, and this pumpkin espresso loaf, covered with crushed hazelnuts made me dream.  I knew we would love it.  It is quite simple to prepare, and it smells AMAZING (all caps required) as it bakes.  It is moist, not too sweet, the coffee flavor quite subtle, and the crumb topping gives that contrast of texture which is always a nice touch on this type of loaf.

loaf2222
PUMPKIN ESPRESSO BREAD
(from Baker Street)

for the loaf:
¾ cup (150 grams) brown sugar, packed
1 cup (245 grams) canned pumpkin puree
½ cup (118 ml) vegetable oil
¼ cup (59 ml) milk
2 large eggs
1 teaspoon vanilla extract
1½ cups (188 grams) all-purpose flour
1½ teaspoons baking soda
1 tablespoon espresso powder
1 teaspoon ground cinnamon
½ teaspoon ground nutmeg
½ teaspoon ground cloves
½ teaspoon salt

for the topping:
½ cup hazelnut, chopped roughly
3 tablespoons brown sugar, packed
½ teaspoon espresso powder
½ teaspoon ground cinnamon

Heat oven to 350F and generously grease a 9 x 5-inch loaf pan.

Prepare the topping by combining all ingredients in a small bowl, and set aside.

In a medium bowl, combine flour, baking soda, espresso powder, spices, and salt. Reserve. In a large mixing bowl, whisk together the brown sugar, pumpkin puree, oil, milk, eggs, and vanilla extract.  Gently fold in the flour mixture and spread the batter evenly into prepared pan.

Sprinkle the espresso topping evenly over the pumpkin batter. Bake for 50-60 minutes, or until a toothpick inserted into the center comes out clean. Allow to cool before cutting and serving.

ENJOY!

to print the recipe, click here

sliced2

This was SUCH a delicious bread, loaf, whatever you want to call it.  With a cup of cappuccino in the morning, it starts your day on a perfectly warm note. After the loaf was in the oven, I said to myself that some cardamon could be a good addition. Phil, on the other hand, thinks that mini-chocolate chips would take this loaf to unprecedented levels of decadence.  Interestingly enough, that is exactly the variation recommended over at Baker Street.  Keep that in mind if you make this loaf.  And I hope you do!  😉

ONE YEAR AGO: Caramelized Carrot Soup

TWO YEARS AGO: Miso-Grilled Shrimp

THREE YEARS AGO: A Special Holiday Fruitcake