PAIN RUSTIQUE

Make this bread!  Even if you’re yeast-0-phobic,  even if you think you can’t  bake a bread to save your own life, …PLEASE  make this bread.  I’ll hold your hand throughout, and toast your success at the end!

PAIN RUSTIQUE
(from Hamelman’s Bread)

For the poolish
1 lb bread flour (3 + 5/8 cup)
1 lb water (2 cups)
1/4  tsp instant dry yeast

For the dough:
all the poolish made the previous day (about 2 lb)
6.1 oz water (3/4 cup)
1 lb bread flour (3 + 5/8 cup)
0.6 oz salt (1 Tbs)
0.17 oz yeast (1 + 1/2 tsp)

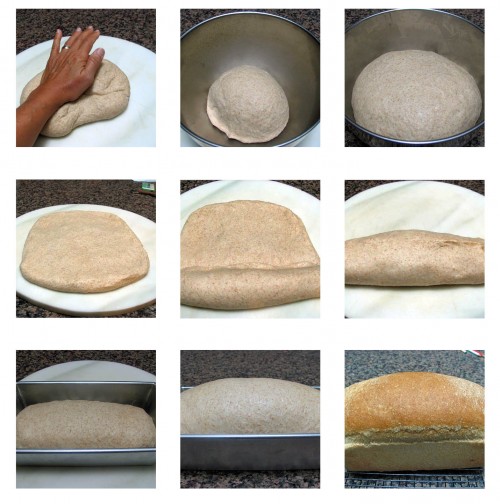
Make the poolish the day before: add water to a bowl, sprinkle the yeast on top, add the flour and mix until smooth with a large spoon.  Cover with plastic wrap and let it stand at room temperature for 12 to 16 hours (ideal temperature: 70 F).

This is what the poolish will look like the next day….

Prepare the dough:  add the flour, water and fermented poolish to the bowl of a Kitchen Aid-type mixer.   Don’t add the yeast or the salt yet.  Mix on first speed (or by hand) until it all comes together in a shaggy-looking mass.  Cover the bowl and let this mixture rest for 20 to 30 minutes.

Add the salt and the yeast over the dough, turn the mixer to the second speed and mix for 2 minutes.  Ideally, the temperature of the dough should reach about 76 F.  If kneading by hand, then work the dough until it’s smooth, about 6 minutes.

Cover the bowl and let it rest for 25 minutes.  Give a quick couple of folds to the dough (as shown here), let it rest 25 more minutes.   Fold the dough a couple of times again, and let it rest 20-25 minutes more, undisturbed.

Gently divide the dough into two pieces, trying not to deflate it too much, and place them over lightly floured kitchen towels. Cover,  and let them stay for 20 to 25 minutes at room temperature, for a final quick proofing.  No need to shape the loaves in any particular way.

Invert the dough over parchment paper, so that the floured side is now up.  Slash the bread quickly with a single stroke of a razor blade or sharp knife.

Bake the loaves in a 460F oven, with steam (add ice cubes to a baking pan placed at the bottom of the oven, or use any method of your choice to add steam in the initial baking time).  The bread will be ready in about 35 minutes.   Let them cool completely on a rack before slicing.

ENJOY!

to print the recipe, click here

Comments:  My expectations were not too high for this bread when I first made it:  no wild yeast, no involved kneading and shaping.  When the loaves were ready to go into the oven, they seemed too flat, with a tendency to spread.   However,  they had  nice oven bounce, and the simple slash perfectly coached them into the final shape.   Each loaf was light as a feather, with a nice crumb and subtle sour flavor, thanks to the poolish.

Even though this recipe comes from Hamelmn’s book,  I did not make it as part of the Mellow Baker’s Challenge.  I had to take  a step back and turn into an avid observer of the group instead of a participant.  But make sure you jump over there to see what they are baking,  some great breads for the month of August, including baguettes…  😉

I am submitting this post to Susan’s Yestspotting

ONE YEAR AGO: A Souffle to Remember…  Julia Child

Add to FacebookAdd to DiggAdd to Del.icio.usAdd to StumbleuponAdd to RedditAdd to BlinklistAdd to TwitterAdd to TechnoratiAdd to Yahoo BuzzAdd to Newsvine

CINNAMON TURBAN BREAD

King Arthur all purpose flour and instant yeast: $11

Penzey’s Ceylon cinnamon: $4

Sugar, oil, salt: $2.50

Baking Noon Rogani just in time to join this party: PRICELESS!

NOON ROGANI
(from King Arthur website)

19 ounces all purpose flour
1 teaspoon instant yeast
10 ounces warm water
2 teaspoons salt
1 tablespoon sugar
1 tablespoon vegetable oil

filling
2 ounces melted butter, divided
2 to 4 ounces sugar to taste
2 teaspoons cinnamon

In a large bowl mix the flour, water and yeast to a thick shaggy mass. Let rest for 10 minutes. After 10 minutes add the salt, sugar and vegetable oil to create a dough that is not sticky to the touch but still slightly tacky. Knead by hand, mixer or bread machine until the dough is smooth and elastic.

Place the dough in a greased bowl and cover. Let rise until puffy, about 30-40 minutes.

Turn out the dough onto a well floured surface. Gently deflate and shape into a square pillow. Roll the square to approximately 23″ square and 1/8th” thick.

Mix the cinnamon and sugar in a small bowl. Brush the dough with half of the melted butter and generously sprinkle on the cinnamon sugar mixture. Use more or less sugar to taste.
Roll up the dough tightly, pinching the seam well, and continue rolling and stretching the rope until it reaches a length of 5 feet. Twist the entire length of the rope similar to wringing out a towel, but much more loosely.

On a greased baking sheet or parchment paper, coil the rope into a round spiral, turban style. Don’t wrap too tightly, keep the coil slightly loose to aid in the final rise. Brush with the remaining melted butter and set aside, covered, to rise until puffy 40-45 minutes.

Bake the loaf in a preheated 400°F oven for 30-45 minutes or until deeply golden brown. Cool slightly on a rack before serving. Makes one 10-12″ spiral.

ENJOY!

to print the recipe, click here

Comments: This was a fun bread to make, the dough was easy to handle, it would be a great baking project for kids. I decided to halve the recipe, but should have taken that in account during baking: 35 minutes was too long, and my bread did not turn as soft and tender inside, as others described. Live and learn, right?  It still tasted great, like a giant cinnamon roll, minus the icing.

Note to self: If halving the recipe reduce baking time to 25 minutes!

I am submitting this post to Susan’s Yeastspotting.

ONE YEAR AGO: Summertime Gratin


Add to FacebookAdd to DiggAdd to Del.icio.usAdd to StumbleuponAdd to RedditAdd to BlinklistAdd to TwitterAdd to TechnoratiAdd to Yahoo BuzzAdd to Newsvine

MELLOW BAKERS: BEER BREAD WITH ROASTED BARLEY

Taking the Mellow Bakers Challenge in the mellowest possible way, I made the last bread of June in the first week of July… 😉 This was a slightly more complicated recipe, as it required roasted barley – not just the grain, mind you – but “malted barley“, not very easy to find, unless you have access to a beer brewery. Following the footsteps of other bakers, I decided to make my own, and it was a fun (and successful) project!  I highly recommend that you read Susan’s article about malt and its uses in bread,  she did a great job explaining it all.

For Hamelman’s Beer Bread, you need a poolish (made the day before), roasted barley, beer, flour and commercial yeast. The malted barley gives the bread a beautiful reddish tone, and the beer a flavor that is surprisingly delicate for such a hearty-looking bread. To allow me to bake it early in the morning, I retarded the dough overnight after the final proofing.

Comments: Making malted barley seems intimidating at first, but once again I asked the help of an expert, and brought Dan Lepard to the rescue. His book, The Handmade Loaf, has clear instructions on how to do it. Here is a quick summary of it…

THe process starts by soaking the grains in water, for 2 to 3 days, keeping them in a cool place..

Then, the grains are rinsed, spread over a damp paper, covered, and kept for 4 days in a cool place, until the sprouted portion is twice the size of the grain. Aren’t they cute? 😉
(click to enlarge)

Finally, the sprouted barley is thoroughly dried (for 12 hours or so), and either roasted for a few minutes and ground (to make this bread), or dried at 50 C for several hours and ground into a powder (to make malt powder, and use in any bread that benefits from it).

Follow this link, so you can read about all my fellow bakers who stuck to the plan and had this bread made last month… 😉

Add to FacebookAdd to DiggAdd to Del.icio.usAdd to StumbleuponAdd to RedditAdd to BlinklistAdd to TwitterAdd to TechnoratiAdd to Yahoo BuzzAdd to Newsvine

A GOLDEN SANDWICH BREAD

The past couple years of sourdough baking turned me into a wild yeast purist, to the point that using commercial yeast feels like cheating. So, it’s time for a confession: I cheated last weekend and used commercial yeast to bake my bread. However, instead of penance, I got a beautiful, golden loaf to enjoy the rest of the week! 😉

SEMOLINA SANDWICH LOAF
(from Daniel Leader, Local Breads)

300 grams water (1 + 1/2 cups)   at 70 to 78  F
5 grams instant yeast (1 tsp)
500 grams fine semolina (durum) flour (3 + 1/4 cup)
15 grams granulated sugar (1 Tbs)
50 grams extra-virgin olive oil (1/4 cup)
10 grams sea salt (1 + 1/2 tsp)

Pour the water into the bowl of a stand mixer. Add the yeast, flour, sugar, olive oil and salt and stir just until a rough dough forms.

Use the dough hook and mix the dough on medium speed (4 on a KitchenAid type mixer) until it is very smooth and elastic, about 9 minutes. Transfer the dough to a lightly oiled container, cover and leave to rise at room temperature until it doubles (1.5  to 2 hours).

Optional: go for a run during this time and come back to find out that 1 hour and 10 minutes later your dough is about to walk out the door to greet you).


Grease a loaf pan (8 1/2 x 4 1/2) with oil. Lightly dust the counter with semolina flour, place the dough on it, and shape it as a loaf. Insert it into the pan, with the seam side down. Dust the top lightly with semolina flour, and cover the pan. Let the loaf rise at room temperature (70 to 75 degrees) until it crowns just above the rim of the pan, 1 to 1 1/2 hours. (my loaf got there in only 45 minutes – must be the phase of the moon 😉

Bake in a 375 F oven until the loaf pulls away from the sides of the pan, and the crust is golden brown – 35 to 45 minutes.

Carefully remove the bread from the pan, and cool it over a rack for at least one hour before slicing it. Marvel at the beautiful, golden crumb, and…..

ENJOY!

to print the recipe, click here

Comments: I highly recommend this recipe if you are new to bread making.  The dough handles very well, and has impressive oven spring, baking into a gorgeous loaf that rises way above the pan. The semolina flour allows the  bread to last slightly longer than most homemade breads would – just store it at room temperature, inside a paper bag. Slightly toasted slices are delicious as part of a sandwich or just spread with jam or butter.

I am submitting this post to Susan’s Yeastspotting… make sure you stop by on Friday to see her weekly collection of breads.

ONE YEAR AGO: Tomato Confit with Arugula and Zucchini

Add to FacebookAdd to DiggAdd to Del.icio.usAdd to StumbleuponAdd to RedditAdd to BlinklistAdd to TwitterAdd to TechnoratiAdd to Yahoo BuzzAdd to Newsvine

MELLOW BAKERS: PIZZA! PIZZA!

My second recipe for the month of June in the Mellow Bakers Challenge is Hamelman’s pizza dough. I was anxious to try this one, to compare it with my favorite recipe, that you can find here. Hamelman’s dough uses a biga – a pre-ferment of flour, water, and yeast – that is incorporated in the final dough, together with a small amount of additional yeast. Apart from that, the recipes are quite similar.

Last week we had a small pizza party at home, and Hamelman’s method was put to the test. It passed with flying colors, or… should I say… ballooning colors!

In the Summer, we avoid turning the oven on, so we use our grill as an improvised oven, placing unglazed tiles over its grids, and cooking the pizza on them. This is not a grilled pizza, simply a regular pizza baked inside the grill. Once you get the temperature right, it works like a charm, each pizza will be ready in about 7 minutes. My husband was the one who had the idea for this “oven-grill-method”, yet another evidence that I won the jackpot when I married him.

So, what’s the verdict? This dough deserves to share the first prize with my default recipe – excellent texture and flavor. The only thing that prevents me from placing it ahead of Fine Cooking, is the 2 hour rise with a folding cycle after 1 hour. That makes it slightly more complicated to have pizza on a weeknight. But, it is a minor detail, and I will definitely be making this recipe again and again during the weekend.

I remind everyone that we are not supposed to share the recipes for our Mellow Bakers Challenge, so if you are interested, consider buying Hamelman’s book “Bread”, where all these recipes will be waiting for you… 😉

That evening, we made 8 pizzas, this one was particularly tasty: sauteed cremini mushrooms, roasted yellow bell peppers, and smoked mozzarella. Pizza parties are a lot of fun!

Many Mellow Bakers have already enjoyed their pizzas, if you want to see their report, jump here.

Add to FacebookAdd to DiggAdd to Del.icio.usAdd to StumbleuponAdd to RedditAdd to BlinklistAdd to TwitterAdd to TechnoratiAdd to Yahoo BuzzAdd to Newsvine

One year ago: From Backyard to Kitchen….