OH, MY GOD! I THINK I SAW SOMETHING….

At the end of a beautiful Summer night we were sitting at the kitchen island chatting about our  day. From the corner of my eye I see something.

“Oh, my God!  I think I saw a mouse!”.

“No, you didn’t”.

(That type of remark never fails to hit a nerve)

“What do you mean, no I didn’t?” 

“You really think you did? Where?”

“From under the stove, I think it ran and passed through the air conditioning vent at the bottom of the cabinet”

composite4(Phil – reluctantly, I must add – gets up and inspects the vent)

“There is NO WAY a mouse can pass through THAT. Don’t worry, you didn’t see anything”

 (I wasn’t particularly thrilled, but accepted that maybe it was all part of my vivid imagination)

clock

 TWENTY MINUTES LATER….

I get up to grab a glass of water in the fridge.  I know, I know, it’s always me. Never anyone else.

A gray mouse dashes between me and the fridge, and hides behind the trash can.

 (Insert high-pitched scream here)

rodentpaht2

“You see? You see? I TOLD YOU!  Why don’t you EVER BELIEVE ME?  You think I’m some kind of a Drama Queen, don’t you? So there you have it: THERE WAS A MOUSE ALL ALONG!  We’ve probably been living with this monster for months, maybe there is more than one, maybe there is a whole family, but NOOOOOO, “you didn’t see a mouse, Sally”.

“Ok, ok, I am sorry. We do have a mouse. I tell you what, let’s get the dogs to take care of him”.

So we devised this perfect plan.  First, Phil stood by the trash can with a broom ready in case the creature decided to run away.  Then, doing my best to stop shaking, I locked Chief in his cage, and brought Oscar and Buck to the war zone. I was actually quite optimistic,  having witnessed more than once Buck retrieving and killing snakes in our backyard.

“Ready boys? Ready boys? There’s a mouse, there’s a mouse, GO GET IT!”

(Phil moves the trash can. No action, apart from my preemptive screaming)

“Where IS the mouse?”

“I don’t know, maybe it went inside the trash can, let’s see”

“NOOOOOOOOOOO!  Don’t open it here, if the mouse jumps out I WILL have a heart attack and die, I SWEAR I WILL. You simply cannot open it here. How can you even CONSIDER doing that?

(I think the husband sighed)

“OK, FINE!  I will carry it all the way to the garage and open it there if that makes you happy.”

I did not care for his tone a bit, but was too terror-stricken to let him have a piece of my mind. Plus, the “all the way to the garage” is a few steps, but “I” am the Drama Queen. How unfair is that, can you even stand it?

As he is moving the trash can, the rodent pops from underneath, runs like Usain Bolt, ignores my crazed screaming, and passes right by Oscar’s nose. Our valiant dog BACKED AWAY FROM IT, as if afraid, disgusted or a mixture of both.  Buck? He was already laying in his bed, oblivious to the whole thing.

Mouse disappeared under the stove.  Five minutes later he pops up out of who knows where over the countertop by the sink, sprints in front of my beautiful salt and pepper bowls, jumps and dives through the opening of the stove burner!

mousedive

In a complete state of mental disarray,  I called it a day. Left the kitchen after informing Oscar and Buck that – effective immediately – they were on a diet.

Phil set up a mouse trap with ham and peanut butter and placed it under the stove.   The beast was pronounced dead next morning, around 5:25am, when we entered the premises to have our cappuccino.

Never a dull moment, my friends.  Never a dull moment.

ONE YEAR AGO: Celebrate Wednesday with Hoisin-Grilled Chicken & Soba Noodles

TWO YEARS AGO: The Manhattan Project

THREE YEARS AGO: Carrot “Nib” Orzo

FOUR YEARS AGO:  A Sticky Situation

FIVE YEARS AGO:  The Garden


FRENCH LEMON YOGURT CAKE WITH POPPYSEEDS

It’s a little hard to believe that it took me 5 years to finally blog on this cake, a classic that I’ve made quite a few times in the past decade to take to graduate students in our lab. The funny thing is that I thought it was already in the blog, so whenever I made it, I never bothered taking a picture. Last month, searching through my index to retrieve the recipe, I was shocked to realize the harsh reality: it was nowhere to be found.   Better late than never, this is the cake-challenged dream.  One bowl, one whisk, absolutely nothing can go wrong. Except of course, if you tip the bowl…

IMG_4759

FRENCH-STYLE YOGURT LEMON CAKE
(from Alpineberry)

for the cake:
3/4 cup plain yogurt
1 cup granulated sugar
1 tbsp finely grated lemon zest
3 large eggs
1 + 1/2 cups all-purpose flour
2 tsp baking powder
1 tbsp poppy seeds
1/3 cup canola oil

for the glaze:
1/4 cup freshly squeezed lemon juice
1/3 cup powdered sugar

Heat the oven to 350F. Butter a 9-inch round cake pan. Line with a parchment circle and butter the paper.

In a large bowl, mix the yogurt, sugar, and lemon zest with a whisk. spoon. Add the eggs and mix well.  Add the flour, baking powder, and poppy seeds. Mix until flour is just incorporated.

Add the oil and mix well. The batter will look curdled at first but it will come together. Pour the batter into your prepared pan.

Bake at 350F for 30-35 minutes, until your cake tester is clean and the cake springs back when lightly touched.

Allow cake to cool in pan on a rack for about 15 minutes. Remove cake from the pan and set on a rack to cool completely.

Combine the lemon juice and powdered sugar and spoon it gently over the cake. The glaze will be thin and will soak in like a syrup.

ENJOY!

to print the recipe, click here

Such a perfect little dessert or morning treat with a cup of cappuccino.  Not too sweet, not too rich, poppy seeds are of course optional, but they add a very unique flavor, and look pretty cute in their random distribution through the cake.  If you have kids, it will be hard to find a recipe more appropriate for their first lesson in baking. By starting them early enough on this path, they won’t turn into cake-o-phobes like certain food bloggers you may know 😉


sliced

Disclaimer: No bowls were tipped during the making of this cake.
Isn’t that something?


ONE YEAR AGO: In My Kitchen – July 2013

TWO YEARS AGO: Jacques Torres Chocolate Chip Cookies

THREE YEARS AGO: Ina Garten’s Banana Bran Muffins

FOUR YEARS AGO: Beer Bread with Roasted Barley

FIVE YEARS AGO: Tomato Confit with Arugula and Zucchini

SOUS-VIDE PORK CHOPS WITH ROASTED POBLANO BUTTER

Cooking certain cuts of pork in the Bewitching Kitchen can be a bit tricky. No matter how many chefs, cooks and food bloggers recommend cooking pork medium or even medium-rare claiming that it’s safe and tastes better, we prefer our pork to be fully cooked, approaching well-done.  Sorry, folks, it’s a matter of taste… At that point, the less marbled pieces will end up dry.  So, I pretty much abandoned center-cut pork loin chops in favor of other cuts. Pork tenderloin is my number one choice, and for braises and low-roasting I go with pork shoulder.   Let’s bring sous-vide to the scene.  Now I can cook the meat to the point we enjoy it, ending with a piece of meat that is both tender and juicy.  This recipe, by the way, was the one that really sold the sous-vide concept to Phil.  He was amazed by how perfectly cooked these turned out!

Pork sous vide


PORK LOIN CHOPS WITH ROASTED POBLANO BUTTER
(from the Bewitching Kitchen)

for the compound butter:
2 sticks of butter at room temperature
1 small poblano chili, roasted and peeled, seeds removed
1 Tbsp minced cilantro
zest of 1/2 lime
1/2 teaspoon salt
black pepper to taste

for the brine:
2 cups water
2 Tbs salt
1 Tbs sugar

for the meat:
4 center cut pork chops, boneless
1 tablespoon butter (probably a bit less)
grated ginger to taste
2 Tablespoons soy sauce
2 Tablespoons honey
1 teaspoon mustard
1 teaspoon lime juice

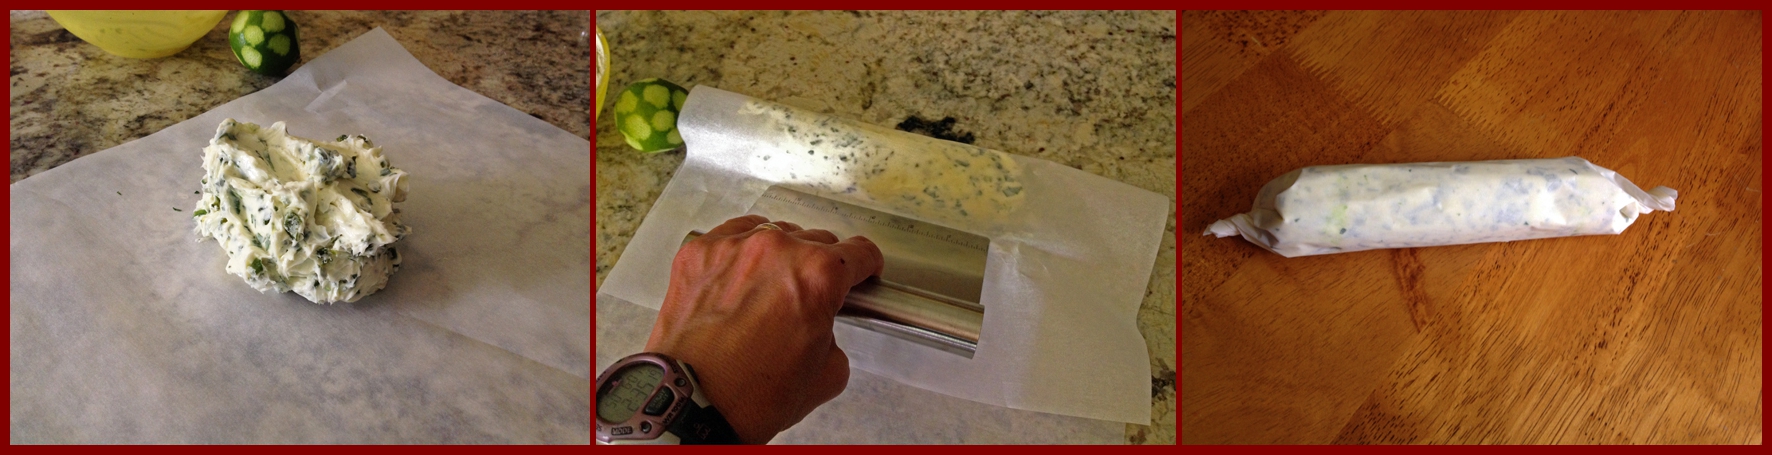
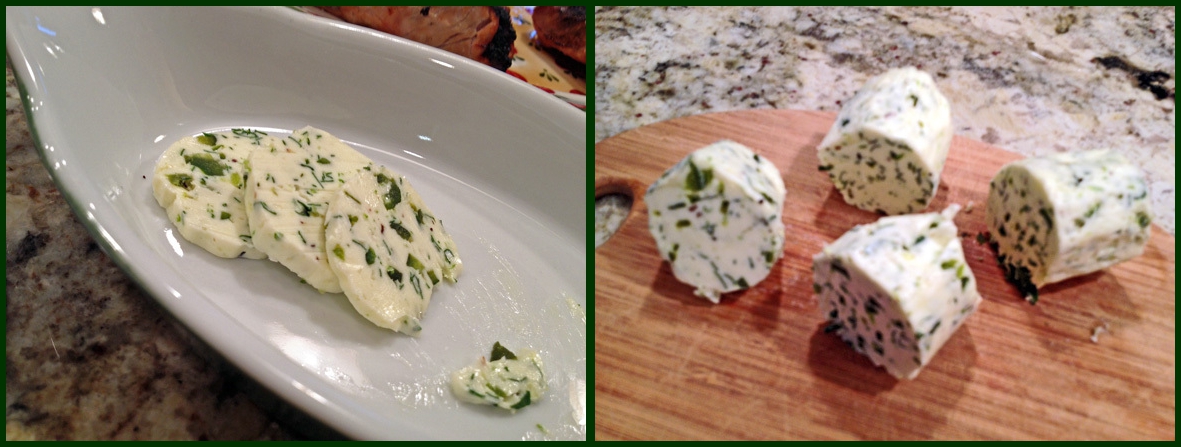
Make the compound butter earlier in the day or several days before. Mix all ingredients well, form the butter into a log shape over parchment paper, rolling it tightly.  Place the roll in the fridge for several hours, cut in slices when ready to use.  Freeze leftover slices in a plastic bag.

Make a brine by dissolving the salt and sugar in 2 cups of cold water.  Place the pork chops in the brine, refrigerate for a couple of hours.  Remove the meat from the brine, rinse briefly and pat dry.  Add a little bit of butter and grated ginger on top of each piece of pork, and place two chops inside each sealable bag.

Seal the bags and place in a sous-vide bath set for 140F for 6 hours.

When the time is almost up, mix the soy sauce, honey, mustard and lime juice in a small bowl.  Remove the meat from the bag, brush the pieces with this mixture and grill very quickly on a hot grill just to char the surface, a couple of minutes per side.

Serve with a piece of compound butter on top.

ENJOY!

to print the recipe, click here

composite

If you’ve never made compound butter, that’s a nice cooking project for a Saturday afternoon. You can flavor it with many different fresh herbs, the traditional kind uses minced parsley.  I went with a lot of roasted poblano, a small amount of cilantro and some lime zest. Using a bench scraper helps a lot to get the butter shaped as a nice roll, but next time I will add a layer of plastic wrap underneath the paper. The butter must be very cold when you serve it, so that it slices easily. It is hard to make compound butter using less than 2 sticks, so you will have plenty of slices to save in the freezer for later. Just remove what you will use a few minutes before dinner time.

composite
We both really loved this meal. Take a look at how juicy the slice of pork turned out! We served it with mashed cauliflower and sautéed broccolini.  A perfect way to end a Sunday!

Sliced

If you do not have a sous-vide, the exact same recipe can be made on the grill, simply brine it before, brush with the soy mixture (add the ginger to the rest of the ingredients) and grill, preferably with indirect heat to prevent the surface from burning too fast. If you are anti-butter, I feel a bit sorry for you, but the sous-vide pork will be ok on its own.    😉

ONE YEAR AGO: Roasted Strawberry Buttermilk Sherbet

TWO YEARS AGO: Amazing Ribs for the 4th of July!

THREE YEARS AGO: Baby Back Ribs on the 4th of July

FOUR YEARS AGO: Blueberry Muffins

FIVE YEARS AGO: A Pie for your 4th of July

AND HERE ARE THE WINNERS!

All names were written in pieces of paper, carefully folded.  The husband picked two names, the first one will get the beautifully crafted wooden board, and the second will get the cookbook, My Paris Kitchen.    Not surprisingly, my beloved managed to pick two gorgeous ladies….. he’s got a magic touch, I suppose…   😉

winners


Congrats to the winners, and please send me your address info so I can get those babies in the mail for you!


WHEAT BERRY CARAWAY BREAD

Time running out to enter the Bewitching giveaway… click HERE to join the fun!

WheatBerryCarawayBreadMom and her kids…

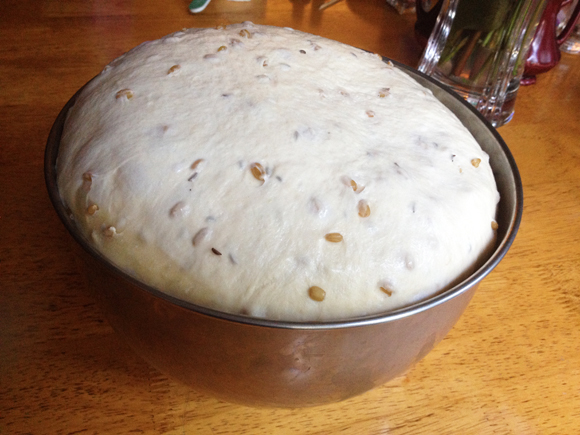
This bread was featured by the bloggers at Bread Baking Babes. I do not participate of this group event, but Ilva – from Lucullian Delights – does and when she blogged about this recipe, I made it on the following weekend, no time wasted.  The original recipe from Peter Reinhart called for wild rice and onions, but she decided to use barley and caraway.  I went with a modified version of her modified recipe, keeping the caraway but replacing the barley with wheat berries.  A soft crumb, permeated with just enough crunch with the wheat berries, and that great flavor given by caraway seeds.  You would almost think about rye bread as you savor this bread, since caraway is so often used in European rye concoctions. But it is definitely different.  A wonderful dough to work with, rose like a balloon…. what a great sight this is for a bread baker, whether or not she is a babe…   😉

risen2

WHEAT BERRY AND CARAWAY BREAD
(adapted from Ilva’s recipe)

6 cups (765 g) bread flour
2 + 1/4 teaspoons (17 g) salt
2 tablespoons (19 g) instant yeast
1 cup (170 g) cooked wheat berries
1/4 cup (56.5 g) brown sugar
1+1/2 cups (340 g) lukewarm water
1/2 cup (113 g) lukewarm buttermilk
1 Tablespoon caraway seeds
1 egg white, for egg wash (optional)
1 tablespoon water, for egg wash (optional)

The day before baking:
Combine all of the ingredients, except the egg wash, in a mixing bowl. If using a mixer, use the paddle attachment and mix on the lowest speed for 1 minute. If mixing by hand, use a large spoon and stir for 1 minute. The dough should be sticky, coarse, and shaggy. Let the dough rest for 5 minutes. Switch to the dough hook and mix on medium-low speed, or continue mixing by hand, for 4 minutes, adjusting with flour or water as needed to keep the dough ball together. The dough should be soft, supple, and slightly sticky.

Transfer the dough to a lightly floured work surface. Knead the dough for 2 to 3 minutes, adding more flour as needed to prevent sticking. The dough will still be soft and slightly sticky but will hold together to form a soft, supple ball. Place the dough in a clean, lightly oiled bowl, cover the bowl tightly with plastic wrap, and immediately refrigerate overnight or for up to 4 days.

On Baking Day:
Remove the dough from the refrigerator about 2 hours before you plan to bake. Shape the dough into one or more loaves, in any shape you like, free form or in a loaf pan (if using a 5 by 9 inch pan, use 1kg of dough). For sandwich loaves, proof the dough in greased loaf pans. For freestanding loaves and rolls, line a sheet pan with parchment paper or a silicone mat and proof the dough on the pan.

Mist the top of the dough with spray oil and cover loosely with plastic wrap. Let the dough rise at room temperature for 1.5 to 2 hours, until increased to about 1.5 times its original size. In loaf pans, the dough should dome at least 1 inch above the rim. If you’d like to make the rolls more shiny, whisk the egg white and water together, brush the tops of the rolls with the egg wash just before they’re ready to bake.

Heat the oven to 350°F and bake the loaves for 10 to 15 minutes, then rotate the pan. Total baking time is 45 to 55 minutes for loaves, and only 20 to 25 minutes for rolls. The bread is done when it has a rich golden color, the loaf sounds hollow when thumped on the bottom, and the internal temperature is above 185°F in the center.

Cool on a wire rack for at least 20 minutes for rolls or 1 hour for loaves before slicing.

ENJOY!

to print the recipe, click here

Rolls1
Comments:  This recipe makes A LOT of dough…  Peter recommended using only 2 ounces (around 57g) dough per small roll.  My rolls were definitely bigger than that.  Normally I do not weigh dough when shaping. For this recipe I more or less cut the dough in half, shaped one as a large ball, and divided the remaining dough in 6 pieces, eyeballing the process.   For hamburger-type sandwich, they were the perfect size.

shaped
The crumb is super soft, and since I used a reasonably small amount of caraway seeds, the flavor was not overpowering.  I love caraway, but in breads I like it to be a mild presence.  This bread was perfect with our Black Bean Burgers of a recent past…

crumb
FINAL REMARK:  Remember that this bread takes TWO days to prepare.  On the first day you will mix the dough, and place it in the fridge.  Next day you resume shaping and baking.  The fact that the dough can be kept in the fridge for a few days will make it easy to have freshly baked bread on a whim.  Or almost on a whim…


I thank Ilva for the inspiration, and Susan for her Yeastspotting venue so I can share this bread with other bread baking “babes’…


ONE YEAR AGO: Mexican Focaccia 

TWO YEARS AGO: Sunny Kamut Salad with Roasted Lemon Vinaigrette

THREE YEARS AGO: Pane de Casa & Crostini

FOUR YEARS AGO: Down-home Dig-in Chili

FIVE YEARS AGO:  Cinnamon Rolls