SCARY GOOD PORK BURGERS

Don’t forget to enter my million page views giveaway!

Time is running out, so click here to participate…

A few weeks ago I shared with you a recipe for light brioche burger buns, and promised a future blog on a pork burger that was a perfect match for those buns. The inspiration for this recipe was a show by Giada de Laurentiis on FoodTV, but I made enough modifications to call it my own. Pork and green apples make a nice pas de deux, and to give the patties a little more spice I added a small amount of chorizo, an ingredient I’ve been using a lot lately. It packs so much flavor, but its heat is not overpowering, especially if you use it sparingly. These burgers were scary good. Scary in the sense that they almost gave me a heart attack. Read on, my friends. This post proves what I suspected for a long time. In a previous life, I was a merciless serial killer.
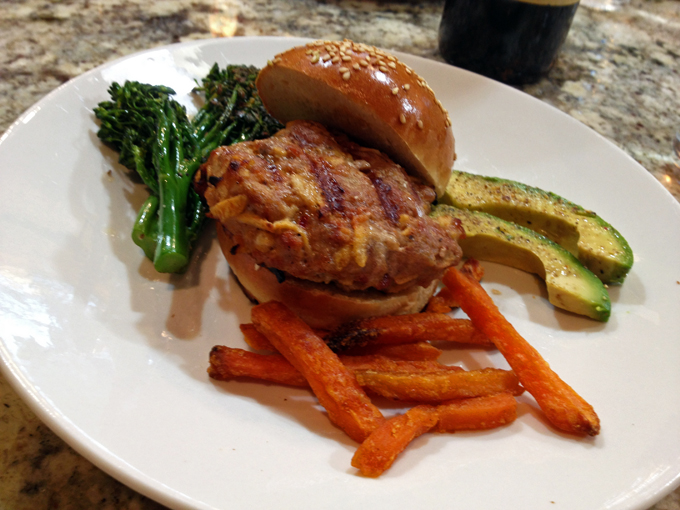
PorkBurgers

PORK BURGERS WITH APPLES AND CHORIZO
(from the Bewitching Kitchen)

2 pounds ground pork
1/2 link (about 1.5 oz) fresh pork chorizo (Mexican type)
1 Granny Smith apple, peeled, cored and shredded
1 clove garlic, finely minced
1/2 inch piece of ginger, grated
1 tsp dried thyme
salt and pepper to taste

Mix all the ingredients in a large bowl.  Do not pack the mixture too tightly.

Form into 6 medium-size patties. The mixture will be soft.   Place the patties over parchment paper and refrigerate until it’s time to grill them.

Grill them about 5 minutes per side on grates lightly coated with oil.   If you want to add a slice of cheese, do so on the final couple of minutes of grilling, or as soon as you remove them from the grill, keeping them tented with foil. Serve with tomatoes, lettuce, or any other topping you like.

ENJOY!

to print the recipe, click here

Comments:  I prepared these burgers at the end of an intense working day. I was doing experiments that require very precise timing, and once started, cannot be paused until the very end. Every reagent has to be in its spot, ready to be quickly grabbed and used. Once the prep work is all done, I take a deep breath, start the chronometer, and hope for the best.  It’s hard to have a totally flawless experiment, but that day the stars were perfectly aligned, and flawless it was. I drove home feeling on top of the world, ready to stretch the super-accurate timing to dinner preparation. Phil had to stay for another hour working in his office, so my plan was to welcome his arrival home with a nicely set dinner table, juicy pork burgers all ready.

patties

I made the patties, refrigerated them, worked on a couple of side dishes, and walked outside to light the grill.  Under one of those gorgeous Kansas sunsets,  I opened the knob of the gas tank, and lifted the lid of the grill to turn the flames on. The last thought that popped in my mind was “life is good”. And then, it quickly wasn’t anymore. Life had just gifted me a gargantuan mouse prancing over the grates. He froze when he saw me, and just as I let out a screech with the potential to wake up newborn babies in Tokyo, the creature jumped off passing one inch from my left arm, landed on the ground and disappeared into some bushes. Deja vu all over again. The worthless quadrupeds that I feed on a daily basis  went hiding inside their dog house.  Apparently they do not handle well hysterical screaming. I know, inconceivable. That marked the end of a perfectly timed meal. Instead of juicy burgers, Phil encountered a distraught wife who refused to step outside into the backyard to finish the dinner.

mouse1

Due to the profound psychological trauma this situation caused me, I was unable to use the grill for a couple of weeks. Now I go through a process of kicking the door that encloses the gas tank a couple of times, then banging on the grill lid four or five more times before opening it. I am sure the neighbors worry about my mental state in case they catch a glimpse of my routine. Granted, a foreigner can get away with a lot. For all they know, that might be a common pre-grilling performance back in Brazil.   That’s my story, and I’m sticking to it.

Back to food. These burgers were pretty tasty. I made them a second time recently and grated the apples a little finer, not sure which version I liked best, though.  There’s some visual appeal to the bigger shreds of apple peeking at the surface to say hello.  No matter how you decide to treat the fruit, the combination of pork, green apple, chorizo, a touch of ginger was spot on.  No need to use egg as a binder if you refrigerate the patties and handle them gently.  If you are feeling tropical enough, do the Brazilian thing, and release your frustrations on the lid of the grill before you light it.  One never knows….   😉

ONE YEAR AGO: Review of exercise program Focus25

TWO YEARS AGO: Celebrate Wednesday with a Thai Seafood Curry

THREE YEARS AGO:  Post-workout Breakfast

FOUR YEARS AGO: Semolina Barbecue Buns

FIVE YEARS AGO: Lavash Crackers
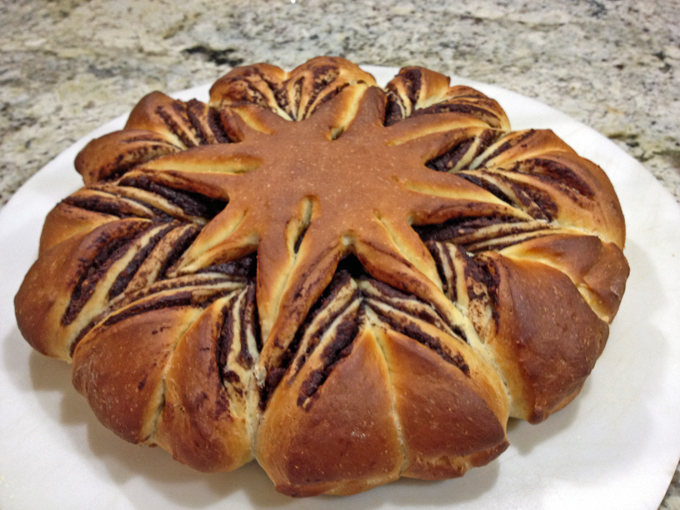
STAR-SHAPED CHOCOLATE BRIOCHE BREAD

Every once in a while I fall in love with a recipe, and cannot wait to make it. Last week I logged into Facebook, and by pure chance there on the top of the Artisan Bread Bakers page I saw a gorgeous bread, worthy of the cover of a Breads Illustrated Swimsuit Issue – if there was such a thing. Except that, contrary to what seems to be the case for many supermodels, no Photoshop tweaking was involved. The bread was naturally stunning. I wasn’t sure I would be able to make it, as it involved a shaping technique I had never seen before. But, it all worked well. It’s bread after all, not cake.  😉

Star-Shaped Brioche1

STAR-SHAPED CHOCOLATE BRIOCHE BREAD
(from  Lindarose at Instructables)

for the dough:
500g all-purpose flour
2 eggs
60g sugar
180ml room temperature milk (3/4 cup)
80g room temperature butter
7g active dry yeast
8g salt
peel from one orange

for the chocolate cream:
35g cocoa powder
75g sugar
250g ricotta ( about 1 cup)
30g hazelnuts

Put the flour in the mixer and add the yeast, milk, sugar and eggs. Start mixing on low, as the ingredients start to incorporate, add the butter in small pieces, the salt, and the orange peel.  Keep mixing until very smooth (about 5 minutes on a Kitchen Aid type mixer). Remove the dough to a lightly floured surface and finish kneading it by hand, to make sure all butter is uniformly distributed. The dough should be slightly tacky, resist the urge to add more flour. Form a ball, and let it rise in a bowl in a warm spot until double in size, about 2 hours, depending on the temperature of your kitchen.

While you wait for your dough to rise, prepare the chocolate cream.

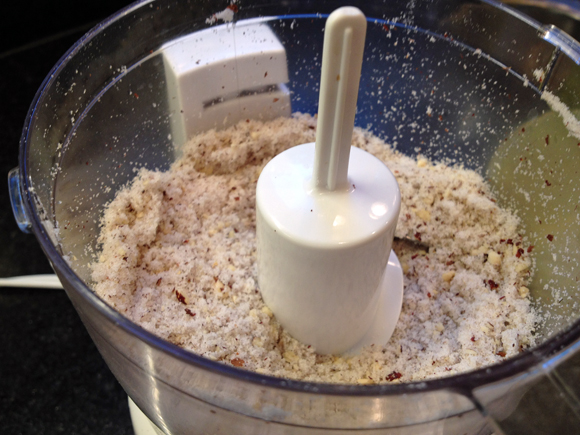
In a food processor, mix the sugar and hazelnuts together until you obtain a powder. It’s ok if there are still some big pieces in it. Transfer to a bowl, and sift the cocoa powder on top of it.   Add the ricotta and mix everything together with a hand mixer until your mixture becomes a cream.

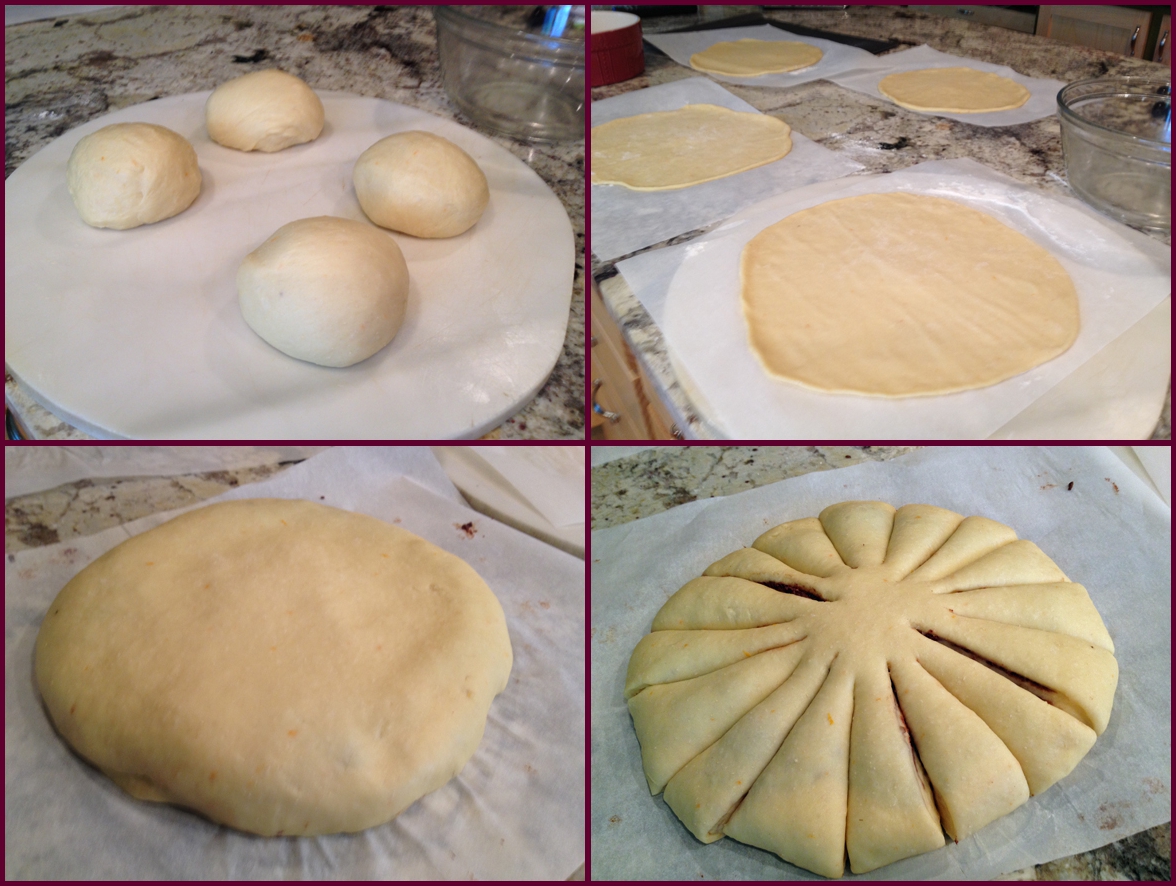
Once your dough has risen, divide it in 4 equal pieces and make 4 separate balls. Make a disc with each of the 4 balls using a rolling-pin. The most important thing is that the discs are all the same size.

Place the first disc on a piece of parchment paper and spread some chocolate cream on it, making sure to leave about half an inch of free border all around. Lay the second disc on the first one and press the border with your fingers to join them together. Now spread some other chocolate cream on the second disc (always leaving a free border), add the third disc and close it with your fingers. Do the same on the third disc and close it with the last disc, but don’t spread the chocolate on it this time. The 4th disc is the top of the bread.

Using a knife, divide the dough in 4 with 4 cuts. It’s  crucial for the shaping that you don’t cut the center of the disc (see pictures). Now make other 4 cuts between the others, for a total of 8, always leaving the center free. Finally, make 8 cuts between the ones you already made, just like the others. You will have a total of 16 sections now.

Consider 2 sections that are next to each other: lift one with one hand and the other with the other hand and twist each of them towards the outside. This means that the piece you are holding with your right hand will be twisted to the right and the one you are holding with your left hand will be twisted to the left. Do this for all the sections. Your bread will look like a snowflake. Put it in the baking sheet with the help of the parchment paper (don’t remove it) and let it rest and rise for another hour. As the bread rises, turn your oven to 350 F.

Bake at 350°F (180°C) for 25 to 30 minutes. Let it cool on a rack.

ENJOY!

to print the recipe, click here

balls-checker

I woke up very early on Labor Day to bake this bread. Long before sunrise. Mixed the dough and went for a run with Phil, while the streets were still completely dark. Come to think of it, “with Phil” is not a correct statement. Let’s say we start together and within five minutes I am begging for mercy,  slow down my pace and see him move farther and farther ahead.  The sun started to rise midway through our run, in such a magical experience, the subtle change in light, slow and beautiful. By far my favorite kind of run. A day that started so perfectly had  to be a good baking day. And indeed it was.

hazelnutpowder

This dough is wonderful to work with.  As you can see in the instructions, the most important thing to keep in mind is dividing the dough in equal parts – use a scale, don’t just eye-ball it.  Once the dough is divided, it rolls out very nicely, use just a little bit of flour on top of the parchment paper so that you can release it easily. I rolled all four balls of dough, but if you prefer, roll one at a time, spread the chocolate cream, move to the next one. Before you cover the bread with the last disk of dough, wash your hands of any chocolate to keep the surface of the bread clean.

shaped

Slicing the dough in 16 sections and twisting the sections for the final shaping is not as hard as it may seem.  I have a lot of trouble with spacing things regularly, and was a bit nervous handling the knife, but even if my cutting was not perfectly uniform,  the bread turned out ok.  Maybe not worthy of the cover of Breads Illustrated, but not bad for a first time.

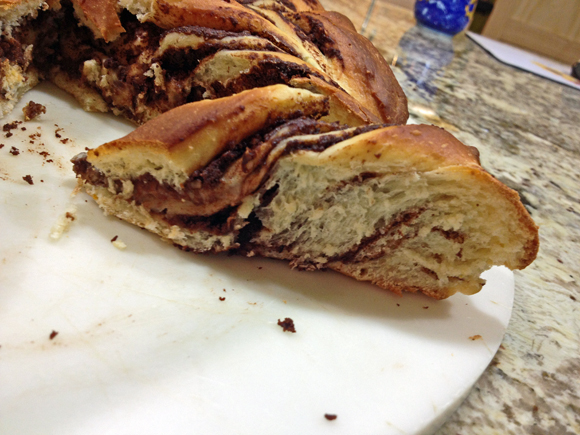
This star-shaped bread reminded me of the classic Chocolate Babka, which I’ve never made, but saw Peter Reinhart demonstrate in a lecture in Dallas many years ago. In fact, my friend Marilyn said this bread looked like “Babka’s wealthy cousin”.  I suppose that defines it quite well.

The filling can be anything you like. Some bakers from the Facebook group used pesto and cheese, others used cinnamon cream, or a mixture of different nuts with chocolate. Pretty much anything goes with the exact same dough and shaping.  Be creative and impress your friends and family, it is a show-stopper of a bread.

Sliced

I am submitting this post to Susan’s Yeastspotting event…

ONE YEAR AGO: Blueberry-Banana Bread 

TWO YEARS AGO: Into the Light Again

THREE YEARS AGO: Five Grain Sourdough Bread

FOUR YEARS AGO: The Nano-Kitchen

FIVE YEARS AGO: Kaiser Rolls

SOUR CHERRY SORBET: A LABOR OF LOVE

HAPPY BIRTHDAY TO MY MOM!

Far away in Brazil, today she celebrates her 91st Birthday!
We are not there for the occasion, but I share a photo taken one year ago.

 PSMomSee you in November…. countdown started!

 On my last In My Kitchen post, I mentioned we got to pick sour cherries from a friend’s tree. It was a first time for me, and I admit that it surprised me how much work was involved. Of course, picking the fruit requires that you climb up a ladder carrying a basket, and spend quite some time in a daze-inducing repetitive activity. Nothing wrong with that, except that all that Zen might make one less careful. It is tempting to stretch the body just a little more to reach that great looking cherry winking at you, maybe a tad too far.  Thankfully, it all had a happy ending, no falls, no broken bones. We went home with a load of fruit ready for the next step: sorting.  The basic goal is to get rid of the cherries that have worms inside. That information was not conveyed to me BEFORE we picked the fruit. I wasn’t thrilled, and made sure my beloved husband got the message loud and clear during our drive home. The thought that I had my hands on stuff potentially hiding slimy creatures was unbearable. Unfortunately, it was too late, I had already been exposed to danger. So how do you sort the cherries? You dump them all in a container with water. The ones that float very likely have worms. The ones that sink to the bottom better be worm-free because next comes pitting. Finding a worm together with the pit would be extremely no bueno. No bueno as the end of me.

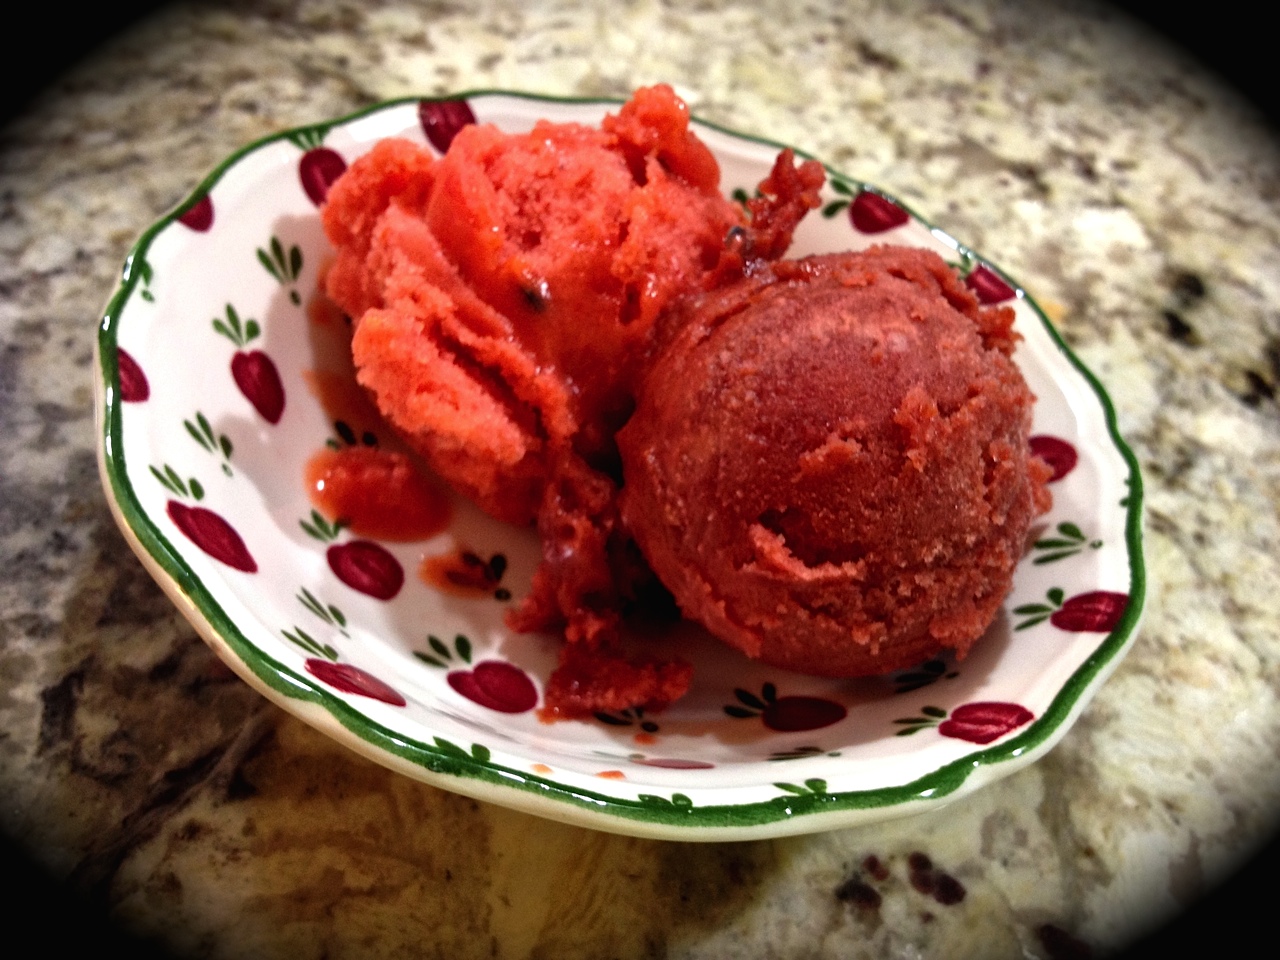
IMG_4994(on the left, Apricot-Passion Fruit Sorbet; on the right, Sour Cherry)

SOUR CHERRY SORBET
(from the Bewitching Kitchen)

4 cups worm-free, pitted sour cherries
1 ripe banana
1 Tablespoon lemon juice
3/4  cup sugar (you can add more)
1 cup water
2 Tablespoons vodka

Add the cherries, and the banana to the bowl of a food processor.  Process until smooth, cleaning the sides of the bowl a couple of times. Add the lemon juice, the sugar, and the water, and process everything together until fully smooth. Taste and adjust the sugar level, adding more if you like.  Add the vodka, give it a final mix.

Keep the base in the fridge overnight or for at least 4 hours to cool completely.

Place the mixture in your ice cream maker and churn it according to the instructions of the manufacturer.

Scoop into a freezer-safe container.

ENJOY!

to print the recipe, click here


PittingAdventure

Comments:  All credit for the sorbets featured in the blog in the past couple of years should go to Phil, even if he fooled me into handling worm-containing fruit. He comes up with all sorts of flavors, each and every one of his concoctions turns out great!  The only fruit he cooks down before churning is apricot, all others go in fresh.  He always includes a ripe banana, and in his latest versions a tablespoon or so of some type of alcohol, usually vodka or rum. They give the sorbet a creamier  consistency when frozen, and you will not taste any alcohol.

Once more I should add that we like our sorbets with very little sugar, you might find that our versions are too tart for your taste. Adjust accordingly, tasting the base before you churn it.

stored
As  you can see, it often takes me a little time to go from making a recipe to blogging about it, but better late than never, I wanted to get this post out before summer is over.  Summer and over is never a good combination. Oh, the pain, the incredible cruelty of what lays ahead for me…  Autumn first, then misery.

ONE YEAR AGO: In My Kitchen – September 2013

TWO YEARS AGO: Raspberry Sorbet at Summer’s End

THREE YEARS AGO: When three is better than two 

FOUR YEARS AGO: Grating Tomatoes (and loving it!)

FIVE YEARS AGO: A Peachy Salad for a Sunny Day

DRUM ROLL PLEASE….. ONE MILLION PAGE VIEWS! IT’S GIVEAWAY TIME!

(Sep 23rd, 2014: comments are shutdown, no further entries accepted) 

Today my Bewitching site hit a wonderful milestone: 1,000,000 page views!  How on Earth did I get there?  😉

onemillion

I am so excited about it, I will offer a small token of appreciation to my readers.  Ottolenghi is about to publish a new cookbook, PLENTY MORE, so if you would like to have it, leave a comment on this post.  The giveaway is open to the whole wide world, by the way…

The comments will be open until September 22nd, and I will announce the winner the following day. Of course, shipping the book will depend on its release, as soon as I get it, it ships.

plenty more

It’s been a ton of fun to keep this site going, and of course hitting this milestone gives me an extra boost of energy!

THE COUSCOUS THAT WASN’T

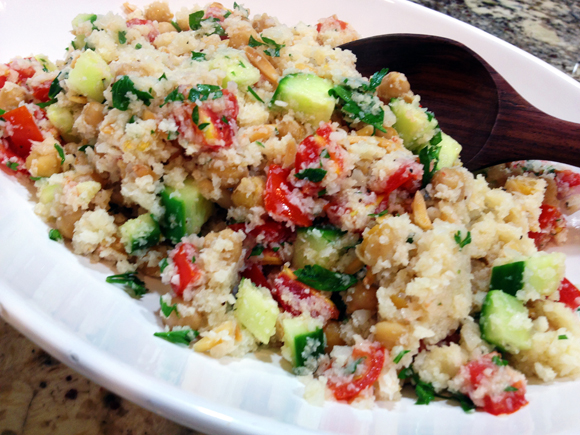
I am quite slow when it comes to following cooking trends. Chia seeds? Haven’t used them yet, although I do own a bag and lovingly glance at it from time to time. Then, there is cauliflower in its unexpected uses, like the super popular pizza crust and processed versions that mimic rice.  The only non-traditional preparation I embraced long ago was mashed cauliflower for a low-carb take on mashed potatoes. It turns out I am so fond of it, that the real thing almost never finds its way into our kitchen. It is a bit puzzling that I ignored all other “out-there” uses for cauliflower. Better late than never, I now profess my newest found love: cauli-couscous.  Please, if you haven’t tried it yet, do not twist your nose at it. The tiny bits of cauliflower end up with a texture very similar to its semolina cousin, and seem to absorb flavors even more efficiently.  A very versatile dish, you can take it in many different directions by changing the veggies, the spices, herbs, and the cooking liquid. Just as you would with… couscous!  😉

CauliCouscous
MEDITERRANEAN STYLE CAULIFLOWER COUSCOUS

(from the Bewitching Kitchen, inspired by many sources)

1 head of cauliflower, broken into florets
1 Tablespoon grapeseed oil + drizzle for chickpeas
1 can of chickpeas, drained and well rinsed
1/4 teaspoon ground cumin
3/4 teaspoon salt, divided (1/4 + 1/2 tsp)
pinch of cayenne pepper
juice of 1 lemon mixed with 1/4 cup water
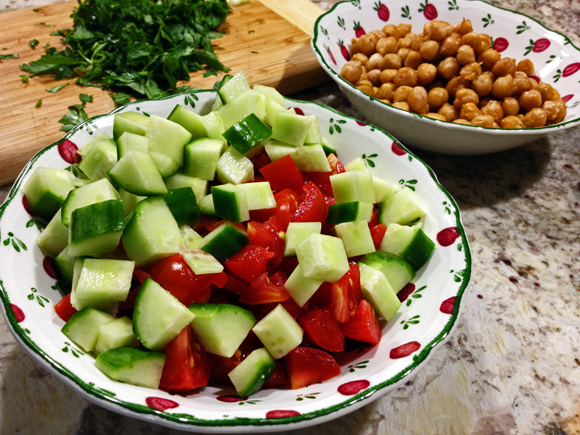
8 cherry tomatoes, quartered
1 English cucumber, diced
1/4 cup slivered almonds, toasted
fresh parsley, minced (to taste)

Prepare the chickpeas: Warm a dry skillet over medium-high heat and toss chickpeas in warmed skillet for about two minutes to remove any residual moisture. Be sure to shake the pan and/or stir the chickpeas. Sprinkle the chickpeas with cumin, salt, and cayenne pepper.  Drizzle a little grapeseed oil over the seasoned chickpeas and toss to combine. Keep stirring the chickpeas and adjust seasonings as desired. When the chickpeas are well saturated with flavor, remove from heat and reserve.

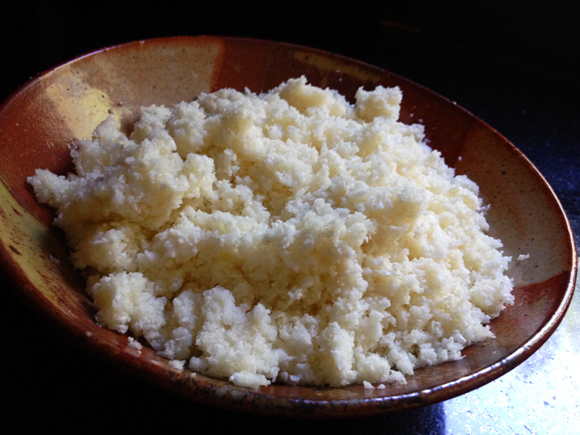
Place the cauliflower florets in the bowl of a food processor. Pulse until the cauliflower reaches the desired consistency, not too fine, not too coarse.  You will need to stop the processor a few times and move the large pieces around.  Transfer to a bowl, and marvel at how beautiful your fake couscous looks.

Heat 1 Tablespoon of grapeseed oil,  add the cauliflower, and saute until it starts to get some color. Add the water and lemon juice, cover the pan and simmer just for a few minutes.  Add the tomatoes, cucumber, almonds, adjust seasoning with salt. Add the reserved chickpeas, toss gently to combine using low heat. Remove from heat, add the fresh parsley, and serve.

ENJOY!

to print the recipe, click here

 I was surprised by the amount of “couscous” the single head of cauliflower produced. Isn’t that beautiful?

RicedCauliflower

Once more I used the skillet dried chickpeas “invented” by Kelly, from Inspired Edibles. I did not want them to get soggy, so they were added in the final moments of cooking, right before serving. Still, even next day after a brief torture in the microwave, the chickpeas were very tasty.  Maybe  a little less crunchy, but nothing to be disappointed at.

On a side note, whenever I say “invented” I think about one of Seinfeld’s classic episodes… Merlot? Never heard of it. Did they just invent it?”  😉

ingredients

I decided to call this recipe “Mediterranean” because it does have a lot of the usual suspects in that style of cooking. Plus, Mediterranean has a nice gastronomic reputation. Everybody loves it.  😉

Before I leave you, I’d like to share a list of very creative uses for cauliflower, some will surprise you, I am sure. Did you know you can use it for a fake bechamel-style sauce?  And that’s just the tip of the iceberg…

For the basic crust: The Best Cauliflower Pizza Crust, from Lucky Penny Blog

For a gorgeous example of the cauli-pizza:  Roasted Pear and Caramelized Onion Pizza, from Inspired Edibles

Cauliflower Crust Calzone, from The Iron You

Cauliflower Crust Stromboli, from The Iron You

Paleo Moussaka, from The Iron You (Mike, aka Cauliflower Overlord, is a cauliflower magician, and in this post he uses it in a very interesting bechamel type sauce)

Cauliflower Fried Rice, from Skinnytaste

Spicy Buffalo Cauliflower “Wings”, from Inspired Edibles

Cauliflower Pancakes, from Healthy Recipes

Cauliflower Gnocchi, from The Food in my Beard

Ricotta and Cauliflower Gnocchi, from Divalicious Recipes in the City

Cauliflower Pesto, from Vintage Cooking Notes, tried and loved by yours truly

 and if you thought sweets are off-limits, think again 

Cauliflower and Chocolate Ice Lollies with Pistachio Dust, from Veggie Desserts

Cauliflower Chocolate Cake, from Divalicious Recipes in the City

Chocolate Chip Banana Cauliflower Muffin, from Once Upon a Gourmet Gin

 I hope I convinced  you to give cauliflower couscous a try, I am definitely in the mood for a cauliflower pizza crust, just for the fun of it…

ONE  YEAR AGO: Tlayuda, a Mexican Pizza

TWO YEARS AGO: Paradise Revisited

THREE YEARS AGO: Feijoada, the Ultimate Brazilian Feast

FOUR YEARS AGO: Vegetable Milhojas

FIVE YEARS AGO: Italian Bread