WAFER PAPER AND SOURDOUGH BAKING

This post is dedicated to Eha, a lover of butterflies

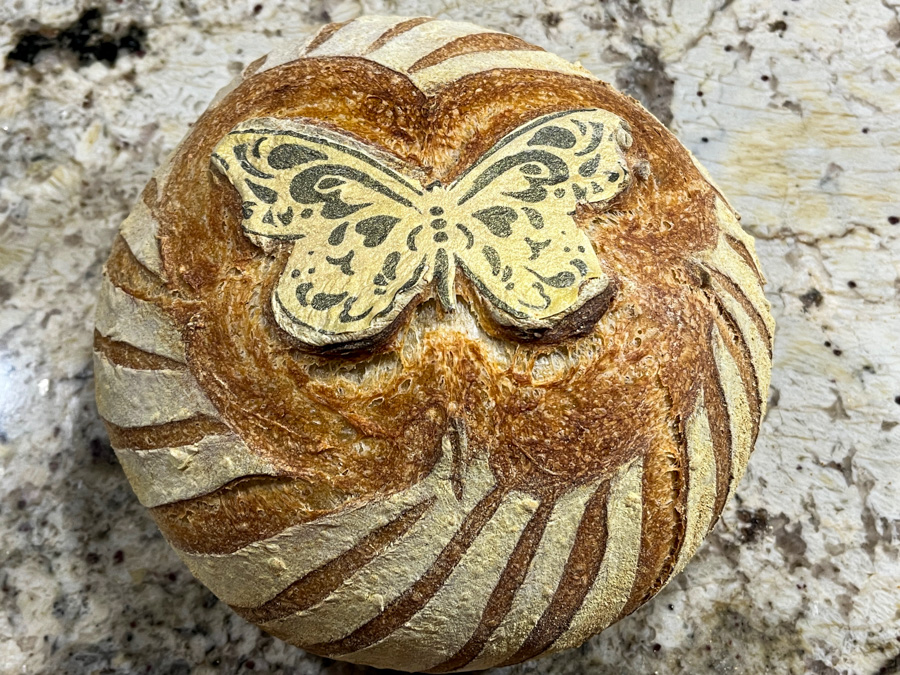
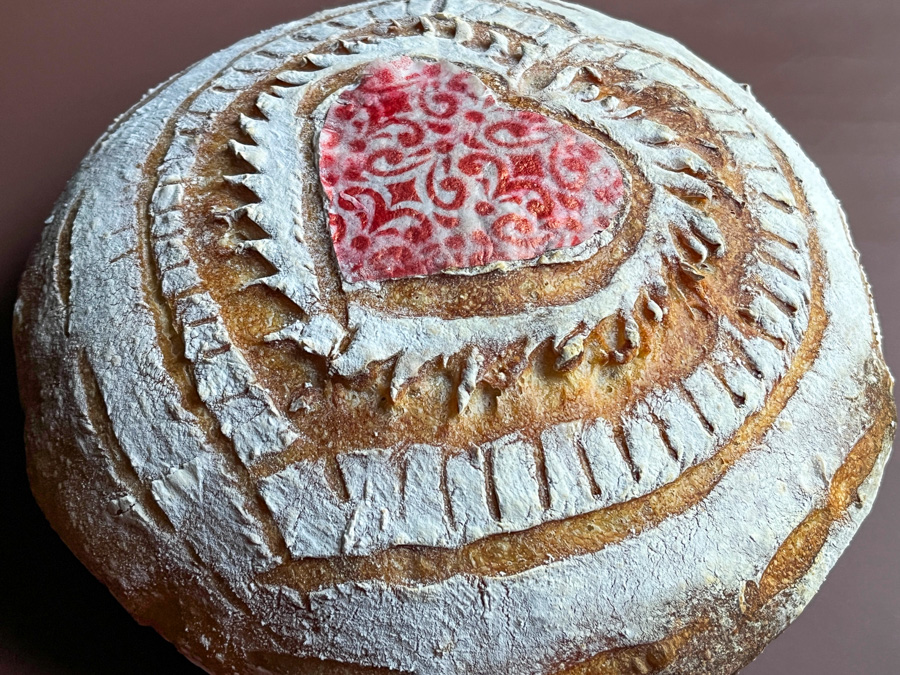
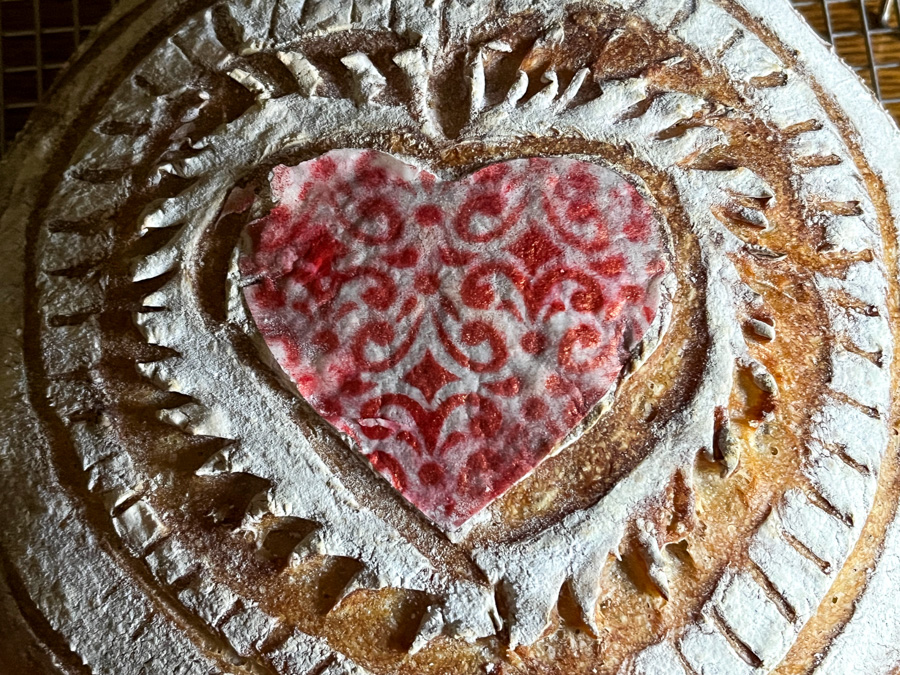
I am so excited to share this new technique with you today! I first saw it on Instagram (check this page) and decided to give it a try. The possibilities are simply endless, of course. Basically, you make a design using wafer paper painted by hand or with a stencil, add that to the shaped, fully proofed dough right before baking, score around it with a razor blade. Isn’t that the coolest thing since….. sliced bread?


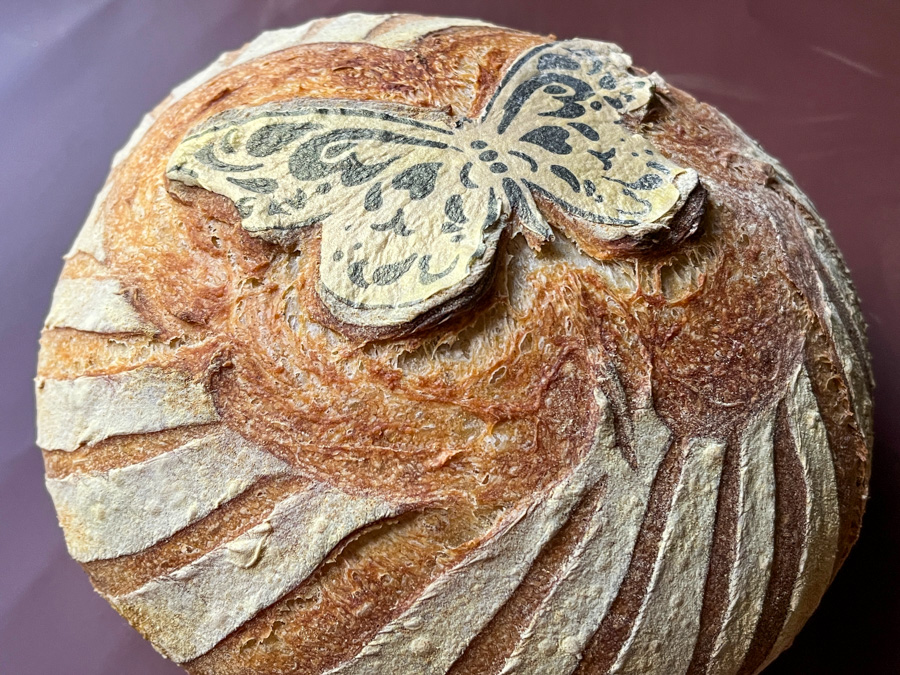
You can use any sourdough formula you want, in this particular loaf I re-visited the Ras-El-Hanout of my past, because I love that combination of flavors. Below you see the preparation of the wafer paper and the way I scored it (using my Sonic blade).

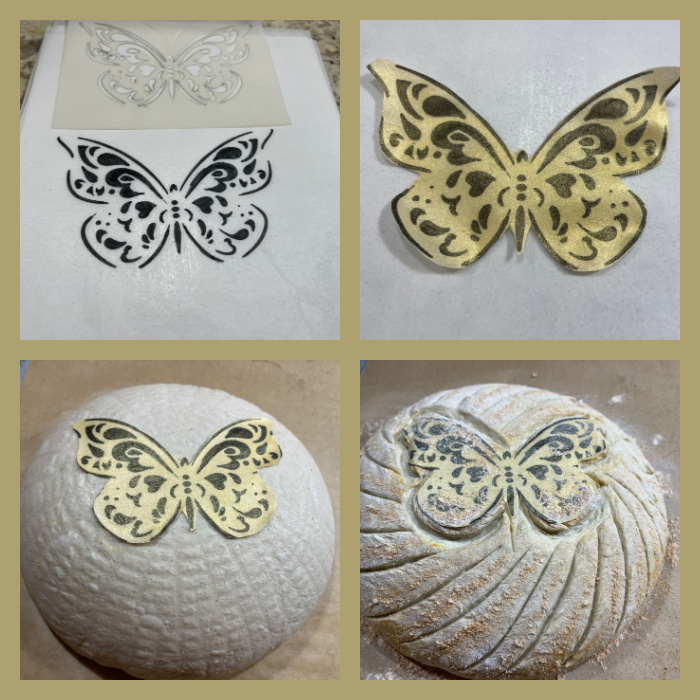
I used a stencil and painted the black portion with a food safe pen. Then I sprayed the whole surface with air-brush gold. That has to dry completely, so I advise you to make the wafer paper decoration the day before you intend to bake the bread. Or even several days in advance, it stays perfect, no issues.

My dough had enough moisture for the paper to stick to the surface without problem, if your dough is too dry, spray it lightly with water. VERY lightly. After the paper is on the surface, dust the surface of the loaf lightly with tapioca or all-purpose flour. In my case, I mixed tapioca flour with a little turmeric to re-inforce the golden color and the taste of the bread. Slash around the paper and all over the bread with the pattern of your choice.

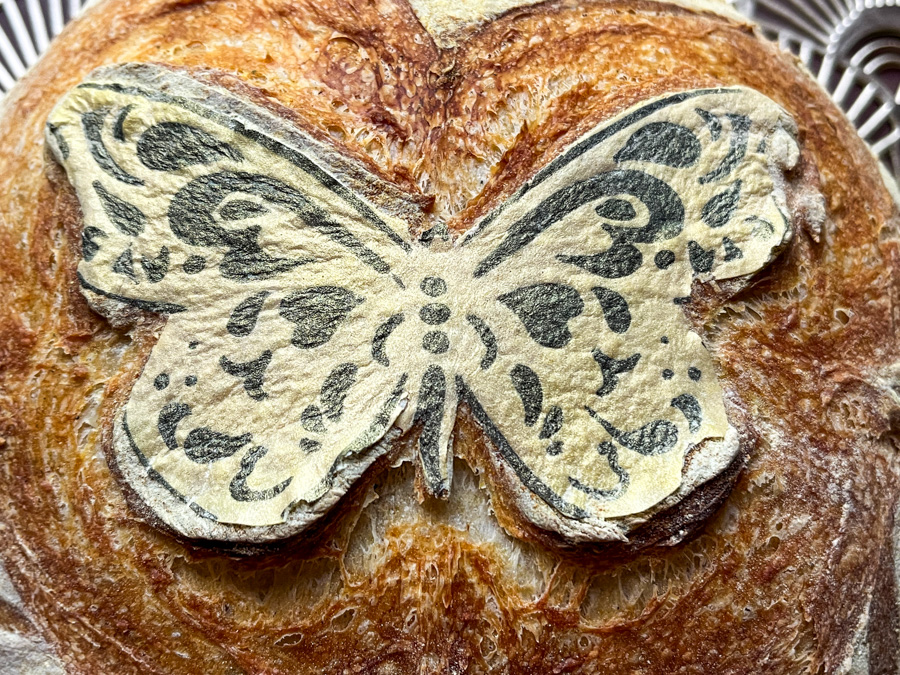
Another important point – do not forget this – after the bread has been in the oven for 5 to 7 minutes, go back and slash AGAIN only around the design. That will make it lift and look much better. Try not to forget this step.

My first attempt making this type of decoration did not work as well for two reasons: I was too focused on the paper and did not plan carefully the scoring, so it did not turn out very good. Second, I forgot to go back and slash the design again after 5 minutes into the bake. That made the paper stay glued to the bread and the design did not have the right impact. Anyway, it is the type of thing that you learn the more you do it.

I know I will be playing with this quite often in the future, and I hope you consider this fun technique also. The paper does not darken in the oven, which surprised me a bit, and the air-brush colors also seem to hold up well. If you are the artistic type, you can paint flowers, landscapes, whatever your imagination desires!

.

ONE YEAR AGO: Banana Bread from the Experts

TWO YEARS AGO: Shrimp Stir-Fry with Snow Peas and Cashews

THREE YEARS AGO: Pickled-Roasted Chickpeas with Cashew Cream

FOUR YEARS AGO: Twice-Baked Goat Cheese Souffle

FIVE YEARS AGO: A Star from England in the Bewitching Kitchen

SIX YEARS AGO: Hommage to the Sun

SEVEN YEARS AGO:The Fabulous Three
.
EIGHT YEARS AGO: Turkey-Chorizo Burger with Green Chile Dressing
.
NINE YEARS AGO:Taco Salad
.
TEN YEARS AGO: Semolina Sourdough Boule
.
ELEVEN YEARS AGO:Forgive me, for I have sinned
.

TWELVE YEARS AGOCracked Wheat Sandwich Bread
.
THIRTEEN YEARS AGO:  Au Revoir, my Bewitching Kitchen
.
FOURTEEN YEARS AGO:French Bread

THREE DELICIOUS BAKES


These three recipes are absolutely delicious, I cannot pick the top favorite, no matter how much thought I put into it. I will list them in the order they materialized in my kitchen, over the past couple of months. Each recipe has some interesting twist that makes it special. They are available online, so I provide you the links to the original author, because giving credit matters!

BAKE #1
HERMIT BARS WITH LEMON GLAZE


RECIPE AVAILABLE HERE

If you are into spiced cookies, this is THE most delicious bar concoction you will ever taste. Period. I have made Hermit cookies in the past, but this bar format with the lemon glaze on top is infinitely better. I urge you to try it. As usual, Helen’s instructions are absolutely spot on. The bar component bakes beautifully, it will end up with the perfect height to welcome the luscious lemony topping.

All flavors go together beautifully and the texture is also wonderful. I cannot recommend this recipe enough! Please make it…

.

>

BAKE #2
STRAWBERRY CURD BROWNIE BITES WITH MERINGUE

RECIPE AVAILABLE HERE

Look at those cutie pies! Or should I say cutie-brownies instead? The twist in this recipe is the topping, a strawberry curd… OMG that is to die for! I advise you to make the curd the day before, then the recipe is super easy. The brownie component calls for almond flour, which gives it a very nice texture and slightly more complex taste. Adding the meringues on top is a cute detail that you can skip if you like to simplify it. My only change from the recipe as published by Amisha, was to make the meringues separately – I used a Swiss meringue recipe for that, and just placed them on top of the brownies while they were still a tad warm.

Above you see some of the steps involved to make this delicious concoction…

To make them, I used this silicone pan, which was also used for the other brownie in this post. It makes for a super polished final look.

.

BAKE #3
ANNA OLSON’S FUDGE BROWNIES WITH SALTED PECANS

RECIPE AVAILABLE HERE

What makes this recipe special is definitely the addition of the pecans, both in the brownie batter and to top each little square. Do not omit the flake salt, it definitely works a special kind of magic here. I have made this recipe years ago, but now I found it available online and feel it is ok to share. It is from one of her great cookbooks, Bake with Anna Olson, which I bought in 2018 (according to my amazon records!).

I am obviously in love with my little brownie pan, and use it often. If you’ve missed it, I included the link to get it in the previous recipe.

Thank you Helen, Amisha and Anna for three absolutely great recipes!

ONE YEAR AGO: Banana Bread from the Experts

TWO YEARS AGO: Shrimp Stir-Fry with Snow Peas and Cashews

THREE YEARS AGO: Pickled-Roasted Chickpeas with Cashew Cream

FOUR YEARS AGO: Twice-Baked Goat Cheese Souffle

FIVE YEARS AGO: A Star from England in the Bewitching Kitchen

SIX YEARS AGO: Hommage to the Sun

SEVEN YEARS AGO:The Fabulous Three
.
EIGHT YEARS AGO: Turkey-Chorizo Burger with Green Chile Dressing
.
NINE YEARS AGO:Taco Salad
.
TEN YEARS AGO: Semolina Sourdough Boule
.
ELEVEN YEARS AGO:Forgive me, for I have sinned
.

TWELVE YEARS AGOCracked Wheat Sandwich Bread
.
THIRTEEN YEARS AGO:  Au Revoir, my Bewitching Kitchen
.
FOURTEEN YEARS AGO:French Bread

WATERMELON SALAD

Years ago I thought that watermelon salads and watermelon skewers with feta cheese, and all things watermelon savory would fade away. But it did not, and I am glad it didn’t. Because putting it simply, watermelon works in many savory concoctions. It is refreshing, has a delicate texture, soaks dressings well, and it does not clash with other ingredients. Give it a try if you have resisted it so far.

WATERMELON SALAD WITH PECANS AND FETA CHEESE
(from The Bewitching Kitchen)

Seeded and cubed watermelon, any amount you like
Mixed color baby lettuce leaves
¾ cup chopped toasted pecans
1 cup crumbled feta cheese, keep in large chunks

For the vinaigrette:
3 Tbsp white wine vinegar
1 Tbsp fresh lime juice
1 Tbs agave nectar
1 tsp salt
¼ tsp pepper
¼ cup grapeseed oil

Make the vinaigrette by whisking all the ingredients except the oil together. Still whisking, pour the oil to emulsify it well. Reserve.

Make the salad. Combine watermelon and greens in a large bowl; add the vinaigrette, tossing gently to coat. Top with the toasted pecans and feta cheese. Season to taste with additional salt and pepper, if needed.

ENJOY!

to print the recipe, click here

Comments: You can vary this salad in countless ways… different greens, different cheese, different nuts. I love the acidity of the vinaigrette, and I believe some ginger could go well with it also. Try to exercise self-control and don’t pick all the watermelon before your guests or family members had a chance to serve themselves…

ONE YEAR AGO: Kashmiri Chicken Thighs

TWO YEARS AGO:  A Vegan Trilogy

THREE YEARS AGO: The Mystifying Hurricane Roll

FOUR YEARS AGO: Pop-Tarts with Strawberry Balsamic Jam

FIVE YEARS AGO: Ptichye Moloko, a Russian Dessert

SIX YEARS AGO: Cheesy Low-Carb Zucchini Tarts

SEVEN YEARS AGO: Blogging Hiatus

EIGHT YEARS AGO: Apricots, Three Ways

NINE YEARS AGO: Up Close and Personal with Kale

TEN YEARS AGOBlack Berry Cherry Sorbet

ELEVEN YEARS AGO: Asparagus Pesto

TWELVE YEARS AGO: Chocolate and Chestnut Terrine

THIRTEEN YEARS AGO: Under the spell of lemongrass

FOURTEEN YEARS AGO: Greens + Grapefruit + Shrimp = Great Salad!

KAREN’S SAUTEED SHRIMP WITH CAPERS AND OLIVES

If you need a great dinner that will be ready in less than 30 minutes, look no further… I have actually made this recipe several times after Karen published it in her blog, and I bet it will become a favorite with your family too. Something about capers and black olives together makes my mouth water.


SAUTEED SHRIMP WITH CAPERS AND OLIVES
(slightly modified from Karen Kitchen Stories)

1/4 cup olive oil
1/2 cup chopped, pitted black olives
2 tablespoons capers
1 + 1/2 pounds peeled and deveined extra large or jumbo shrimp
1 (14 oz) can chopped tomatoes (I used fire roasted)
Salt and pepper to taste

In a large skillet, heat the olive oil over medium low heat. Add the olives and capers, and cook for another minute or two.Add the shrimp and tomatoes to the pan, and sauté until the shrimp turns pink, about 5 minutes. Season with salt and pepper to taste and serve immediately.

ENJOY!

to print the recipe, click here

Comments: I really think the best way to serve this seafood preparation is over pasta, in this case just a simple spaghetti with fresh lemon and olive oil. Normally I brine the shrimp before sautéing but this time I skipped that step and just made sure not to cook it for too long. It is ready super fast, and all flavors go wonderfully together. Give it a try and then go thank Karen for it!

ONE YEAR AGO: Kashmiri Chicken Thighs

TWO YEARS AGO:  A Vegan Trilogy

THREE YEARS AGO: The Mystifying Hurricane Roll

FOUR YEARS AGO: Pop-Tarts with Strawberry Balsamic Jam

FIVE YEARS AGO: Ptichye Moloko, a Russian Dessert

SIX YEARS AGO: Cheesy Low-Carb Zucchini Tarts

SEVEN YEARS AGO: Blogging Hiatus

EIGHT YEARS AGO: Apricots, Three Ways

NINE YEARS AGO: Up Close and Personal with Kale

TEN YEARS AGOBlack Berry Cherry Sorbet

ELEVEN YEARS AGO: Asparagus Pesto

TWELVE YEARS AGO: Chocolate and Chestnut Terrine

THIRTEEN YEARS AGO: Under the spell of lemongrass

FOURTEEN YEARS AGO: Greens + Grapefruit + Shrimp = Great Salad!

MINI-CAKES, TWO WAYS

This is a wonderful, simple recipe that works well even in very small silicone molds, as you can see further down in my article. For the mini cakes below, I used the pan featured in this post from my past.


MINI-RASPBERRY CAKES WITH RUBY RED GANACHE FILLING
(from The Bewitching Kitchen)

250g butter, soft, at room temperature
200 grams of sugar
1 tsp vanilla paste
pinch of salt
5 large eggs, at room temperature
250g all-purpose flour
2 tsp baking powder
3 tablespoons milk at room temperature
25g freeze-dried raspberries – finely crushed

for ruby red ganache:
100 g ruby red chocolate (from Godiva)
110 g whipping cream

Make the ganache. Heat the whipping cream in the microwave until very hot, and pour over the pellets of ruby chocolate. Allow to sit 5 minutes at room temperature, then stir gently until fully dissolved. Reserve at room temperature.

Heat the oven to 350F.

Mix the flour, baking powder and salt in a bowl and set aside. Cream the butter and sugar until the sugar is fully dissolved and the butter turns lighter and fluffy, about five minutes in a Kitchen Aid type mixer with the paddle attachment. Add the eggs one by one, mixing for about 30 seconds before you add each egg. Gently fold the flour mixture and then the milk. Once that is incorporated, add the freeze-dried raspberry powder.

Fill the mold of choice to 3/4 of their capacity. Bake for 15 to 20 minutes, depending on the size of your mold. Let the cakes cool completely before removing them, at least 45 minutes. Fill the center with ruby red ganache. Wait until it sets before serving.

ENJOY!

to print the recipe, click here

MINI-HEARTS RASPBERRY CAKES

Use the same recipe for the cake, distribute the batter into the cavities of this mold. Use store-bought or home-made raspberry jam to fill the center of the cakes. 

These are soft, moist and delicious little cakes. The hear-shaped ones are tiny, as you can see in this close-up picture.

Two bites, and you are done! They were a huge success with colleagues from our department. The cakes filled with ganache are richer (and considerably bigger, although still small). I do love ganache so maybe my heart moves more in the direction of those, but if you prefer the sharp taste of raspberry jam to pair with the sweet cake, consider making a batch of the tiny hearts. 

ONE YEAR AGO: Earl Grey Shortbread Cookies

TWO YEARS AGO: Summertime Macaron Duet

THREE YEARS AGO: Pain de Mie Dressed up for Party

FOUR YEARS AGO: Five-Stranded Bread

FIVE YEARS AGO: Green Olive Salad

SIX YEARS AGO: Coffee Macarons Dressed up to Party

SEVEN YEARS AGO: Blogging Hiatus

EIGHT YEARS AGO: Tomato Tatin

NINE YEARS AGO: Headed to Colorado!  

TEN YEARS AGO: Farofa Brasileira

ELEVEN  YEARS AGO: Thai-Inspired Pork Tenderloin

TWELVE YEARS AGO: A yummy Brazilian cake: Bolo de Fuba’

THIRTEEN YEARS AGO:  Summer’s Tomatoes

FOURTEEN YEARS AGO: Leaving on a jet plane…