MARBLED TAHINI COOKIES

These are the perfect cookies for grown-ups. Not too sweet, with a nice tahini flavor. They look stylish in their black and white nature, with the added bling of black sparkling sugar around the edges. I saw this recipe on the New York Times and made it the following day. But, guess what? I was not very happy with the outcome, because the cookies ended up too big. In their recipe, the full block is sliced to form the cookies. I changed things around a bit, and cut the block in half first. They turned out quite a bit more delicate. This version I am happy with, so I share it with you…

MARBLED TAHINI COOKIES
(adapted from The New York Times)

385 grams all-purpose flour
1 teaspoons kosher salt
½ teaspoon baking powder
Cooking spray
225 grams unsalted butter, softened
125 grams confectioners’ sugar
1 large egg, at room temperature, plus 1 egg white
1 teaspoon vanilla extract
¼ cup plain tahini
3 tablespoons black tahini
coarse black sanding sugar (optional)

In a medium bowl, whisk to combine flour, salt and baking powder; set aside. Coat a loaf pan (9 x 5) with cooking spray, then line with plastic wrap, leaving plenty of overhang. Set aside.

In the bowl of a stand mixer fitted with the paddle attachment, cream together butter and confectioners’ sugar on medium-high speed until fluffy, 2 to 3 minutes. Add the egg and the vanilla; beat on medium-high until combined, about 2 minutes. Add flour mixture; beat on low speed until combined; then increase speed to medium and beat until dough starts to clump together.

Remove dough from bowl, knead lightly and form into a fat log. Using a bench scraper or knife, cut into two pieces, one about 1/3 of the dough, and the other 2/3 of the dough. Return the larger piece to the bowl, add the plain tahini, and beat on medium speed until fully combined. Remove from bowl and set aside. Add the smaller piece and the black tahini to the bowl and beat on medium speed until fully combined.

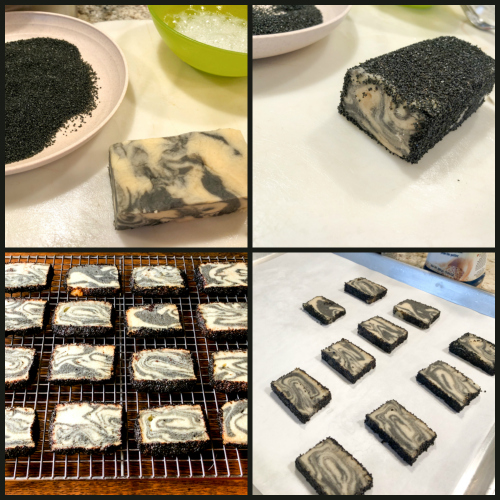
On a floured surface, using a bench scraper or a knife, cut the white dough in half. Pat half the white dough into a 5-inch square. Cut the black dough in half, then pat half the black dough on top of the flattened white dough to match dimensions. Repeat with remaining white dough, then black dough, so you have four alternating layers of white dough and black dough. Cut in half crosswise, and gently knead and roll one piece to marble the two colors together. Repeat with the second piece of dough. Stack both pieces of dough together and briefly knead the pieces together to form one dough. The idea is to marble the colors, so do as much or as little as you like.

Press dough into prepared pan, and fold the plastic wrap over the top to seal. Gently press down to even out the surface as much as possible. Chill until firm,  at least a few hours or overnight.

Heat oven to 325 degrees. Beat the egg white with 1 teaspoon water to thin it out. Spread the sanding sugar out on a small baking sheet. Remove the block of dough from the loaf pan and unwrap it. Trim the slanted sides and the top if you want them really square. Cut it in half lengthwise, so that you’ll have two equal blocks of  cookie dough. Very lightly brush the outside of each block with the egg white mixture. Press  firmly to coat all sides (except the ends) with the sugar, sprinkling and pressing it on to cover any bare spots.

Cut each block into thin slices (less than 1/4 inch) and lay them out 1 inch apart on parchment-lined baking sheets. Freeze until firm, about 10 minutes. Bake until cookies are golden underneath, 14 to 16 minutes. Let cool a few minutes on the baking sheets, then transfer cookies to wire racks to cool completely.

ENJOY!

to print the recipe, click here

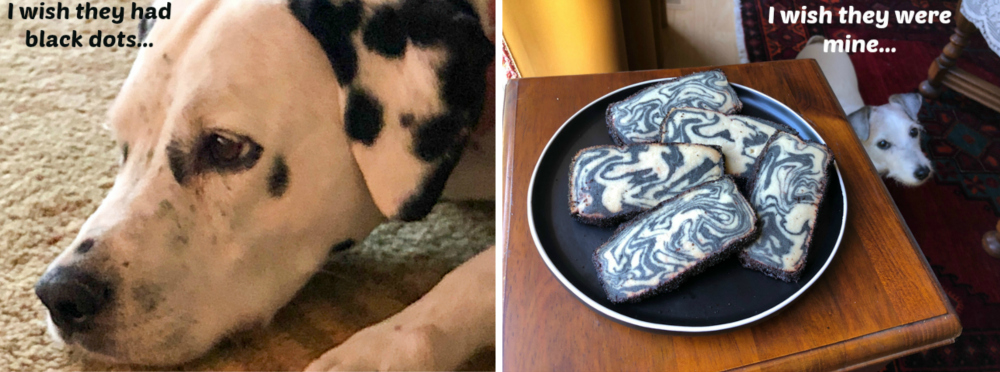
Comments: These are quite likely my favorite cookie of this crazy year.  Well, you know I am partial to macarons, but macarons are pretty sweet. Truth is, I like to dream about designs and flavors, bake them, but once I eat one, I’m satisfied. These cookies are quite a bit more dangerous… They have that savory-sweet quality that I find hard to resist. The black sparkling sugar is a nice touch, but you can skip that step with no major harm done. Halloween is approaching. I see no parties, no get-togethers, but I definitely see a batch of these babies, in orange and black. What do you think?

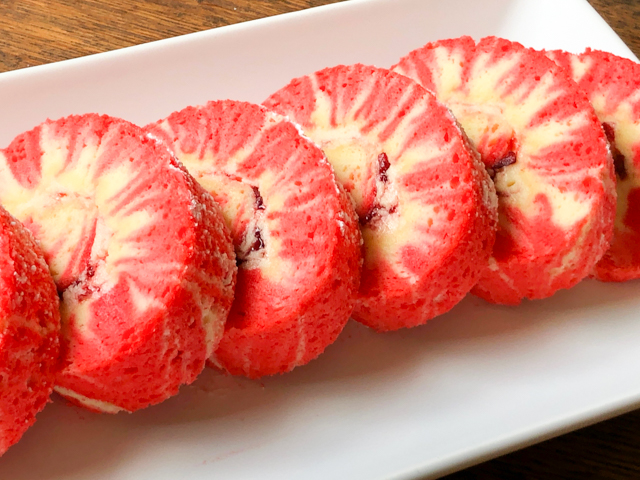
On the picture above you can see the first batch, slicing the full block of cookie dough to make the cookies. Maybe you would prefer them that way, but I definitely like the smaller better.

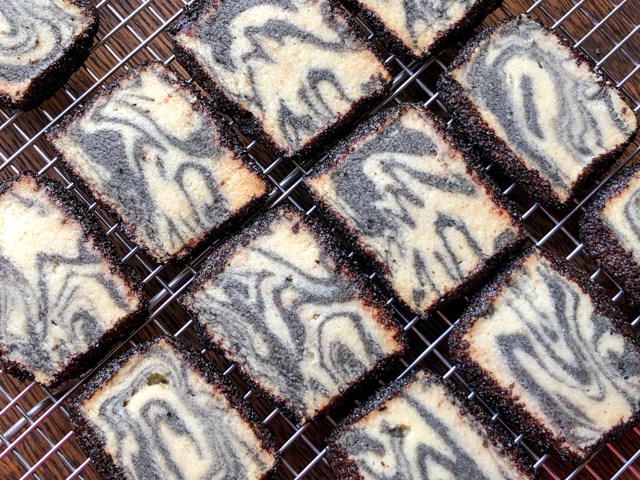
Each one, so unique!


ONE YEAR AGO: Twice-Baked Goat Cheese Souffle

TWO YEARS AGO: Strawberry-Mango Entremet Cake

THREE YEARS AGO: Hommage to the Sun

FOUR YEARS AGO: Tomato and Cucumber Salad with Almond Vinaigrette

FIVE YEARS AGO: Eggplant Tomato Stacks

SIX YEARS AGO: The Couscous that Wasn’t

SEVEN YEARS AGO: Apple-Cinnamon Bread

EIGHT YEARS AGO: Blueberry Galette

NINE YEARS AGO: In My Kitchen, August 2011

TEN YEARS AGO: Journey to a New Home

ELEVEN YEARS AGO: Friday Night Dinner


PICKLED-ROASTED CHICKPEAS WITH CASHEW CREAM

I share with you today another slightly unusual side dish, or main dish if you add to it a nice helping of couscous. It starts with chickpeas simmered in white vinegar, then roasted with smoked paprika. After pairing them with juicy tomatoes, the whole thing was dressed with the number one choice for vegans when they crave sauces like bechamel: cashew cream.  It has the advantage of being very low in saturated fat, so those who are watching their intake of all things butter and cheese, can indulge without worries.

PICKLED-ROASTED CHICKPEAS WITH CASHEW CREAM
(from the Bewitching Kitchen)

1 (15-ounce) can chickpeas, drained and rinsed
2 cups white vinegar
drizzle of olive oil
1/2 tsp salt or to taste
1/2 tsp smoked paprika or to taste
fresh tomatoes, cut into slices or small pieces
cilantro leaves (optional)

for the cashew cream:
1 cup cashews, soaked for 4 hours to overnight in a large volume of cold water
2 tablespoons lemon juice
salt to taste
1 cup water

Heat oven to 420F.

Bring the vinegar with a pinch of salt to a boil in a sauce pan. Immediately add the chickpeas, boil for 30 seconds, close the pan and remove from heat. Leave the chickpeas in the hot vinegar for 20 minutes. Drain.

Place the drained chickpeas in a roasting pan covered with aluminum foil. Drizzle the olive oil, season with salt and smoked paprika, rubbing them gently to coat well. Roast for about 25 minutes, until dark golden.  Remove them to a paper towel lined plate to cool.

Make the cashew cream. Place the drained cashews with lemon juice and salt into a Vitamix type blender, blend until almost smooth (it won’t turn completely smooth until you add water). Add the water slowly with the motor running. Add as much water as you like to achieve a smooth, creamy consistency.

Assemble the dish: place tomatoes on a serving platter, season lightly with salt, pepper, and a drizzle of olive oil. Spoon the roasted, cold chickpeas on top, and drizzle with the cashew cream. Decorate with cilantro leaves if desired.

ENJOY!

to print the recipe, click here

Comments: If you love pickled things, you will enjoy this take on chickpeas. If you are not too fond of the sharp taste of vinegar, simply skip that step and roast the chickpeas without simmering first. They will still be delicious, and complement the tomatoes well.

The cashew cream. This is a simpler version of one I made a few years ago.  I actually made a double batch and enjoyed it over smoked chicken fajitas, drizzled over roasted butternut squash, and replacing cheese on eggplant Parmigiana. The secret is to soak the cashews for several hours. You can speed up the process by using boiling water and letting them sit for 30 minutes or so, but I find that the taste is brighter and the texture better if you take the longer route. Next on my list is to use cashews as a base for “buttercream” in macaron filling. Perhaps with matcha flavor. Stay tuned.

ONE YEAR AGO: Twice-Baked Goat Cheese Souffle

TWO YEARS AGO: A Star from England in the Bewitching Kitchen

THREE YEARS AGO: Hommage to the Sun


THE MYSTIFYING HURRICANE ROLL

Last month I was watching a video on youtube and on the side bar a little cake got my attention because it was so whimsical. I clicked on it and found out it was the so-called Hurricane Roll. I have no idea who “invented” it, but most are made by Oriental bakers with the patience of Buddha. Patience, I don’t have, but still decided I had to make one. To make a long story short, I confess that I made FIVE. Not because they were nice and easy, but because the first three attempts did not give me the desired hurricane effect. At most, I got a tropical storm.  I learned a lot during the process of trial and error, and will share with you the recipe and method that finally worked well for me.

RED HURRICANE ROLL WITH MORELLO CHERRY FILLING
(from the Bewitching Kitchen)

for a 10 inch square cake

for the meringue:
110 g sugar
6 egg whites
pinch of cream of tartar

for the cake batter:
110 g milk
80 g butter, melted
85 g cake flour
15g dry milk powder
1/8 tsp vanilla paste
1/8 tsp salt
6 egg yolks
raspberry flavor from Amoretti (optional)
red gel food color
Morello cherry jam for filling (or any other filling you like)

Spray a 10-inch square pan with baking spray and cover it with parchment paper.

I use a handheld mixer to make the batter, so I start with the meringue.  Whisk the egg whites with cream of tartar until it gets foamy. Add the granulated sugar very slowly and whisk to soft peaks. Reserve.

No need to wash the beater, move on to make the egg yolk component. Whisk the milk with the melted butter and vanilla in a bowl. Sieve the dry ingredients on top, whisk gently until fully combined.  Add one egg yolk at a time, whisking well after each addition.  Remove 135g of this batter to another bowl, add 1 tsp raspberry flavor and red food dye to taste. To this  bowl, add 100g of the reserved meringue and fold gently. Place in a piping bag, no need for piping tip. Reserve.

Add what is left of the meringue to the white cake batter, and fold gently. Pour into the prepared pan – add gently the red batter on top  to cover it completely, you can use an offset spatula to help even the surface.

Now do the hurricane effect. I used the handle of a wooden spoon, making stripes all over the pan back and forth horizontally, with the handle all the way into the bottom of the batter. Move it slowly.  Then do the same thing in the other direction, perpendicular to the first. Bang the pan gently to release bubbles and even the surface.

Bake at 325F for 10 min, reduce temperature to 300F and bake for 25 minutes longer, but check the center of the cake so that it does not over-bake and gets dry.  Remove from oven, wait 2 minutes and invert the cake on a towel sprinkled with powdered sugar. Trim the edges that tend to get too dry and interfere with rolling. Roll while warm, let it cool. Unroll, spread jam (or any filling you like), and roll back again. Place in the fridge for a couple of hours before slicing.  If all went well, you should see a nice color effect due to the partial mixing of both colors.

ENJOY!

to print the recipe, click here

Comments: The recipes I tried before failed to mix properly. Still made delicious cakes, but I was left with a simple roll cake like this one, made with lemon flavor and pitaya powder (clearly did not use enough, there was barely any hint of color in the second batter after baking).

Another attempt produced what I called a “Tropical Storm” effect, in which the hurricane was almost there but not fully…  In this case I went with a classic vanilla/cocoa combination, and the filling was Chocolate Russian buttercream.

If you are familiar with Swiss roll cakes, you might find the method I used a bit strange, as the egg yolks are added in the end, without any intense whipping to generate more volume. There is actually a reason for it. If you do a regular batter, it will be denser, and the two colors will not mix properly. The other thing to keep in mind is that you need to be aggressive mixing the batters in that criss-cross pattern. Insert the handle all the way to the bottom (you can use a knife, chopsticks, a very small spatula also works), and work your way slowly as shown in the drawing above.


if you do that you will be rewarded with a nice effect that will become evident the moment you cut the edges. I’ve been playing quite a bit with this technique so expect a few more rolls coming on the blog soon. Apart from the hurricane effect, there is a lot you can do with two colors of cake batter.  I wish I had kids around, it’s the type of bake that they would love to play with.

Disclaimer: no, we did not eat five roll cakes. I often get asked how come we don’t weigh a ton with all the sweets around. Everything I bake is donated to Common Table on Fridays. Most things I try a little bite for quality control, but that is about it.
The last time I made a dessert for the two of us was…
Valentine’s Day!

Common Table of August 08th, 2020
(I bet you are you not surprised that I keep photo records of all my weekly bakes)

ONE YEAR AGO: Pop-Tarts with Strawberry Balsamic Jam

TWO YEARS AGO: Ptichye Moloko, a Russian Dessert

THREE YEARS AGO: Cheesy Low-Carb Zucchini Tarts

FOUR YEARS AGO: Blogging Hiatus

FIVE YEARS AGO: Apricots, Three Ways

SIX YEARS AGO: Up Close and Personal with Kale

SEVEN YEARS AGOBlack Berry Cherry Sorbet

EIGHT YEARS AGO: Asparagus Pesto

NINE YEARS AGO: Chocolate and Chestnut Terrine

TEN YEARS AGO: Under the spell of lemongrass

ELEVEN YEARS AGO: Greens + Grapefruit + Shrimp = Great Salad!


ROASTED SWEET POTATO WITH CORN AND SUNFLOWER SEEDS

A few things make this recipe a bit unusual. First, the sweet potato is roasted at a low temperature, 300F. Second, it is served either barely warm or at room temperature over fridge-cold lemony yogurt. And finally, it gets crowned with a hot and spicy mixture of sauteed sunflower seeds and corn. I know it all sounds a bit crazy, but when the husband praised this side dish more than he did the bison chili that went with it, I knew I had hit gold.

ROASTED SWEET POTATO WITH CORN AND SUNFLOWER SEEDS
(adapted from Start Simple)

3 medium sweet potatoes
olive oil and salt to season potatoes
1/2 cup yogurt
1 tablespoon lemon juice
1 tsp harissa paste
Urfa pepper (or another ground chile pepper you like)
salt to taste
2 tablespoons grape seed oil
kernels of 1 ear of corn (raw or cooked)
1/4 cup sunflowers seeds, raw
drizzle of toasted sesame oil

Turn the oven to 300F. Rub the sweet potatoes with a little olive oil, season with salt. Roast for 60 to 75 minutes, until soft (it depends on the size of the potatoes). Let the potatoes cool to room temperature, the flesh will sink and the skin will peel off super easily.  Cube the flesh in the size you like. Reserve.

Mix the yogurt with lemon juice and harissa, season lightly with salt. Place in the dish you will use to serve the potatoes.  Add the cubed potatoes on top. Just before your meal, add grape seed oil to a non-stick skillet, when it gets nice and hot add the corn kernels, season with Urfa pepper and salt. Sautee until fragrant, add the sunflower seeds and cook until they start to get golden.  Immediately add the hot mixture over the sweet potatoes, and take to the table.

ENJOY!

to print the recipe, click here

Comments: There are two ways to make sweet potatoes truly special, sous-vide and low-temperature roasting. The latter is the easiest, and if you’ve never tried them prepared this way, you are in for a treat. It is really a lot better than the more common method of blasting it at higher temperatures, either whole or cut in pieces. Roasted, they can sit in the fridge waiting for you, perfect texture, to be used in all sorts of preparations.

We enjoyed it over bison chili (made with this recipe, but using ground bison instead of ground turkey). The yogurt tames that heat from the chili, acts as a refreshing breeze on a warm summer night. A delicious dinner, that will be on our menu for sure in the near future.  The husband already requested it…

ONE YEAR AGO: Five-Stranded Braided Bread

TWO YEARS AGO: Ptichye Moloko, a Russian Dessert

THREE YEARS AGO: Cheesy Low-Carb Zucchini Tarts

FOUR YEARS AGO: Blogging Hiatus

FIVE YEARS AGO: Apricots, Three Ways

SIX YEARS AGO: Up Close and Personal with Kale

SEVEN YEARS AGOBlack Berry Cherry Sorbet

EIGHT YEARS AGO: Asparagus Pesto

NINE YEARS AGO: Chocolate and Chestnut Terrine

TEN YEARS AGO: Under the spell of lemongrass

ELEVEN YEARS AGO: Greens + Grapefruit + Shrimp = Great Salad!


PAIN DE MIE DRESSED UP TO PARTY

The idea for this bread came from a cookbook called “Le Grand Livre de la Boulangerie” which I recently impulse-bought.  I fell in love with one of the recipes and in less than 24 hours was trying it in our kitchen. It is a simple pain de mie (I modified a King Arthur recipe for it), but with bread dough decorations placed on top right before baking. Imagine the possibilities!

PAIN DE MIE WITH DECORATIONS
(inspired by Le Grand Livre de la Boulangerie)
basic Pain de Mie formula from King Arthur Flour)

175 g milk
260 g water
97 g butter
2 + 1/2 tsp salt
32 g dry milk
40 g potato flour
40 g sugar
650 g all-purpose flour
2 + 1/8 tsp instant yeast
fine charcoal powder (about 1/2 tablespoon)

Combine all of the ingredients, except the charcoal powder into the bowl of a KitchenAid type mixer and knead until fully smooth and with good gluten development (about 8  minutes).  Adjust with flour if the dough seems too loose.  The dough will be soft and pliable.

FOR THE BLACK DECORATIONS:  Remove 180 g of the dough and transfer to a small bowl. Knead by hand into it the charcoal powder (gloves are a very good idea!).  When the dough it nice and black, roll it out to about the dimension of a 9 x 13 pan (no need to be exact, the dough will be about 2mm in thickness). Place between two sheets of parchment paper or Silpat, and bake in a 450F oven for a couple of minutes, you just want to set it a bit.  Immediately remove from the oven and place in the fridge while you continue proofing the main dough.

Bulk proofing: transfer the main, white dough to a lightly greased bowl  and allow the dough to rise until puffy though not necessarily doubled in bulk, about 1 + 1/2 hours, depending on the warmth of your kitchen.

Lightly grease a 13″ pain de mie pan. Gently deflate the dough, transfer it to a lightly greased work surface, shape it into a 13″ log, and fit it into the pan. Cover the pan with lightly greased plastic wrap, and allow the dough to rise until it’s just below the lip of the pan, 45 minutes to 1 hour.

Towards the end of the rising time, preheat the oven to 350°F, and work on the decorations. Take the sheet of black dough out of the fridge, cut it in any shapes you want, keeping in mind the dimensions of the top of the loaf.

When the dough is ready to bake, carefully place the decorations on top, close the lid and place in the oven. Bake for 25 minutes, open the lid, and bake for 20 minutes more, until internal temperature is at least 190F (mine reached 200F).

Remove from the oven, take the bread out of the pan and allow it to cool over a rack before attempting to slice it.

ENJOY!

to print the recipe, click here

Comments: First of all, let me tell you about the book. It is in French and in the words of one of the authors, Chef Jean-Marie Lanio, it is geared towards professionals and “home bakers with skills.” Don’t expect detailed instructions, it is basically a series of formulas with one word (yes, one word) to describe expected dough texture, one word to describe shaping, and a general expected timing for proofing. Truth is, you need to be very comfortable with baking in general (the book is not only on bread) to put it to use. But the recipes are stunning,  always some little twist to make each production unique and special. Come to think of it, baking from this book is like setting yourself up for a technical challenge. But with a huge advantage: no cameras around! Pretty much a win-win situation…


In their recipe, they use a pâte fermentée viennoise as one component and I did not have that around. Being the impatient being I am, I wanted to try the recipe right away. I also don’t have the Pullman loaf pan with the exact dimensions they recommend. So I went to King Arthur site, and from their basic recipe adjusted amounts, hoping for the best.  I am thrilled that it worked so well on  my first attempt. Trust me, that almost never happens in the Bewitching Kitchen.

Making the recipe exactly as described, and using the same pan I did (PADERNO 41750), you will be a bit unsure if it will work, because the dough will be pretty low in the pan as you shape it and place it inside. Don’t worry, in a little over one hour it will rise substantially and in fact I had to push down a little bit the top to make sure I could add the decorations and have some space between the top of the dough and the lid.  It worked perfectly well. The crumb is exactly what you expect from this type of bread, soft, a tad on the sweet side, and a bit buttery.

In the book, they gilded the lily a step further, by adding a line of white flour on top of the black decorations. I just could not make that work, no matter how I tried to deal with the flour (piping bags, piping tips, straws), my lines were never smooth and beautiful, so I skipped that part. I now wonder if rice flour would have worked, as it has a different texture. Anyway, I am super happy with the way it turned out, it’s a nice technique to play with. Imagine how many designs and even colors you can come up with…

As I hit publish and look at the date on my calendar, I realize that exactly one year ago I was being eliminated from a certain show in a certain tent. It is hard not to feel that sadness trying to hit me again, but this too shall pass… and a good bake definitely helps exorcize certain demons….

ONE YEAR AGO: Five-Stranded Bread

TWO YEARS AGO: Green Olive Salad

THREE YEARS AGO: Coffee Macarons Dressed up to Party

FOUR YEARS AGO: Blogging Hiatus

FIVE YEARS AGO: Tomato Tatin

SIX YEARS AGO: Headed to Colorado!   

SEVEN YEARS AGO: Farofa Brasileira

EIGHT  YEARS AGO: Thai-Inspired Pork Tenderloin

NINE YEARS AGO: A yummy Brazilian cake: Bolo de Fuba’

TEN YEARS AGO:  Summer’s Tomatoes

ELEVEN YEARS AGO: Leaving on a jet plane…