BLACK CROWN SEEDED SOURDOUGH

I am so excited to share this recipe today! I’ve always enjoyed the look and taste of sourdough bread with a coating of seeds, but they do interfere with a more elaborate slashing of the surface. Since slashing the bread is quite likely my favorite part of bread baking, seeds posed a problem with no satisfying solution. But then, Alex, tent-baker extraordinaire, tagged me on a post on Instagram, as we had been discussing the issue for a while. His tagging started my virtual journey through #sourdoughrose, and I could not wait to try the technique. Basically, a portion of the dough is rolled out thin, brushed with oil.  The main dough is shaped as a ball, and coated with seeds. The oil prevents the film of dough from sticking during baking, so it more or less peels away, to reveal the seeds underneath.  I dyed the outside dough black, hoping for a more dramatic contrast.

BLACK CROWN SEEDED SOURDOUGH
(from the Bewitching Kitchen, inspired by Ana is Baking)

makes one very small round loaf

150g water
55g starter at 100% hydration
100g bread flour
60g semolina flour
55g whole-wheat flour
1 tsp honey
4.5g salt
activated charcoal powder (optional)
seeds of your choice (I used black and white sesame, nigella, and white poppy seeds)
olive oil to brush laminated dough

Dissolve the starter in the water,  add all other ingredients and knead until smooth (by hand or using a KitchenAid type mixer).

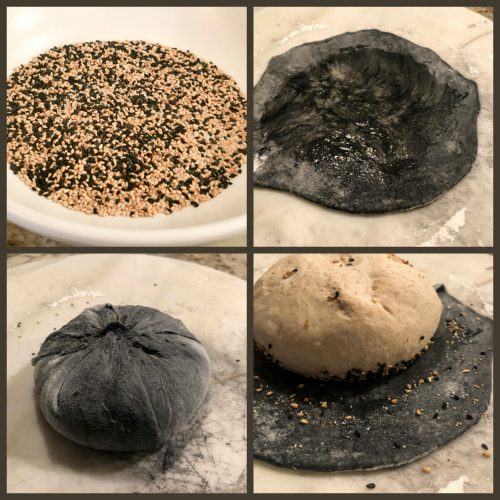
Proof at room temperature for 3 hours, folding every 30 to 45 minutes. After 3 hours, remove a small portion of the dough (about 65g) and dye with charcoal powder if you want to make it black. Leave it plain if you prefer.  Roll this portion as a circle (about 6 inches in diameter), then brush the center with olive oil, leaving a margin without oil, so that it will stick to the main dough.

Shape the dough as a round ball, spray the top with water and roll over the seeds that you can spread on a flat tray. Immediately place the ball of dough over the laminated component, so that the seeds are in touch with the oil. Wrap the dough around, place it, seam side up in a banetton and leave it in the fridge overnight. It the dough seems very mad at you, don’t worry, he’ll get over it as the fermentation proceeds.

Next morning, turn the oven to 450F.  Once ready to bake, invert the bread over parchment paper, and score the surface in a pattern that will allow it to open in some interesting way. Make sure you cut all the way to expose the seeded component underneath.

Bake for 30 minutes with steam (Dutch oven closed), then remove the lid and bake for 5 to 10 more minutes. Allow it to cool completely over a rack before slicing.

ENJOY!

to print the recipe, click here

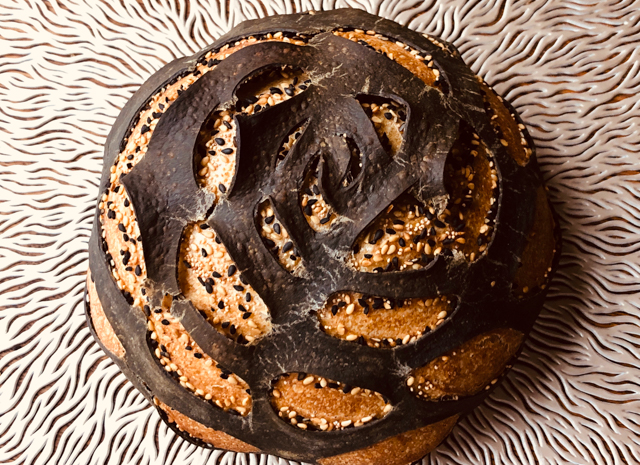
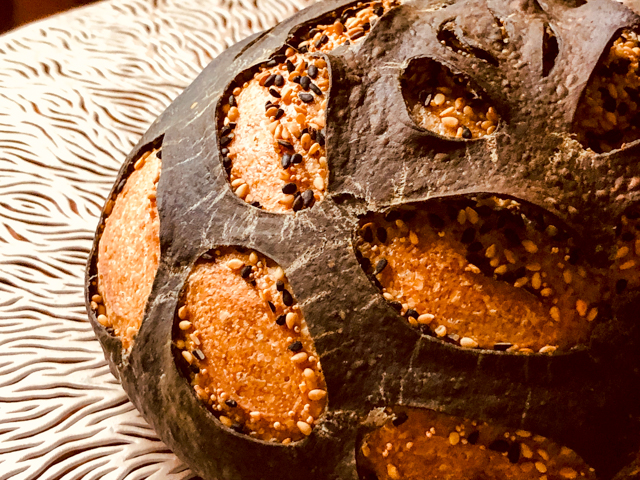
Comments: Obviously, the way you slash the dough will have a huge impact on the look of the final loaf. Most bakers go for the design of a rose, and that was my goal, as  you can see in the picture below:


However, I think my decoration ended more in the direction of a crown. Might be my love for all things Game of Thrones.  I want to do this type of bread again, trying to coach the first slashes in the center to open in a more parallel way to the surface. It will be fun to try other designs also. The bread has a lower hydration level than my regular sourdoughs, so the crumb ends a bit tighter, but I love the softness given by the semolina flour.


I am not sure pumpkin and sunflower seeds could work, maybe they are a big too big, but you never quite know until you try it. Just a few more things in that big list of baking and cooking projects for the future.


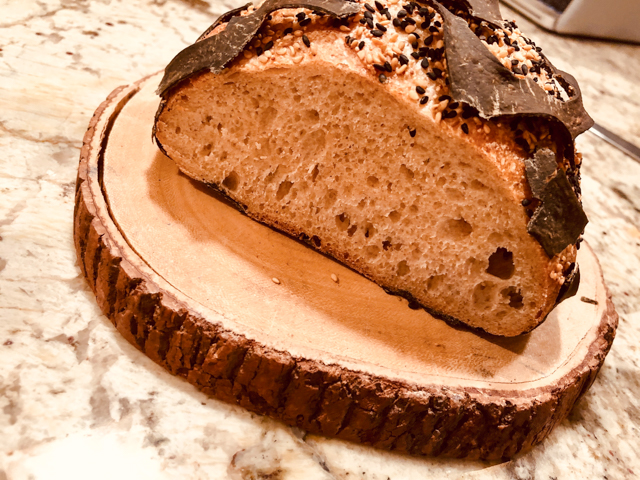
As you slice the bread, the laminated dough falls off, so you get bread and some bonus crackers, very delicious too…

Alex, thanks so much for bringing #sourdoughrose to my attention! It is exactly the kind of technique I was hoping for, slashes and seeds, co-existing together in perfect harmony…

ONE YEAR AGO: The Great British Bake-Off is Back!

TWO YEAR AGO: Queen of Sheba

THREE YEARS AGO: Brunch Burger

FOUR YEARS AGO: Mango Salsa with Verjus

FIVE YEARS AGO: Raspberry Bittersweet Chocolate Chunk Brownies

SIX YEARS AGO: Scary Good Pork Burgers

SEVEN YEARS AGO: Review of exercise program Focus25

EIGHT YEARS AGO: Celebrate Wednesday with a Thai Seafood Curry

NINE YEARS AGO:  Post-workout Breakfast

TEN YEARS AGO: Semolina Barbecue Buns

ELEVEN YEARS AGO: Lavash Crackers


SWEET AND SPICY ROASTED CAULIFLOWER

Cauliflower is quite likely the most versatile vegetable out there. You can turn it into pizza crust. You can turn it into pasta sauce. It roasts well, it fries well, it mimics rice, it disguises as tabbouleh. I’ve seen recipes using it in brownies, but even with my mind open wide, I cannot quite embrace that aspect. In this recipe, it gets a tempura-like treatment, and into the hot oven it goes. I never expected to have to fight the husband for the last bits of cauliflower in the bowl, but that’s what happened.

SWEET AND SPICY ROASTED CAULIFLOWER
(inspired by Cook Eat Share Vegan)

Yogurt sauce:
150g full-fat yogurt
zest and juice of 1 lemon
1 teaspoon cider vinegar
salt to taste

panko breadcrumbs
1 head of cauliflower, broken into florets

for the batter:
70g g rice flour
pinch of sea salt
¼ teaspoon black pepper
¼ teaspoon baking soda
juice of ½ lemon
150ml milk

for the spicy sauce:
2 tablespoons gochujang (Korean red chilli paste)
2 tablespoons soy sauce
1 tablespoon apple cider vinegar
3 tablespoons agave nectar
50ml water

Heat oven to 420F and line a baking tray with foil or baking paper. Make the yogurt sauce by whisking all ingredients in a small bowl, and reserve in the fridge until serving time.

To make the batter, whisk the ingredients together in a bowl until smooth. Place the panko in a shallow baking dish.  Dip cauliflower florets in the batter and shake off any excess before dredging in the panko crumbs and placing on the prepared baking tray. Bake for 25 minutes or until crispy and golden.

As the cauliflower roasts, place the gochujang dressing ingredients in a saucepan, bring to a boil and cook for 5 minutes, or until smooth thick, adding a splash more water if it seems too thick. Transfer the baked cauliflower to a large bowl, pour over the dressing and toss to coat. Serve right away of keep in a low oven while you prepare the rest of your dinner, with the yogurt sauce on the side.

ENJOY!

to print the recipe, click here

Comments: This was the type of preparation that had me a bit nervous until I finally took the first bite. The Gochujang sauce looked like liquid lava as it reduced, and I thought that it could end up as something that would turn my Dad off for being too spicy (Dad used to eat hot peppers as if they were candy… I refer you to this story of my past if you like to be amused).

But both Phil and I loved it!  It definitely had enough heat but it was not overpowering. No need for Kleenex. At any rate, if you don’t like spicy food, this is definitely not for you. But where there’s a will, there’s a way:  use ketchup instead of kochujang and proceed with the recipe as written. I am sure it will be very delicious.

ONE YEAR AGO: Roasted Cauliflower Salad over Hummus

TWO YEARS AGO: Queen of Sheba

THREE YEAR AGO: Brunch Burger

FOUR YEARS AGO: Mango Salsa with Verjus

FIVE YEARS AGO: Raspberry Bittersweet Chocolate Chunk Brownies

SIX YEARS AGO: Scary Good Pork Burgers

SEVEN YEARS AGO: Review of exercise program Focus25

EIGHT YEARS AGO: Celebrate Wednesday with a Thai Seafood Curry

NINE YEARS AGO:  Post-workout Breakfast

TEN YEARS AGO: Semolina Barbecue Buns

ELEVEN YEARS AGO: Lavash Crackers


CHAI-BUTTERFLY

(for a video tutorial on my default recipe for macarons, click here)

At the risk of inflicting misery on some of my readers, I confess that my current ear worm is “Fly, Robin Fly“, but with the lyrics “Chai Butterfly” instead. I apologize in advance for the inconvenience. Ear worms aside, these were fun to make, but it took me two attempts to get them right. The problem with my first batch (as you can see in the picture below) is that they turned out too big, each macaron could feed a family of four. You don’t want that. They need to mimic the delicate nature of the Monarch butterfly.  Imagine the size of a regular macaron and when you pipe the four circles that will be the final cookie, they must fit that dimension, or be just slightly bigger.

CHAI-BUTTERFLY MACARONS
(from the Bewitching Kitchen)

For the shells:
200g  Icing/powdered sugar
115 g Ground Almonds/Almond Meal
1 bag of Double Spice Chai Tea (Stash)
115 g egg whites at room temperature (approx. 4 eggs)
1/8 tsp of cream of tartar
100 g granulated sugar
¼ tsp vanilla paste or extract
orange, yellow and red food dye (adjusted to get the color of your favorite butterfly)

for the lemon buttercream:
40g unsalted butter, softened
130g powdered sugar
2 teaspoons heavy cream
1 tablespoon lemon juice
zest of 1/2 lemon
pinch of salt

For antennas (optional):
melted Candy melts
black food dye

Make the shells:
Line 3 heavy baking sheets with parchment/baking paper or Silpat mats. Layer the powdered sugar, almond flour and contents of the chai tea bag in a food processor. Pulse until the mixture looks like fine meal, about 12 pulses. Pass through a sieve and transfer to a small bowl or to a sheet of parchment/baking paper. Set aside.

Place the egg whites and cream of tartar in the bowl of a stand mixer fitted with the whisk attachment. Make sure that the bowl and the whisk are impeccably clean. Starting on medium speed, whip the whites with the cream of tartar until they look like light foam. The whites should not appear liquid. The foam will be light and should not have any structure.

Slowly rain in the granulated sugar in five additions, trying to aim the stream between the whisk and the side of the bowl. Turn the speed up to high. Continue to whip the meringue until it is soft and shiny. It should look like marshmallow creme (marshmallow fluff). Add the vanilla and food gel dye. Whip the egg whites until the mixture begins to dull and the lines of the whisk are visible on the surface of the meringue. Check the peak. It should be firm. Transfer the whites to a medium bowl.

Fold in the almond mixture in two increments. Paint the mixture halfway up the side of the bowl, using the flat side of a spatula. Scrape the mixture down to the center of the bowl. Repeat two or three times, then check to see if the mixture slides slowly down the side of the bowl.   Put the mixture in a piping bag fitted with your choice of piping tip.  Pipe shells, making two large circles touching side by side, and two smaller right below them.  Use a needle or a toothpick to smooth the surface and join the circles, to get the right shape.

Slam each sheet hard four to six times on the counter/worktop. Let the unbaked macarons dry until they look dull but not overly dry. Drying time depends on humidity. In a dry climate, the macarons can dry in 15 to 20 minutes; in a humid climate, it can take 35 to 40 minutes.

While the macarons are drying, heat the oven to 300 F. Bake one sheet at a time on the middle rack. Check in 11 minutes. If the tops slide or move (independently of the ‘feet’ when you gently twist the top), then bake for 2 to 3 more minutes. Check one or two. If they move when gently touched, put them back in the oven for 1 to 2 more minutes until they don’t move when touched.   Let the macaroons cool for 10 minutes before removing from the pan.  The macarons should release without sticking.

When they are cold, match the shells and decorate one of them using a black food pen.

For the lemon buttercream filling:
In a mixing bowl with whisk attachment, beat the butter until fluffy. Add powdered sugar, heavy cream, lemon juice, lemon zest and salt and beat until well combined. Transfer the buttercream into a pastry bag and fill the macarons.

If you want to make antennas, use Candy Melts dyed black, place in a small piping bag, no need to use a piping tip, just cut a small hole. Pipe antennas (make more than you need, because they break easily). Let them set. Stick them on the head of the butterfly, in between the two shells.

Store the macs in the fridge for 24 hours for perfect texture.

ENJOY!

to print the recipe, click here

Comments: There are two ways to pipe a butterfly-shaped shell. You can draw a butterfly shape and work with a small piping tip to fill it, or go the much easier route, piping two larger circles next to each other on top, and two smaller ones at the bottom. Smooth the joints using a toothpick or a cookie needle. On my first attempt I used two colors of batter and made a central line for the body in black. I did not like the effect, it was too thick. I think drawing the whole body details with a food-pen (Chefmaster has a soft point, perfect for it) is a much better option.

For the antennas, I used Candy Melts dyed black, and piped on parchment. When dry, I stuck into the filling. They are very fragile, and on my second batch I made mutant butterflies. Antenna-less. They are easier to wrap, which is a must for the treats I share at the Common Table.

For the macaron addicts out there, lately I’ve been incorporating one additional step to my recipe: I dry the almond flour the day before in a low oven (200F) for about 20 minutes. I find that the feet are bigger when I do so, and  I like the overall texture of the shell better. The chai flavor is subtle but definitely there.  One bag of the double chai tea is perfect for this amount of batter. I like the contrast of the spice in the shell with the brightness of the lemon buttercream in the filling.

ONE YEAR AGO: Roasted Cauliflower Salad over Hummus

TWO YEARS AGO: Sous-vide Egg Bites

THREE YEARS AGO: Paul Hollywood, The Weekend Baker

FOUR YEARS AGO: Texas Sheet Cake

FIVE YEARS AGO: In My Kitchen, September 2015

SIX YEARS AGO: Sour Cherry Sorbet: A Labor of Love

SEVEN YEARS AGO: In My Kitchen – September 2013

EIGHT YEARS AGO: Raspberry Sorbet at Summer’s End

NINE YEARS AGO: When three is better than two  (four years with Buck!)

TEN YEARS AGO: Grating Tomatoes (and loving it!)

ELEVEN YEARS AGO: A Peachy Salad for a Sunny Day

FROM MY HUSBAND TO YOU: ASPARAGUS STIR-FRY

Some veggies are so delicious that I tend to do as little as possible to prepare them, so they can shine on their own. But the other day the husband pulled an amazing dinner for us and the side dish blew my mind. Asparagus stir-fry that packed a ton of flavor and made us feel as if we were dining in a cool restaurant in Los Angeles. Just like we did during our sabbatical at UCLA years ago (it does feel like a previous life).  I insisted he should write a guest blog post about it, but he is quite busy wrapping up a review article, and food blogging is definitely not a distraction he needs. So, I did the altruistic, sensible thing, and composed the post myself. Because if you also have a soft spot for asparagus, you need this in your life…

ASPARAGUS STIR-FRY
(adapted from The Washington Post)

1 medium jalapeno chile pepper, seeded and thinly sliced
1 tablespoon olive oil
1 pound asparagus, trimmed and thinly sliced on a diagonal
1/4 teaspoon kosher salt
1 tablespoon soy sauce
3 tablespoons lemon juice,  divided
Zest of 1 lemon
1 teaspoon finely grated fresh ginger
1/2 cup fresh cilantro leaves with tender stems
toasted sesame seeds

Heat a large, non-stick skillet over medium-high heat until a drop of water sizzles on the surface. Add the jalapeno and olive oil, saute for a couple of minutes, until fragrant.  Add the asparagus. Sprinkle lightly with salt and cook, tossing occasionally, until the asparagus begins to brown around the edges, a couple of minutes more.

Add the soy sauce and 2 tablespoons of the lemon juice and cook, stirring constantly, until the asparagus is coated in sauce, but still firm, about 1 minute.

Add the lemon zest, the remaining tablespoon of lemon juice and the ginger. Toss to combine and cook, continuing to toss for 1 minute, or until ginger is fragrant. Remove the pan from heat. Transfer the asparagus to a platter and toss with cilantro and sesame seeds. Serve right away, perfect with grilled salmon.

ENJOY!

to print the recipe, click here

Comments: Looking at our served meal, you could conclude we love sesame seeds. And you would be 100% correct. They do go well with salmon and perfect with asparagus. This is a very simple and quick dish to put together, and would complement many main dishes, from beef to poultry.  Serve these asparagus over polenta and you can call it a great, satisfying vegan meal…

I have to say I am pretty lucky to have a partner who cooks dinner for us every other day. I love to cook, but it would get a bit tiring to do it every single evening.  We have different styles, I am always trying new recipes, whereas he tends to stick to his favorites. But every once in a while he finds a recipe and jumps on it. Like this one. It was a fabulous meal…

ONE YEAR AGO: The Best, The Very Best Hummus

TWO YEARS AGO: Chicken Katsu

THREE YEARS AGO: Whole-Lemon Marinade: Long Overdue

FOUR YEARS AGO: Tomato and Cucumber Salad with Almond Vinaigrette

FIVE YEARS AGO: Eggplant Tomato Stacks

SIX YEARS AGO: The Couscous that Wasn’t

SEVEN YEARS AGO: Apple-Cinnamon Bread

EIGHT YEARS AGO: Blueberry Galette

NINE YEARS AGO: In My Kitchen, August 2011

TEN YEARS AGO: Journey to a New Home

ELEVEN YEARS AGO: Friday Night Dinner