WHITE CHOCOLATE AND RASPBERRY MOUSSE CAKE

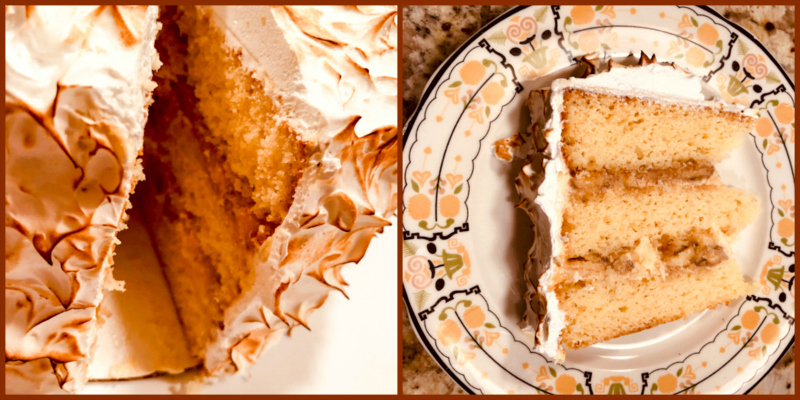
If you are obsessed with mirror glazed cakes, perhaps you’ve heard of the absolute goddess of the mirror universe, Ksenia Penkina.  The stuff she does is purely mind-blowing. Ksenia offers classes online and for a long time I dreamed about taking one.  I finally caved and got her introductory class, in which she explained how to make this adorable mousse cake. Having changed quite a few things in the recipe, (cake base, insert and glaze), I feel it’s ok to share. Plus, it would be impossible to offer in a blog post everything you get from watching her. Running no risk of infringing any copyright issues, I show you two versions of the same mousse cake, a larger one in a traditional format, and a small cake that would be perfect for a Valentine’s Day dessert. They were both made to celebrate Aritri’s PhD defense in November, a wonderful accomplishment by our most amazing graduate student. Congratulations, Dr. Majumdar!

WHITE CHOCOLATE RASPBERRY MOUSSE CAKE
(adapted from Ksenia Penkina)

for the hazelnut dacquoise:
120 g ground hazelnuts (peeled and lightly roasted)
135 g powdered sugar
40 g all-purpose flour
200 g egg whites, at room temperature
pinch of cream of tartar
70 g granulated sugar

for the raspberry insert:
7.5 g gelatin (around 200 bloom)
40 g cold water
280 g raspberry puree, sieved to remove seeds
12 g cornstarch
80 g sugar

for the white chocolate mousse:
11 g gelatin (200 bloom)
60 g cold water
350 + 400 g heavy cream (divided)
370 g white chocolate, finely diced
30 g fresh lemon juice

for the mirror glaze (adapted from Phil’s Home Kitchen):
2½ sheets (4g) of Platinum grade sheet gelatine
120ml water
150 g liquid glucose
150 g granulated or caster sugar
100 g condensed milk
150 g white chocolate, chopped fairly small
1/2 tsp titanium oxide
red, black, pink and white gel food colouring
tempered white chocolate for decoration (optional)
sprinkles for decoration (optional)

Prepare a 7 inch cake ring by wrapping it in plastic from the bottom to the sides, so you can use it to pour the fruit insert and freeze it later. Make sure it is sitting on a flat baking sheet that will fit in your freezer.

Heat the oven to 350 F.

Make the dacquoise base: in a bowl, mix together the flour, powdered sugar, and ground hazelnuts. Reserve. Make a meringue by whisking the egg whites with the cream of tartar until very foamy. Add the sugar slowly, whisking in high-speed until soft peaks form. Delicately fold the dry ingredients into the meringue. Spread as homogeneously as possible in a baking sheet to have a thickness of about 0.4 inch (1 cm). Bake for 15 to 20 minutes. Cool it completely and store in the fridge until ready to assemble the cake.

Make the raspberry insert: In a small bowl, add the cold water, then pour the gelatin powder on the surface, gently mixing to hydrate the powder. Let it sit at room temperature for 10 minutes. Sift the sugar with the cornstarch and add to the puree of raspberries in a saucepan. Bring to a boil, stirring constantly.  Turn the heat off, allow the mixture to cool to around 175 F (80 C), and add the bloomed gelatin, whisking well to fully incorporate it into the hot liquid. Pour some of it in the prepared cake ring to a depth of 1/2 to 3/4 inch. If using the heart-shaped mold, pour an amount to give similar thickness into that pan too. You will use the full amount made to divide in the two pans. Freeze for several hours, or preferably overnight.

Make the white chocolate mousse: mix the gelatin with water as described for raspberry insert. Reserve. Heat 350 g of heavy cream in a saucepan until bubbles appear around the edges.  Pour over the white chocolate, add the bloomed gelatin, stir gently until chocolate is dissolved. Warm the lemon juice briefly in the microwave, and pour over the white chocolate cream.  Reserve.

Whip the remaining 400 g of heavy cream until it reaches the consistency of melted ice cream. Fold gently into the reserved white chocolate mixture. Your mousse is done.

Assemble the cake: remove the pans with the frozen inserts from the freezer and remove them from the molds. Prepare a slightly larger cake ring (8 inch) with plastic wrap in the bottom to assemble the larger cake. Add to the bottom of each pan (cake ring and heart-shaped mold) a layer of white chocolate mousse. Carefully place each insert floating on top, trying to center them as well as possible. Cover the mold almost to the top with mousse, then add the reserved dacquoise on top. Fill and gaps on the sides with mousse to make a smooth top (which will be the bottom of your un-molded dessert). Freeze overnight. Really important that the cake is absolutely frozen before proceeding with the glaze.

Make the mirror glaze. Put the water, sugar and liquid glucose in a small pan and bring to simmering point, stirring occasionally to dissolve the sugar. Remove from the heat and let it stand for about 5 minutes. This is the base syrup for the glaze.  Meanwhile, soak the gelatin in some cold water for about 5 minutes. Squeeze out the excess water and stir into the hot water, sugar and liquid glucose mixture to dissolve. Stir in the condensed milk.

Put the chocolate in a medium bowl and pour this hot mixture slowly over the chocolate, stirring gently to melt it, avoid making bubbles. A stick immersion blender works great, but you must keep the blades fully submerged at all times. If bubbles are present, pass the mixture through a fine sieve. Add 1/2 tsp titanium oxide to the mixture, divide in two portions. You are aiming for two different tones of red. I used red and a tiny amount of black dye for the darker color, red, pink and white to the second portion.

Leave the glaze uncovered for an hour at room temperature for the glaze to cooled and be slightly thickened: if it is too runny you will get too thin a layer on top, colors will not blend well and less glaze will cling to the sides of the cake. The ideal temperature to pour the glaze is 92 to 94 F. Once it is slightly above that (around 97 F), pour both colors in the same container, barely mix them, and pour over the frozen, un-molded cakes sitting over a rack with a baking sheet underneath.

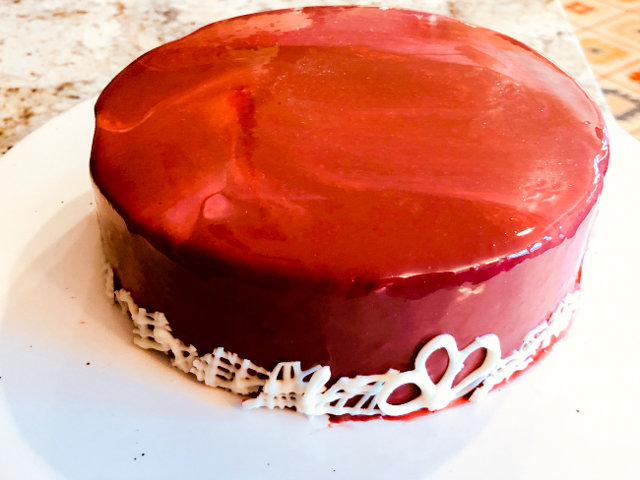
Tap the rack gently to settle the glaze, and very gently and quickly run an off-set spatula on top of the cake to force excess glaze to run down the sides. Do that just once, or you will ruin the marble effect. Drips under the cake can be cleaned with a spatula or sharp knife. Let the glaze set at room temperature for 15 minutes, add the decorations of choice, then place the cakes in the fridge for 2 to 3 hours. Use a hot knife to cut slices without compromising the glaze.

ENJOY!

to print the recipe, click here

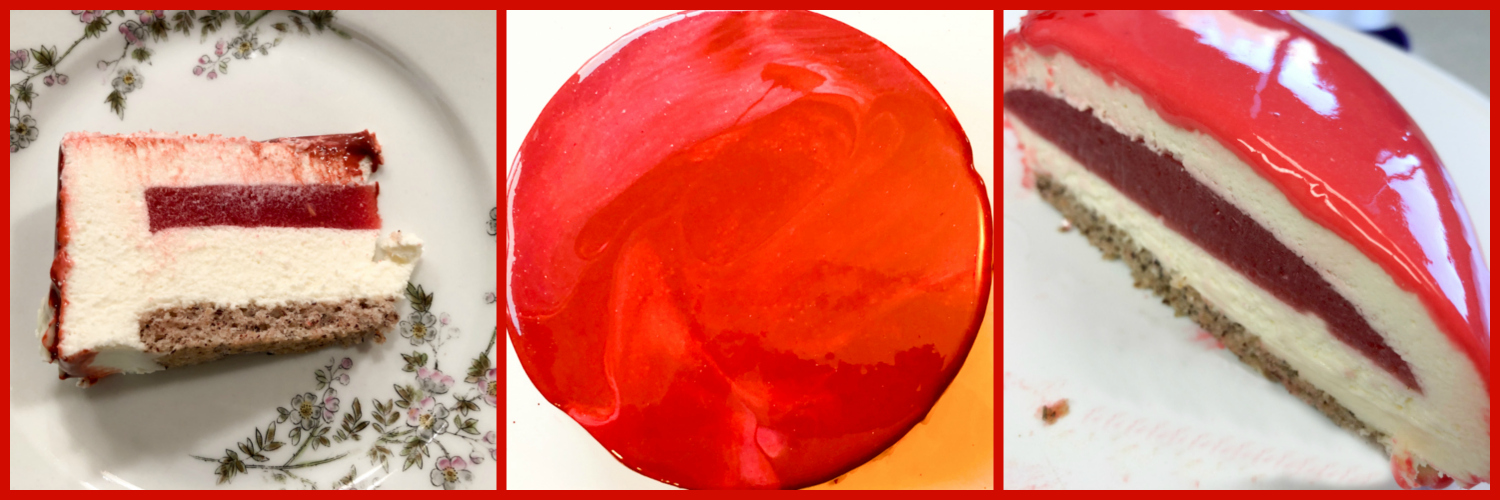
Comments: The recipe will make two cakes, you can definitely cut it in half and bake a single large cake or a couple of small ones. I used a Silikomart mold called Amore for the small cake, and a cake ring, 8 inch diameter for the large one. The original cake base was a coconut dacquoise, but Aritri is not too wild about coconut in desserts, so I used a hazelnut version instead. Ksenia has access to a different type of gelatin, hard to find in the US, so I decided to stick to the mirror glaze formula from Philip’s blog, as I’ve been doing lately.

The larger cake was glazed a few hours before the heart cake, so I could only do the two-color effect on the big one. The leftover glaze was saved and applied to the small cake, but then the colors were obviously mixed. To add a bit more of a festive look, I used decorations from Fancy Sprinkles, a company I advise you to visit with restraint. Dangerous, very dangerous site. You’ve been warned.

To decorate the larger cake, I sat in front of a candle in a comfortable Full Lotus posture (yeah, right), went through 113 cycles of deep breathing, and… tried my hands at tempering some white chocolate. Against all odds, it was successful. Once I was done with my extended version of the Ecstatic Dance, I piped random crisscrossed lines on acetate film, let them set, broke them into small pieces and attached them to the base of the cake. In retrospect, I should have planned the decorations more carefully to come up with something a little more elegant. But truth be told, tempering chocolate is so tricky for me, I never expect it to work. When I realized it was all good, I had no specific plan on how to use it. Oh, well. Next time I’ll be ready. And then we all know what might happen: both chocolate and me will lose temper. Story of my life.

The cake tasted pretty amazing. I do think the combination of raspberries with white chocolate is hard to beat. Raspberries shine in desserts because they have such tangy flavor, cutting through excessive sweetness. The hazelnut dacquoise retained its nice texture during the freezing-thawing process, it did not turn mushy at all. I need to fine tune the amount of gelatin in the glaze, though. It seems a tad too runny.


One of the tricky parts of this type of dessert is baking a very uniform layer of cake or biscuit base. For cookie type bases (sable for instance), you can roll the dough using plastic guides with specific dimension. For cakes like dacquoise or genoise, I think baking frames could be the best option. Must investigate. Could be a fun gadget to showcase in a future “In My Kitchen.” The sacrifices one makes in the name of blogging!

As far as mousse cakes are concerned, this is a reasonably simple one, because it involves a single mousse, a single insert, and a single layer of cake/biscuit. If you are worried about making a mirror glaze, the cake could be served “naked” with some simple decorations on top. A drizzle of milk and white chocolate, a drizzle of white chocolate with some red dye dissolved in it, sprinkles, shaving of tempered chocolate, so many things you can do. But between you and me, the mirror glaze just makes a simple cake super special. Perfect to celebrate a terrific PhD defense!

ONE YEAR AGO: Panettone Time!

TWO YEARS AGO: Pistachio Creme Brulee

THREE YEARS AGO: Fast and Furious Bison Chili

FOUR YEARS AGO: In My Kitchen, December 2014

FIVE YEARS AGO: Braised Fennel with Saffron and Tomato

SIX YEARS AGO: Revenge of the Two Derelicts

SEVEN YEARS AGO: Grilling Ribbons

EIGHT YEARS AGO: Peppery Cashew Crunch

NINE YEARS AGO: Baked Shrimp and Feta Pasta

FUN WITH SOURDOUGH

Bread baking can be intimidating, and if you take it into sourdough territory, things are potentially even more stressful. Truth is, when compared to “regular” bread made with commercial yeast, sourdough is very forgiving. In part because it is a slower process, and it offers a lot of flexibility in terms of timing, amount of starter, level of hydration. It is easier to accommodate to any working schedule, once you get used to the rhythm. I am set on mixing the dough from 5 to 9pm, shaping and retarding in the fridge the whole night, baking early next morning, straight from the fridge. The breads from this post were all made with the same simple formula, mostly white bread flour, a touch of spelt. After bulk proofing for 4 hours at room temperature, they were shaped and placed in the fridge to sleep and dream overnight. Then, the real fun started. I tried a few different things, as you will see. It’s great that the husband enjoys a slice of bread for lunch several days a week. Because the home bakery has been working overtime lately!

CLASSIC SOURDOUGH  BREAD
(from the Bewitching Kitchen)

100 g active starter (at 100% hydration)
375 g water, room temperature
450 g bread flour
50 g whole-wheat flour
10 g salt

Mix all ingredients for the bread in a large bowl, making a shaggy mass. Let it sit at room temperature for 30 minutes. Mix gently folding the dough a few times until smooth.

Allow it to ferment for 4 hours at room temperature, folding the dough 3 times during the four hours, no need to be precise about the spacing of folding cycles. Just make sure you fold it a few times.  At the end of four hours, shape it either as a round ball or a batard.

Transfer to a well floured banneton, seam-side up, and place in the fridge overnight, 8 to 12 hours, longer if needed.

Next morning, heat the oven to 450 F. Invert the shaped loaf, still cold from the fridge over parchment paper. Dust the surface with a little flour and slash to your liking. Or, dust with cocoa powder using a stencil.

Place in a cold Dutch oven, cover, and stick in the hot oven for 30 minutes with the lid on, and 15 more minutes with the lid off.  Allow it to cool completely before slicing.

ENJOY!

to print the recipe, click here

Comments: Cocoa powder is a nice way to create contrast without affecting taste. You will not detect any bitterness or cocoa flavor in the bread, don’t even worry about it. The sourdough nature will be pretty much unaffected by the thin layer of cocoa on top. Right before baking the bread, lay your stencil on top of the shaped dough, sift cocoa all over. Remove the stencil carefully, slash the bread and bake.

You have two options here, slashing right before adding the stencil, or after. I think slashing before might be better, and that’s what I’ll be doing from now on. The other thing to keep in mind is that you need to coach your bread to preserve the design as much as possible during baking. With that goal in mind, make one or several reasonably deep slashes around the perimeter of the design, so that – all things working as planned – the bread will burst around the design, not in the middle of it. But, of course, bread has a mind of its own, and part of its charm is that you just never know…

I did not expect to have such amazing oven spring, but Polaris, my newly named starter, is absolutely amazing!  I got it from Elaine, and you can get it too (as well as the gorgeous bread lame you can see in the composite photo) with a visit to her site here. She ships worldwide, by the way.

Another way you can use cocoa powder is coupling it with a more delicate slashing using a brand new razor blade (this is really important, it must be super sharp). Coat the bread with a fine dusting of cocoa powder (or you can use a mixture of regular bread flour with cocoa for a lighter tone), then slash the pattern you like.

As you can see, I made the mistake of not coaching the bread into opening someplace else rather than the middle of my design. It was still a pretty nice loaf, but just did not look the way I wanted. Next morning we noticed a scary monster waiting for us in the counter top…

Hello there! Come here often?

😉

Now, to continue with the fun. For the following bake, I made a slightly bigger amount of dough (starting with 600 g flour and increasing all other ingredients proportionally), then shaped two small balls (using roughly 200 g dough for each). The remaining dough was used to make a batard. The small loaves were proofed in cute little bannetons, about 5 inches in diameter. This picture shows them next to the regular sized banneton.

So we had not only a scary monster in the Bewitching Kitchen, but also an alien. Never a dull moment, my friends. Never a dull moment.

One of the small rolls received a cocoa-stencil, the other got slashed in a basket-pattern. Exact same dough and time of fermentation, baked side by side in the Dutch oven. These would be excellent bread-gifts for the holidays, maybe with a special stencil design, like a small Christmas tree, stars, or bells. 

The bigger, batard, got just a straightforward slashing pattern, and upon baking, also showed its rebel personality… 😉

As usual, we enjoy a couple of slices on the day I bake, next morning the bread is sliced and placed in the freezer. Baking once or twice a month is enough to keep up with our bread consumption. But, I confess that the temptation to bake every week to try something new… is not negligible (sigh).

ONE YEAR AGO: Pasteis de Nata

TWO YEARS AGO: New Mexico Pork Chile, Crockpot Version

THREE YEARS AGO: Chocolate on Chocolate

FOUR YEARS AGO: Double Chocolate and Mint Cookies

FIVE YEARS AGO: The Story of my first Creme Brulle’

SIX YEARS AGO: Sourdough Mini-rolls

SEVEN YEARS AGO: Focaccia with Sun-dried Tomatoes and Gorgonzola

EIGHT YEARS AGO: Mediterranean Skewers

NNE YEARS AGO Fettuccine with Shrimp, Swiss Chard, and Tomatoes

BANANA LAYER CAKE WITH MERINGUE ICING

If you need a festive cake that is not that hard to make (trust me, as a former cake-o-phobe, I know what I’m talking about), look no further. Inspiration came from several sources: cake from one cookbook, icing from another, filling from my own imagination, based on my Mom’s “doce de banana”. It was one of the very few sweets she made regularly, as both my Dad and I were crazy about it. I had to control myself not to say we went bananas for it. There, I just said it. Good memories.

BANANA LAYER CAKE WITH MERINGUE ICING
(adapted from Sprinklebakes)

for the cake:
113 g butter, softened (1 stick)
350 g sugar
3 eggs at room temperature
1 tsp vanilla paste
270 g all-purpose flour
3 + 1/2 tsp baking powder
1/2 tsp salt
1 + 1/4 cup milk, at room temperature (about 290 g)
for the frosting:
150 g sugar
2 tablespoons all-purpose flour
1 egg
1 egg yolk
1 cup milk (230 g)
1 tsp vanilla paste
1/4 pound butter (1 stick), softened
2 Tablespoons icing sugar
for the filling:
4 medium bananas, cut into slices
2 Tablespoons butter
1/4 cup brown sugar
1/4 cup whipping cream
pinch of salt
2 bananas, sliced, sprinkled with lemon juice
for the frosting:
3 cups granulated sugar
1 cup egg whites

Make the cake. Heat oven to 350 F. Grease the center and perimeter of three 8 inch round cake pans and line the bottom with parchment paper. Grease the center of the paper.  In the bowl of an electric mixer, cream the butter and sugar, add the eggs, one at a time, and the vanilla paste, beat until combined.

In a large bowl, sift the flour, baking powder, and salt. Add to the mixer in three additions, alternating with the milk, beginning and ending with the flour. Beat on high-speed for 3 minutes, cleaning the bowl midway through.  Divide the batter in the three pans, bake for 30 to 35 minutes, until a toothpick comes out clean when inserted in the center of the cake. After the cakes cool in the pan for 10 minutes, invert them on a rack and allow them to completely cool.

Make the custard frosting. Mix the sugar and flour inside a saucepan. Add the egg and egg yolk, whisk vigorously. Add the  milk and vanilla and mix very well. Heat gently over medium-low heat until the mixture boils and thickens. The goal is to have the consistency of pudding. Let it cool completely.

Beat the butter and icing sugar in an electric mixer using a wire whisk. When they are very well combined and creamy, add the cooled custard prepared before. Beat on high-speed for 7 minutes, until it thickens.

Make the filling. Melt the butter in a large non-stick skillet, add the brown sugar and cook until it starts to dissolve. Add the slices of banana, the heavy cream, and cook everything together until the bananas start to get golden brown and the cream thickens slightly.  Cool and reserve.

Assemble the cake.  Toss the fresh slices of banana with lemon juice and reserve in a small bowl. Place one cake layer over a cake stand, and spread with a very thin layer of custard frosting. Add half the caramelized bananas, and half the fresh banana slices. Set the second cake layer on top. Add a thing layer of custard, and the remaining of bananas, caramelized and fresh. Top with the final cake layer, bottom side up.

Coat the whole cake with frosting, make it a thin layer, no need to worry about covering the surface, because the meringue icing will take care of that.  Keep in the fridge until frosting, for at least a couple of hours.

Make the meringue icing. In the bowl of an electric mixer, mix the egg whites with the sugar and place over a pan with simmering water. Heat until the sugar is fully dissolved and the mixture feels warm to the touch. Immediately hook the bowl to the mixer and beat in high-speed until stiff peak forms.  Remove the cake from the fridge and add a thick coating of the meringue frosting. You can then add all sorts of swirls and spikes to the surface, using either your bare fingers (a bit messy), or the back of a spoon. Have fun with it.  Torch the surface to give a nice effect all over. Don’t burn  it to the point it gets black, because then the sugar will taste bitter.

Slice and serve!

ENJOY!

to print the recipe, click here

Comments: I have four tips for you when it comes to cake baking.

Tip #1: Get that mis-en-place going. When you measure all the ingredients and lay them up spatially in the order they will be used, your life will be a lot easier. And the probability that you will forget the melted butter in the final stage of genoise preparation will be considerably reduced.

Tip #2: Have all ingredients at room temperature, eggs, milk, oils, butter. They incorporate better that way, and you will have a smoother batter. You can soak eggs in warm water for 5 minutes in case you forgot to remove them from the fridge.

Tip #3: Sift the leavening agent with other dry ingredients. This will disperse the powder (baking soda, baking powder) uniformly, ensuring that your cake will rise evenly.

Tip #4: For cake layers that are perfectly leveled, spray or coat just the center of the pan with your greasing agent of choice (Pam, butter), and a light coat on the sides. Amazing how well that works. If you look at the composite picture, I included a shot of one of the cakes when I just inverted it out of the baking pan. No trimming was needed in any of the three cake layers. I cannot take credit for this baking tip, it’s something I saw over at Pastries Like a Pro and have been using for a long time now. Always works. Thank you, Helen!

Some bakers recommend those Wilton bands that go around the cake pan to ensure even baking. I’ve tried them, and found that the cake ended up with a sort of “steamed” quality I did not care for. Maybe that could be fixed with a slightly longer bake, but to me nothing beats the trick of greasing just the center of the pan. It’s so much easier than messing with those bands soaked in water.

This is a big, hearty cake, a small slice will be enough, but you will be tempted to go back for another little sliver. The contrast of caramelized bananas with a few bites of fresh fruit made the cake even more flavorful and cut through the sweetness of the filling.  For the future, I would reduce the amount of icing (maybe start with 3/4 cup of egg whites and decrease the sugar proportionally), as it made way too much.  It was a recipe from Fine Cooking and they said it would be enough to cover one 9-inch round cake. In my opinion, that amount would be enough to cover two of those with some to spare and flick at drooling dogs standing nearby.

I made the cake on Sunday but added the frosting Monday morning just before taking it to the department. I don’t think meringue icing holds up very well and was afraid it would be compromised after a night in the fridge.  It was a ton of fun to torch it, maybe next time we should try to make a video.  Everybody loved this cake, even though it was massive, it was gone before 11am. I call that a successful Mondays with Sweetness deal!

ONE YEAR AGO: Mini-Frittatas with Broccoli and Cheese

TWO YEARS AGO: Pumpkin Brownies with Cream Cheese Frosting

THREE YEARS AGO: Anne Burrell’s Focaccia

FOUR YEARS AGO: Double Chocolate and Mint Cookies

FIVE YEARS AGO: Cappuccino Panna Cotta

SIX YEARS AGO: Chicken Parmigiana, the Thriller

SEVEN YEARS AGO: Wild Mushroom Risotto

EIGHT YEARS AGO: Tartine Bread:  Basic Country Loaf 

NINE YEARS AGO:  Pugliese Bread