LEMON BUTTERCREAM MACARONS

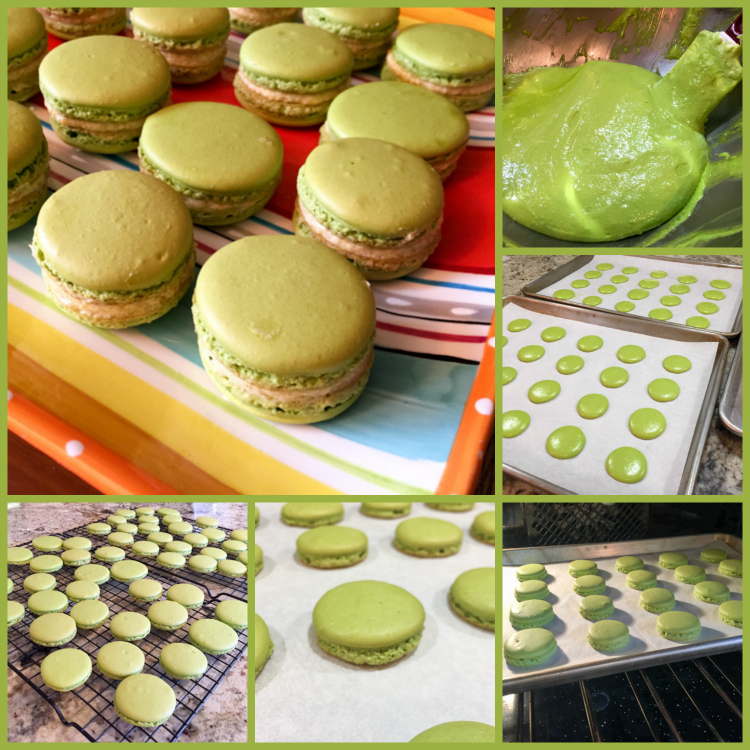
I baked this batch back in February, evidently I took my sweet time (pun intended) to blog about them. The recipe is the same basic one I’ve been using from the Craftsy tutorial. I want to feel totally comfortable with it before moving to the Italian version. To get this color, I used a mixture of green and yellow gel coloring, but it’s hard to be precise about the amounts. I added a little bit of the green, mixed, added a little more, then some yellow, and gave a thorough mix. Crossed my fingers and hoped that the color would stay true during baking. You just never know. Not a single shell cracked, and all formed cute feet. What more can a baker ask to the Macaron Gods? Not much. Maybe uniformity in size? Yeah, that would be nice…


LEMON BUTTERCREAM MACARONS
(from the Bewitching Kitchen, adapted from Crafsy)

for the shells:
198 g powdered sugar
115 g almond meal
113 g egg whites (aged for three days)
a pinch of cream of tartar
100 g granulated sugar
Green and Yellow Gel colors from AmeriColor
2 drops vanilla extract

for the filling:
3 eggs
1 cup (200 grams) sugar
grated zest from 2 large lemons
juice of 2 large lemons
1 cup plus 2 tablespoons (230 g) chilled butter, cut in pieces

Line 3 heavy baking sheets with parchment paper or Silpat mats. Layer the powdered sugar, almond meal and lavender in a food processor or mini processor. Pulse until the mixture looks like fine meal, about 15 seconds. Pass through a sieve and transfer to a small bowl. Set aside.

Place the egg whites and pinch of cream of tartar in the bowl of a stand mixer fitted with the whisk attachment. Make sure that the bowl and the whisk are impeccably clean. Starting on medium speed, whip the whites with the cream of tartar until they look like light foam. The whites should not appear liquid. The foam will be light and should not have any structure.

Slowly rain in the granulated sugar, trying to aim the stream between the whisk and the side of the bowl. Turn the speed up to medium-high. Continue to whip the meringue until it is soft and shiny. It should look like marshmallow creme. Add the gel colors and the vanilla. Staying at medium-high speed, whip the egg whites until the mixture begins to dull and the lines of the whisk are visible on the surface of the meringue. Check the peak. It should be firm. Transfer the whites to a medium bowl.

Fold in the almond meal mixture in three increments. Paint the mixture halfway up the side of the bowl, using the flat side of a spatula. Scrape the mixture down to the center of the bowl. Repeat two or three times, then check to see if the mixture slides slowly down the side of the bowl. Put the mixture in a piping bag fitted with a Wilton #8 tip or another kind of your preference. Pipe rounds of the batter.

Slam each sheet hard four to six times on the counter. Then fist bump each end of the sheet’s underside twice. Let the unbaked macarons dry until they look dull but not overly dry. Drying time depends on humidity. Ina dry climate, the macarons can dry in 15 to 20 minutes; in a humid climate, it can take 35 to 40 minutes.

While the macarons are drying, heat the oven to 330 F (170 C/gas mark 3). Bake one sheet at a time on the middle rack. Check in 11 minutes. If the tops slide, then bake for 2 to 3 more minutes. The macarons should release without sticking. Check one or two. If they stick, put them back in the oven for 1 to 2 more minutes. Let the macaroons cool for 10 minutes before removing from the pan.

Make the filling: Beat together the eggs and the sugar with a Kitchen Aid type mixer on high-speed. Try to get the butter to double in volume by beating. Transfer to a saucepan and add the lemon zest and juice. Stir until it thickens slightly and all liquid is incorporated.  Pour the mixture into a bowl, cover with plastic wrap and cool in the fridge.

Once the lemon mixture is cold, put back into the bowl of the mixer, and beat with the wire whisk for a couple of minutes. Start adding the pieces of chilled butter, whipping until incorporated.  The mixture is now ready to be used to fill the shells.

Assemble the macarons: find two macarons similar in size and add a good amount of filling to the bottom of one of them. Place the other on top and squeeze gently to take the filling all the way to the edge.  Ideally, store in the fridge for 24 hours before savoring them.

ENJOY!

to print the recipe, click here

Comments: I made this batch before my dear niece Raquel sent me the macaron Silpat that I showcased in the Black Sesame Macarons post. The mat does make it a lot easier to get baking, as there’s no need to draw circles in parchment. Place the silpat over the baking sheet and off you are to a good start.  The lemon buttercream turned out very good to balance the sweetness of the shells. If you’d like to make it even easier, get some lemon curd from the store, but I imagine the texture is not as pleasing as homemade buttercream.

I must say that now I am not sure what I enjoy more, baking bread or macarons. They can easily turn into a bit of an obsession. And when you are obsessed, you tend to order special cookbooks. Such as….

order from amazon with a click here
(side note: I am not affiliated to amazon.com)

This is a more advanced macaron book. Can you imagine little macaron horses? I am not ready to face fancy shapes yet, but it’s fun to dream… It all starts with a dream, you know…

😉

Add to FacebookAdd to DiggAdd to Del.icio.usAdd to StumbleuponAdd to RedditAdd to BlinklistAdd to TwitterAdd to TechnoratiAdd to Yahoo BuzzAdd to Newsvine

ONE YEAR AGO: Raspberry Buckle

TWO YEARS AGO: Seafood Gratin

THREE YEARS AGO: Black Bean and Pepper Jack Burger

FOUR YEARS AGO: Carrot and Sesame Sandwich Loaf

FIVE YEARS AGO: Border Grill Margaritas

SIX YEARS AGO: Goodbye L.A.

SEVEN YEARS AGO: Vermont Sourdough


SaveSave

SaveSave

SaveSave

SaveSave

SaveSave

SaveSave

SaveSave

SaveSave

SaveSave

SaveSave

SaveSave

SaveSave

SaveSave

SaveSave

SaveSave

SaveSave

FIRST MONDAY FAVORITE: MAY 2017

June. We are almost halfway done with the year. Unreal. Today is the First Monday of the month, so it’s time to showcase my favorite post of May. Not very easy to choose. Part of me would love to pick Kouign-Amann, because it was the best thing I made in a long time. But I prefer to choose something that was in my kitchen when I had no idea of the sadness about to hit my family. The bliss of not knowing what was waiting for us. So, I share a delicious Chicken Noodle soup, made earlier last month.

for the full post, click here

Thank you Sid, for organizing the First Monday Favorite!

If you are a food blogger and would like to participate, drop Sid a line.

To see the contributions from my virtual friends, click on the link below


(comments are shutdown for this post)

https://static.inlinkz.com/cs2.js

SaveSave

SaveSave

SaveSave

PORK TENDERLOIN, BRACIOLE STYLE

There I go taking liberties with food once again. Braciole is a very traditional Italian recipe made with beef. Flank steak, butterflied and pounded thin is the meat of choice for it. I used pork tenderloin. And I made it sous-vide. Reckless. Times two.

PORK TENDERLOIN, BRACIOLE STYLE
(from the Bewitching Kitchen, inspired by Jeff Mauro)

1 pork tenderloin, butterflied, pounded thin
salt and pepper
smoked mozzarella, sliced thin
8 asparagus stalks, blanched and cooled
1/2 cup Panko bread crumbs
1/4 cup sun-dried cherry tomatoes packed in oil, coarsely chopped
3 tablespoons walnuts, toasted and diced
3 tablespoons raisins
1 to 2 tablespoons olive oil
for searing:
a little olive oil
a little lemon juice
a touch of maple syrup

Make the filling by mixing Panko bread crumbs, tomatoes, walnuts, raisins and olive oil in a small bowl. Season lightly with salt and pepper.

Place the butterflied pork tenderloin on a flat surface, season with salt and pepper. Lay slices of smoked mozzarella over the surface, leaving a little border without cheese all around. Place the stalks of asparagus over the cheese, add the filling on top.  Roll the meat as tightly as  you can make it, tie with kitchen twine at 2 inch intervals. Season the surface lightly with salt and pepper. If using sous-vide, seal the meat and place in a water-bath set to 140F. Cook for 2 to 6 hours.

Make the brushing sauce by mixing  olive oil, lemon juice, and maple syrup in a small bowl. Remove the meat from the bag,  brush the surface with the olive oil mixture, and sear on a hot grill or non-stick pan. Cut in slices and serve.

If cooking on a regular oven, sear the surface of the meat over high heat after brushing with the olive oil mixture. Place in a 375 F oven until done to your liking.

ENJOY!

to print the recipe, click here

Comments: You can definitely make this exact recipe without a sous-vide gadget. The  big advantage of sous-vide is keeping the rolled meat nicely tight. No filling spills out, it is all contained by the vacuum packing. And, of course, the flexibility with timing is a nice touch too. Anywhere from 2 to 6 hours will work perfectly well, all you have to do after is sear the outside for cosmetic reasons. For our taste the pork cooked at 140F was too rare. I was kicking myself for choosing that temperature, knowing that we do not like the taste of the meat when it’s still a bit pink. So, full disclosure: I seared the cut slices briefly on a skillet before we enjoyed them. Next time I’ll go for 150F.

The smoked  mozzarella does a magical job in the filling. It packs so much flavor, and it pairs well with the sweetness of the raisins and the sun-dried tomatoes. A very nice main dish well suited for company. You can serve it with many sides: mashed cauliflower, mashed potatoes, a little pasta, or a lemony risotto. If you prefer a more austere route, just a salad with a bright vinaigrette will do.

Soon I’ll make the traditional version with flank steak, since we enjoyed this one so much.  Flank steak will be easier to roll in layers, the pork tenderloin ends up more like a single layer of meat enclosing the filling.  I imagine that I could have pounded it a bit thinner, but I was afraid to compromise the texture of the meat.  At any rate, this one is a keeper, and I hope that – sous-vide or not – you’ll give it a try.

Make me happy… grab a pin!

Add to FacebookAdd to DiggAdd to Del.icio.usAdd to StumbleuponAdd to RedditAdd to BlinklistAdd to TwitterAdd to TechnoratiAdd to Yahoo BuzzAdd to Newsvine

ONE YEAR AGO: Raspberry Buckle

TWO YEARS AGO: Seafood Gratin for a Special Dinner

THREE YEARS AGO: Cooking Sous-Vide: Sweet and Spicy Asian Pork Loin

FOUR YEARS AGO:  Farewell to a Bewitching Kitchen

FIVE YEARS AGO: In My Kitchen. June 2012

SIX YEARS AGO: Goodbye L.A.

SEVEN YEARS AGO: 7-6-5 Pork Tenderloin

SaveSave

SaveSave

SaveSave

SaveSave

SaveSave

SaveSave

SaveSave

SaveSave

SaveSave

SaveSave

SaveSave

KOUIGN-AMANN, FIGHTING FIRE WITH FIRE

When life shakes you down hard, cooking becomes iffy, at least for me. Being sick with the worst cold in 25 years didn’t make it any easier. From Brazil, apart from a very heavy heart, I brought a virus, one that clearly was a brand new acquaintance. I had to fight it from scratch from an immunological point of view. And my beloved was hit  too. We were in horrible shape for a week.  Anything you set yourself to do seems to demand a lot more energy. Simple tasks drain you. And a lot will go wrong. Like a tomatillo sauce, poured down the garbage disposal, much to my despair. Still puzzled by that one, as it was a recipe from a very reputable source. Only possible explanation, I grabbed a mutant jalapeno pepper with off-the-chart capsaicin levels. Trust me on that one. I love pepper, being the Daughter of my Dad. That thing could scare all three dragons from the Game of Thrones into hiding. Liquid lava.  But, after that fiasco, I decided to grab the bull by the horn and go for the kill. I would make something more involved than dumping things in a blender. I would make a concoction that has been sitting on my list of culinary goals for a long time. I would tackle Kouign-Amann.

OVERVIEW OF THE RECIPE
(from Sugar Rush, a great cookbook!)

First you make a simple dough from flour, a little yeast, salt, and a little butter. That goes into the fridge to rest from a couple of hours to overnight.  You will also make a slab of butter with a precise dimension and cool it until firm.

Then, the dough is rolled out, the cold layer of butter placed on one side, and the dough folded in the usual puff pastry making technique. A few differences, though: only four folds are needed. Sugar gets sprinkled over the dough before each fold. No lengthy refrigeration between folds, because you do not want the sugar to melt into the dough. That’s about it. After four folds the dough is refrigerated for only 10 minutes, then rolled out and 4 inch squares are cut to form the individual pastries. They sit for 45 minutes before baking so that the yeast has a chance to work its magic.

They are best baked in rings, although muffin tins can be used. They are baked for longer than you would expect, so that the sugar gets really dark. And utterly delicious.

I did not ask permission to publish the recipe, but my friend Karen has made a beautiful batch in the past, and the recipe is available on her site. She also talks about the origin of this interesting pastry from Brittany.

recipe available here

Comments: This one goes to the OMG files. With honors, with a red carpet rolled out for its entrance. My gosh, this is good. This is so good it should probably be illegal. Think of a croissant, but with sugary caramelized bites in between the layers. A croissant that married a muffin and had a beautiful baby. It won’t crumble into buttery pieces in your mouth. It is actually a lot more sturdy, with the butter tamed by sugar. Oh, yeah. Butter tamed by sugar. Perverse, isn’t it? If you low-carb, if you keto, if you Paleo, this is not for you. But let me tell you one thing. Life is short. The pleasure you’ll have by biting into one of these babies is worth a little restraint for a few days. A few more push-ups, one more mile on the treadmill. There. I hope I made my case.

Add to FacebookAdd to DiggAdd to Del.icio.usAdd to StumbleuponAdd to RedditAdd to BlinklistAdd to TwitterAdd to TechnoratiAdd to Yahoo BuzzAdd to Newsvine

ONE YEAR AGO: In My Kitchen, Yin and Yang

TWO YEARS AGO: Chocolate Toffee Banana Bread

THREE YEARS AGO: In My Kitchen, June 2014

FOUR YEARS AGO:  Strawberry Frozen Yogurt

FIVE YEARS AGO: Baked Coconut and “The Brazilian Kitchen”

SIX YEARS AGO: Honey-Glazed Chicken Legs

SEVEN YEARS AGO: French-Style Rolls


SaveSave

TANGENTIAL QUICHE WITH ASPARAGUS AND FENNEL

I would like to thank everyone who contacted me about my Mom’s passing.
It is a natural cycle of life to say goodbye to a parent, but it is still very painful.
Your kind words warmed my heart.

I’ve taken way too many liberties with recipe titles. Hummus without chickpeas? Yes, guilty of that one. Tortillas with no corn? Read my sentence. Rice-free risotto? Just take me. Today I add one more to the list. A quiche. But no crust. In fact, I’ve made a version almost exactly one year ago using sweet potato slices to cover the pie dish. We loved it so much that it’s hard to believe it took me so long to re-visit. This time I paired asparagus and fennel, with a small amount of cheese for good measure. Trickiest part of this recipe is getting the sweet potato slices to roast without shrinking too much and collapsing from the sides of the dish. Still, even if that happens, no major harm will be done. It is all going to be delicious.

SWEET POTATO CRUST QUICHE WITH ASPARAGUS AND FENNEL
(inspired by The Wimpy Vegetarian)

2 tablespoons olive oil
2 sweet potatoes, peeled, sliced thin
olive oil spray for potatoes
kosher salt (about 1 teaspoon total)
freshly ground pepper to taste
1 cup thinly sliced asparagus plus a few stalks left whole for decoration
1 large fennel bulb, diced
4 large eggs
2 egg whites
½ cup half-and-half
½ cup milk
1 teaspoon mustard powder
1/4 cup Gruyere cheese
nutmeg to taste

Heat oven to 400°F.

Coat a pie dish with the sliced potatoes, and spray a good amount of olive oil over the slices. Make sure to do a nice layer all around the edges coming up above the rim of the plate. Season lightly with salt. Place in the oven until the potatoes start to get some color, about 12 minutes. Reserve and lower the oven to 350 F.

Heat 2 tablespoons oil in a skillet over medium-high heat.  Add the asparagus and fennel, season with salt and pepper, and sauté until just tender, about 8 minutes; set aside. Place the whole stalks in a microwave safe dish with a little water, microwave for 30 seconds. Reserve.

Whisk eggs, egg whites, half-and-half, milk, mustard powder,  half teaspoon salt and pepper in another large bowl. Spread the sautéed asparagus and fennel evenly on top of the sweet potato crust. Sprinkle the cheese on top of the vegetables. Pour the egg mixture over it all. Place the stalks of asparagus carefully on top. Grate fresh nutmeg across the top just before sliding into the oven.

Bake until quiche is set and crust is well browned, about 30 minutes, but check after 25 minutes in the oven. It should just jiggle lightly at the center.  Let cool to room temperature before cutting into wedges.

ENJOY!

to print the recipe, click here

Comments: I love fennel but despise licorice. Go figure that one. My problem with fennel is that you buy this huge bulb and by the time you’re done prepping it, you are left with 1/4 cup at most of goodness. Oh, well. Maybe I don’t do a good job prepping it. But all instructions say to remove the tough outer layer. That “outer layer” is often so thick, a huge amount of fennel is gone once I remove it. Oh, well again. But I do love its flavor, both raw in salads, roasted, sautéed, it’s all great.  I am still learning my way around the sweet potato “crust.”  If you go to Susan’s site, you’ll  notice she opted for a hashbrown path to make the crust. That is definitely something to consider. At any rate, a quiche without the regular crust is so much lighter, and a lot quicker to prepare too. Obviously, you could omit the crust altogether, just coat the pie dish with a little butter or oil, add the veggies, pour the egg mixture and bake it. But it’s nice to have a bit of texture underneath.  Whatever you choose to do, this filling with asparagus and fennel, a touch of Gruyere (a favorite cheese of mine) is a winner.


Add to FacebookAdd to DiggAdd to Del.icio.usAdd to StumbleuponAdd to RedditAdd to BlinklistAdd to TwitterAdd to TechnoratiAdd to Yahoo BuzzAdd to Newsvine

ONE YEAR AGO: Fakebouleh

TWO YEARS AGO: Yellow Squash Soup

THREE YEARS AGO: Grilled Chicken with Tamarind and Coconut Glaze

FOUR YEARS AGO: Chicken-Apricot Skewers

FIVE YEARS AGO:  Asparagus Quiche

SIX YEARS AGO: Two-stage Pea and Prosciutto Risotto

SEVEN YEARS AGO: Mellow Bakers: Corn Bread