PARADISE REVISITED

It was a trip that started with this sunset on the beach behind our backyard, at the North Shore of Oahu…

Can it get any better… ?   We awakened the next morning to the great news that my stepson and his girlfriend were engaged!  He invited her that morning (her birthday!) for a walk on the beach, and when they reached a beautiful spot near some rocks overlooking the ocean, he popped the question!  How cool is that, folks? We were thrilled!

Phil made margaritas at sunset to celebrate the double happy event: the birthday and the engagement…  Afterwards we kept our momentum with a nice dinner at the Turtle Bay Resort.  Yeap, the one from that movie, remember?  😉

So the festivities began!

The beautiful house we were fortunate to find (VRBO) and the incredible beach in our backyard….

The owners of the house have two gorgeous Golden Retrievers, quite likely the happiest dogs in the known universe!  They often dropped by the beach in the morning, hung out the whole day with the regulars for occasional  quick swims, then came back to lay on the sand or the cool grass in the backyard.  Tough life!   One of them assumed the “belly rub” position at the sight of any willing human being, and stayed like that forever. Patiently waiting…
Who could resist that belly?   None of us did!

We went for long walks, marveled at nature, relaxed on the beach, and took stand-up paddleboard lessons (harder than I anticipated, folks!). The strong swimmers followed sea turtles underwater.

We were impressed by the little Go Pro camera my other stepson had. The tiny thing is a workhorse! You can take it under water, clip it to helmets, to surfboards, to bikes, and make videos or serial time frames that are amazing! Take a look at this one, of the chase of a sea turtle under water (make sure to watch to the point the turtle goes up for air, it’s beautiful).  He also made several time lapses of sunsets, like this one, while some other folks were preparing to camp for the night on the beach, and lit a fire at sunset.


To close the week we had a farewell dinner at Tiki’s Grill on Waikiki, with the best Mai Tais, great food and wonderful ambiance, particularly if you arrive before  sunset, as we made sure we did!  😉

UNTIL NEXT TIME, ALOHA OAHU, and MAHALO!

ONE YEAR AGO: Feijoada, the Ultimate Brazilian Feast

TWO YEARS AGO: Vegetable Milhojas

THREE YEARS AGO: Italian Bread

THE SECRET RECIPE CLUB: BLUEBERRY GALETTE

The Secret Recipe Club is a fun monthly event in which bloggers are assigned in secret to make a recipe from another blog,  and then post about it at exactly the same time on reveal day.  The group is now so popular that new members must  wait in a long line for a chance to join.  This popularity also explains one of the rules: if you mess up and don’t post on reveal day, you are out of the game, leaving an opening for someone else to take your place. It’s only fair, after all: it’s very disappointing to have your blog “orphaned” on reveal day.

This month was a bit of a stretch  to participate, but I’m sure glad I did.  My assigned blog was  Baking and Creating with Avril.   Did you notice the “Baking” in the title?  I have a slight suspicion that the SRC organizers like to have a little fun at my expense…  How else could it be that I’ve been matched with serious bakers for months in a row?  😉  Still, I love a challenge, and as soon as I got the assignment I jumped into Avril’s cool site, in full “blog stalking mode”.  After narrowing a long list of tasty options, I could not decide between  the blueberry galette or the white chocolate cranberry  bars.   You see, she’s got some seriously delicious stuff posted.   Phil, the blueberry-addict, made the choice for me.  Blueberry galette it would be.

RUSTIC BLUEBERRY GALETTE
(from Baking and Creating with Avril

for the crust
1 +  1/2 cups all purpose flour
1 tablespoon sugar
1/2 teaspoon salt
1 + 1/2 sticks unsalted butter {ice cold}
1 egg yolk
3 tablespoons  milk
3 tablespoons apricot preserves, warmed

for the filling:
3 cups fresh blueberries
1/4 cup brown sugar
2 tablespoons Flour
1/4 teaspoon cinnamon
1/8 teaspoon nutmeg, freshly grated
a pinch of salt

Make the crust: In a bowl of a food processor add the flour, sugar and salt, process to combine. Drop the cold butter pieces and pulse until small pea size crumbles appear. In a small bowl combine egg yolk and milk.  Pour into food processor and pulse just until combined.   Take dough mixture out of food processor and put onto a piece of parchment paper.  Form dough into a large disk, wrap parchment paper around it and place in refrigerator to chill for at least 30 minutes.

Make the filling by mixing in a large bowl the blueberries, flour, brown sugar, pinch of salt, cinnamon and nutmeg.

Preheat your oven to 350 degrees. On a lightly floured surface roll out the chilled pie crust to about 12 inches in diameter. Transfer to a parchment lined large baking sheet. Place the filling in the center of the pie crust, then fold up the sides pleating every now and then. Brush with warmed apricot preserves. Place in preheated oven to bake for 50-60 minutes. Rotating the pan halfway through. Let cool for 15 minutes before slicing and serving.

ENJOY!

to print the recipe, click here

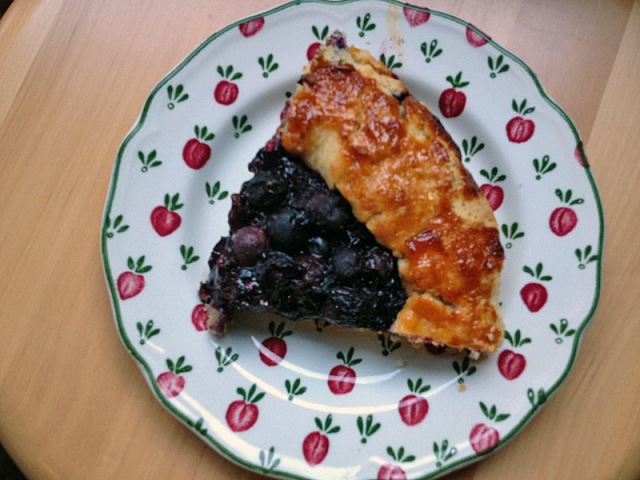
Comments:  As far as taste goes, I hit the nail in the head.  I could eat the filling of the galette by the spoonful over some nice, thick yogurt. But, let’s be honest: my product wouldn’t make the finals of the 2012 Galette Beauty Pageant.  In my defense, I made this recipe in one of the busiest weekends ever, preceded by a full day flying back to OK and a lab move that began the next  morning (Friday) at 5am!  That weekend found me  like a zombie trying to finish countless tasks at the same time.

But, I won’t sugar-coat the pill:  frantic times or not, pie crust is always tricky for me. Usually Phil comes to the rescue, but the poor guy had enough on his plate.  My pie dough was not as smooth as I hoped for, so I couldn’t make the beautiful pleats, trademarks of a nice galette.  Oh, well…   It gives me the opportunity to improve my baking skills, right? Alternatively, I can stand by the title and profess my galette as the most rustic ever! 😉

Don’t let my boo-boos prevent you from making it. Avril is right, the galette is incredibly tasty, and you should also consider making the original recipe (link is in Avril’s blog), that includes a mixture of fresh peaches and blueberries.  Oh, my….

Avril, it was nice to “meet” you through The Secret Recipe Club!  I hope you had a lot of fun finding your assigned blog and cooking from it!

ONE YEAR AGO: In My Kitchen, August 2011

TWO YEARS AGO: Journey to a New Home

THREE YEARS AGO: Friday Night Dinner (very tasty pork medallions)


FORGIVE ME, FOR I HAVE SINNED

The perfect food blogger would never resort to using pre-washed greens, buying instead produce exclusively from the farmer’s market,  each leaf washed with loving care. However, I am not ashamed to confess this particular sin. Quite the contrary, the bag of organic  “mixed greens” found in most grocery stores is one of my best friends, because it makes life so much easier.  To my delight, the latest issue of Fine Cooking had an article devoted to redeeming sinners like me: it offered  several options of salad recipes that,  starting from those handy bags, turn them up into something special. I intend to try all of them, but my first choice was the one featuring a ginger-yogurt dressing and fresh cucumber. I can never resist the call of ginger.  😉

MIXED GREEN SALAD WITH CUCUMBER, ALMONDS, AND GINGER-YOGURT VINAIGRETTE
(adapted from Fine Cooking magazine, July 2012)

1-1/2 Tbs. rice vinegar
1 Tbs. finely chopped shallot
2 tsp. freshly grated ginger
2 tsp. thinly sliced mint leaves
salt and black pepper to taste
1/3 cup plain non-fat yogurt
1 Tbs. extra-virgin olive oil
5 oz. (5 cups) mixed baby greens
1 small English cucumber, peeled, sliced
1/4 cup toasted slivered almonds

In a small bowl, combine the vinegar, shallot, ginger, mint, salt, and black pepper.  Stir in the yogurt and olive oil.

In a large bowl, season the greens and cucumbers with a pinch of salt and a few grinds of pepper and toss with enough dressing to lightly coat. Sprinkle the toasted almonds on top, and serve right away.

ENJOY!

to print the recipe, click here

The original recipe called for sesame seeds instead of almonds, but I like to have extra crunch in my salad, and felt that the sesame seeds would more or less disappear through the mix.  I also used non-fat yogurt in place of low-fat, because that’s what we had laying around in the fridge.  The dressing turned out light, with the mint and ginger bringing a nice zing to it.   Great, simple salad, perfect way to doctor up those bags that may find their way into your grocery cart… 😉  Extra-vinaigrette keeps well for a day, the flavors intensify a bit.

Because Fine Cooking doesn’t make their recipes available online for non-subscribers, a while ago I contacted the magazine to know their thoughts on copyright issues. Here’s the deal: they don’t mind bloggers publishing any of their recipes, as long as full credit is given and a link to the magazine is included, so that’s what I’ve been doing, without guilty feelings.  Except, of course, the guilt of buying that eventual bag of salad greens. Pre-washed.  😉

ONE YEAR AGO: Cracked Wheat Sandwich Bread

TWO YEARS AGOAu Revoir, my Bewitching Kitchen

THREE YEARS AGO:  French Bread

ASPARAGUS PESTO

My dear friend and great cook Cindy raved about this recipe during the peak of asparagus season.  Full disclosure: the year was 2010.  Yes, it takes me a while to get to important stuff, but I finally made it. Better late than never!  I am fond of the traditional Genovese pesto, but often find it a bit overwhelming.  This version takes just a bit of basil in a sea of asparagus, and I guarantee if you make it even the die-hard asparagus haters (like two of my stepsons ;-)) will fall for it.

ASPARAGUS PESTO WITH WHOLE WHEAT PASTA
(adapted from Cindy, who adapted it from Michael Chiarello)

1 lb asparagus|
1 cup (lightly packed) basil leaves
2 tablespoons slivered almonds, toasted
1 clove garlic, sliced
Salt and freshly ground pepper to taste
1/4 cup low fat yogurt
about 1/4 cup extra virgin olive oil
1/2 cup grated Pecorino cheese
zest of 1 lemon
1 tablespoon lemon juice

Boil the asparagus in salted water until very tender. Drain, reserving the water, and cool slightly. Put in a food processor with the all of the other ingredients except the oil, and puree well. With the machine running, slowly add the olive oil. Taste and adjust for seasonings and consistency. It should be about the thickness of mayonnaise.

Return the water used for cooking the asparagus to a boil and cook pasta. Drain, reserving about 1/2 cup of the pasta cooking water. Mix the pasta and pesto, thinning with the pasta cooking water as necessary. Taste and adjust seasoning.

ENJOY!

to print the recipe, click here

We had this pasta with a juicy, thick salmon steak, cooked to perfection by the master grilling-guru whom I married 12 and a half happy years ago.  The pesto was excellent with the whole wheat pasta, but a small amount topping the hot salmon just as it left the grill was mind-blowing delicious!    I actually think grilled salmon and asparagus pesto might be the gastronomic discovery of 2012 for me, and I have to thank Cindy for it.

And now, for something completely different, once again.  While reading Sawsan’s blog, Chef in Disguise, I learned that she’s got two awards:  The Versatile Blogger, and Very Inspiring Blogger.  I smiled and told myself  “she definitely deserves them both!”.    Much to my surprise and delight, she passed them to a few bloggers and there was the Bewitching Kitchen! Now I am the proud receiver of those awards too!   Versatile, maybe. Inspiring?  Wow, that would be awesome…

Thanks so much, Sawsan!

ONE YEAR AGO: Chocolate and Chestnut Terrine

TWO YEARS AGO: Under the spell of lemongrass

THREE YEARS AGO: Greens + Grapefruit + Shrimp = Great Salad!

A SMIDGEN OF A TART

One of my favorite food blogs is “Just a Smidgen”, from the lovely Barbara, a poet, mother, cellist, great cook, and superb photographer.  Each of her posts is a work of art, with carefully chosen words, and photos that will make you dream.  And, to top it all, everything she cooks makes my mouth water…   Last month she had this tomato tart featured on her blog, and since heirloom tomatoes insist on jumping in my grocery cart,  I immediately added it to my Pinterest cooking board for future reference.   Contrary to what usually happens, I made it right away, it was simply irresistible!

ROASTED HEIRLOOM TOMATO TART
(adapted from Just a Smidgen)

1 package puff pastry, defrosted (use one half for the tart)
5 to 6 heirloom tomatoes
olive oil
salt and cracked black pepper to taste
1 container of bocconcini mozzarella, drained (200g / 7 to 8 ounces)
1/4 cup tomato sauce
1/8 cup Parmigiano-Reggiano cheese, grated
2 tsp Herbes de Provence
1 egg

Heat oven to 400° F.

Roll out one sheet of puff pastry directly on a piece of parchment paper until it is about an 11” x 14” rectangle. Take a fork and poke holes all over the pastry, leaving a one-inch border all around. Using the palm of your hands, gently roll up to form a border of dough.

Within that border, spread the tomato sauce evenly then add the mozarella pearls over the top.

If your tomatoes are too juicy, slice them and place over paper towels to drain the excess moisture. Place them over the tart, overlapping slightly. Use different colors and sizes, it is supposed to be a rustic-looking tart.

Sprinkle with the herbes the Provence. Finish by sprinkling the grated Parmigiano over the surface of the tart.

In a small bowl, whisk the egg with a drizzle of water to make a wash. Brush this egg mixture on the border of the pastry.

Bake for about 30 minutes or until the puff pastry has risen and lightly browned, but start checking the bottom of the tart after 20 minutes, as depending on the moisture of your tomatoes, it could be ready earlier.

Cool slightly and serve warm or at room temperature, cut in squares.

ENJOY!

printable version available soon

Make sure to stop by Smidge’s blog to look at her gorgeous photos of the making of this tart.  The use of bocconcini mozzarella pearls was a nice touch. Although they may seem a bit bulky to lay on the tart,  they’ll melt into a thing of pure beauty and enticing creaminess, in a perfect marriage with the heirloom tomatoes.  Let me remind you once more:  if using overly juicy tomatoes, drain  the slices and pat them dry.  They will release more liquid during baking, so there will be no risk of ending with a dried up topping.

I hope there is no penalty for a blog with too many heirloom tomato recipes.  If there is, I’m in trouble, because there will be more, I’m afraid…  😉

Barbara, thanks for a great recipe!

ONE YEAR AGO:  A Tropical Street Market

TWO YEARS AGO: Groceries

THREE YEARS AGO:  A Souffle to Remember Julia Child