HALLOWEEN ALMOND COOKIES

I am not quite sure why they are described as cookies, to me they are more like little cakes. They are often served during the holiday season in Italy, known as Almond Rainbow Cookies. To mimic the colors of the Italian flag, the layers are green, white and red. I used the basic recipe and turned them into Halloween creatures. What do you think?

HALLOWEEN SESAME-ORANGE ALMOND COOKIES
(from the Bewitching Kitchen)

4 eggs (separated)
1 cup sugar
7 oz almond paste
2 + 1/2 sticks unsalted butter
1 tsp almond extract
2 cups all-purpose flour
½ tsp salt
2 tsp black sesame paste
1/2 tsp orange emulsion
black and orange food coloring
raspberry jam (I used SOLO raspberry filling)
7 oz semi-sweet chocolate
small amount of white chocolate and orange fat-soluble dye for decoration (optional)

Heat your oven to 350°F and line 3 baking pans (13 by 9 inch) with parchment paper. Reserve.

In an electric mixer, whisk the egg whites using the whisk attachment on medium-high speed and add 1/4 cup of the sugar a little at a time. Beat at high speed until you have glossy stiff peaks then transfer to another bowl and reserve until needed.

Clean the bowl and switch to the paddle attachment. Mix the almond paste and remaining 3/4 cup sugar until well incorporated, about 3 minutes. They will look like small pebbles. Add the butter and beat until pale and fluffy, another 3 minutes. Next add in the yolks and almond extract until well combined. Reduce the speed to low, then add flour and salt and mix until combined. Fold half of the egg white mixture into almond mixture to lighten, then fold in remaining whites gently until everything is mixed all together.

Weigh the batter and add 1/3 to one bowl, 2/3 to another. To the smaller portion, add the sesame paste and the black dye, mix well to incorporate. Add the orange extract and orange dye to the other bowl.

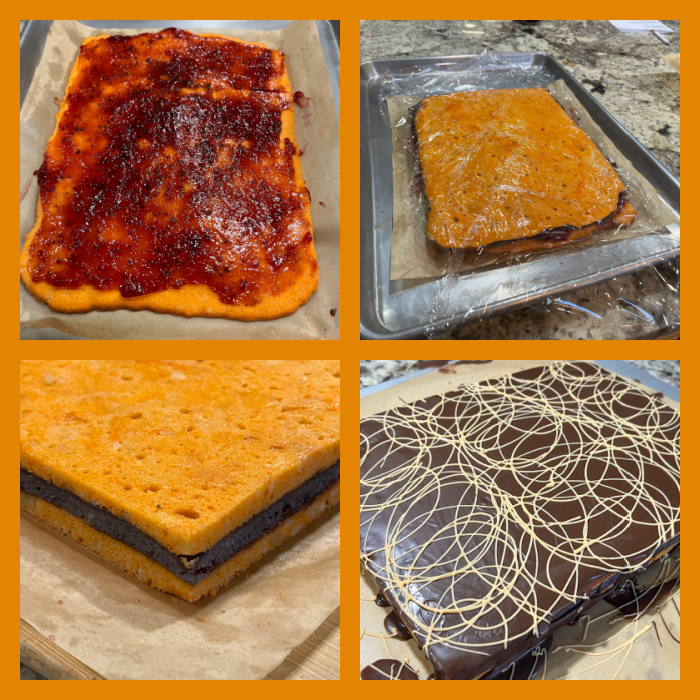
Spread the black batter into one of the prepared pans. Spread the orange batter divided in the two other pans. Bake each pan for about 12 minutes, until a toothpick inserted in the center comes out clean. Let them cool completely. Now it is time to assemble.

Place one orange layer onto a baking sheet with some parchment paper. Spread a thin layer of jam, then place the black layer on top, and spread another thin layer of the jam. Place the second orange layer on top of the black and cover with plastic wrap. Place another baking sheet on top with some weight and let it chill in the fridge for 4 hours.

Remove the weight and plastic and bring layers to room temperature (so that the chocolate won’t set too fast when you spread it). Melt chocolate in a microwave at 50% power until smooth. Trim the edges of the assembled layers and spread a thin layer of the chocolate on top of the cake. Place it back in the fridge to chill and until chocolate is firm. Cover with a sheet of parchment paper, place another baking sheet on top, carefully flip the cake. Spread a thin layer of chocolate and chill again until firm. Melt some white chocolate and dye it with fat-soluble orange dye, then make swirls on top (optional).

With a serrated knife cut the cookie/cake in rectangles while still very cold.

ENJOY!

to print the recipe, click here

Comments: I cannot lie to you, as it stands right now, I am not sure I will ever make these again… Labor of love, yes, no doubt. Maybe a second time will be easier but I was quit exhausted at the end and until I cut the pieces and looked at them all lined up, I was not sure of the outcome. For starters, it is hard to judge the thickness of the batter as you spread it on the baking sheet, so it was not easy for me to make sure the three layers had the same dimension. But overall, I think it was all fine. The taste (I tasted some trimmings) was really pretty spectacular. I love almonds and any sweets made with almonds so if you are part of my cheerleading team, you will love these!

ONE YEAR AGO: Miso-Honey Chicken Thighs

TWO YEARS AGO: Raw Zucchini and Chickpea Salad with Tahini Yogurt

THREE YEARS AGO: Black Tahini Shortbread Cookies

FOUR YEARS AGO: A Fruitful Trio (of Macarons)

FIVE YEARS AGO: Halloween Entremet Cake

SIX YEARS AGO: Pork with Prunes, Olives and Capers

SEVEN YEARS AGO: Kansas Corn Chowder

EIGHT YEARS AGO: Impossibly Cute Bacon and Egg Cups

NINE YEARS AGO: Pulling Under Pressure

TEN YEARS AGO: Cooking Sous-vide: Two takes on Chicken Thighs

ELEVEN YEARS AGO: Miso Soup: A Japanese Classic

TWELVE YEARS AGO: On my desk

THIRTEEN YEARS AGO: A must-make veggie puree

FOURTEEN YEARS AGO: Vegetarian Lasagna

FIFTEEN YEARS AGO:  Brazilian Pão de Queijo

SARAH BERNHARDT’S COOKIES

Don’t you love a cookie with a nice story behind it? Sarah Bernhardt was one of the greatest French actresses of the last century. During a trip to Denmark at the height of her career she had a cookie from an upscale bakery and fell totally in love. She was so passionate about that delicacy that in 1911, after her memoirs were published in Denmark, Chef Johannes Steen named this spectacular chocolate cookie after her. Read more about it here. You will find many versions around, but count on Helen Fletcher to bring you the authentic. The cookie joins an almond base, and a chocolate truffle enrobed in a chocolate shell. Many versions cover the whole thing in chocolate, but if you want to do the real thing, cover just the truffle. You should still see the cookie underneath and it will be much more elegant to eat. Worthy of a dame like Sarah Bernhardt.

SARAH BERNHARDT’S COOKIES
(from Pastries like a Pro)

for the cookie base:
100g almond flour
150g granulated sugar
2 large egg whites
1/2 teaspoon almond extract

for the chocolate truffle topping:
1/2 cup cream
2 tablespoons unsalted butter (28g)
2 tablespoons sugar (25g)
140g semisweet chocolate
1 teaspoon vanilla

to coat the truffle:
114g semisweet chocolate (114 grams)
1 tablespoon shortening
Gold Leaf, optional

Make the cookie base. Draw a template with 1 in diameter circles on parchment paper to pipe the cookies, flip the paper so that you can pipe on the back.

Combine the almond flour and sugar in the bowl of a food processor, and run it for a few seconds to combine. Add the egg whites and vanilla, process until a paste forms. Place the mixture in a piping bag fitted with a 1/2 in round tip. Pipe rounds of cookie batter on the parchment paper, going just to the circle drawn. They will puff up during baking. Leave the piped cookie sitting at room temperature while you heat the oven to 300F. Bake the cookies for 20 minutes or until they just start to get some color on the edges. Let cool completely on the paper before removing to a cooling rack.

Make the chocolate truffles. Heat cream, butter and sugar until the butter is melted and the sugar is dissolved. The mixture should be very hot, but not boiling. Submerge the chocolate under the cream and let sit for 4 or 5 minutes. Whisk gently until smooth. Add vanilla.

pour it into a rimmed baking sheet, cover the top with plastic wrap and let it sit at room temperature until it sets up. If it is too soft to pipe and hold a shape, refrigerate briefly until it can be piped.

If making up to a week ahead, pour into a container, cover the surface with film and chill store in the refrigerator. Bring to room temperature to pipe. Follow the instructions above if it gets too soft.

Fit a pastry bag with a 5/8 inch tip. Fill the bag the truffle mixture. Pipe a kiss shaped mound in the center on top of each macaroon about 1” high and within about 1/4″ from the edge. If there is a pointed tip, press it gently with your finger to smooth the surface out.

Place in the freezer to harden. If not finishing within a day or so, place these in a covered container and keep them frozen for a month or so until time to finish.

Finish the cookies. Combine the chocolate and shortening in a short, wide mouth glass or other small container and microwave at 50% power for 1 minute.  Stir to mix. If the chocolate isn’t completely smooth, microwave for 10 seconds at a time.  Do not let it get too hot.

Remove the cookies from the freezer. Dip them upside down to cover the kisses, just short of their bottoms. Let the excess chocolate drip off. The chocolate finish should cover the kiss but not touch the cookie base. The fact they are frozen will stop the chocolate from running. If the kisses start to warm, pop them back into the freezer. Right after coating, add golden leaf decoration or sprinkles.

Cookies should be kept in the fridge and be brought to room temperature for serving. They can sit at room temperature for a few hours.

ENJOY!

to print the recipe, click here

Comments: Helen’s post about these cookies is extremely detailed, so I recommend you visit her site if you’d like to bake a batch. She decorated them with gold leaf, I went the easier route and resorted to my trustworthy golden stars. You’ll need to work fast, because the chocolate coating sets almost immediately upon contact with the frozen truffle component.

These are festive and luscious, the type of cookie that will brighten up any holiday table. There is something about the contrast of the cookie base with the melt-in-your-mouth truffle that explains why Ms. Bernhardt went crazy for them.

ONE YEAR AGO: A Really Big Announcement

TWO YEARS AGO: Stir-Fried Chicken in Sesame-Orange Sauce

THREE YEARS AGO: Monday Blues

FOUR YEARS AGO: A New Way to Roast Veggies

FIVE YEARS AGO: Two Takes on Raspberries

SIX YEARS AGO: Spice Cake with Blackberry Puree

SEVEN YEARS AGO: Own Your Kitchen with Cappuccino Panna Cotta

EIGHT YEARS AGO: Chicken Parmigiana, the Thriller

NINE YEARS AGO: Wild Mushroom Risotto

TEN YEARS AGO: Tartine Bread:  Basic Country Loaf 

ELEVEN YEARS AGO:  Pugliese Bread

RUSSIAN TEA COOKIES: WHEN PERSISTENCE PAYS OFF

This recipe has tempted me ever since I first encountered it on Barbara’s blog. If you read her post you’ll understand my sentiments and want to bake a batch too. So, a couple of Mondays ago I awakened at 5:30 am and went to the kitchen, hoping to have these cookies still warm from the oven for our lab meeting. As you shall see momentarily, the road to hell is indeed paved with good intentions.

Because I was a little tired and sleepy I carefully followed the recipe, and even arranged the measured ingredients on the counter top (the mis-en-place, mark of a serious cook). Nevertheless, unimpressed by my organizational skills, the ingredients refused to shape into a dough. No matter what I did, I only found revolving sandy crumbs forming in the KitchenAid mixer bowl. My husband woke up, came to the kitchen with a good morning kiss, but quickly decided to fetch the newspaper and read it with his coffee, far away from the kitchen (smart man that he is).

I returned to Barbara’s blog … had I forgotten something? – nope, everything was in order. So I gathered up portions of the sandy mess, formed them into “balls” and baked them, into what turned out to be unstable, unappetizing blobs. Frustrated, I rolled one into powdered sugar and tried it….Not fit for human consumption. Almost in tears, I began cleaning the kitchen, and while putting the almond flour away I noticed something printed on the bag: “brown rice flour“.

Some days a woman should not leave the comfort of her bed until way past 7 am, possibly around noon. But, I made them again, and… persistence paid off. Would you believe that the correct flour made them just as tasty as Barbara described?

RUSSIAN TEA CAKES
(adapted from Barbara’s blog, originally published in A Blithe Palate)

1 + 3/4 cups (6 oz) almond flour
2 cups all purpose flour
6 T sugar, divided (4 T + 2 T)
8 oz unsalted butter, softened
1 t vanilla
extract zest of 1/2 large lemon
1 t salt

Powdered sugar for dusting the cookies.

Heat the oven to 325 F.

Cream the butter and 4 T sugar until light and fluffy. Add the vanilla until combined, then reduce speed and add the two kinds of flour, salt, lemon zest, and the remaining 2T of sugar. Scoop a spoonful of dough and roll it into a 1 inch ball. You should obtain about 36 cookies.

Place them on a lined baking sheet. Bake them until light brown, approximately 20 minutes. Do not overcook. Half way through baking time, switch the cookie sheets, rotating them to promote even baking. Remove from the oven and dust them liberally with powdered sugar. Cool on a rack. Eat 3 or 4 four cookies while no one is looking.

ENJOY!

to print the recipe, click here

receita em portugues na segunda pagina

This slideshow requires JavaScript.

Comments: What a difference a flour makes! 😉 My only change to the recipe was to add a bit of lemon zest, because it’s a natural match for almonds. The dough is easy to shape and has a delightful aroma even in its raw form. At the first bite of the cookie I wondered, “do I like it”? But within seconds it melted in my mouth, with a lovely almond flavor, simultaneously sweet and nutty, with a slight splash of citrus as an extra kick. Eat one, and you will reach for a second in no time.

ONE YEAR AGO: CINNAMON-RAISIN WALNUT LOAF

Add to FacebookAdd to DiggAdd to Del.icio.usAdd to StumbleuponAdd to RedditAdd to BlinklistAdd to TwitterAdd to TechnoratiAdd to Yahoo BuzzAdd to Newsvine

receita em portugues na pagina seguinte