One of our favorite main dishes, boneless chicken thighs cook on the grill very fast and always turn out moist and tender. For this marinade, make sure you leave it several hours in the fridge, the acidity in the lemon won’t affect the texture and the flavor will be much more pronounced. Yes, that is a lot of meat for two people, but we always cook with leftovers in mind.
LEMONY GRILLED CHICKEN THIGHS (from the Bewitching Kitchen)
8 boneless, skin-less chicken thighs for the marinade: 1 tsp salt 1/2 tsp black pepper 1 tsp smoked paprika 1 tsp Herbes de Provence 1/4 cup avocado oil juice of 1 lemon 2 tsp Dijon mustard
Make a marinade whisking well all ingredients in a bowl. Add to the pieces of chicken, preferably inside a large plastic bag. Place in the fridge for several hours.
Heat the grill and remove the chicken from the marinade. Pat it dry, and if you like it to be a bit more salty, season each piece lightly with additional salt (we do like that).
Grill on both sides until done, in our grill it takes a total of 16 minutes, 8 minutes per side.
Comments: We cook boneless chicken thighs all the time, I like to use a yogurt-based marinade, and smoked paprika is almost always part of it. There’s something about its flavor when you grill the meat that I find irresistible. This marinade is considerably brighter, so to speak. More intensely flavored. For this meal, I paired the juicy chicken thighs with air-fried cauliflower, and snow peas sauteed with lemon plus a touch of soy sauce. Apparently, I can never had too much lemon around. Excellent dinner! And, pretty light too.
If you’ve been around my blog for a while, you might know that I have my Baking Gurus, and by far the baker I respect the most is Helen Fletcher. I’ve faithfully followed her blog since 2014 (check this old blog post) and have made many of her recipes. Never a single disappointment. One of my favorites of a recent past is Sarah Bernhardt Cookies. She has decades of professional experience and was actually responsible for developing baking recipes using a food processor, back when that gadget was not very common in the home kitchen. Before the pandemics hit, she told me she was working on a new cookbook, all about cookies, and asked me if I would write a foreword for it. It was the greatest honor, the greatest gift online blogging provided me with. Her book, just released, is called CRAVING COOKIES: The Quintessential American Cookie Book. I adore it, and having witnessed all the love and effort she put into it, I am thrilled to share with you one amazing recipe from it, and a little review of the book.
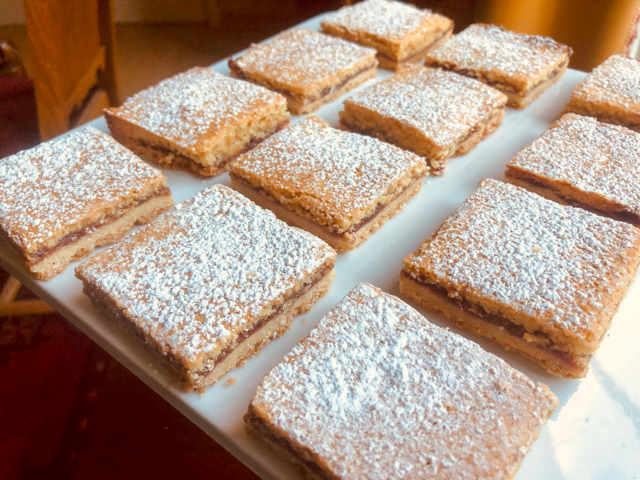
ALMOND RASPBERRY TRIANGLES (reprinted with permission from Craving Cookies)
for the cookie base and filling: 210 g all-purpose flour 140 g unsalted butter, very cold 65 g granulated sugar 1/2 cup seedless red raspberry jam
for the topping: 170 g almonds, toasted lightly in a 350F oven, then cooled 150 g granulated sugar 2 large eggs 1 large egg white 1/4 tsp salt 2 tablespoons Amaretto 1 tsp vanilla extract 1 tsp almond extract 60 g butter, melted powdered sugar for dusting (optional)
Heat the oven to 350F. Line a 9 x 13 x 2 pan with foil, being sure to also cover the sides of the pan. Spray well with non-stick baking release and set aside.
Butter should be cold and cut into small pieces. Place the flour in the food processor, add the cold butter and process until indistinguishable. Add the sugar and process again. It will be very powdery. Turn the dough into the prepared pan, and spread it out evenly. Press in firmly to compact and completely cover the bottom of the pan. Bake for 22 to 25 minutes until medium brown and completely baked.
As soon as it comes out of the oven, use the back of a spoon to press the base firmly against the sides of the pan to fill any gaps. This will make sure no jam leaks under the baked base. Spread the jam over the base and set aside.
Make the topping: process the toasted almonds and sugar in a food processor until finely ground. Add the rest of the ingredients and process until completely combined. Pour the mixture over the raspberry jam. Place back in the oven and bake for 25 to 30 minutes until golden brown and set. Cool completely.
To facilitate removal of the foil, chill or freeze the pan until very cold. Turn upside down, remove the foil, being careful around the edges. Turn right side up. Cut 4 across and 5 down to make 20 squares, then each square diagonally to make 40 triangles. Dust with powdered sugar if you so desire, just before serving.
Comments: I have to tell you these were one of the most delicious cookies ever! The combination of raspberry with almond is a winner, and the triangles look every elegant. They would brighten up any cookie table. I left some as squares, some as triangles, some I dusted with powdered sugar, some I left plain. They were a huge hit. One of the things I love about Helen’s recipes is precision. You know they will work, the amounts will be right for the dimension of the pan, and all her little tips for success are spot on.
TEASER RECIPE
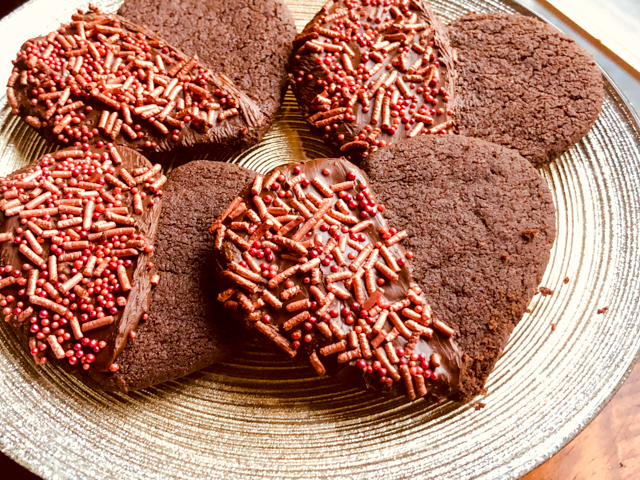
CHOCOLATE SHORTBREAD HEARTS
And now let me walk you through CRAVING COOKIES: THE QUINTESSENTIAL AMERICAN COOKIE BOOK (available to order here)
The book starts with an introduction to equipment and ingredients, which will be helpful particularly for those in their beginning stages of cookie baking obsession. Then she offers a full chapter on Techniques and I urge you to read it very carefully because she shares every single little tip that she’s learned in her professional career and most will have a huge impact in your baking.
CHAPTER ONE
Cut-Out and Sliced Cookies. The first cookie in this chapter is Cardamon Black Pepper Snaps. I will definitely make them because to me nothing beats a cookie that goes into the spicy territory. Chocolate-Dipped Cappuccino Rounds look amazing with a quick-tempered chocolate coating, so they make my list of favorites to bake soon. Limeaways are a classic, and I must mention Chocolate-Dipped Sweet and Salted Butter Cookies (picture is amazing).
CHAPTER TWO
Drop Cookies. Nineteen choices for you. Baileys Chocolate Crinkles make my list for sure. Chocolate Snowballs coated with Swedish pearl sugar are a must. A version of Gluten-Free Chocolate Chip Cookies is calling my name because Helen said it is one of the recipes she is most proud of. I can imagine it will be perfection, so keep that one in mind. She also has two other choc chip cookies, including a big Levain Bakery Style. Chocolate Awesomes are a one bowl-concoction that her grandson made himself… In this chapter you will find the Oatmeal Cookies I’ve blogged about in the past, as she had them in her blog. They were to die for. Harlequins is a cute concoction, three color, which I made in the past also.
CHAPTER THREE
Meringues. Three recipes in this chapter, with a very nice introduction to pull these tricky cookies perfectly, no cracks, no problems. Anise Meringues flavored with LorAnn oil is a very intriguing twist. If you’ve always been instructed to avoid oils in meringue cookies, you will learn something new. I always do when I am around Helen. Cafe au Lait Meringues and Peppermint Meringues, they all seem great to me.
CHAPTER FOUR
Shortbread Cookies. Well, those speak straight to my heart, I simply LOVE shortbread. I fell in love with all of them, and the Chocolate Hearts made it here as the teaser recipe. It is spectacular and so very simple to make, particularly using the food processor. Double Ginger Shortbread, Nutmeg Baton Shortbreads, and Black and White Filled Shortbreads are all in my list of favorites in this great chapter.
CHAPTER FIVE
Stuffed and Filled Cookies. Can I say outstanding? The first cookie blew my mind away: Peppermint Ravioli. OMG. I am making it for the holiday season, but you can conceivably use a different square of chocolate and bake it anytime. Well, who cares, actually? Why would we reserve Peppermint and Chocolate for the holiday season only? Caramel-Filled Chocolate Gems are thumbprint style cookies that made my heart miss a beat. Creme de Menthe Patties are another masterpiece in cookie shape. Inside-Out Oreos, Almost Oreos, Neapolitan Cookies, my list is big.
CHAPTER SIX
Bar Cookies. Twenty amazing choices, each one of them very tempting. The featured recipe – Almond Raspberry Triangles – is part of it. With a great deal of struggle, I offer you just five top favorites: Banana Split Bars, Chocolate Raspberry Squares, Hermit Bars (so so cute), Lemon-Steeped Gingerbread Squares (OMG), and Creamy Lime Bars.
CHAPTER SEVEN
Brownies. Nine different brownies, including one I’ve made in the past and might very well be one of the best ever: Santa Fe Brownies. But next on my list might be her Macadamia White Chocolate Lightening-Fast Brownies. Or maybe her Frosted Brownies. We shall see…
Helen, I cannot wait to bake more and more recipes from your beautiful book, and I hope my readers will get a copy and join the fun. You did an outstanding job, but I knew you would. I am so lucky to have “met” you in the virtual world!
Some adventures in the kitchen can be catastrophic. My lowest of the low was a certain Vegan Soufflee made in 2019 that was by far the worst thing I’ve ever made and maybe the worst I’ve ever tasted. Then there are things that ended up quite tasty but the process was so convoluted that… all I could think was “never, never again.” I share two examples today. You can actually use your own recipes to come up with them, they are both very simple. A brownie cake and sugar cookie dough, in two colors.
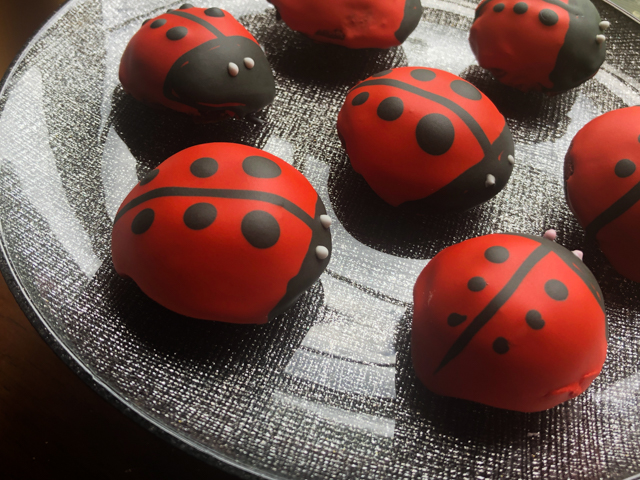
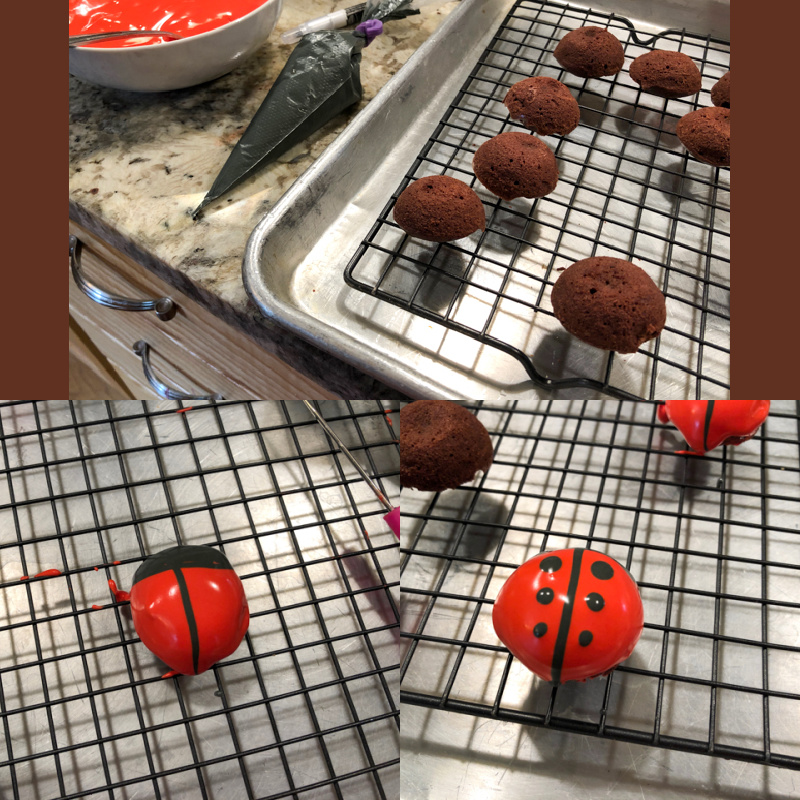
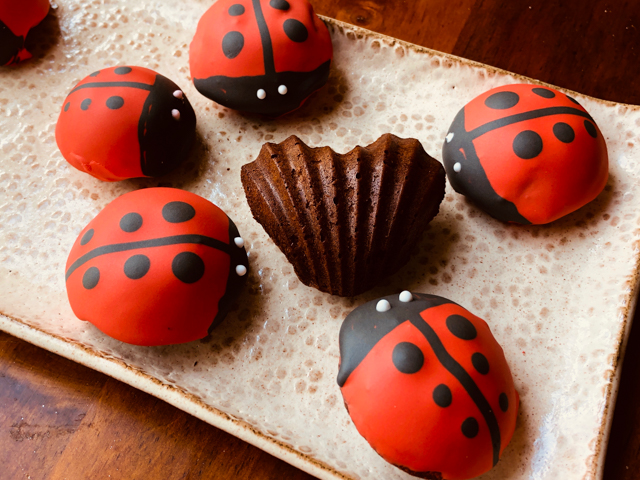
LADY BUG BROWNIE BITES
This one took me by surprise, after all I like to think I’m quite comfortable around Royal icing. And after baking the brownie bites in your favorite silicone half-dome mold, you are half way there. But, not so fast, my dear… not so fast. Getting the red icing to smoothly coat the surface, all the way down, is VERY messy and requires colorful language. Then you need to add the details in black while the red is still wet. Finally the white eyes are added later, when the base is set and any Zen you had is far gone.
They did look awfully cute, but I tell you, NEVER AGAIN!
Moving on…
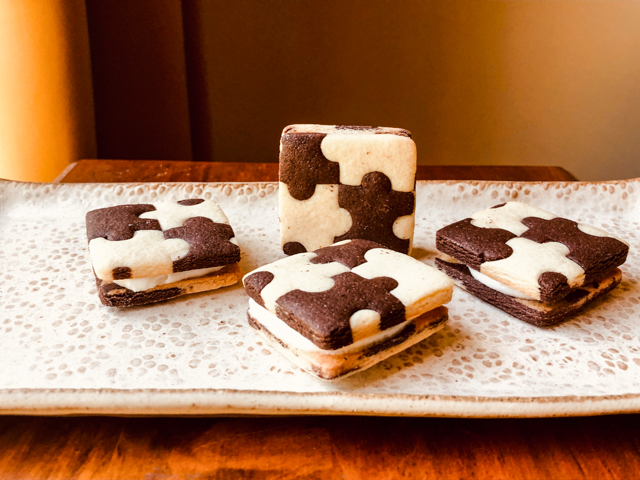
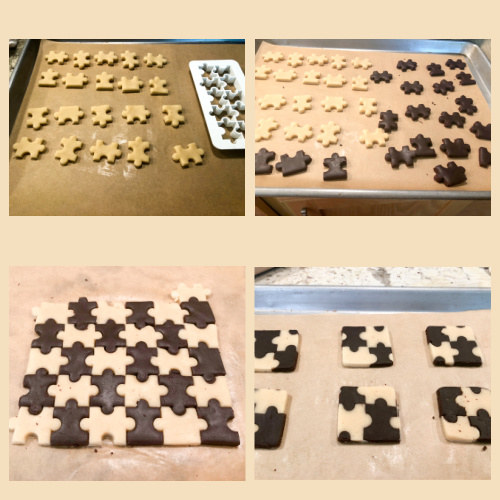
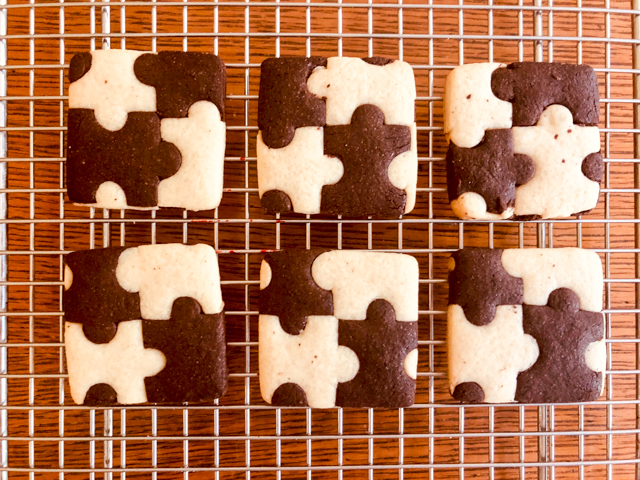
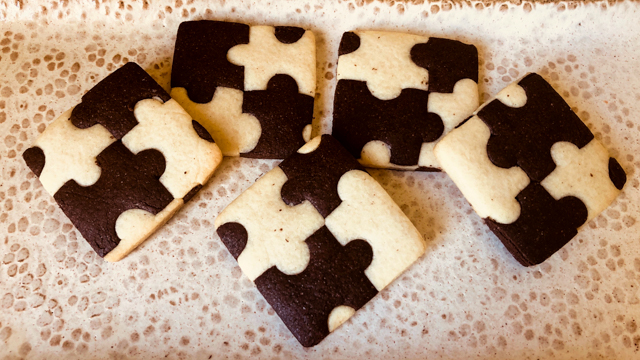
JIGSAW BLACK AND WHITE COOKIES
For these cute looking cookies, all you need is the right cutter, and I recommend this one. I actually saw someone on IG making a pastry shell using this technique and immediately adapted it for cookies. It seemed so straightforward.
Roll out both doughs less than 1/4 inch thick (I was going to do sandwich cookies because I like to maximize suffering, so I wanted them thin). Cut with the mold, separate the pieces and assemble them together. Cut them in square shapes to bake.
I know they look pretty nice and appealing, but it was time-consuming, a lot of work to come up with just a few cookies. Also, you are left with some trimmings that to use you must mash together for a marble effect, no way to re-roll and get more jigsaw patterns going.
To be honest, I really like the Jigsaw Cookies and might do them again, maybe a Red Velvet and White when Valentine’s comes up. But I need some time to forget the hassle and tell myself “I don’t remember it being that bad.”
Once again I am following the steps of Joanne. Once again my pictures won’t do justice to how delicious this meal turned out. The peanut sauce is perfectly balanced: salty, sweet, spicy, you will feel like going at it with a spoon, eyes-closed, total bliss.
ZUCCHINI WITH QUICK-PICKLED VEGETABLES IN PEANUT SAUCE (slightly adapted from Joanne’s blog)
2 medium zucchini, cut into ¼-inch coins black pepper, to taste salt to taste olive oil to lightly coat it (if using air-fryer)
For the quick-pickled veggies 5 oz shredded carrots 1 seedless cucumber, thinly sliced 1 tbsp lime juice 1 tbsp soy sauce 1 tbsp rice vinegar
For the peanut sauce 6 tbsp creamy peanut butter 2 tbsp soy sauce 2 tbsp lime juice ½ tsp fresh grated ginger 2 tbsp sesame oil 3 tbsp maple syrup 1 tbsp sweet chili sauce 1 tsp sambal oelek
Pickle the veggies: In a medium bowl, toss together the carrots, cucumber, lime juice, soy sauce, and rice vinegar. Set aside as you prepare the sauce and cook the zucchini.
If using an air-fryer, coat the zucchini with olive oil (you can use a spray can), season lightly with salt and pepper, and air-fry at the highest temperature until done (10 to 12 minutes). Reserve. If using a frying pan, add enough oil for a shallow fry, and cook the zucchini on both sides until golden.
Make the peanut sauce. In a medium bowl, whisk together the peanut butter, soy sauce, lime juice, ginger, sesame oil, maple syrup, sweet chili sauce, and sambal oelek until well combined.
Serve everything over rice, with a nice drizzle of the peanut sauce.
Comments: You see that plastic bottle with leftover sauce? You will become very fond of it, and start squeezing it on plenty of stuff. Including your fingers, when no one is around to be a witness.
Truly delicious recipe, you can make it as Joanne did, with crispy tofu. I skipped that and confess that we enjoyed it with one of our favorite proteins, grilled pork tenderloin. But it would be perfect for a vegetarian meal without it. Ground peanuts wold be perfect on top, and that’s what I plan to do in the very near future.
Joanne, I need to thank you once again for bringing so many cool recipes into my horizon… we loved this one!
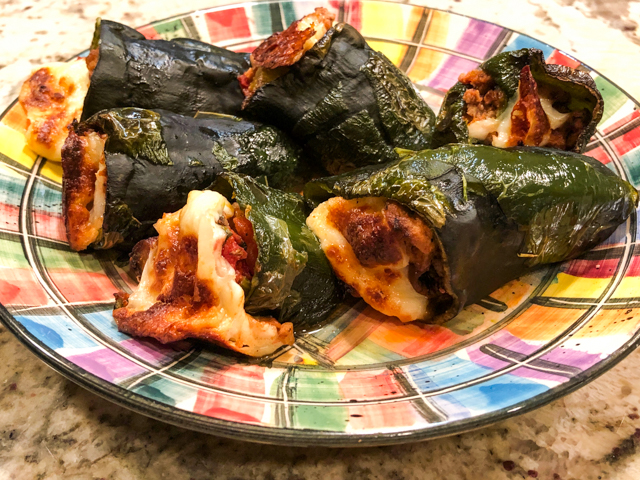
I love a nice Chile Relleno but talk about a heavy dish! It is basically cheese, more cheese, a coating of egg and flour, and a nice bath in hot oil. I wanted to profit from the beautiful Poblanos from our garden, by making some type of stuffed chile that could act as a full meal. In my world, that calls for meat. Google University showed me that there is a concoction from Guatemala that is not too far from my goal. However, it is loaded with potatoes and I wanted something a little lighter. This version was born. Using the air-fryer made it even lighter. Mission accomplished.
AIR-FRIED “GUATEMALAN” CHILE RELLENOS (from the Bewitching Kitchen)
6 Poblano chiles olive oil spray 1 pound ground turkey 8 oz mushrooms, sliced thinly 1 celery stalk 1 clove garlic, minced (optional) 1 tablespoon olive oil 1 tsp salt 1/2 tsp black pepper 1/2 tsp chili pepper 1/2 tsp cumin, ground 1 can (14.5 oz) diced tomatoes, preferably Fire-roasted fresh cilantro leaves, minced Panela cheese or another cheese of your choice
Start by making the filling. Heat the olive oil, add mushrooms, celery, garlic (if using), season lightly with salt and pepper. Saute until fragrant in medium-heat, increase the heat to high and add the ground turkey. Add the chili powder, cumin, and the teaspoon of salt. Cook until the meat is golden at spots, at the canned tomatoes with their liquid and simmer for 10 minutes, pan covered, in low-heat. Remove the lid and let the excess moisture evaporate. Add the cilantro. Reserve to cool.
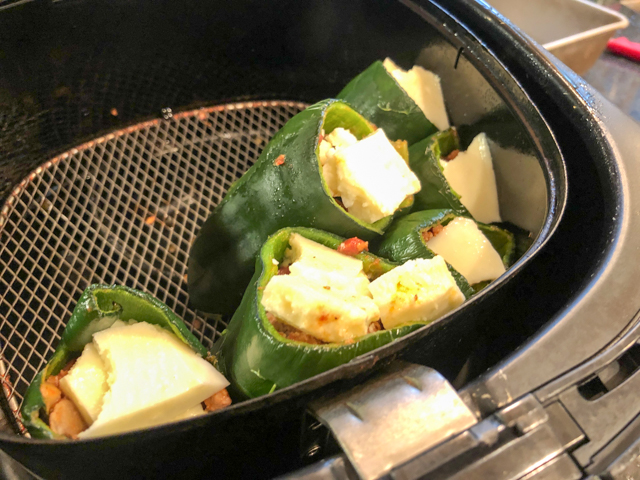
Prepare the poblanos. Cut their tops, carefully scoop out seeds. Spray olive oil and place them in the air-fryer, cut side down. Cook for about 5 minutes at the highest temperature your fryer reaches (mine is 390F). When the skin blisters at points, they are done.
When poblanos and meat are ready and cool enough to handle, fill the poblanos 3/4 of the volume, then add pieces of Panela cheese on top.
Air-fry for about 12 minutes, until cheese is golden brown.
Comments: I don’t know if home-grown poblanos might pack more heat than store-bought, but I can tell you that the few little seeds I left in them were spectacularly hot. As you can see from the picture, our air-fryer was not even half full with the filled peppers, I was afraid it would make a mess during cooking, but everything turned out fine. I don’t have any container that would fit in the basket and keep the peppers standing up. It might also be easier with bigger poblanos, we wanted to use the average size from our backyard, and keep them more or less uniform.
It is hard to beat the speed and convenience of the air-fryer for this type of preparation. Everything browns nicely with just a small amount of oil. No frying, no dealing with leftover oil and the messy process of the coating with egg-flour. I admit it is not authentic, and many Mexicans will consider sending me hate mail… but it was really a delicious meal. If you don’t have an air-fryer, just use the oven at 425F, for a slightly longer time.