THE ULTIMATE RASPBERRY SORBET

My latest obsession is America’s Test Kitchen. The TV series, the books, the website, I simply cannot get enough of it. Which is kind of odd, because until recently I was…. how should I put it… a bit “cold” about Christopher Kimball. The convoluted nature of their recipes used to irritated me, as they go on and on about every single variable tested in their kitchen until the elusive best recipe is found.  But our friend Steve (my certified saffron-provider) recommended the show, and knowing him, I had to give it a try. Long story short, I am slightly addicted.  The recipes always work, which is saying a lot. Chances are that for many recipes you will dirty every single pot you own, but…  you won’t be disappointed. First one I tried: raspberry sorbet. Their goal was to come up with a sorbet with excellent texture, just the right amount of sweetness, and one that would not freeze rock solid.  The recipe is a bit involved (what else is new, ATK?), but once I tried my first spoonful, I was in raspberry bliss… And you can be there too!

Raspberry Sorbet ATK
THE ULTIMATE RASPBERRY SORBET

Recipe Overview:  To keep the formation of ice crystals to a minimum, their trick is making the sorbet base and dividing it in two unequal parts.  A small amount of the base is placed in the freezer, and later churned together with the very cold liquid part reserved in the fridge.  A little bit of no-sugar pectin is also added to improve texture.  The result is mind-blowing good!

For the full recipe, please visit this link at America’s Test Kitchen.  You might have to register with the site to see their recipes, but it is a small price to pay for the opportunity to surf through their huge collection.

************************************************************************

VitamixIsn’t the color of the raspberry mixture intoxicatingly beautiful? And matching the color of our Vitamix was a happy coincidence…

composite1This recipe forced me to do something that a couple of years ago I said “never ever again for as long as I live“. Oh, well.  I can change my mind as easily as I change my nail polish. I said before but it’s worth repeating: pushing raspberry puree through a sieve is not for sissies.

doubleBase
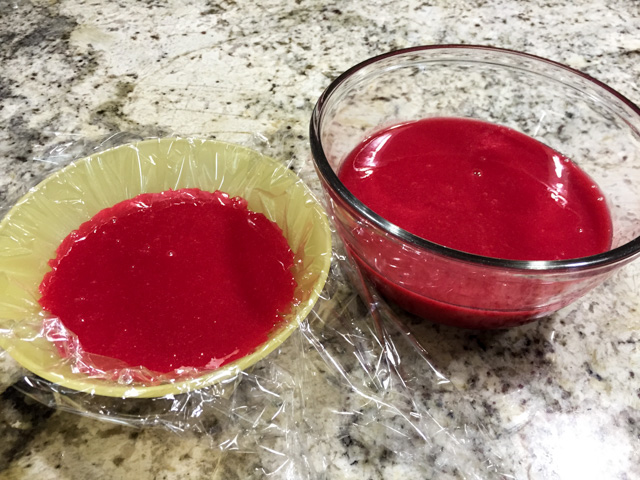
The base divided in two portions, one ready for the freezer…

last bit
Great to the last spoonful….

************************************************************************

ONE YEAR AGO: Crispy Cornmeal Sweet Potato Fries

TWO YEARS AGO: Pan-grilled Tilapia with Smoked Paprika & Avocado Cream

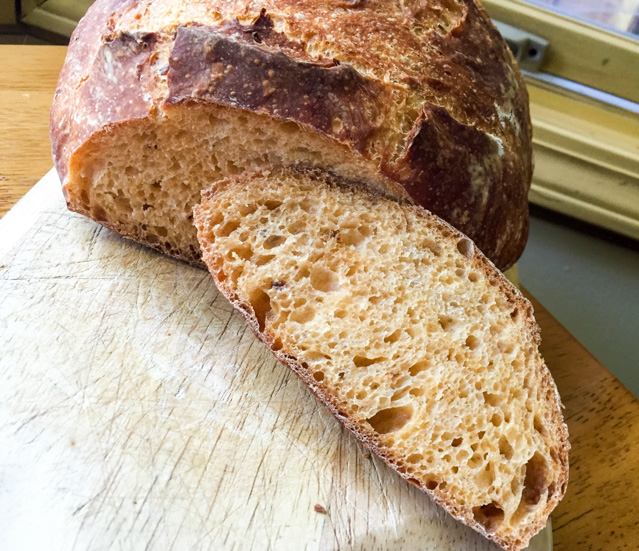
THREE YEARS AGO: Golden Saffron and Fennel Loaf

FOUR YEARS AGO: In My Kitchen, July 2011

FIVE YEARS AGO: Heavenly Homemade Fromage Blanc

SIX YEARS AGOA Perfect Sunday Dinner

CHOCOLATE CHIP SHORTBREAD COOKIES

It’s hard to make a case for one more chocolate chip cookie recipe, but this one is worth talking about…   What makes this recipe special is its shortbread nature. No eggs in the dough. As Sue described in her original post, shortbread cookies were probably the first versions “invented” by bakers. Think flour, butter and sugar. Beautify it with your favorite additions. And that’s pretty much it. The texture is completely different from a regular cookie. I think I slightly over-baked this batch, as the edges turned just a tad too dark compared to hers.  It did not compromise the deliciousness of the final product, though.  Trust me.

Shortbread Cookies1

MILK CHOCOLATE CHIP SHORTBREAD COOKIES
(from The View from Great Island)

1 cup unsalted butter, at room temperature
1/2 cup sugar
1 tsp vanilla extract
2 + 1/4 cups all-purpose flour
1 cup milk chocolate chips

Heat the oven to 350F.

Cream the butter and the sugar together. Beat in the vanilla extract.
Add the flour, a little at a time, until the dough comes together. Fold in the chips just before it all comes into one mass. Turn the dough out onto a floured board and bring it all together with your hands. Form it into a plump disk and then roll it out, flouring your rolling-pin as necessary, to about 1/3 to 1/2 inch thick.

Cut cookies with a 3″ cookie cutter, pressing down firmly to cut through the chocolate chips. Reform the dough as needed to use it all up. Arrange the cookies on a cookie sheet and then cover with plastic wrap and refrigerate the whole tray for at least an hour.

Bake the cookies for about 20 minutes. You want them to be every so slightly golden just around the edges, and be slightly firm to the touch.  Let them cool for a few minutes on the tray and then transfer to a rack to finish cooling.

ENJOY!

to print the recipe, click here

cutting1

Such a nice dough to work with!  It rolls smoothly, each cookie hiding the perfect amount of chocolate chip goodness… I rolled mine straight on the countertop, nice and easy.compositeThese cookies don’t spread much, so cut them in the size you’d like to enjoy them.  You might be surprised to see milk chocolate instead of dark, but I think the extra sweetness is perfect in the shortbread environment. Of course, you can use this basic recipe to make many variations.  Think white chocolate and dried cranberries, toffee bits and dark chocolate would be awesome too.  Not to mention macadamia nuts, a little lemon zest…  Ok, I’ll stop here, but you don’t have to, put your imagination to work…

I’d never had a shortbread cookie before. With the first bite, I asked myself “do I like it?”… one more bite….  “Hummmmm, I think I do like it!“…..  After two cookies disappeared in lightning speed, I realized they won me over, big time! If you’ve only had “regular” cookies until now, open your baking horizons with a batch of these.

Sue, as usual it took me quite a while to blog on this recipe… I checked my files and noticed I baked these cookies back in January, can you believe it?  But better late than never to say thank you for the inspiration!

😉

ONE YEAR AGO: Chicken in Green Pipian Sauce, Sous-vide Style

TWO YEARS AGO: Classic Shrimp Gobernador Tacos

THREE YEARS AGO: A Walk Towards the Sunset

FOUR YEARS AGO: In My Kitchen

FIVE YEARS AGO:  Heavenly Home-made Fromage Blanc

SIX YEARS AGO:  A Perfect Sunday Dinner

THE DEVIL’S BREAD

For those who like it really hot…

Diablo Bread

It’s been a while since I blogged about bread, in fact I have a nice bread post waiting patiently in a long line to show up here, but last weekend I stumbled upon a very interesting recipe, and made it right away. I  simply could not wait to share because it’s so unusual and intriguing. A very simple no-knead dough using instant yeast, but here is the devilish twist: the dough is flavored with red pepper flakes and…. ready for this? Sriracha sauce!  Can you imagine it? Now, I am a certified Sriracha-cheerleader, but never imagined adding it to bread. Apparently no one had, until DeKay did a search in google for Sriracha and no-knead bread, and came up empty-handed. He took matters into his own hands (sorry, lousy pun), and made this version.  I could not wait to try it. It turned out awesome, and I think any Sriracha lover will fall in love with the devil after trying a piece.  Ok, if not with the devil himself, definitely with his bread..  But, before I give you the recipe, let me share a cartoon that cracked me up the other day. Perfect!

(Photo credit: Benjamin Schwartz/The New Yorker Collection/The Cartoon Bank)

Conde Nast TagID: cncartoons031905/Photo via Conde Nast

Conde Nast TagID: cncartoons031905/Photo via Conde Nast

THE DIABLO BREAD
(adapted from The Mad Scientist Labs)

400 grams unbleached all-purpose flour
7 grams table salt
1/2 teaspoon instant dry yeast
1 tablespoon crushed red pepper flakes
260 grams cool water (55 – 65 °F)
60 grams (4 tablespoons) Sriracha sauce (go for it!)
Wheat bran for dusting

Mix the flour. salt, yeast, and pepper flakes together in a medium-sized bowl. Add in the water and Sriracha sauce. Mix using a wooden spoon or your hand until all of the flour is incorporated and the dough is sticky. This should only take 30 seconds or so. Add more water if the dough seems too dry.

Transfer the dough to another bowl lightly oiled or sprayed with cooking spray. Leave one hour at room temperature, remove the dough to a lightly flour surface and knead it 8 to 10 times.  Place it back in  the bowl, cover with oiled plastic wrap and leave it at room temperature for 3 more hours.  Place it in the refrigerator overnight (about 12 hours).   Remove the dough from the fridge,  dump it into a lightly floured surface, and shape it as a ball.  Place it in a banneton or another appropriate container seam side up, dusted with wheat bran for its final proofing, two hours at room temperature.

Heat the oven to 450 F.  After the shaped bread proofed for 2 hours, invert it on a sheet of parchment paper, so that the seam side is now down. Slash the surface with a serrated knife, and place it in the oven, using your favorite method to generate steam (I bake my bread inside a large Dutch oven, and cover it with a wet lid).

After 30 minutes, open the lid and allow the bread to brown for 10 to 15 minutes longer.  You can lower the oven to 425 F in case it is browning too fast.

Once the loaf is a nice dark brown, take it out of the pan and set it on a wire rack to cool for at least an hour.

ENJOY!

to print the recipe, click here

composite11

Be honest with me. Have you ever seen a more awe-inducing color of a bread dough in your whole life? I know, you can hardly continue reading, you want to run away and call your family and close friends over, then your neighbors, and anyone else wandering the streets.  It is pure Sriracha beauty. My dear friend Denise saw this photo and said “you expect to see a flamingo flying out of the dough any minute”. I could not have said it better myself.

My basic change to the recipe was to take it from “no-knead” to “minimal knead.”  I’ve made enough no-knead breads to realize that just one small cycle of minimal kneading or folding does wonders to improve the texture of the crumb.  It is almost as though with no kneading whatsoever you’ll get a slightly harsher crumb, not very well structured.  One cycle of kneading gives the dough a little extra body that pays off in the final product.  Of course, you can skip it and go for a completely knead-free production, you won’t hurt my feelings…

The smell as this bread baked was something!  Sriracha on opioids. I fully agree with  DeKay on the taste, though. It is not overly spicy, baking seems to mellow some of its peppery nature, but make no mistake, it is hot. If you don’t like Sriracha, this bread is not for you. As to the red pepper flakes, I think I like the amount I added, not more.  Every once in a while you bite into a flake and get that hush of heat that lasts just a second or two.  Perfect.   I think this bread would be great paired with a bowl of chili in the winter, but if you toast it lightly and add some tomatoes, mozzarella cheese and run it under the broiler for a minute it is sinful.  Sinful. But then again, what else could you expect from The Bread of the Devil

 😉

Crumb1If you’ve been naughty enough, you can have several slices….

ONE YEAR AGO: Heart of Palm Salad Skewers

TWO YEARS AGO: Potluck Frittata and Lavoisier

THREE YEARS AGO: Home-made Corn Tortillas

FOUR YEARS AGO: Whole-Wheat Spaghetti with Peanut Sauce

FIVE YEARS AGO: Brigadeiros: A Brazilian Party!

SIX YEARS AGO: Lemony Asparagus

MOROCCAN CARROT DIP OVER CUCUMBER SLICES

Those who follow my blog might remember we hosted a very special reception at our home a couple of months ago. So far, I only shared one of the recipes here, a focaccia that pleased me even more than my usual version. But my favorite appetizer by far was a carrot dip served over cucumber slices. A contrast of colors, textures, and flavors that pleased every single guest, in fact many asked me for the recipe.  If you are hosting a dinner party, please make a batch of these babies to open the evening. They are light enough that no one will feel overly stuffed before the real meal, and if you go the extra mile and pipe the dip over the cucumber, the presentation is quite stunning. Even if I say so myself…

Carrot Dip Cucumber

MOROCCAN CARROT DIP APPETIZER
(inspired by this recipe)

tablespoons extra-virgin olive oil, divided
2 pounds carrots, peeled and sliced
Salt
Pepper
1/2 teaspoon ground coriander
1/2 teaspoon ground cumin
1/8 tsp ground cinnamon
1 tsp freshly ground ginger
 cup water
1 tablespoon white wine vinegar
sliced English cucumber
black sesame seeds for decoration (optional)

Heat 1 tablespoon of the oil in a large skillet.  Add the carrots and 1/2 teaspoon salt and cook until they begin to soften, stirring occasionally. Add the coriander, cumin, cinnamon and ginger and cook until fragrant, about 30 seconds. Add the water and bring to a simmer. Cover, reduce the heat to low, and cook until the carrots are fully tender, about 15 minutes.

Add the cooked carrots to a food processor and process until smooth. Stir the remaining tablespoon of oil and vinegar. Transfer to a bowl, cover, and refrigerate until the dip is chilled, about 30 minutes. Season with salt and pepper to taste before serving.

Pipe mounds of the dip over cucumber slices, arrange on a serving platter, sprinkle black sesame seeds on top.

ENJOY!

to print the recipe, click here

Appetizer1

Hello there!  We are not only cute, but Paleo-friendly too!  
😉

And now for something completely different. Let me share a small drama associated with the preparation of this plate. Keep in mind that I was already quite stressed and running out of time to get it all ready for the guests. I used a disposable piping bag coupled to a plastic star-shaped piping tip. When I finished piping the last round, I went to the sink to recover, wash and store away the tip. Well, the tip would NOT come out of the bag. I pulled, and pulled, and twisted and pulled.  Just as I told myself I really did not need that grievance, the tip exploded off and behaved like a golf tee after a perfect driver shot: it twirled up in the air, up, up, then down down, falling next to my feet on the floor.  I suspect you know where this is headed. Buck was way faster than me. He grabbed it, ran away to his bed, and started munching on it. I was terrified that he would choke on the tip, but I know better than trying to stick my fingers inside the mouth of a feasting Jack Russell.  Granted, once the tasty carrot stuff was gone, he let go of the tip, good doggie that he is (yeah, right). The piping tool was laid to its final rest in the trash can, totally ruined. But, can you imagine the odds of that? Unreal.  My kitchen must be a really bewitched spot… And I was not even baking a cake this time!

Back to food.  This was definitely one of the tastiest appetizers I’ve ever made, there’s something about the mixture of spices and the sweetness of the carrots… wow!  I tried the dip on Ak Mak crackers, it is great that way too, but please match it with the cucumber slices for a real treat.  I guess we could call it a nobel treat…

😉

Small platter

ONE YEAR AGO: White Chocolate Macadamia Nut Cookies

TWO YEARS AGO: Cilantro-Jalapeno “Hummus”

THREE YEARS AGO: A Moving Odyssey (three years already!!!!)

SIX YEARS AGO:
 Shrimp Moqueca

CAPRESE SALAD WITH CELERY AND TOASTED WALNUTS

I got the inspiration for this salad from Lidia Bastianich. In a recent cooking show she came up with a refreshing celery-mozzarella combo to which toasted walnuts were added for crunch. Lidia mentioned something I fully agree with: celery is a very under-utilized veggie. I know many people don’t like it because of its fibrous and harsh texture. However, if you use the best celery you can find (no need to search for the gigantic creature of my recent past) at the perfect stage of ripeness, and slice it thinly, chances are most of your objections to this stalky creature will go away. Some chefs recommend peeling it, but I don’t see that happening in our kitchen.  I find celery refreshing, bright, and use it all the time. For this salad, I adapted Lidia’s basic idea to make a departure on the classic Caprese, a favorite with us.

Caprese Celery Salad

CAPRESE SALAD WITH CELERY AND WALNUTS
(adapted from Lidia Bastianich)

perfectly ripe tomatoes, sliced
fresh mozzarella, sliced
celery stalks, thinly sliced
toasted walnut halves or pieces
lemon juice
olive oil
Dijon mustard
salt and pepper to taste

Make a simple dressing mixing olive oil, lemon juice, mustard. Season with salt and pepper. Amounts are pretty flexible, I add a lot of lemon juice probably 50/50 with the oil. Make enough to coat all the pieces of celery and have some extra so you can drizzle all over the assembled salad. In a small bowl, mix the celery pieces with the dressing and allow it to sit for 5 to 10 minutes.

Add the tomatoes and mozzarella to a serving platter,  place the celery and dressing all over. Scatter toasted walnuts, sprinkle salt to taste (Maldon flakes are a great option here).

ENJOY!

to print the recipe, click here

We loved this salad so much, I’ve been making it regularly now. Toasted hazelnuts go very well too, and sometimes I make the dressing with walnut oil.  The combination of celery with nuts is superb, I hope you’ll give it a try.  Now that the weather is wonderfully hot, this type of salad is the side dish to go with almost any protein of your choice. Roast chicken, grilled meats, grilled salmon. No need for anything else if you ask me…

Lidia’s show has everything I’d hope FoodTV Network would offer, but it doesn’t.  In our town it is broadcast by PBS. I set our Tivo to tape it and maybe twice per week there is a new episode waiting for me. She is very knowledgeable, fun to watch, and as a bonus often suggests the perfect wine to pair with her meals. I was surprised to learn that one of her restaurants is located in Kansas City, a couple of hours from home. Something to keep in mind if we ever decide to go for a special weekend trip to the “big city.”

ONE YEAR AGO: Oh, my God! I think I saw something!

TWO YEARS AGO: Celebrate Wednesday with Hoisin-Grilled Chicken and Soba Noodles

THREE YEARS AGO: The Manhattan Project

FOUR YEARS AGO: Carrot “Nib” Orzo

FIVE YEARS AGO:  A Sticky Situation

SIX YEARS AGO:  The Garden