WINTER STRIKES BACK, IT’S TIME FOR SOUP!

Recently I read a very interesting article by Marcella Hazan,  in which she rants against the current trend of under-cooking vegetables and pasta in many restaurants.  You can find the article here.  I couldn’t agree more, there is a fine line of perfectly cooked food – particularly veggies –  that preserves some bite and freshness.  Err in either direction and you’ll get mushy, gray food or  warm crudites. Not sure which would be worse.  😉

With that thought in mind, it is surprising that a soup that simmers zucchini for 45 long minutes could be so perfect, but it is.   Until now, my default zucchini soup was from Chocolate and Zucchini, a version that adds a touch of sesame in the form of tahini paste.  With this curried zucchini recipe, I found a serious contender for the number 1 spot. I will consider that a tie, and enjoy them both!
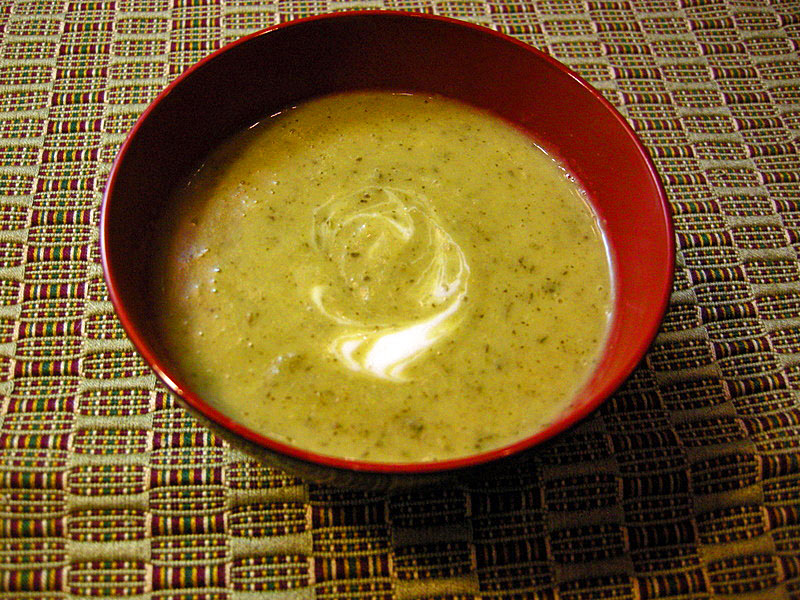
CURRIED ZUCCHINI SOUP
(adapted from The Essential New York Times Cookbook)
receita em portugues na proxima pagina

4 small zucchini, cut into chunks
1 medium shallot, minced
1 tsp curry powder
1 tsp ground fresh ginger
1/4 tsp dry mustard
2 cups chicken broth
2 Tbs raw rice
salt and pepper
1/4 to 1/2 cup heavy cream

Add the zucchini chunks, shallots, curry, ginger, and mustard into a saucepan.  Pour the chicken broth over it, add the raw rice, and bring to a boil.  Cover the pan and simmer for 45 minutes.  Puree the mixture using a hand held blender, or pass it through a food mill. Season with salt and pepper. Add 1/4 cup of heavy cream, taste it and add more if you like it richer.

The soup can be served hot or chilled.

to print the recipe, click here

Comments: Until I tasted it, I wasn’t sure I would like this soup, thinking the zucchini would have lost all its brightness from the long simmering.  The first spoonful got my silent appreciation, suddenly interrupted by Phil’s words “wow, this soup is really good!”   With heavy emphasis on the “really.”  The curry and the ginger perform some kind of magic to restore a sense of freshness to the zucchini, which retains a nice green color.  I reduced quite a bit the amount of heavy cream called for in the original recipe, but indulge if you prefer, and go for one and a half cups of it.

ONE YEAR AGO: Chocolate Bread (this one melts in your mouth….)

Add to FacebookAdd to DiggAdd to Del.icio.usAdd to StumbleuponAdd to RedditAdd to BlinklistAdd to TwitterAdd to TechnoratiAdd to Yahoo BuzzAdd to Newsvine

para receita em portugues, veja a pagina seguinte

MOGO MOJO

A few weeks ago a reader left a comment on my post about “mandioca frita.” He told me about “mogo,” a common dish in Indian restaurants in the UK, that also starts from cooked manioc root, but instead of frying, the root is seasoned with a mixture of spices and roasted.   I was intrigued, and put google to work, searching for an authentic recipe.  Very quickly I realized there is no consensus about it.   The only common denominator in mogo recipes is that you start with cooked roots, prepared as I described in this post.  After that, some recipes call for roasting, some for frying  then roasting, others for gently cooking on the stove.   Some recipes use tomatoes, some only peppers, others add coconut milk.  Spices also vary a lot.   With all that complexity facing me,  I shutdown my computer and improvised.  So, here is my version of mogo, a delicious, hearty dish that will be showing up at our table on a regular basis.  Well, as regularly as I can find manioc root at the store…  😉

MOGO
(from the Bewitching Kitchen)

10-12 pieces of cooked manioc root
1 Tbs olive oil
1 shallot, finely diced
1 garlic clove, minced
1/4 tsp red pepper flakes (or more)
1/2 tsp curry powder
salt and black pepper
1 can diced tomatoes with their juices (14.5 oz, about 1 + 3/4 cups)
1/2 cup coconut milk
chopped cilantro leaves

Cook the manioc root until tender. Cut in serving pieces and reserve (cooked manioc can sit in the fridge for a few days, or be frozen for months).

Heat the oil in a saute pan, add the shallots, cook until soft and starting to develop some color.  Add the minced garlic and the red pepper flakes, cooking for a minute or two. Season with salt and pepper, add the tomato with the juices, cook on gentle heat for 5 minutes, stirring a few times.  Add the coconut milk, curry powder, cook for a couple of minutes, add the cilantro leaves, taste the seasoning and adjust to your taste.  You can add some hot pepper sauce if you like it really hot.

Spread the cooked manioc on a baking dish, pour the tomato-coconut sauce on top, cover with aluminum foil and bake at 375 F for 45 minutes.  Remove the foil, and serve or, if you prefer less sauce and some browning on the cassava root, increase the heat to 400 F to finish roasting.

ENJOY!

to print the recipe, click here

Comments: I will be forever in debt with Jack for the heads up about this recipe.  We enjoyed it with roast chicken, but next day it was a meal in itself re-heated in the microwave and served over Israeli couscous.  Wonderful!   Change this basic recipe around by adding roasted bell peppers to the sauce, increasing the heat level with a hot sauce, maybe some smoked hot paprika.

I hope my Brazilian readers will give mogo a try, as they have access to excellent quality manioc root in farmers markets and grocery stores everywhere. Manioc root is not a very popular item in the US, but hopefully that will soon change!   😉

ONE YEAR AGO: Slow-roasted chicken thighs

Add to FacebookAdd to DiggAdd to Del.icio.usAdd to StumbleuponAdd to RedditAdd to BlinklistAdd to TwitterAdd to TechnoratiAdd to Yahoo BuzzAdd to Newsvine

HOLIDAY DOUBLE-DECKER

One post, two recipes…   It’s the holiday spirit! 😉

A few years ago I began using the 7-6-5 method to cook pork tenderloin, with all varieties of rubs, glazes, and marinades.  It’s a nice approach because once you memorize those numbers, you’ll have no need for the recipe, and you’ll always have perfectly cooked pork tenderloin.

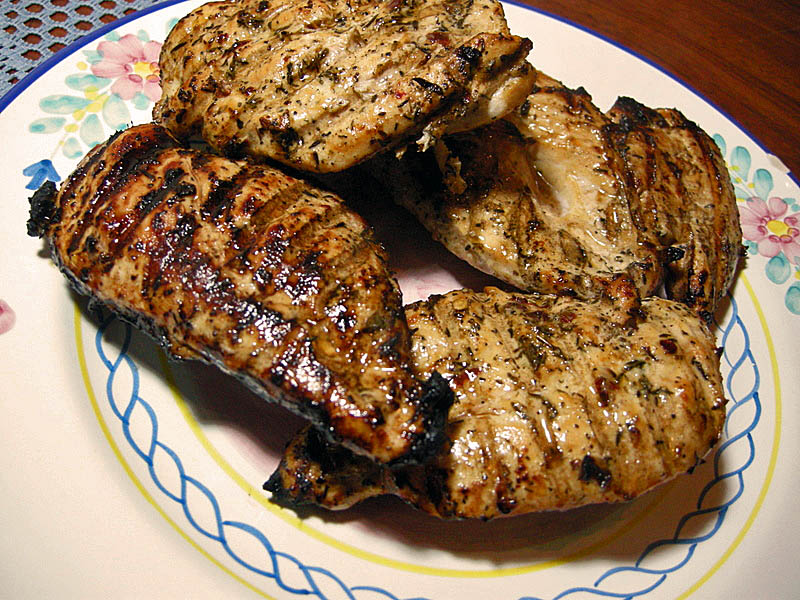
Shortly thereafter it occurred to me that chicken breasts are so similar  in fat content and overall texture, so why not  “7-6-5 them?”  Well, I’m happy to report that the idea was a success.   Several times I’ve grilled chicken breasts  with this technique, and it leaves meat tender, moist, and perfectly cooked.

7-6-5 GRILLED CHICKEN BREASTS
(from the Bewitching Kitchen)

4 chicken breasts, boneless, skinless
for the marinade (substitute any recipe you like)
:
1/4 cup olive oil
1 T red wine vinegar
1 T fresh orange juice
1 tsp dried thyme leaves
pinch of red pepper flakes
salt and pepper

Whisk the olive oil, vinegar and orange juice vigorously together into an emulsion.  Add the dried thyme and red pepper flakes and whisk again.  Place the chicken breasts in a bowl and pour the marinade over them, coating well.   Cover and refrigerate for a couple of hours or overnight.

Remove the meat from the marinade, season with salt and pepper and place on a very hot grill, covered,  for 7 minutes.   Turn the meat over and continue grilling for 6 minutes.  Without opening the grill, turn it off and let the meat stay inside for 5 minutes.   Place the meat on a serving plate, tented with aluminum foil, let it rest for 5 minutes.  Slice at an angle and serve.

ENJOY!

to print the recipe, click here

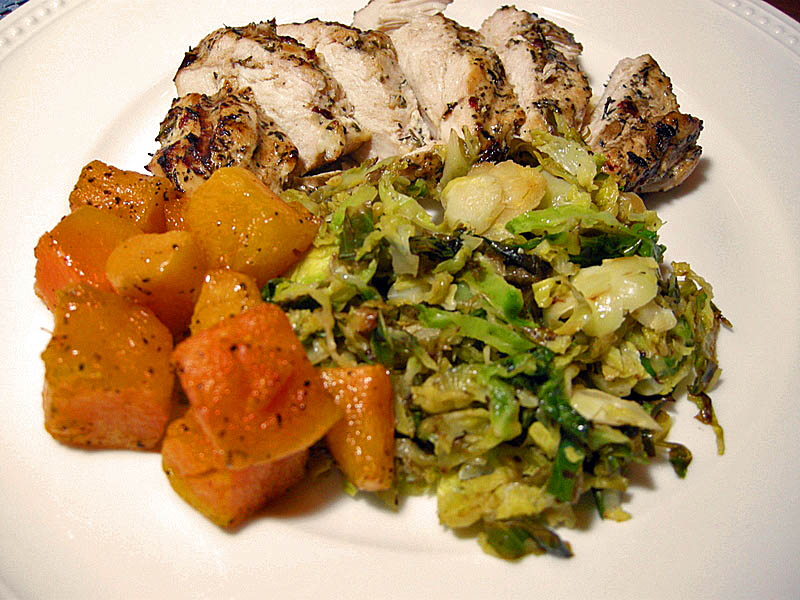
Comments: This is a basic method, with which you can use any marinade or rub you ‘re fond of.   I like to start marinating the chicken early in the morning before leaving for work, so that dinner is a no-brainer: all it takes is 7-6-5 minutes, and a side dish or two.   Like Brussels sprouts and roasted butternut squash!

Which brings me to the double-decker,  Shredded Brussels sprouts.  My  husband insisted that a post solely devoted to Brussels sprouts would scare away most, if not all my readers!  I am sure my readers are very loyal (fingers carefully crossed), but in fact this poor veggie ranks way low in any popularity contest.   So, allow me to share with you a GREAT way to prepare Brussels sprouts, and I ‘ll bet that even the sprout haters in the audience will enjoy it…

LEMONY SHREDDED BRUSSELS SPROUTS
(adapted from Martha Stewart.com)

1-2 pounds of Brussels sprouts
2 T olive oil
2 T water
zest of 1 lemon
good squeeze of lemon juice
salt and pepper to taste

Thinly slice the Brussels sprouts with a knife or the slicing disk of your food processor. Heat the olive oil in a skillet until very hot, almost smoking.   Add the sliced veggies, the water, season with salt and pepper and cook,  stirring every once in a while until the sprouts become tender and develop a few brown spots.  Add lemon zest, mix, and squeeze a little lemon juice all over and serve.

ENJOY!

to print the recipe, click here

Comments: Sometimes a different way of processing a vegetable will substantially improve its taste.  Prepared this way, Brussels sprouts have a pleasant texture ( don’t overcook them!), and a bright, fresh flavor from the lemon juice. It’s perfect alongside roast chicken, pork, or a thick piece of grilled salmon.

Brussels sprouts are low in carbs, and loaded with vitamins A, C, thiamin, riboflavin, iron, magnesium, and fiber.  They are good for you, so, give this recipe a try!   😉

ONE YEAR AGO: Baked Shrimp and Feta Pasta

Add to FacebookAdd to DiggAdd to Del.icio.usAdd to StumbleuponAdd to RedditAdd to BlinklistAdd to TwitterAdd to TechnoratiAdd to Yahoo BuzzAdd to Newsvine

REVISITING SPRING

I am fully aware that Spring is long finished, and that every year I commit the exact same sin: buying asparagus from a far away place, just because I can’t resist their charm at the grocery store. Locavores, forgive us. We love asparagus too much to wait for several months…

This is a very simple way to prepare them, but looks elegant enough to make a weeknight dinner special.

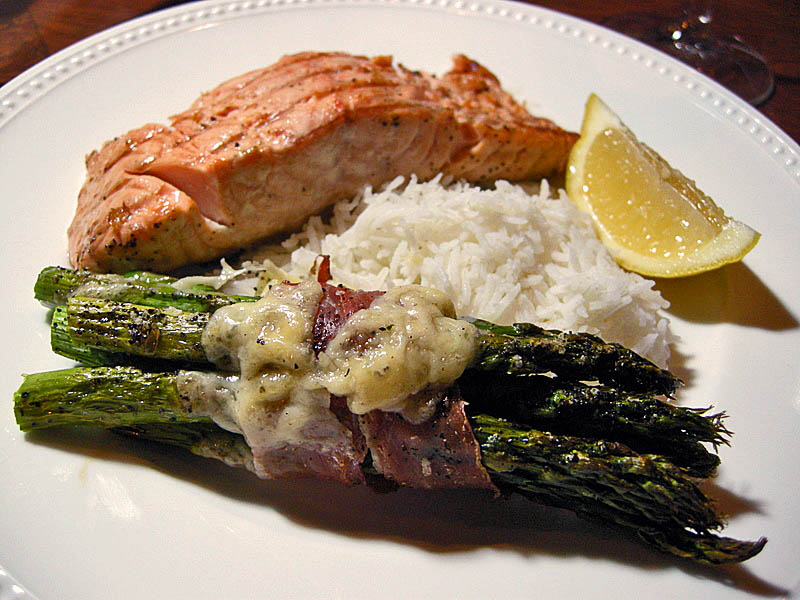
ASPARAGUS BUNDLES WITH PROSCIUTTO AND PARMIGGIANO
(from the Bewitching Kitchen)

asparagus
prosciutto slices
olive oil
salt and pepper to taste
Parmiggiano Reggiano cheese, shaved

Make a bundle with a single-serving amount of asparagus.  Cut 2 slices of prosciutto in half or thirds lengthwise, forming small ribbons.  Wrap them around each bundle and place on a baking sheet lined with aluminum foil.   Drizzle a little olive oil over it, rubbing it around the surface with your fingers or with a silicone brush. Season lightly with salt and pepper (prosciutto is salty, go easy on the salt).

Bake in a 400F oven until the asparagus are starting to brown on the edges – 20 to 25 minutes.  Add shaved parmiggiano and bake for a couple of minutes.  Sprinkle extra black pepper right before serving.

ENJOY!

to print the recipe, click here

Comments:  Roasted asparagus are always showing up as a side dish in our home, the addition of prosciutto is a nice variation.  We enjoyed it with a delicious grilled salmon and white rice.   I did not give credit to a particular source for this recipe, because I’ve been making it for years, I probably saw it in some publication long time ago.  However, it’s so simple that it hardly qualifies as a real recipe…   I’ve made it with regular ham  and it works well too, but I prefer the extra-bite the prosciutto provides.

ONE YEAR AGO: Basic Sourdough Bread

Add to FacebookAdd to DiggAdd to Del.icio.usAdd to StumbleuponAdd to RedditAdd to BlinklistAdd to TwitterAdd to TechnoratiAdd to Yahoo BuzzAdd to Newsvine

VEGETABLE MILHOJAS

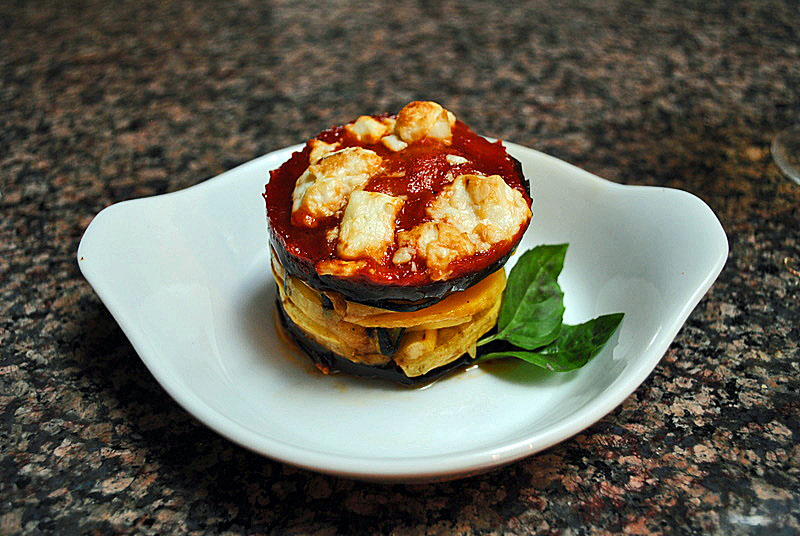
I prepared this recipe the week before our departure to the “nano-kitchen,”  (which I’m still adapting to), but using only the appliances I took with us, as a warm up for the “adventure.”   I’d also  like to say that this is a simple and straightforward recipe.   In some ways it’s not, but in other ways it is:  it takes  time and effort in the prep work, but once that’s completed it’s painless.  After tasting it, I predict that you won’t mind the road you traveled to make it.  I suggest that you assemble it on a weekend afternoon with nice music playing, perhaps this excellent  CD from Yo Yo Ma (skip the Metallica, or you may lose some fingertips).  I made individual servings with 3″ ring molds that I originally bought for cakes, but never used for that purpose.

VEGETABLE MILHOJAS
(adapted from Michael Bauer’s Secrets of Success)

for the tomato sauce:
1 Tbs olive oil
1/2 lb tomatoes, seeded and diced
2  garlic cloves
5 basil leaves
salt and pepper to taste

for the veggies
1/2 pound eggplant, sliced 1/8 inch thick
1/2 pound zucchini, sliced 1/8 inch thick
1/2 pound kabocha (or other squash), peeled, sliced 1/8 inch thick
1/2 pound celery root, peeled, sliced 1/8 inch thick
1/2 bunch basil  + 1/2 cup olive oil
1/2 pound soft goat cheese (Montrachet type)
salt and pepper

Make the tomato sauce by sauteeing the garlic in olive oil for 30 seconds, adding the tomatoes, basil, salt and pepper.  Cook on medium heat for a couple of minutes and reserve.

Heat a non-stick skillet (or preferably a large electric griddle), sprinkle each slice of vegetables with a little salt and pepper, and add to the hot surface of your non-stick pan (or griddle) for a couple of minutes on each side, until it just starts to show some color.  Do not let it burn, or completely cook.  Reserve the slices.

Mix the olive oil with the basil (you can use a food processor or finely slice the basil to help releasing its flavor.

Assemble the dish: coat a 8 x 8 inch baking dish slightly with olive oil to prevent the veggies from sticking.  Layer the eggplant slices, zucchini, squash, and celery root.  Add a little basil oil as you form each layer.  Continue layering the veggies until they are all used up.   Spoon some tomato sauce over the top, crumble the goat cheese and bake in a 450F oven for 10-15 minutes until the veggies are hot and the cheese shows some golden brown spots.

(If making the dish in individual rings, coat them slightly with olive oil to help removing the rings before serving – bake on a baking sheet, and use a flat spatula to remove each ring to the serving plate).

ENJOY!

to print the recipe, click here

Comments: Michael Bauer states that the secret of this dish is to thin-slice the vegetables,  and he’s absolutely right.  By doing so, the different layers bake into a single entity in which each flavor mingles with that of its  neighbors. It’s a feast for the taste buds.   I advise you to avoid excess  tomato sauce, because this is not about the tomatoes,  which just give it some extra moisture and flavor.  This recipe lets the veggies do the talking.  I couldn’t find celery root, so instead I used butternut squash, for its texture and color.  “Dry sauteéing” is an interesting, low-fat technique.  You’ll still need some oil while layering the dish, but it will finish lighter than similar versions that rely on “regular” sauteéing.  Eggplant, in particular, absorbs oil and I usually avoid frying it, so this preparation suits my style.  Play with different vegetables, as it’s fun to change this basic recipe.  It’s perfect for entertaining:  assemble it ahead of time, and bake it just before serving.

ONE  YEAR AGO: A peachy salad for a sunny day!

Add to FacebookAdd to DiggAdd to Del.icio.usAdd to StumbleuponAdd to RedditAdd to BlinklistAdd to TwitterAdd to TechnoratiAdd to Yahoo BuzzAdd to Newsvine