BROCCOLI-WALNUT SOUFFLE FROM A SPECIAL COOKBOOK

served1Last month I got a wonderful gift from Fer, my virtual friend who hosts the blog “Chucrute com Salsicha“.   She sent me a cookbook:  The Vegetarian Epicure Book Two, written by Anna Thomas.  Anna’s family was originally from Poland, but she was born in Germany, and moved to the US as a young child. While in college at film school in UCLA, she wrote a masterpiece of a cookbook, The Vegetarian Epicure, at a time when avoiding meat was not very common.  I enjoyed my gift so much that I could not resist getting her most recent book, Love Soup. It will have a special spot in our home, as the first cookbook I bought this year. By exercising considerable restraint, I lasted through the first week of February. I certainly make  my readers proud!  ;-)Fer’s thoughtful gift arrived at our doorstep on a Thursday.  Forty eight hours later, we enjoyed this very delicious souffle.

BROCCOLI-WALNUT SOUFFLE
(reprinted with permission from Anna Thomas)
Original recipe in  The Vegetarian Epicure Book 2, published by Alfred Knopf, New York, 1988

4 Tbs butter
4 Tbs flour
1 + 1/2 cup hot milk
5 egg yolks
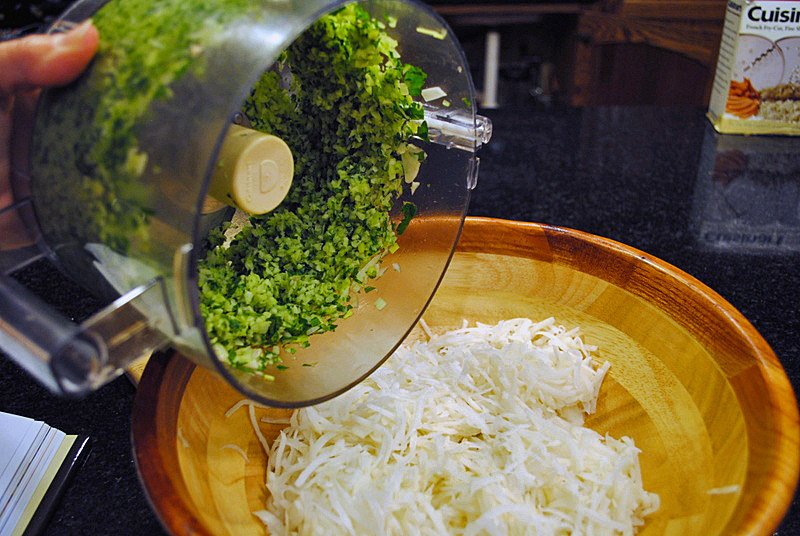
1 + 1/2 cups chopped cooked broccoli
1/2 cup finely chopped walnuts (I lightly toasted them first)
2 Tbs minced onions
2 Tbs grated Parmigiano cheese
1/2 tsp salt, ground black pepper to taste
7 egg whites
pinch of cream of tartar

Butter a 2-quart souffle dish and tie a buttered “collar” made of parchment paper if you want (I omitted this step).

Melt the butter in a saucepan and stir in the flour. Cook the roux over medium heat for a minute or two, stirring constantly. Then add the hot milk and stir with a whisk as the sauce thickens.

When the sauce is smooth, remove it from the heat and whisk in the egg yolks, one by one. Then add the cooked broccoli, the walnuts, the onions, and the cheese. Stir well and season with salt and pepper.

In another bowl, add a pinch of cream of tartar to the egg whites and beat them with a clean whisk or beater until they are stiff enough to form peaks.  Stir about 1 cup of the beaten egg whites into the warm sauce. Now add the remaining egg whites and gently fold them in, making sure not to lose the air incorporated into it.

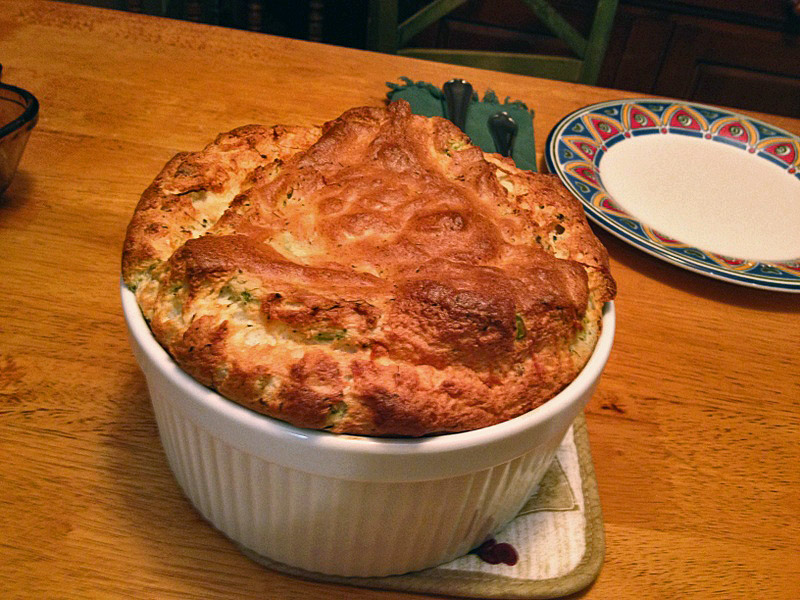
Pile the souffle into the prepared dish, place it in the middle of a 375 F oven, and bake it for 40 to 45 minutes.

Serve immediately. Remember, a souffle waits for no one…  😉

ENJOY!

to print the recipe, click here

before

Comments: We always alternate cooking days. One day I’m in charge, the other day it’s Phil.  That Saturday, mid-afternoon, Phil looks at me and asks “Am I cooking tonight?”  Before I could answer, he remembered that no, it would be me.  He quickly changed the question to “What are we having tonight?”  I tried to be as nonchalant as possible, “We are having a souffle“.    Oh, the big smile that I love so much!  But, how could a souffle not bring a smile?  It makes any meal special…

This version is heartier than your regular cheese souffle, with the broccoli and the nuts.  It is satisfying, creamy, and delicious to the last bite!  It won’t rise as lightly as a cheese-only, as the eggs need  to carry heavier stuff with them. But, what it might lack in airy nature, it compensates with flavor.   I think it is wonderful as a full meal, served with a salad and a piece of bread.  But, if you absolutely must have some  meat with it,  a simple roast chicken will do.  French home-cooking at its best!

Double thank you is in order:  Fer, thanks for sending me this book, and Anna, thank you for your kind emails, and giving me permission to publish your recipe in my blog!  Your Love Soup is such a great book, I already have 5 or 6 recipes fighting to be prepared first… 😉

ONE YEAR AGO: Voila’ les baguettes!

TWO YEARS AGO: Cornmeal English Muffins

THREE YEARS AGO: Butterflied Cornish hens with apricot-pistachio dressing

POMEGRANATE WALNUT DELIGHT

This unusual salad will take the center spot in any meal with its intense flavors and contrast of textures. I spotted the recipe around Thanksgiving last year, saved it to my Pinterest cooking board, and finally made it.  Please, don’t drag your feet like I did, make it sooner rather than later. Green olives, walnuts, pomegranate seeds… What a treat!
served111

GREEN OLIVE, WALNUTS & POMEGRANATE SALAD
(adapted from Alexandra’s Kitchen,  original recipe at Turquoise)   

3/4 cup shelled walnuts
1/2 cup pitted green olives, coarsely chopped
1/4 cup roasted cashews, coarsely chopped
3/4  cup pomegranate seeds
1 red Serrano chile, seeded and finely minced
shredded flat-leaf parsley to taste
1 tablespoon walnut oil
splash of pomegranate molasses
juice of ½ lemon
sea salt
freshly ground black pepper

Heat the oven to 350⁰F. Scatter the walnuts onto a jelly-roll pan and roast for 5-10 minutes, until deep golden brown.  Chop the walnuts coarsely and toss in a sieve to remove any remaining skin or dust.

Combine all the ingredients in a large bowl and toss gently. Leave to stand for 5 minutes or so before serving to allow flavors to meld. Taste and adjust seasoning. I ended up adding more lemon juice.

ENJOY!

to print the recipe, click here

closeup
Confession: I tend to be salad-lazy.  I don’t mind making a recipe that involves plenty of steps, be it reducing a sauce, braising for hours, or as you probably know, bake a loaf of bread that took 12 hours to proof.  But, ask me to make a multi-ingredient salad and I am invaded by a sense of pure exhaustion.  Washing the greens, cutting all ingredients, preparing the dressing…  However, this salad never left my mind from the day I saw it at Alexandra’s site, which, by the way, is a site worth subscribing to.  And, did you notice?  No greens to wash. Yeaaaaaah!   😉

Everything works in this recipe. I am a lot more fond of black Kalamata type olives than green, but trust me, they taste unbelievably good here.  Together with the unique heat that only a Serrano pepper delivers, you’ll enjoy the sweet and sour taste of pomegranate molasses, the toasty walnuts, the herby parsley, the lemon, and last but not least the pomegranate seeds!  Like little pine nuts dressed for a gala party…
We love them!

Three words for you: Make this salad.

ONE YEAR AGO: Romanian Flatbreads

TWO YEARS AGO: Ziti with Artichokes and Meyer Lemon Sauce

THREE YEARS AGO: Blasted Broccoli, Stove-top version

PUMPKIN UNCANNED

A little over 3 years ago, I shared with you our recipe for pumpkin pie that uses home-made pumpkin puree. Phil is absolutely adamant about it, having grown up watching his Grandma and his Mom make the puree from scratch and producing delicious pies with it. But, there’s more than pie to pumpkin, and by making the puree yourself, you can also enjoy your own roasted pumpkin seeds. Plus, one large pumpkin will give enough puree to last for a year!  Yes, you can do it with large pumpkins, even if they are a little more fibrous. And yes, it freezes quite well. Without further ado, here’s how we make it…

First, you need to cover a working surface with newspaper, and your body with a nice apron. Then cut open a lid on the top of your pumpkin, and scoop out all the seeds and the fibers that glue them together. Reserve them for later.
seeding

Next, cut large slices that will fit over baking sheets, and place them in a 350 F oven, with the cut side down. No need for salt, no need for oil. Easy as pie.
intotheoven
Bake the pumpkin for about 1 hour, or until soft. A good test is pushing your finger lightly on the skin, it should form an indentation.
bakingready

Now, let the fun begin!  Scrape the flesh into a bowl, and go to the sink, carrying the cooked pumpkin, an empty bowl, and a potato ricer.  Place some of the pulp in the masher, and squeeze out with a light pressure, just to release what is mostly water.  Let that go down the drain.  Once you feel most of the watery stuff is released, puree the pulp into the clean, empty bowl.  Do that in batches until all the pulp is passed through the holes of the ricer.
composite2

Now, marvel at the beauty of the mashed pumpkin you made yourself, or at least that you took pictures from while your husband worked hard at it… 😉
pureeready
You can use it to make a nice pumpkin pie like the one I blogged about…
sliced
And save the rest in the freezer. I normally make a few 1-cup and some larger portions. Make sure to label, because the freezer can quickly turn into a parallel universe, unknown and mysterious.
freezer
My next two posts will feature goodies I made with our uncanned pumpkin…  First, I will show you an interesting take on roasted pumpkin seeds, and next…  well, next I cannot tell you yet.  It’s a secret.  😉

ONE YEAR AGO: Pork Ragu

TWO YEARS AGO: Friendly Kuri Squash

THREE YEARS AGO: Celery and Apple Salad

POTATO GALETTES A L’ALSACIENNE & BOOK REVIEW

served2222Right around the time I started this blog, I stumbled upon Pham Fatale’s site, and fell in love with it.  The site’s name is a perfect choice for someone called Pham and who looks as gorgeous as she does… 😉   But what captured me for good was her multi-cultural style of cooking.  Keep in mind that she was born in Paris, with parents who emigrated from Vietnam in the mid-70s. To make things even more interesting, she married a man who is also the son of immigrants,  his parents came from India.  If that does not make for an amazing array of recipes, I don’t know what would.  Check her site and you will also be smitten by it, she is an amazing photographer and her recipes quite creative and unique.  Jackie is a busy bee – she has a young baby, and cooks for a large family that includes teenagers with dietary restrictions – but even with such intense life she managed to publish her first cookbook. I asked her permission to publish a recipe from it, as well as write a little review.  The book is called Haute Potato, and it includes 75 gourmet recipes using this “humble” vegetable.  In Jackie’s hands, the potato is anything but humble!

POTATO GALLETES A L’ALSACIENNE
(reprinted with permission from Jacqueline Pham)

2 pounds Russet potatoes
1 lemon, freshly squeezed
2 Tablespoons parsley, chopped
4 shallots, chopped
1 piece of leek (3 inches), white part only, chopped
2 eggs
1/8 teaspoon cayenne pepper
3 Tablespoons all-purpose flour
1/4 teaspoon nutmeg, freshly grated
1/4 teaspoon baking powder
1 + 1/2 teaspoons salt
1/2 teaspoon black pepper
1 cup canola oil, as needed

Prepare the potatoes: wash and peel the potatoes.  Shred 2/3 of them and place in a large mixing bow. Add the lemon juice and cover with cold water. Let sit for 5 to 10 minutes. Drain the potatoes and discard the liquid. Place all the shredded potatoes in a cheesecloth and remove as much excess wter as possible, than pat dry with paper towels.  Pace inside a large bowl. Coarsely chop the remaining 1/3 of the potatoes and place them into the bowl of a food processor. Add the parsley, shallots, and leek. Pulse into a smooth raw puree. Add the mixture to the shredded potatoes.

Make the batter: in a mixing bowl, beat the eggs with the cayenne pepper and the flour for 2 to 3 minutes, until slightly thickened. Add the nutmeg and baking powder. Add this egg mixture to the potatoes.   Season with 1 teaspoon of salt and 1/2 teaspoon of pepper.  Stir well to combine.

Fry the galettes: heat the oil over high heat in a large Dutch oven or heavy-bottomed pan.  You should have 1 inch of oil in the pan, so use as much oil as needed for that. Form small flattened patties with the potatoes (if you have disposable gloves, they work well if you grease them lightly with oil). When the oil is very hot, drop the patties into it, making sure they don’t touch each other.  Lower the heat if they seem to brown too fast, and cook them for 5 to 8 minutes, until browned on the first side, then flip them and cook for about 3 more minutes on the second side.  Season them with a little extra salt as you remove them from the pan and place on paper towels to absorb excess oil. You can fry them and keep them warm in a low oven until serving time.

(makes 6 servings, about 12 galettes).

ENJOY!

to print the recipe, click here

prep1

Comments:  I made one small modification to th recipe, and that was to add about 4 times as much parsley as it called for, which explains that my galettes had a bit more of a green aura than Jackie intended to. Let’s not delve too deeply into the issue. Suffice to say that I prepared the parsley to use in two different venues, and some unexpected firing of neuronal cells made me dump the full amount into the food processor.  No harm was done to the galettes as far as taste is concerned.   The key to the great texture of these fritters is the use of potato in two forms: grated and processed into a paste.  It gives the galettes a very creamy and pleasant texture.

photo(71)

ABOUT HAUTE POTATO, THE COOKBOOK…   I love the way the chapters are divided in an unorthodox way.  Each chapter gives one type of “outcome” for the potato. Here is a list of them with one example of a tempting recipe found in it.

Chapter 1: Refreshing…  Vietnamese-Style Shrimp and Potato Salad

Chapter 2: Decadent… Prosciutto-Wrapped Fig and Gnocchi Bites

Chapter 3: Cheesy…. Pine Nut, Chevre, and Potato Cigars with Lemon-Caper Sauce (this one a favorite of Jackie’s family)

Chapter 4: Crispy & Crunchy… Oven Sweet Potato Fries with Pineapple-Mango Aioli

Chapter 5: Creamy…  Brie Cheese and Roasted Garlic Mashed Potatoes (and Sally feels a little faint….)

Chapter 6: Spicy…   Traditional Samosa

Chapter 7:  Sweet…  Sweet Potato and Matcha Green Tea Creme Brulee

I had a hard time deciding on a recipe to blog about, and almost went with her carrot and potato souffle, but since we very rarely make fried foods, I took the opportunity to try her galettes.  I am definitely making the souffle next, and the potato cigars will be on our menu next time we entertain.  Jackie said they disappear quickly whenever she makes them, and are the number 1 request of friends who were lucky enough to try them… 😉

This is a cookbook that will please anyone who likes to make their meals a little more special. However, even a cook without too much experience will be able to make most recipes, as they are very well explained. Some recipes are published in her blog, but most are exclusive to the book.  You can find it at amazon.com, and in bookstores everywhere!  I wish Jackie great success in her first adventure as a cookbook author, and look forward to her next cookbook!  😉

ONE YEAR AGO: Caramelized Carrot Soup

TWO YEARS AGO: Miso-Grilled Shrimp

THREE YEARS AGO: Pain Poilane

EIGHT-BALL ZUCCHINI: THE MISSING FILES

I made this dish several months ago (we were still living in OK) but the photos were temporarily misplaced.  Misplaced as in “downloaded to the wrong folder”.  I stumbled upon them the other day by complete accident, while searching for a figure to include in a power point presentation. Amazing how efficiently I can mess up stuff sometimes.  For those headed into the cooler months, finding eight-ball zucchini could be a stretch, but my readers in the Southern hemisphere will be able to try this recipe sooner… It is delicious!


EIGHT BALL ZUCCHINI FILLED WITH COUSCOUS AND RICOTTA CHEESE
(from the Bewitching Kitchen)

2 eight-ball zucchini
1 medium regular zucchini, cut in small dice
1 Tbs grapeseed oil (or olive oil)
1 shallot, finely diced
salt and pepper
1/2 cup Israeli couscous
1/2 cup ricotta cheese
1/4 cup dried cranberries

Cut the top off of the round zucchini, and carefully coop out the inside, leaving a 1/4 inch wall around to contain the filling later.   Reserve the pulp.  Place the zucchini on a steamer basket and steam for 10 minutes, checking after 5 minutes to make sure it’s not getting too soft.   Remove from the steamer and let it cool briefly.   Meanwhile, prepare the stuffing:  saute the shallots in grapeseed or olive oil until translucent.  Add the reserved pulp of the eight ball zucchini, and the diced regular zucchini.  Saute until soft and fragrant, season with salt and pepper.    Reserve.

Cook the Israeli couscous in plenty of salted, boiling water.  Drain it a couple of minutes before the time stated in the package, as it will cook further during baking. Reserve.

Heat the oven to 375 F.  Mix the sautéed zucchini with the couscous, ricotta cheese, and dried cranberries.   Adjust seasoning with a little more salt and pepper, if needed.   Generously fill the hollowed eight-ball zucchini all the way to the top and rest the cap on.  You may have leftover filling, depending on the size of your zucchini.  Place the zucchini in a baking dish, cover lightly with foil, and bake for 35 to 30 minutes.

ENJOY!

to print the recipe, click here

Comments:  I’ve made stuffed zucchini many times, but most recipes omit the steaming, and ask you to simply fill it and bake it.  When I make it that way, the zucchini never gets tender.  I also tried microwaving to simplify life a little, but steaming works best.  I know, I know, it’s an extra step and a couple more items to wash, but sometimes in the name of a nice dish sacrifices must be made.  So I put on my Braveheart face, and steam it.

I’ve used quinoa in place of couscous, and it results (of course) in a lighter dish, but very tasty too.   You can use rice, orzo, barley, farro, anything stuffed inside an eight-ball zucchini will immediately seem healthy and light.  Stuffing with lasagna might be a stretch, though!  😉

ONE YEAR AGO: Grilling Ribbons

TWO YEARS AGO: Peppery Cashew Crunch

THREE YEARS AGO: Ossobuco Milanese: an Italian Classic