LET’S GET SPOOKY!

I realize Halloween will not be the same this year, and that  makes me sad. But it is impossible to resist baking all kinds of spooky things, and with this post I share six options for your socially-distant Halloween celebration.

All macarons were filled with a chocolate ganache, but in the Devil and Mummy macs the ganache was made by steeping the cream with smoked tea. Bat Cookies are a hazelnut-almond dough, and the others are regular sugar cookies.

DEVIL MACARONS

I used my default recipe which you can find here (and also a video tutorial in case you’d like to bake along with me). The idea of the decoration came from a brand new cookbook (The Wicked Baker) by one of the most fascinating contestants of the Great British Bake Off, the one and only Helena Garcia. She used a similar decoration for donuts, but I adapted it for macarons. The ears were made with Royal Icing dyed black, and piped on parchment paper in the appropriate format. Make more ears than you’ll need, as they break easily.  The same Royal Icing was used to pipe the devilish tail. Once you assemble the shells with the filling, quickly add the ears, while the ganache is still soft.

Recipe for the smoked chocolate ganache:
150g heavy cream (you won’t use the full amount in the ganache)
1 bag smoked black tea (Lapsang Souchong)
2 tsp corn syrup
230g semi-sweet chocolate in pieces

Start by making the filling, as it must cool down before using. Bring the heavy cream to a gentle boil, add the tea bag. Turn the heat off, close the pan and leave the tea infusing for 30 minutes. Squeeze the tea bag and remove it. Bring the cream to a gentle boil again, then pour 115g of it over the chocolate. Leave it for 5 minutes, gently whisk until smooth, add the corn syrup. Cool it until it gets to a good consistency for piping on the shells.

MUMMY MACARONS

Also made with my default recipe, and filled with Smoked Chocolate Ganache. Once the shells are assembled, simply use white Candy Melts to make a random drizzle on the surface, and quickly add store-bought candy eyes (from Wilton).

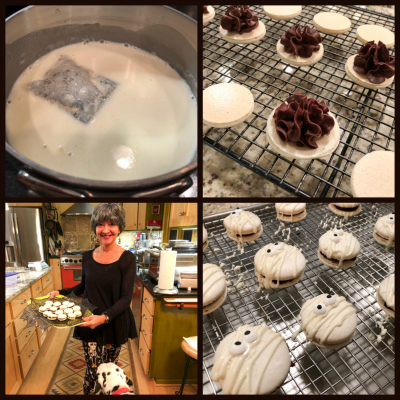
Those were made in fact two years ago, and I totally forgot to blog about them. Back then, there was a thing called “Halloween Party” with guests and all (sigh). Bogey approved the macs, but was a bit spooked by a special version I made at the time.

Isn’t that pup the most adorable being in the universe? Noticed the paw?
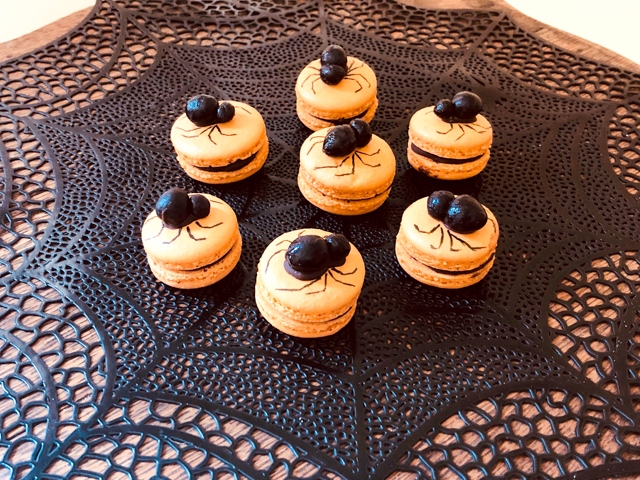
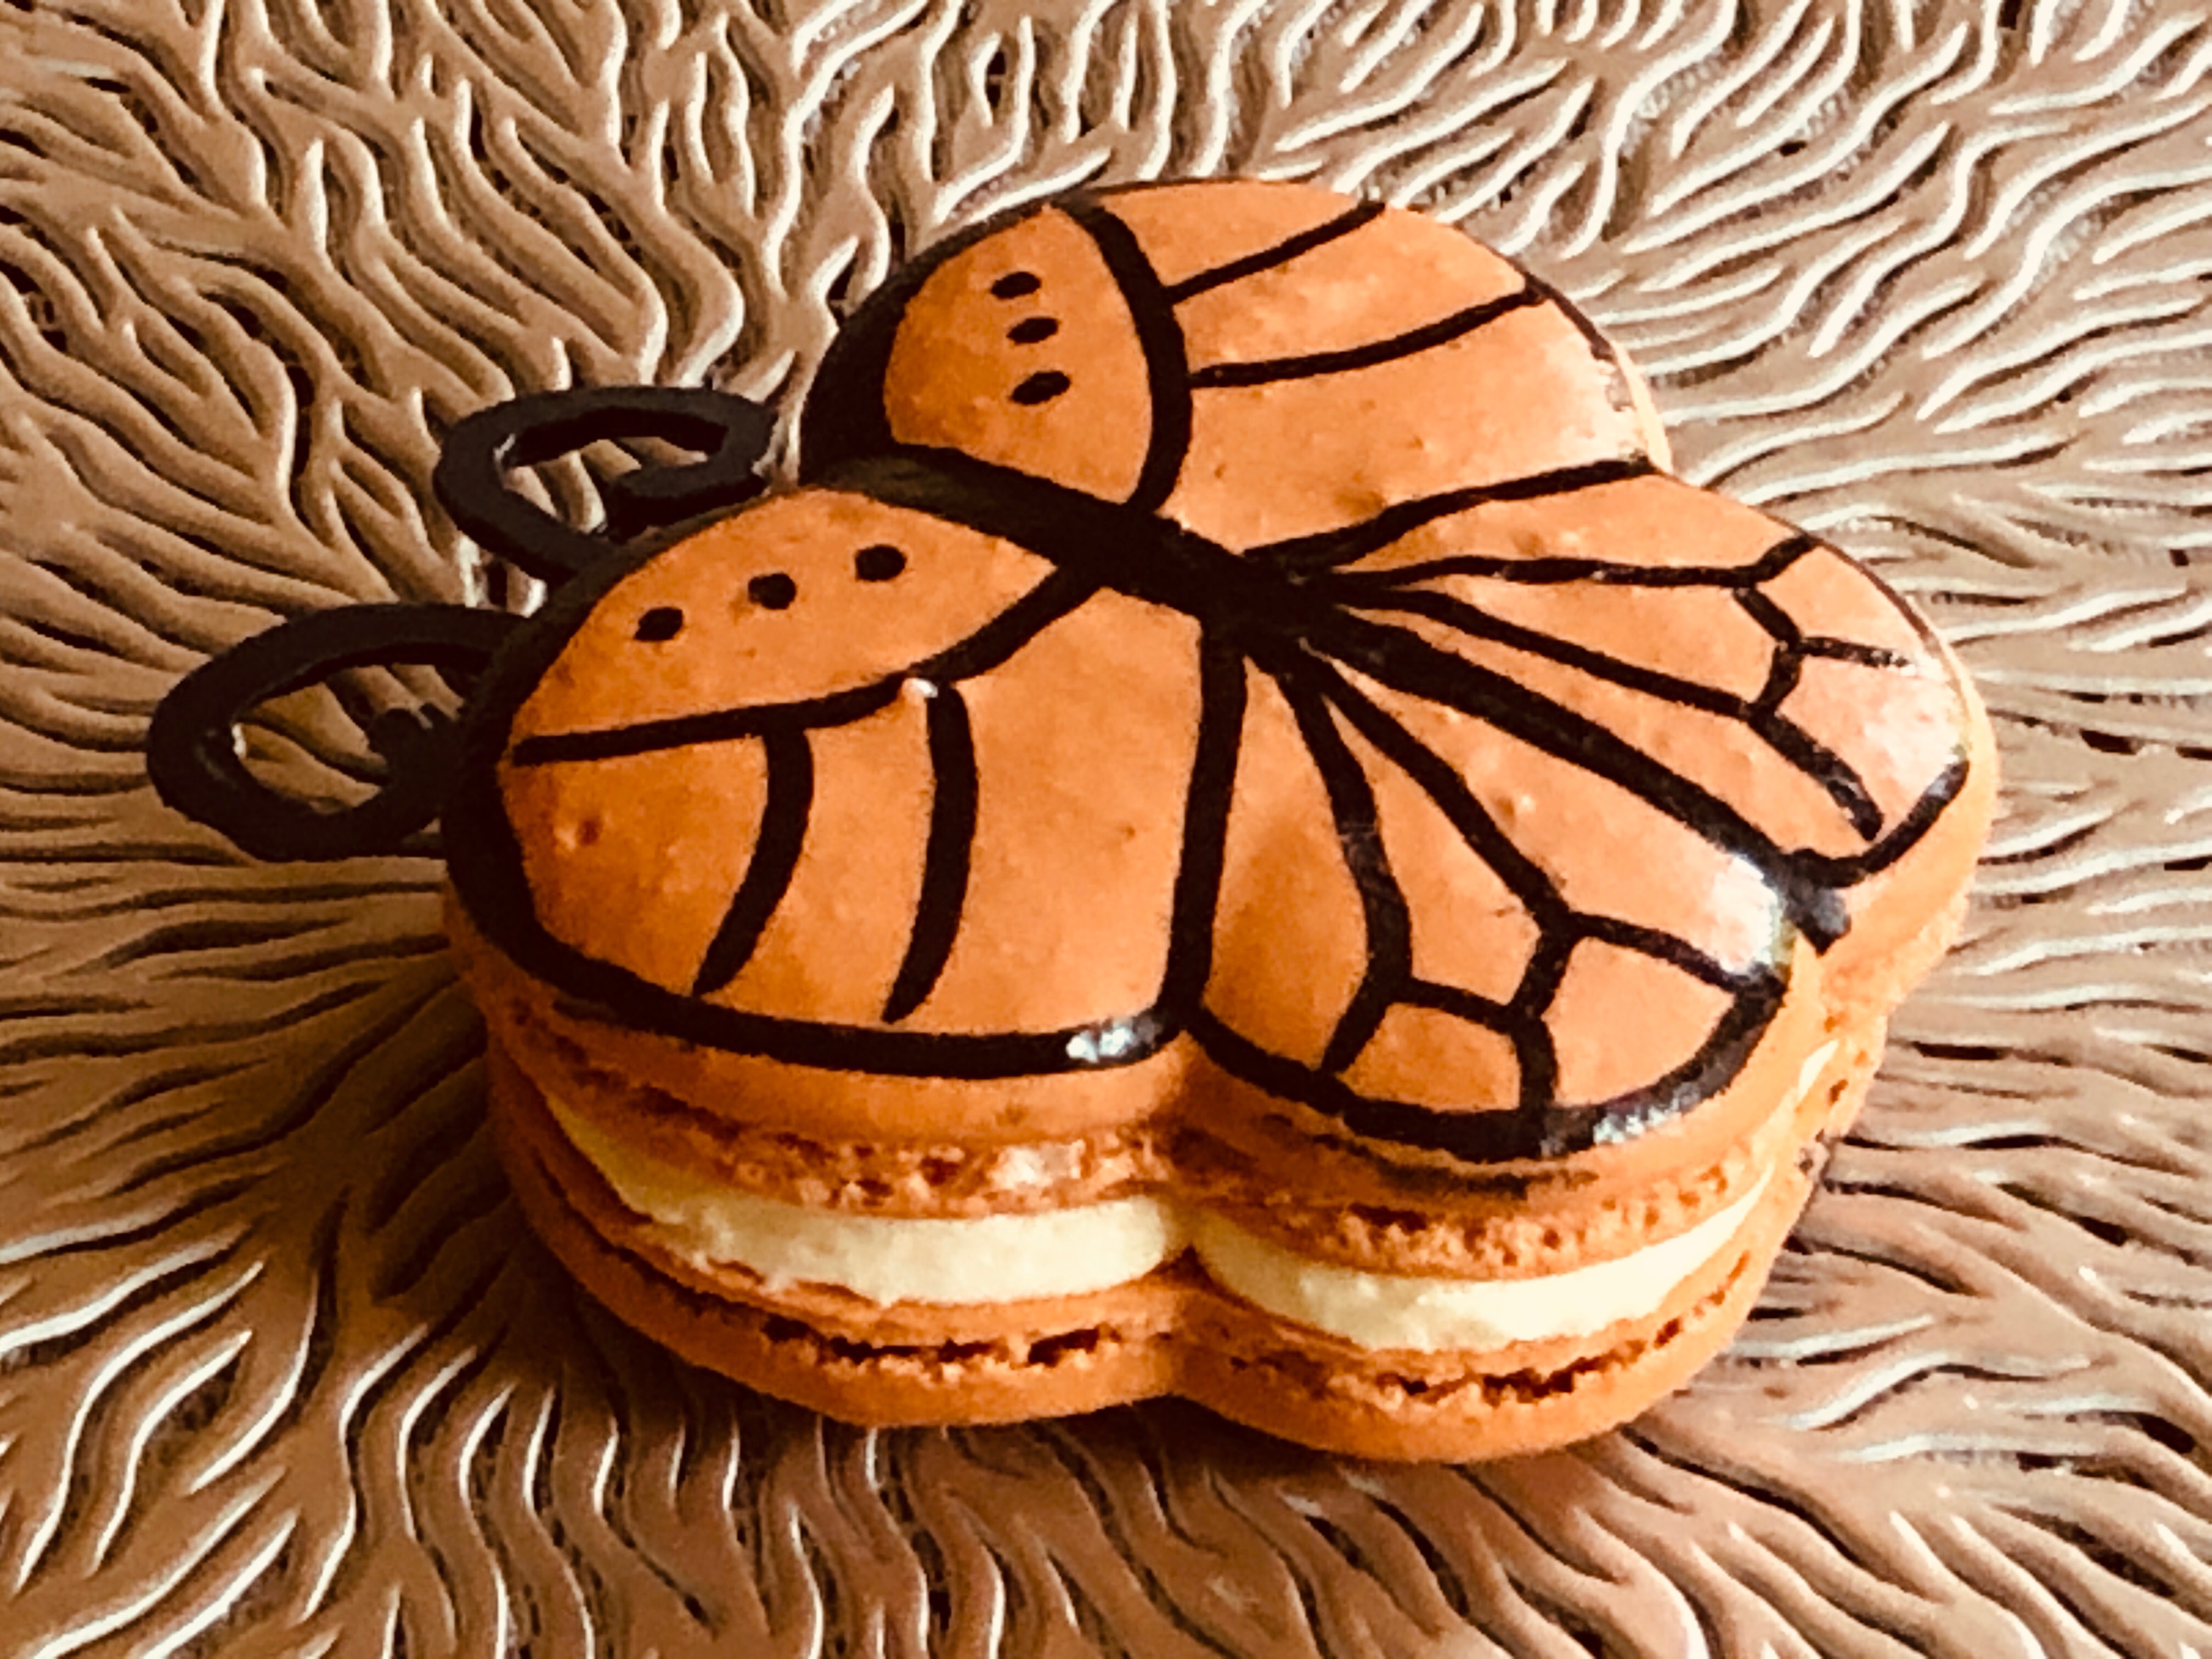
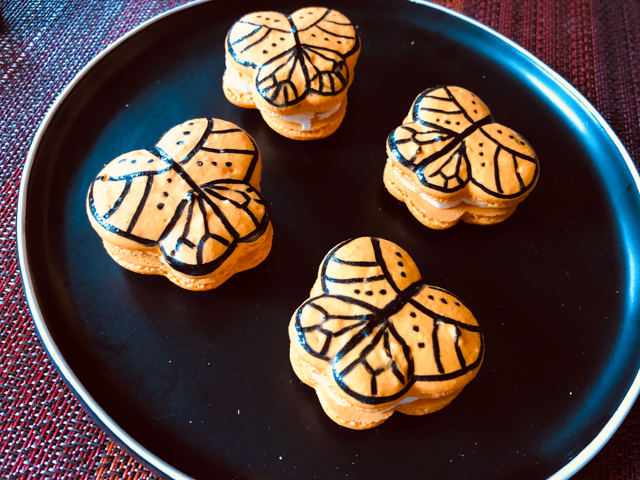
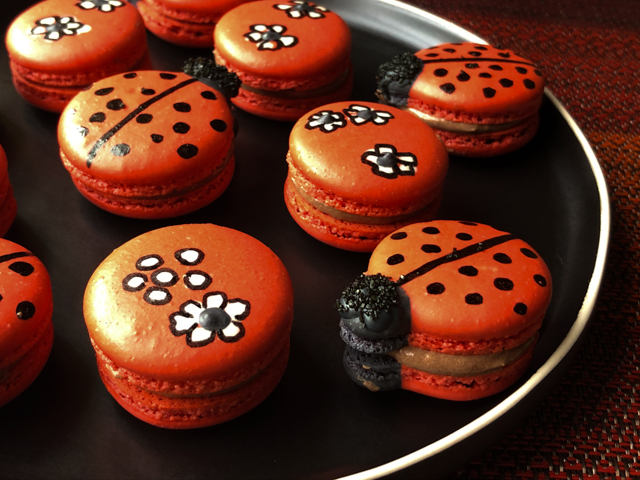
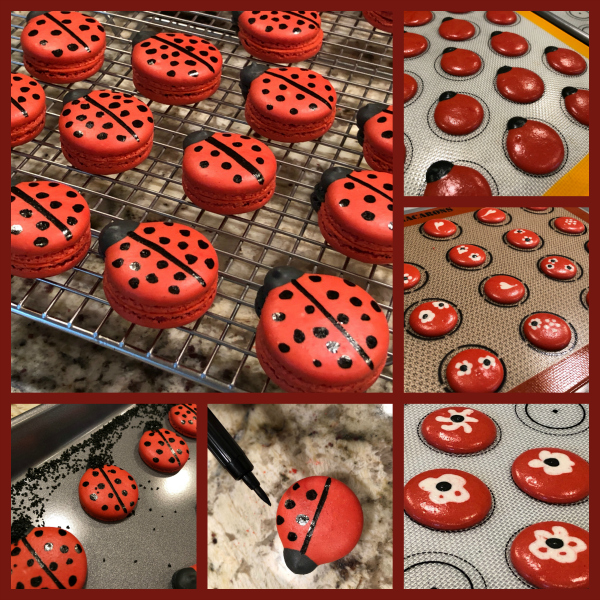
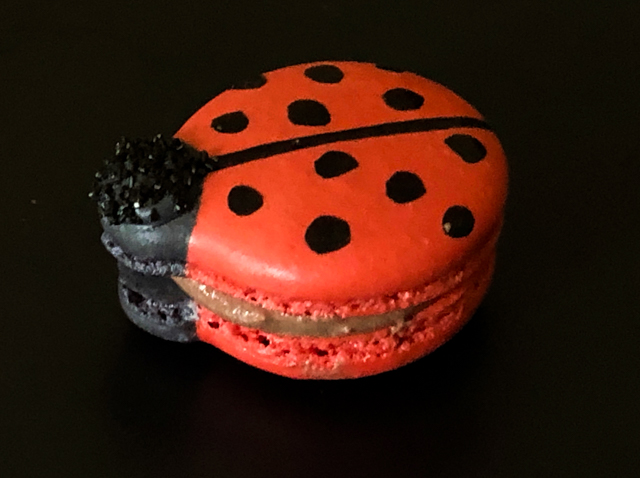
 

SPIDER MACARONS

The shells were made with a new (to me) recipe. I used the Swiss meringue method, in a version that is super easy to memorize: 100g of every ingredient. All details in this recent post from Broma Bakery. I really like the way the shells baked with tall feet, and I did not even passed the almond flour + powdered sugar through the food processor, which made the whole process even simpler.

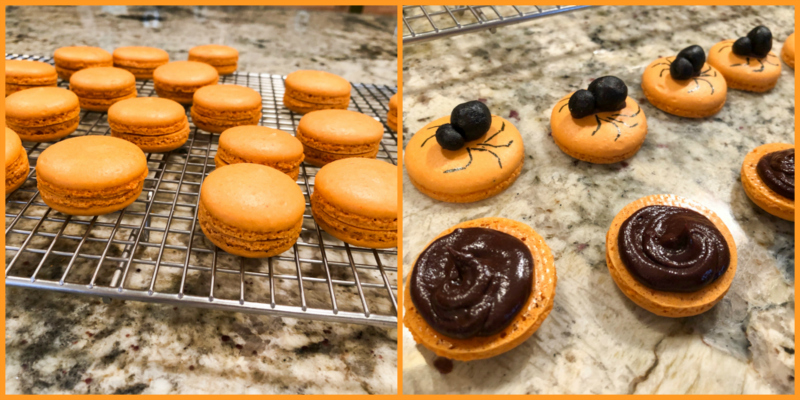
I loved making the spider decorations. I used marzipan dyed black, and then formed the head and the body of the little spiders, glueing them to the shells with candy melts. A little food-safe black pen to make the spider legs, and that was it! If you prefer less marzipan on the shells, roll the marzipan thin, and cut circles, one bigger for the body, one smaller for the head. It will have a similar look, but for those who are not wild about marzipan, even better to enjoy!

Chocolate Ganache Filling

100 g heavy cream
220g dark chocolate, chopped finely (I used Lindt 70%)
15 g butter
15 g honey
1/2 tsp vanilla extract

Gently melt the chocolate with the butter in a double-boiler or microwave at 50% power. Set aside.

Pour the cream together with the honey and vanilla into a small saucepan and place over medium heat until it reaches almost boiling point. Pour slowly over the chocolate-butter mixture, mix until homogenized.  Keep at room temperature for about 3 hours before using to fill the shells. You can make also make it the day before.
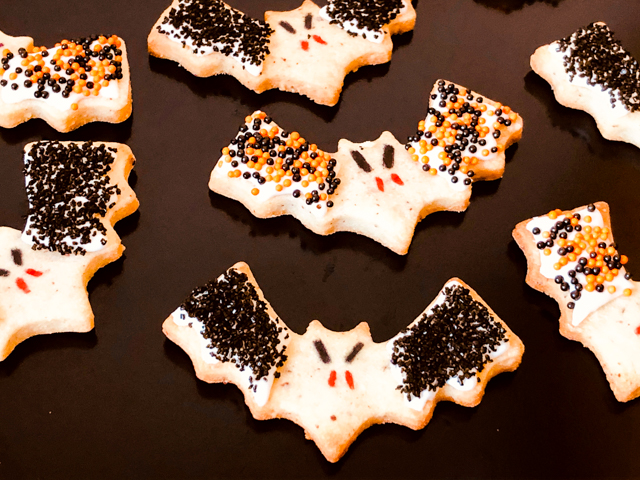
BAT COOKIES

Another decoration idea from The Wicked Baker, Helena’s cookbook. She used sugar cookies, I went with a slightly different recipe for the cookie base.

HAZELNUT-ALMOND CUT-OUT COOKIES
(from the Bewitching Kitchen)

188g butter at room temperature, cut in small cubes
78g powdered sugar
63g eggs
250g all-purpose flour
42g ground hazelnuts
42g ground almonds
1/4 tsp salt

In a Kitchen Aid type mixer with the paddle attachment cream the butter with powdered sugar until soft and smooth. Gradually add the eggs, and keep beating until fully emulsified.

Add the flour, hazelnuts, almonds and salt, mixing gently to a homogeneous mixture. Transfer the dough to a floured surface, pat as a disc and refrigerate for about 2 hours.

Roll out and cut in any shape you like. Freeze the cut cookies for 10 minutes before baking at 350F for about 12 minutes, until edges start to get a little color. Decorate with Royal Icing or serve plain, they are delicious even without decorations.

ENJOY!

to print the recipe, click here

A little Royal Icing, sprinkles, and food pen to finalize the bat-look…  Very simple to decorate, and the hazelnut-almond base really adds a lot to the cookie.

SPOOKY SUGAR COOKIES

I love using these cookie cutters that make the design for you, because I’m not that good at piping fancy designs (I am working on it, but well, you know how it goes). For the houses, I wanted a “granite” look, and it was easy to do with food gel diluted with a bit of vodka (or lemon extract). You need to eye-ball the dilution factor, so that the color is a little faded and does not cover the surface of the cookie completely. I used purple and dark blue from Artisan Accents, and completed the decoration with Royal Icing dyed orange or black.

For the sugar cookie basic recipe, I followed Bakeat350 to a T. I love that you don’t need to refrigerate the dough before rolling it out. All recipes I’ve tried from that site worked wonderfully, and I’ve tried plenty, as every week I include a small batch of sugar cookies in my donations to Common Table.

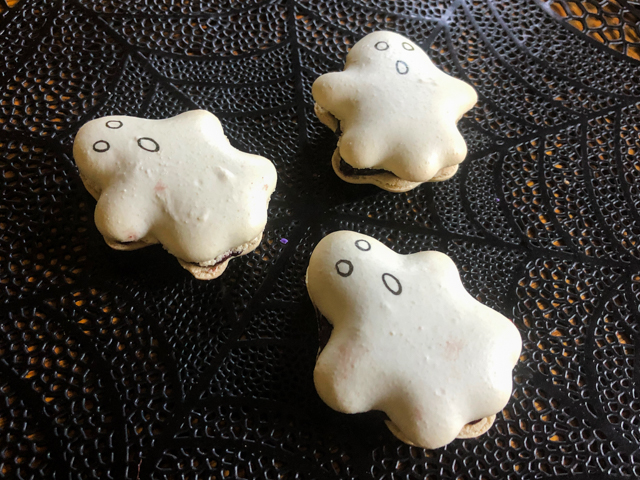
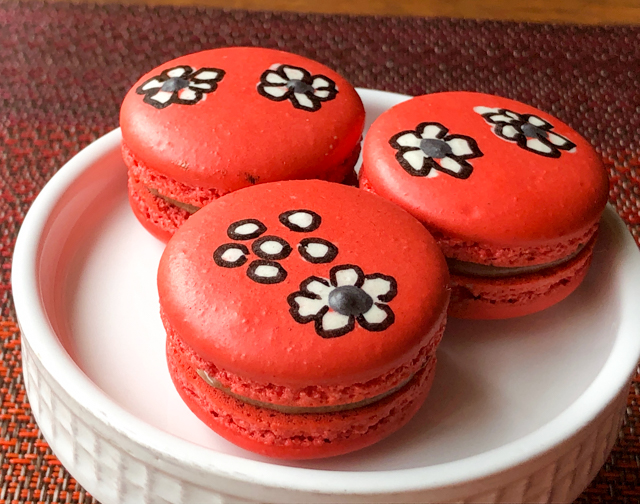
FRIENDLY GHOST MACARONS

I used my default recipe for these, and the same chocolate ganache used for the Spider Macs, posted above.  All you need is a template to pipe your little ghosts, and to make sure the macaron batter is not too thin, stop shorter in the macaronage, so that when you pipe the design it stays as it is.  There are many templates available in the net, I used this one. The only issue I had with these macs is the slight browning in the oven. It is pretty tricky to keep the white color unchanged. In a batch I made earlier, I painted some pearl dust all over the surface, but it used up so much pearl dust, I am not sure it was worth it.

For more recipes to inspire you, click on this link from last year. Amazing how we had no idea how much our world would be changed 365 days later.

ONE YEAR AGO: Miso and Sesame Roast Chicken with Revelation Quinoa

TWO YEAR AGO: Incredibly Simple Times Four

THREE YEARS AGO: Parsnip, Coconut and Lemongrass Soup

FOUR YEARS AGO: In My Kitchen, October 2016

FIVE YEARS AGO: Paleo Moussaka

SIX YEARS AGO: In My Kitchen, October 2014

SEVEN YEARS AGO: In My Kitchen, October 2013

EIGHT YEARS AGO: Bourbon and Molasses Glazed Pork Tenderloin

NINE YEARS AGO: Crimson and Cream Turkey Chili

TEN YEARS AGO: Taking a break from the nano-kitchen

ELEVEN YEARS AGO: Chocolate Chip Cookies


DUTCH MACARONS, AND WILLIAM CURLEY’S NOSTALGIC DELIGHTS

If you are a follower of my blog, you know I suffer from a macaron condition. Cannot stop baking them, and when I go into daydreaming mode, macarons flavors and colors are often part of it. One day, I was relaxing in my favorite armchair with a beautiful cookbook (Nostalgic Delights), when all of a sudden a recipe popped up… Dutch Macarons. Cute beyond description. They look like a macaron gone a bit wild, feet not as well-defined, instead their shells open on the top, revealing a similar inner structure. I could not wait to bake a batch. If you are afraid of baking macarons, these are in many ways easier. No macaronage stage to worry about, you mix the batter, pipe, and then exercise patience. They must dry for 12 hours before baking, which is a major difference. The outer skin has to be really dry, so that it can be cut with a sharp knife (I used a brand new razor blade) right before they go into the oven. That gives them the characteristic opening. I share this unusual recipe after getting permission from Chef William Curley. He is not only a fantastic patissier, but a very sweet person who patiently answered some annoying pressing baking questions I had for him. He owns a shop in Soho, so if you are in London, pay him a visit. I am kicking myself for not doing that last year when I was busy upsetting Paul Hollywood. Bottomline is: I must go back. I meant to Soho, not the tent.

DUTCH MACARONS
(printed with permission from William Curley)

for the shells:
175g powdered sugar, sifted, and divided (125g + 50g)
125g ground almonds, sifted
75g egg whites
50g superfine granulated sugar
20mL water

for praline paste:
100g hazelnuts
100g almonds
200g sugar
1 tsp hazelnut oil (I used grape seed)

for the praline ganache:
150g heavy cream
125g bittersweet chocolate (I used Lindt 70%), chopped in small pieces
12g butter, softened
40g almond praline paste

Ideally the day before, make the praline paste (you will make more than you need, but it keeps well). Heat the oven to 400F. Spread the nuts on a baking sheet lined with a silicone mat. Roast for 8 to 10 minutes, then transfer to a heavy-bottom saucepan.

Cook over medium heat while gradually adding the sugar and stirring non-stop. Cook until the sugar turns into a caramel, it will take from 15 to 18 minutes. Pour the mixture over a baking sheet and allow it to cool. When the nuts are cold, place in a food processor or Vitamix and blend until it forms a paste, adding the teaspoon of oil to help emulsify.

Prepare the ganache: put the cream in a saucepan and bring to a boil. Put the chocolate in a mixing bowl and add the hot cream over it. Mix until emulsified, add the softened butter and the praline paste. Leave to set at room temperature for 2 hours, when it will reach a nice piping consistency.

Make the shells: Place 125g of the powdered sugar, the ground almonds and the egg whites in the bowl of a Kitchen Aid type mixer, and whisk for a minute or so, as  you start preparing the syrup.

Make a syrup with the granulated sugar and water, cooking it to 240F (116C), then pour the syrup over the mixture in the KitchenAid bowl while it is whisking at medium speed.  Beat for 5 minutes, then add the remaining 50g or powdered sugar.

Spoon the mixture into a piping bag fitted with a 10mm round piping tip, and pie ovals of 3/4 inch x 1+1/4 inch.  I made a little template to help me with consistency. Leave in a cool, dry area for about 12 hours to fully dry the macarons.

Heat the oven to 350F. Using a sharp knife, cut a slit in the center of each macaron, then bake for 15 to 18 minutes, until they have puffed up and turned golden. Allow them to get fully cool.

Spread ganache on one shell, top with another of similar size (hopefully they will all be very similar in dimension), leave to set for 30 minutes so that the ganache sets.

ENJOY!

to print the recipe, click here


Comments: This was a super fun and exciting bake for me, because the recipe was familiar and unusual at the same time.  I was in mild hyperventilation mode up to the moment I opened the oven and marveled at those cute babies all plump and ready for the filling. Speaking of the filling, it is pretty spectacular:  almond/hazelnut praline with chocolate. Need I say more? Addictive, truly.

As to the taste, they are indeed very similar to macarons, but with more substance, let’s say that in a regular macaron the filling definitely speaks louder than the shells. In the Dutch version, they share center stage as equal partners. I loved the texture.  They reminded me of a sweet I used to enjoy as a child in Brazil called “AMANDITAS.” Interestingly enough, you can still buy those  which proves I am not that old. HA! The filling in amanditas is harder, but there is a resemblance there for sure.  I can tell you I’ll be making Dutch Macarons on a regular basis from now on.

TEASER RECIPE

Before I take you for a virtual tour of Chef Curley’s book, let me show you another recipe I made from it. These are called Rout Biscuits (I laugh inside imagining how badly I butcher its pronunciation). Just like Dutch Macarons, it is a recipe from a couple of centuries ago, and rarely seen these days. William Curley brings it back to life adding quite a few touches of elegance. A delicate hazelnut-almond biscuit base holds a hazelnut cream piped in a circle, and after baking, a dollop of jam is added to the center. I loved it so much that I made it twice in the same weekend.  The second time around I used a bit of orange-chocolate ganache in the center instead of jam.

I took both batches to our department for my “Mondays with Sweetness”, and people were raving about them. Delicate, delicious, beautiful, just the right size… were some of the comments I got back. The biscuit base is wonderful on its own. I will share soon some cookies I made with that dough.

And now, time to review Nostalgic Delights….


First of all, I adore the name… Nostalgic Delights gives me a nice warm feeling inside, anticipating beautiful bakes of the past. And here’s what William himself has to say about it:

“The definition of nostalgia is – a sentimental longing or wistful affection for a period in the past”.  Every individual has their own interpretation of nostalgia, and of course their own fond memories of food. I hope that within the recipes I have created for this book there is going to be a little something enabling every reader to capture their own bit of nostalgia” 

Isn’t that beautiful? The book is just a complete delight (pun intended), and it was written with passion not only for the art of baking but for teaching it even to those of us without professional training.

The book is divided in 7 chapters, as follows…

Chocolate Confectionery… Being an award-winning chocolatier, you can expect that his recipes in this chapter will take your breath away. It starts with a nice explanation on tempering, casting in moulds and dipping, which you will need to be comfortable with. The chapter opens with his Hazelnut Rochers, the recipe at the very cover of the book. His mother used to serve those at Christmas. Talk about nostalgia! He shared step by step photos of the process of making this beauty, which one day I shall take a deep breath and tackle myself.  I have to say that every single recipe in this chapter had me dreaming. He starts from simple recipes (like Australian Cartwheels, popular in the 1940’s) and turns them into morsels of chocolate-coated art. His Matcha and Yuzu Teacakes are definitely something I will bake in the near future. But truly everything is just amazing and every recipe has detailed photos of the whole process so that even common mortals can attempt them. He closes this chapter with the really fun Curley Wurly, a 1970 classic made in a Bournville factory in an attempt to use leftover toffee. It is basically a braided toffee coated in tempered chocolate, and I tell you, the day I get rid of my braces I will celebrate indulging in a full batch. Mine, all mine.

Bakery Favorites… The chapter starts with tips for lining tins with pastry, blind baking, working with yeast, and rough puff pastry. Then he shares bakes in which these techniques are employed.  His Chocolate Cherry Bakewells are just gorgeous, but you don’t have to take my word for it, here is a shot of that page. I am also quite smitten by the Marignons, because the basic component is a savarin, which intrigues me. I need to try and make it.

In this chapter, the classic Jam Tarts, Custard Tarts which most people are familiar with, but also some interesting bakes like one called Black Bun, a Scottish concoction to be enjoyed on the Twelfth Night of Christmas, much like Galette de Rois in France. Have you heard of Bee Sting? It is a German dessert with a ton of history behind it, and William shares his version, based on a recipe from the 15th century!  I cannot tell you how much I love this type of stuff….

Patisserie Modern Classics… The introduction covers mousses, and I go immediately weak in the knees. This might very well be my favorite chapter.  It starts with my most beloved type of dessert, a mini entremet type cake, this one called Tropical Snowball. If that does not have my name all over it, I don’t know what does. Mango, Passion Fruit and Coconut with a snowy white mirror glaze.  In this chapter he does exactly what you expect, bakes the classics but all with a modernized twist. Black Forest Gateau, Charlotte Russe, Charlotte Royale, a Blackcurrant Cheesecake that is beyond showstopper lavel, a Chestnut Roll equally stunning, the most elegant presentation you can dream for Strawberry Shortcakes… Jaffa Cake Tarts, and a dessert I’ve been meaning to bake for a while now, Pont Neuf, designed in 1860’s to celebrate my favorite bridge in Paris (I am hopelessly romantic).

Ice Cream and Gateau…As William put it, desserts involving frozen components are always decadent, and associated with banquets and real fancy occasions, but they have gone out of fashion. In part because they do demand a lot of skill and attention to detail. Come to think of it, some of the most epic disasters in the Great British Bake Off involved frozen desserts. The initial tutorial in the chapter brings Ice Cream Anglaise and fruit sorbet. He starts with a bang, of course… Baked Alaska, in a Neapolitan fashion. Then Viennetta, his version is yet another masterpiece. Many wonderful things to try, but I would probably settle for his Prune and Armagnac Ice Cream. Prune and Armagnac was one of my favorite little desserts to order when we lived in Paris. So simple, and so delicious.

Afternoon Treats… The inspiration for this chapter was his Grandma, who taught him to bake and was the reason why he became a chef. In his words: “Even with all the decadence and luxury within my industry, you can’t beat a freshly baked homemade cake for a tasty afternoon treat”. I would gladly bake every single item of this chapter. I am totally fascinated by a trio of cakes called “Othellos, Desdemonas & Iagos”.  They are a combination of sponge cake, custard, and fondant, what changes is the main flavor, Othellos are chocolate, Desdemonas are vanilla, and Iagos are coffee. I will take one of each, please and thank you. Rout Biscuits are in this chapter, Empire Biscuits (OMG they are adorable!), and the Dutch Macarons I shared the recipe with you.

Frivolities… These are those little petit-fours that fancy restaurants might bring you at the end of a meal. One adorable bake after another, I am definitely going to make his Allumettes a concoction made in Brittany in the last century. Allumettes mean matchsticks and his version joins almond praline and chocolate. Rocher Noix de Coco, Turkish Delight, Nougat and Marshmallow are all in this chapter, as well as something new to me, a concoction called Mou, a soft caramel that can be flavored in many different ways. Another delicious treat that was designed in Brittany. Those people know a thing or two about sweets, right?

Basics… The final chapter. It is pretty much a big lesson on patisserie, covering all the basic recipes you might need, from pate sablee to filo pastry, the three types of meringue, creme patissiere and its derivatives, frangipane, curds, glazes, icings, and even how to make chocolate decorations.

That’s it, my friends! I cannot praise the book highly enough. The amount of work that went into making Nostalgic Delights is hard to imagine. Many of the recipes have step by step photos, in addition to the finished product. Chef Curley truly wants you to succeed and bake at home the wonderful things that bring him joy. The book gives me peace, I think it does transports me to past times, in which life was far less complicated and stressful than it seems to be today.

Mr. Curley, thank you so much for allowing me to share the recipe for Dutch Macarons with my readers, and for your patience helping me figure out a few issues here and there in my Bewitching Kitchen.

To order the book, click here (I make no profit from your purchase)

ONE YEAR AGO: Yogurt Tart

TWO YEAR AGO: Grilled Lamb-Stuffed Pita Bread

THREE YEARS AGO: Elderflower Macarons

FOUR YEARS AGO: A Duet of Sorbets

FIVE YEARS AGO: Sobering Peach Sorbet

SIX YEARS AGO: Spiralizer Fun

SEVEN YEARS AGO: Beer-Marinated Grilled Skirt Steak

EIGHT YEARS AGO:  Secret Recipe Club: Corn Chowda

NINE YEARS AGO: Page-A-Day Calendar (Pits and Chief 5 minutes of fame…)

TEN YEARS AGO: Home Sweet Home (our beloved Pits in one of his last photos)

ELEVEN YEARS AGO: Marbled Rye

CHAI-BUTTERFLY

(for a video tutorial on my default recipe for macarons, click here)

At the risk of inflicting misery on some of my readers, I confess that my current ear worm is “Fly, Robin Fly“, but with the lyrics “Chai Butterfly” instead. I apologize in advance for the inconvenience. Ear worms aside, these were fun to make, but it took me two attempts to get them right. The problem with my first batch (as you can see in the picture below) is that they turned out too big, each macaron could feed a family of four. You don’t want that. They need to mimic the delicate nature of the Monarch butterfly.  Imagine the size of a regular macaron and when you pipe the four circles that will be the final cookie, they must fit that dimension, or be just slightly bigger.

CHAI-BUTTERFLY MACARONS
(from the Bewitching Kitchen)

For the shells:
200g  Icing/powdered sugar
115 g Ground Almonds/Almond Meal
1 bag of Double Spice Chai Tea (Stash)
115 g egg whites at room temperature (approx. 4 eggs)
1/8 tsp of cream of tartar
100 g granulated sugar
¼ tsp vanilla paste or extract
orange, yellow and red food dye (adjusted to get the color of your favorite butterfly)

for the lemon buttercream:
40g unsalted butter, softened
130g powdered sugar
2 teaspoons heavy cream
1 tablespoon lemon juice
zest of 1/2 lemon
pinch of salt

For antennas (optional):
melted Candy melts
black food dye

Make the shells:
Line 3 heavy baking sheets with parchment/baking paper or Silpat mats. Layer the powdered sugar, almond flour and contents of the chai tea bag in a food processor. Pulse until the mixture looks like fine meal, about 12 pulses. Pass through a sieve and transfer to a small bowl or to a sheet of parchment/baking paper. Set aside.

Place the egg whites and cream of tartar in the bowl of a stand mixer fitted with the whisk attachment. Make sure that the bowl and the whisk are impeccably clean. Starting on medium speed, whip the whites with the cream of tartar until they look like light foam. The whites should not appear liquid. The foam will be light and should not have any structure.

Slowly rain in the granulated sugar in five additions, trying to aim the stream between the whisk and the side of the bowl. Turn the speed up to high. Continue to whip the meringue until it is soft and shiny. It should look like marshmallow creme (marshmallow fluff). Add the vanilla and food gel dye. Whip the egg whites until the mixture begins to dull and the lines of the whisk are visible on the surface of the meringue. Check the peak. It should be firm. Transfer the whites to a medium bowl.

Fold in the almond mixture in two increments. Paint the mixture halfway up the side of the bowl, using the flat side of a spatula. Scrape the mixture down to the center of the bowl. Repeat two or three times, then check to see if the mixture slides slowly down the side of the bowl.   Put the mixture in a piping bag fitted with your choice of piping tip.  Pipe shells, making two large circles touching side by side, and two smaller right below them.  Use a needle or a toothpick to smooth the surface and join the circles, to get the right shape.

Slam each sheet hard four to six times on the counter/worktop. Let the unbaked macarons dry until they look dull but not overly dry. Drying time depends on humidity. In a dry climate, the macarons can dry in 15 to 20 minutes; in a humid climate, it can take 35 to 40 minutes.

While the macarons are drying, heat the oven to 300 F. Bake one sheet at a time on the middle rack. Check in 11 minutes. If the tops slide or move (independently of the ‘feet’ when you gently twist the top), then bake for 2 to 3 more minutes. Check one or two. If they move when gently touched, put them back in the oven for 1 to 2 more minutes until they don’t move when touched.   Let the macaroons cool for 10 minutes before removing from the pan.  The macarons should release without sticking.

When they are cold, match the shells and decorate one of them using a black food pen.

For the lemon buttercream filling:
In a mixing bowl with whisk attachment, beat the butter until fluffy. Add powdered sugar, heavy cream, lemon juice, lemon zest and salt and beat until well combined. Transfer the buttercream into a pastry bag and fill the macarons.

If you want to make antennas, use Candy Melts dyed black, place in a small piping bag, no need to use a piping tip, just cut a small hole. Pipe antennas (make more than you need, because they break easily). Let them set. Stick them on the head of the butterfly, in between the two shells.

Store the macs in the fridge for 24 hours for perfect texture.

ENJOY!

to print the recipe, click here

Comments: There are two ways to pipe a butterfly-shaped shell. You can draw a butterfly shape and work with a small piping tip to fill it, or go the much easier route, piping two larger circles next to each other on top, and two smaller ones at the bottom. Smooth the joints using a toothpick or a cookie needle. On my first attempt I used two colors of batter and made a central line for the body in black. I did not like the effect, it was too thick. I think drawing the whole body details with a food-pen (Chefmaster has a soft point, perfect for it) is a much better option.

For the antennas, I used Candy Melts dyed black, and piped on parchment. When dry, I stuck into the filling. They are very fragile, and on my second batch I made mutant butterflies. Antenna-less. They are easier to wrap, which is a must for the treats I share at the Common Table.

For the macaron addicts out there, lately I’ve been incorporating one additional step to my recipe: I dry the almond flour the day before in a low oven (200F) for about 20 minutes. I find that the feet are bigger when I do so, and  I like the overall texture of the shell better. The chai flavor is subtle but definitely there.  One bag of the double chai tea is perfect for this amount of batter. I like the contrast of the spice in the shell with the brightness of the lemon buttercream in the filling.

ONE YEAR AGO: Roasted Cauliflower Salad over Hummus

TWO YEARS AGO: Sous-vide Egg Bites

THREE YEARS AGO: Paul Hollywood, The Weekend Baker

FOUR YEARS AGO: Texas Sheet Cake

FIVE YEARS AGO: In My Kitchen, September 2015

SIX YEARS AGO: Sour Cherry Sorbet: A Labor of Love

SEVEN YEARS AGO: In My Kitchen – September 2013

EIGHT YEARS AGO: Raspberry Sorbet at Summer’s End

NINE YEARS AGO: When three is better than two  (four years with Buck!)

TEN YEARS AGO: Grating Tomatoes (and loving it!)

ELEVEN YEARS AGO: A Peachy Salad for a Sunny Day

LADY BUG MACARONS

The other day I was minding my own business when a friend tagged me on Facebook. Quite nonchalantly – Caroline, I am looking at you! – she shared a video… “Sally, your next addiction, I mean… project?  ;-)”   The video was all about meringues and macarons, with amazing piping techniques made by a professional baker from Los Angeles. Truth is, this was not the first time a “friend” suggested baking projects for me. Usually they involve either macarons or mirror glazes, all with levels of complexity that make me tempted to ask “do you hate me that much?” or “what have I done to you?”  But, pandemic times do strange things to humans. Somehow, I decided to tackle one of the simpler projects from the video, macarons shaped as Lady Bugs. Having recently enraged Cheetahs, I figured I would be safer upsetting a small insect. I had a total blast with this adventure, and find them adorable… I hope you do too…

LADY BUG MACARONS WITH CHOCOLATE BUTTERCREAM FILLING
(from the Bewitching Kitchen)

For the shells:
200g Icing/powdered sugar
115 g almond flour
115 g egg whites at room temperature (approx. 4 eggs)
1/8 tsp of cream of tartar
100 g granulated sugar
1/4 tsp vanilla paste or extract
red and black food color

for the filling:
Chocolate Russian Buttercream Recipe
113g unsalted butter, room temperature  (1 stick)
1/2 tsp vanilla paste
1/8 tsp of salt
50g  unsweetened cocoa powder (1/2 cup)
200 g condensed milk (about 1/2 can)

to decorate:
Royal Icing (black) or Candy melts (black)
Black sanding sugar
food pen (black)

Make the shells:
Line 3 heavy baking sheets with parchment/baking paper or Silpat mats. Layer the powdered sugar, and ground almonds in a food processor. Pulse until the mixture looks like fine meal, about 12 pulses. Pass through a sieve and transfer to a small bowl or to a sheet of parchment/baking paper. Set aside.

Place the egg whites and cream of tartar in the bowl of a stand mixer fitted with the whisk attachment. Make sure that the bowl and the whisk are impeccably clean. Starting on medium speed, whip the whites with the cream of tartar until they look like light foam. The whites should not appear liquid. The foam will be light and should not have any structure.

Slowly rain in the granulated sugar in five additions, trying to aim the stream between the whisk and the side of the bowl. Turn the speed up to high. Continue to whip the meringue until it is soft and shiny. It should look like marshmallow creme (marshmallow fluff). Add the vanilla and the food color. Whip the egg whites until the mixture begins to dull and the lines of the whisk are visible on the surface of the meringue. Check the peak. It should be firm. Transfer the whites to a medium bowl.

Fold in the ground almond/almond meal mixture in two increments. When the mixture is starting to get homogeneous, remove a small amount and dye black. Remove a small amount and leave it white. Dye the rest red.  Continue with the three portions of batter until you get proper mixing (macaronage).  Put the mixtures in a piping bag fitted with your choice of piping tip (large, 8mm for red, 4mm for black, white can be left without a piping tip, just make a cut in the bag with scissors. To make the lady bugs, pipe a regular round red shell, then a small black round where the head will be. To make the flowers, use the white batter right after piping the red shell, and do the decorations you want, as if working with Royal Icing, “wet on wet” technique.

Slam each sheet  four times on the counter/worktop. Let the unbaked macarons dry until they look dull but not overly dry. Drying time depends on humidity. In a dry climate, the macarons can dry in 15 to 20 minutes; in a humid climate, it can take 35 to 40 minutes.

While the macarons are drying, heat the oven to 300 F. Bake one sheet at a time on the middle rack. Check in 11 minutes. If the tops slide or move (independently of the ‘feet’ when you gently twist the top), then bake for 2 to 3 more minutes. Check one or two. If they move when gently touched, put them back in the oven for 1 to 2 more minutes until they don’t move when touched. Let the macaroons cool for 10 minutes before removing from the pan. The macarons should release without sticking. When the shells are cold, made the black decorations with a food pen, for the lady bug’s body and the outline of the flowers and hearts. If desired, paint the lady bug’s head  with Royal Icing or Candy melts dyed black. Before it sets, sprinkle black sanding sugar.

Make the Russian buttercream. Whip the room temperature unsalted butter on a medium-high speed with a whisk attachment for 5 minutes. The butter should lighten in color as you incorporate air into it. Add in the vanilla extract, salt, and sifted cocoa powder mix on the lowest speed until incorporated.  Pour very slowly the sweetened condensed milk as you whisk at medium-speed. Scrape the  bowl to make sure it is all very well incorporated. Refrigerate until needed to fill the shells.

Assemble the macarons: match two shells similar in size and add buttercream to the bottom of one of them. Place another shell on top and gently squeeze to take the filling all the way to the edge. Store in the fridge overnight before consuming.

ENJOY!

to print the recipe, click here

Comments: In the video, the decorations for the lady bugs were made with piped Royal Icing, but I decided that a food pen was simpler. Also, you can make antennas with candy melts piping them on parchment or acetate, allowing them to fully set, and then stick them in between the two shells, held by the filling. Some bakers use licorice strands cut in small pieces. Since my macs are donated and each must be wrapped individually, I skipped the antennas. My Lady Bugs are mutants, and I hope they don’t hate me for that.

The filling… My first time using Russian buttercream. I decided to try it because many people claim it to be less sweet than American and very easy to prepare. I will say that the texture is really nice, but it is still quite sweet. Of course, it is made with condensed milk, so what was I expecting?  I had a few problems with the texture too, I believe you need to get the butter temperature just right, not too cold, not too warm. My buttercream ended up a tad too soft. When opting for a chocolate filling for macs, I think I’ll stick with a ganache-base.

For the flowers and hearts decorations, the secret is to work fast. Pipe two or three red shells and immediately start to work on the details, because you want to make sure the design will set and dry homogeneously with the background.  It is exactly the same technique I used before, except that I used the food pen to outline the drawings. It does not have to be perfect, in fact I think that being a bit more lax with the outline makes them more interesting. That’s my story…  😉

I hope you enjoyed my little Lady Bug Macarons. Just want to make something abundantly clear: Unicorns are simply never ever happening.  There. I feel better.

ONE YEAR AGO: Five-Stranded Braided Bread

TWO YEARS AGO: Green Olive Salad

THREE YEARS AGO: Coffee Macarons Dressed up to Party

FOUR YEARS AGO: Blogging Hiatus

FIVE YEARS AGO: Tomato Tatin

SIX YEARS AGO: Headed to Colorado!   

SEVEN YEARS AGO: Farofa Brasileira

EIGHT  YEARS AGO: Thai-Inspired Pork Tenderloin

NINE YEARS AGO: A yummy Brazilian cake: Bolo de Fuba’

TEN YEARS AGO:  Summer’s Tomatoes

ELEVEN YEARS AGO: Leaving on a jet plane… 

HOME BAKERS COLLECTIVE: JULY PROJECT

Every month me and several of my friends who shared the amazing experience of baking “in a certain tent” face a little group challenge. This month our challenge was set up by Marissa, a finalist in the Great American Baking Show. Her brief could not be simpler: BAKE YOUR STATE. We could do pretty much anything in all areas of baking, but the theme would be the state we grew up or live in. I coupled the state where I live with my usual state of mind. And the outcome was obvious: Macarons!  Kansas is The Sunflower State, so a bit of sunflower seed “flour” went into the shells. And black walnuts grow wild here, so the filling was a black walnut buttercream. A little dressing up, and here’s my contribution for this month:

KANSAS SUNFLOWER SEED AND BLACK WALNUT MACARONS
(from The Bewitching Kitchen)

For the shells:
200g Icing/powdered sugar
100 g almond flour
15 g sunflower seeds, ground to a fine powder
115 g egg whites at room temperature (approx. 4 eggs)
1/8 tsp of cream of tartar
100 g granulated sugar
1/4 tsp vanilla paste or extract
green food color (I used green, brown and black to get a forest type green)

for the filling:
4 ounces cream cheese (half a regular package), softened
1/2 stick (1/4 cup) butter, room temperature
1/4 teaspoon black walnut extract (or vanilla)
225 g powdered sugar
1/3 cup ground Black Walnuts

to decorate:
2 cups (about 1/2 pound) powdered sugar
2 tablespoons warm water
1 + 1/2 tablespoons meringue powder

Make the decorations, the day before. Beat all ingredients with a KitchenAid type mixer and the paddle attachment for about 7 minutes. Let the icing rest for 10 minutes, adjust consistency if needed. For piping rosettes, it must be thick but soft enough to squeeze through a small piping tip.

Color most of the icing yellow, color a small amount brown.  Use a small leaf tip to make the petals. Add the center with a small icing tip. Pipe your shapes over parchment paper and allow to dry. If desired, brush some of the petals with bronze dust.

Make the shells:
Line 3 heavy baking sheets with parchment/baking paper or Silpat mats. Layer the powdered sugar, and ground almonds in a food processor. Pulse until the mixture looks like fine meal, about 12 pulses. Pass through a sieve and transfer to a small bowl or to a sheet of parchment/baking paper. Set aside.

Place the egg whites and cream of tartar in the bowl of a stand mixer fitted with the whisk attachment. Make sure that the bowl and the whisk are impeccably clean. Starting on medium speed, whip the whites with the cream of tartar until they look like light foam. The whites should not appear liquid. The foam will be light and should not have any structure.

Slowly rain in the granulated sugar in five additions, trying to aim the stream between the whisk and the side of the bowl. Turn the speed up to high. Continue to whip the meringue until it is soft and shiny. It should look like marshmallow creme (marshmallow fluff). Add the vanilla and the food color. Whip the egg whites until the mixture begins to dull and the lines of the whisk are visible on the surface of the meringue. Check the peak. It should be firm. Transfer the whites to a medium bowl.

Fold in the ground almond/almond meal mixture in two increments. Paint the mixture halfway up the side of the bowl, using the flat side of a spatula. Scrape the mixture down to the center of the bowl. Repeat two or three times, then check to see if the mixture slides slowly down the side of the bowl. Put the mixture in a piping bag fitted with your choice of piping tip. Pipe shells, I like to count numbers in my head and use the same count for each shell so they end up similar in size.

Slam each sheet hard four to six times on the counter/worktop. Let the unbaked macarons dry until they look dull but not overly dry. Drying time depends on humidity. In a dry climate, the macarons can dry in 15 to 20 minutes; in a humid climate, it can take 35 to 40 minutes.

While the macarons are drying, heat the oven to 300 F. Bake one sheet at a time on the middle rack. Check in 11 minutes. If the tops slide or move (independently of the ‘feet’ when you gently twist the top), then bake for 2 to 3 more minutes. Check one or two. If they move when gently touched, put them back in the oven for 1 to 2 more minutes until they don’t move when touched. Let the macaroons cool for 10 minutes before removing from the pan. The macarons should release without sticking.

For the black walnut buttercream: Add the cream cheese, butter and vanilla to the bowl of a KitchenAid type mixer and beat until very smooth. Slowly add powdered sugar,  whisk until smooth and fluffy, then fold in the black walnuts.

Assemble the macarons: match two shells similar in size and add buttercream to the bottom of one of them. Place another shell on top and gently squeeze to take the filling all the way to the edge.

To decorate the macarons, add the Royal icing flowers on top using melted Candy melts or royal icing. Store the macs in the fridge for 24 hours for perfect texture.

ENJOY!

to print the recipe, click here

Comments:  I tried using exclusively sunflower seed as the component of the shell but it did not work. So I went with Plan B: added a small proportion to my regular recipe. It does bring a very interesting and noticeable flavor, I liked it a lot. As to the filling, black walnuts can be a bit of an acquired taste. They almost have a perfume quality to them. I am not too wild about extracts, but this one from Beanilla had nice reviews and worked well in the buttercream. If you cannot find or do not like black walnuts, use regular ones, slightly toasted.

The decorations were a lot of fun to make, although I realize the sunflower “look” is quite elusive. I used a very small leaf icing tip (this one) to pipe the petals, and a small icing tip (Ateco #2) for the center. It would be very hard to make the flowers without a little gadget to hold and rotate as you pipe. I made a template with parchment paper, clear acetate over it, and then glued squares of parchment on top with double-stick tape. Make a bunch of squares and have them ready, so you can pipe many flowers and then choose the best ones. Some will look like cabbages after a rabbit attack. Those you don’t use.


I find that the hardest part is getting the consistency of the Royal Icing right. It needs to be thick, but soft enough to flow smoothly without breaking, so it might take a few trials. Be patient. Once you get it all going, it’s quite mesmerizing to see each flower shaping up.

Marissa, thanks for choosing such a cool theme!  Amazing that we are publishing this on the 1st year anniversary of each of us stepping on a plane to the UK to start that incredible journey…

For my readers, make sure to stop by the Home Bakers Collective, to see what my friends baked for their states of choice… If the link is not yet published, try again a little later in the day.

ONE YEAR AGO: Curry Turmeric Sourdough

TWO YEARS AGO: Black Olive Tapenade and Deviled Eggs

THREE YEARS AGO: Blueberry Crumble Coffee Cake

FOUR YEARS AGO: Fresh Strawberry Yogurt Bundt Cake

FIVE YEAR AGO: Quinoa Salad with Red Grapes and Avocado

SIX YEARS AGO: Strawberry Coffee Cake

SEVEN YEARS AGO: Lemon-Poppy Seed Muffins

EIGHT YEARS AGO: Mascarpone Brownies

NINE YEARS AGO: Salmon Tacos

TEN YEARS AGOCinnamon Turban Bread

ELEVEN YEARS AGO: Summertime Gratin