SOBERING PEACH SORBET

I don’t quite know how to soften the blow, so here it goes: this post brings  you my last sorbet of the year.  I know, it is cruel and devastating. The bleak reality is that we must wrap our minds around stews, soups, and braises. Maybe a chocolate bread pudding, or a batch of brownies topped with caramel sauce. But the clock is ticking for sorbets, so here is my contribution to sweeten up that brief period of bliss known as “Indian Summer.”

Peach Sorbet

PEACH SORBET
(from the Bewitching Kitchen)

4 to 5 peaches, peeled and cut in small chunks (two very full cups)
3/4 cup granulated sugar
1/3 cup orange juice
1/3 cup lemon juice
1 medium banana, very ripe
3 Tablespoons orange Curaçao

Add all ingredients to a food processor or blender.  Process at full speed until completely smooth, making sure no large pieces of banana are present.  Transfer the mixture to a bowl and refrigerate for several hours, preferably overnight.

Transfer the sorbet mixture to your ice cream maker and churn according to the manufacturer’s instructions. Store in the freezer.

ENJOY!

to print the recipe, click here

Comments: Sorbets are such simple desserts, since no cooking is involved. I like to include a banana in our sorbets because it improves texture and it also makes the sorbet slightly more substantial. You could leave it out. The same is true for the orange Curaçao, but unless you have something against using alcohol in your cooking, go for it. It won’t taste alcoholic at all, but it will boost the orange flavor.

I like this type of sweet served without any adornment, but the resident sorbet expert thinks that a small square of semi-sweet chocolate never hurts.  I must say he has a point…

LindtPlus
If you’re headed to winter misery like we are, make a batch of this sorbet as soon as possible. Enjoy it as you stare at your fireplace and try to figure out how many days you have before turning that thing on. If you live in Australia, Brazil, India, Jamaica, New Zealand, please invite me for a 3-month visit… What? Way too long? I beg you to re-consider: for the most part I am very well-behaved, and love doing dishes!

ONE YEAR AGO: Winner of the 1 million page give-away…

TWO YEARS AGO: Just married!

THREE YEARS AGO: Corn Chowda

FOUR YEARS AGO:  Oven-broiled Salmon over Saucy Spinach

FIVE YEARS AGO: Butterscotch Brownies

SIX YEARS AGO: First Soup of the Year

SICHUAN PORK STIR FRY IN GARLIC SAUCE

My love affair with America’s Test Kitchen only grows stronger and stronger… I’ve been making a lot of their recipes without a single disappointment (insert discreet knock on wood).  Pork stir-fry can be pretty tricky to prepare. More often than not the meat either turns out too dry or too greasy, and the flavors fail to mingle well.  Cook’s Illustrated to the rescue.  They tackle the many issues with this preparation by using boneless country-style pork ribs, and soaking the pieces of meat in a solution of baking soda. Baking soda acts by raising the pH (decreasing acidity), therefore affecting the charges present in protein molecules, which in turn changes the way the molecules interact with each other. With a raise in pH, the protein strands unfold and relax, in other words, the meat becomes considerably more tender. If you take the process too far, either by using a huge amount of baking soda or by allowing the meat to sit for too long in its presence, you’ll end up with mushy meat.  But when performed correctly it results in meat with fantastic texture. ATK also incorporated a coating with cornstarch before stir-frying, which helps retain moisture as the meat cooks. Genius, right? As to the sauce that finalizes the dish, they use ketchup and fish sauce to up the level of glutamates, giving it a boost in flavor.

Seems simple and straightforward enough. In fact, the dish comes together quite quickly once you do the initial prep of the meat, so have all your ingredients ready, and get busy… Dinner will be served in no time!

Pork Stir Fry ATK

SICHUAN PORK IN GARLIC SAUCE

(reprinted with permission from America’s Test Kitchen via Cook’s Illustrated)

for the sauce:
1/2 cup low-sodium chicken broth
2 tablespoons sugar
2 tablespoons soy sauce 
4 teaspoons Chinese black vinegar
1 tablespoon toasted sesame oil
1 tablespoon Chinese rice wine or dry sherry
2 teaspoons ketchup
2 teaspoons fish sauce
2 teaspoons cornstarch

for the meat:
12 ounces boneless country-style pork ribs, trimmed
1 teaspoon baking soda
1/2 cup cold water
2 teaspoons Chinese rice wine or dry sherry
2 teaspoons cornstarch

for the stir-fry:
4 garlic cloves, minced
2 scallions, white parts minced, green parts sliced thin
2 tablespoons Asian broad-bean chili paste
4 tablespoons vegetable oil
6 ounces shiitake mushrooms, stemmed and sliced thin
2 celery ribs, cut on bias into 1/4-inch slices

For the sauce: Whisk all ingredients together in bowl; set aside.

For the pork: Cut pork into 2-inch lengths, then cut each length into 1/4-inch match sticks. Combine pork with baking soda and water in bowl. Let sit at room temperature for 15 minutes. Rinse pork in cold water. Drain well and pat dry with paper towels. Whisk rice wine and cornstarch in bowl. Add pork and toss to coat.

For the stir-fry: combine garlic, scallion whites, and chili paste in bowl. Heat 1 tablespoon oil in 12-inch nonstick skillet over high heat until just smoking. Add mushrooms and cook, stirring frequently, until tender, 2 to 4 minutes. Add celery and continue to cook until celery is crisp-tender, 2 to 4 minutes. Transfer vegetables to separate bowl.

Add remaining 3 tablespoons oil to now-empty skillet and place over medium-low heat. Add garlic-scallion mixture and cook, stirring frequently, until fragrant, about 30 seconds. Transfer 1 tablespoon garlic-scallion oil to small bowl and set aside. Add pork to skillet and cook, stirring frequently, until no longer pink, 3 to 5 minutes. Whisk sauce mixture to recombine and add to skillet. Increase heat to high and cook, stirring constantly, until sauce is thickened and pork is cooked through, 1 to 2 minutes. Return vegetables to skillet and toss to combine. Transfer to serving platter, sprinkle with scallion greens and reserved garlic-scallion oil, and serve.
.
ENJOY!
.

to print the recipe, click here
 .

Comments: In the past, I’ve attempted a few recipes using boneless country-style pork ribs and was quite disappointed by how they turned out, particularly in texture. I had pretty much given up on them. When I noticed they used this cut for the stir-fry, I was intrigued. Could they possibly make it work? Never doubt ATK, my friends. They do their home work, or… should I say their kitchen work, testing every variable imaginable.

When Phil and I sat down to enjoy this stir-fry, we both had the same thought: this feels like a meal served at an upscale Chinese restaurant. Let’s be frank, Chinese restaurants can be a gastronomic disaster, every dish presented with the exact same gloppy, overly sweet soy-based sauce.  But when you find a place that offers truly authentic recipes, it’s an amazing experience! I had fantastic Chinese meals in São Paulo’s huge Chinatown during my college years. I can picture this recipe served in such a setting, or better yet,  in the comfort of our bewitching kitchen.

Sichuan Pork Stir Fry
I hope you give this recipe a try, don’t be intimidated by the number of ingredients or steps in preparing it.  As I mentioned, once the meat is out of its baking soda spa, the whole meal will be ready in lightning speed.  Nothing better to crown a busy working day…
😉
 .

FIVE YEARS AGO:
 Popeye-Pleasing Salad
.
SIX YEARS AGO: Summer’s Finale

CREAM CHEESE MINI-PANCAKES WITH SMOKED SALMON

Remember our Nobel Reception that happened a few months ago? I still have a few items from that event to share with you, as cooking goes by at a fast pace in the Bewitching Kitchen, but blogging takes a little longer. Good thing my readers seem to be quite patient…  Lucky blogger, yes I am.  These mini-pancakes were a big hit at the party. I’d say of all the things I prepared, they were the most involved, but quite a fun project to tackle.  I found the recipe during a session of Pinterest hopping on the week before our get-together, and the decision to make them happened in 3.8 seconds. A phrase that sums me up well: I am hip about time (be ready for a quiz).

MiniPancakes

CREAM CHEESE MINI-PANCAKES WITH SMOKED SALMON
(from Evil Shenanigans)

For the pancakes:
1 cup all-purpose flour
1 1/4 teaspoon baking powder
1/4 teaspoon kosher salt
1 tablespoon fresh chopped chives
1 ounce cream cheese, softened
1 tablespoon butter, softened
1 egg
3/4 cup milk
8 ounces cold smoked salmon
Freshly chopped chives, for garnish

For the sour cream sauce:
1/2 cup sour cream
1 teaspoon horseradish
1/4 teaspoon kosher salt

In a medium bowl whisk together the flour, baking powder, salt, and chives. In a small bowl cream together the cream cheese and butter until smooth.  Add the egg and whisk until completely incorporated.  Whisk in the milk.Pour the wet ingredients into the dry and whisk until just incorporated and no large lumps remain.  Do not over-mix.

Heat a non-stick skillet over medium heat.  Spray lightly with non-stick spray then scoop the batter by the tablespoon into the pan.  Cook for one minute on the first side, flip, then cook for an additional thirty seconds, or until the cakes are golden brown and spring back when gently pressed in the center.  Remove to a plate to cool while you prepare the rest.

While the cakes cool prepare the sour cream sauce by adding the sour cream, horseradish and salt to a small bowl.  Whisk to combine then let stand ten minutes.

To prepare, spoon a heaping 1/4 teaspoon of the sauce onto the center of the cakes.  Top with a piece of the salmon.  Garnish with the chives.  These can be assembled up to one hour in advance.  Serve at room temperature.

ENJOY!

to print the recipe, click here

compositepancakes

Comments: There’s something to be said about practicing recipes before a big event, however, it’s not always possible. Still, a recipe such as this makes me admire caterers, because small details are so important in that business. If I had to make these again, I would try to make each pancake a little smaller. They puffed up more than I expected, so in the end my appetizers were a tiny bit too big.  I was so involved in frying them that I did not realize the problem until it was time to assemble the sour cream topping and the salmon. So, if you make them for your next dinner or cocktail party, run a little test, fry different portions and settle on the amount that will be perfect for your topping. Of course, you don’t have to limit yourself to smoked salmon, but let’s face it: it’s a classic topping with the dill and all.  Capers would feel totally at home also…  just sayin’….

PancakesReady
You can make these pancakes ahead of time, and I am sure they freeze well too with all the cream cheese in the batter.  I think a salmon mousse would be superb topping these babies, with a sprinkle of fresh dill all over. Come to think of it, I’ve never made salmon mousse. Once, years and years ago, before my blogging life, I made a fish mousseline that shaved a few years off my life.  It was a recipe from a special cookbook I own, one written by Vincent Price. The recipes are amazing, but soooo involved and complicated. That fish mousse tasted wonderful but  hell will have to freeze over three times before I attempted it again.  These pancakes?  A walk at the beach by comparison… try them and you will not be disappointed!

And now it’s time for the quiz… do you know which movie the expression “I’m hip about time” comes from?  It’s as much of a classic as smoked salmon on a horseradish cream with dill and capers….

😉

ONE YEAR AGO: Our Green Trip to Colorado

TWO YEARS AGO: Ditalini Pasta Salad

THREE YEARS AGO: Celebrate Wednesday with a Thai Seafood Curry

FOUR YEARS AGO:  Post-workout Breakfast

FIVE YEARS AGO: Semolina Barbecue Buns

SIX YEARS AGO: Lavash Crackers

RASPBERRY-BITTERSWEET CHOCOLATE CHUNK BROWNIES

Cheesy as it may sound, some matches are made in heaven. Like cheese and wine… that’s cheesy enough, right? Sauternes and foie gras…  Lobster and drawn butter…  Another winning combination: chocolate and raspberries. They work together to awe your palate in a tantalizing way. And that is the match I offer today delivered in the shape of Raspberry & Chocolate Brownies. I found this recipe in a book I bought after Karen from Karen’s Kitchen Stories delicately twisted my arm. Amazing what we do to please a fellow food blogger. Yeap, going against my nature and unshakable will power, I purchased a cookbook. How could I not? Karen said it was her favorite cookie book, and she knows her way around baking. Obviously, I had no choice.  Anyway, the book is called quite simply Simply Sensational Cookies, and I have three words to say about it: you need it.

Raspberry Chocolate Brownies

RASPBERRY– BITTERSWEET CHOCOLATE CHUNK BROWNIES
(reprinted with permission from Nancy Baggett’s Simply Sensational Cookies)

Nancy’s thoughts on the recipe: I tried teaming up raspberries and chocolate in brownie recipes several times in the past, but they weren’t nearly as fruity or fudgy as these beauties. They are dark, as rich as candy, and burst with berry and chocolate flavor.

1⁄2 cup (1 stick) unsalted butter, cut into chunks
2 cups (about 11 ounces) coarsely chopped bittersweet chocolate, divided
1⁄2 cup good-quality unsweetened natural or Dutch-process cocoa powder, sifted after measuring
1 cup granulated sugar
1⁄4 teaspoon salt
3 large eggs, at room temperature
1⁄4 cup very finely chopped freeze-dried raspberries (see comments)
1⁄4 cup seedless raspberry preserves
1⁄2 teaspoon raspberry extract
1 cup unbleached all-purpose white flour

Heat the oven to 350 F and position a rack in the center of it. Line an 8-inch square baking pan with aluminum foil; let the foil slightly overhang on the two opposite sides. Grease the foil or coat with nonstick spray.

In a large microwave-safe bowl with the microwave on medium power, melt the butter and 1 cup chopped chocolate, stopping and stirring every 30 seconds, until the chocolate mostly melts. Stir until completely melted. Vigorously stir the cocoa, sugar, and salt into the chocolate mixture until smoothly incorporated, free of lumps, and cooled to warm. Vigorously stir in the eggs, then the chopped raspberries, raspberry preserves, and raspberry extract. Stir in the flour until the batter is smooth and shiny. Lightly fold in the remaining 1 cup chopped chocolate. Put the batter in the pan, spreading evenly to the edges.

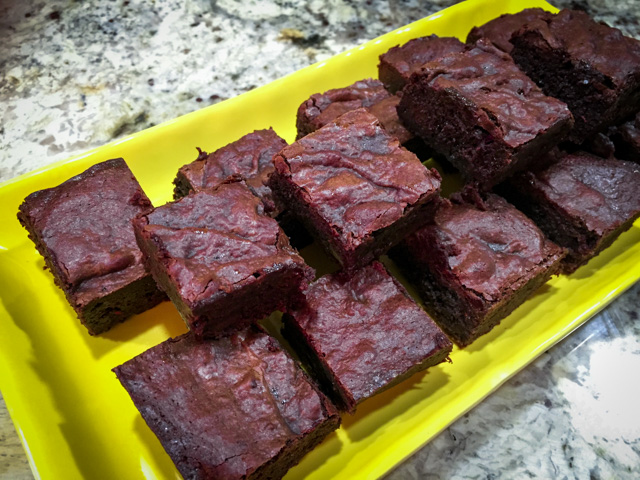
Bake for 20 to 25 minutes or until the edges are just pulling away from the pan sides and a toothpick inserted in the center comes out clean except for the bottom 3⁄4 inch, which should still look moist and gooey. Transfer to a wire rack until cooled to room temperature.  Refrigerate the brownie slab for at least 45 minutes so it will cut more neatly. Using the overhanging foil as handles, lift the slab onto a cutting board. Peel off and discard the foil. Using a large sharp knife, cut the brownie crosswise and lengthwise into quarters to yield 16 bars; or cut as desired. Use a damp paper towel to wipe the blade of buildup between cuts. Let the brownies warm up  to room temperature before serving.

ENJOY!

to print the recipe, click here

COMPOSITE

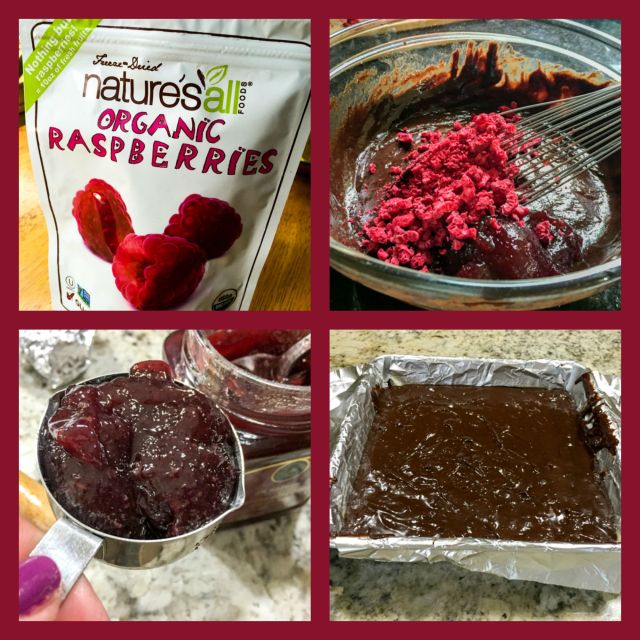
Comments: Nancy suggests that if you object to the seeds in the freeze-dried raspberries, you can pulverize them in a food processor and sieve out the seeds.  I did not do that, and thought the brownies turned out perfect, with some little chunks of raspberries peeking through them.  If you prefer a smoother texture, you can get rid of the seeds.

I really love this cookbook! It is divided in the following chapters: Extra-Easy Cookies, Drop Cookies, Hand-Shaped Cookies, Rolled Cookies, Brownies and Bars, Slice & Bake Cookies, Biscotti, Semisweet Crisps, Savory Cocktail Cookies, Cookies-in-Jars Mixes, No-Bake Cookies, Semi-Homemade Cookies… and a few more general chapters on techniques and finishing touches.  Each recipe starts with quick general notes. For instance, for the  brownies I shared today she added: Fairly Easy One-Bowl, one-spoon mixing. Gourmet taste with easy technique.  Exactly right. My only modification of the recipe was to omit the raspberry extract, because I did not know if what they had available at the store was good enough quality. I often hear that extracts can ruin a recipe unless you get the very best.  For my taste, the brownies were perfect, they had a distinct raspberry flavor thanks to the use of freeze-dried fruit and the preserves. She suggests a chocolate ganache to top them, but I decided to keep them simple. They were very rich, definitely can stand on their own without gilding the lily.  Fantastic recipe, two thumbs up!

Raspberry Brownies1

Nancy, thank you for giving me permission to publish your recipe!  I gave a Kindle copy of  your book to one of my nieces in Brazil, the one who got all the good baking genes in the family, and she fell in love with it too… And of course, thanks Karen for bringing this cookbook into my radar…

To order your copy of Simply Sensational Cookies, click here.
(No, I am not going to make a single penny out of your purchase, I recommend it because it is a great book).

😉

ONE YEAR AGO: Scary Good Pork Burgers

TWO YEARS AGO: Review of exercise program Focus25

THREE YEARS AGO: Celebrate Wednesday with a Thai Seafood Curry

FOUR YEARS AGO:  Post-workout Breakfast

FIVE YEARS AGO: Semolina Barbecue Buns

SIX YEARS AGO: Lavash Crackers

HERB GRILLED CHICKEN THIGHS

After more than 6 years in the blogosphere, I often ask myself which types of recipes are “blog-worthy?” If you get a T-bone steak, season it with salt and slap in on the grill, is it worth writing a post about? Well, maybe it is if you come up with a twist on how to cook it to perfection, but… that would be a stretch. I prefer to share recipes that have some element of surprise in the ingredients and/or method of cooking. This one is a good example. Simple grilled chicken thighs, but involving a vinegar-based marinade that is also used in the initial stage of cooking before the meat hits the grill. The original recipe, known as Cornell Chicken, has been around for a while. You can read about its interesting development here. I noticed this variation in a cooking forum after many members raved about it. I made it twice in two weeks, trying to perfect it to our liking, which in the case of chicken thighs means a yin-yang kind of deal: meat falling off the bone plus crispy skin. I haven’t arrived there yet, but the recipe is great even in its original form. After all, what is perfection to me might not be the same for you. Give this recipe a try, it’s totally worth it. Unless of course, you are a vegetarian. In this case, skip this post. I will have something to please you soon enough…

😉

Herb Grilled Chicken

HERB GRILLED CHICKEN THIGHS
(adapted from  The Creekside Cook)

½ cup fresh, whole sage leaves
¼ cup fresh rosemary leaves
⅛ cup fresh oregano leaves
⅛ cup fresh thyme leaves
½ cup olive oil
1 cup of cider vinegar
1 egg
1 + ½ tablespoons kosher salt
ground black pepper to taste
8 to 10 chicken thighs

Strip any stems from all of the herbs, and chop them well – they should equal about a half cup total when they are all chopped. Whisk together the olive oil, vinegar, egg, salt and pepper. The egg is to keep the mixture emulsified, and though it is often left out of the original recipe, it works better with it. Whisk in the chopped herbs.

Trim the excess skin and fat from the chicken thighs, and pat dry with paper towels. Put the chicken in a large ziplock bag with the marinade.  A couple of times a day, flip the bag over and move everything around a little to make sure all the thighs are getting marinated.

After 24 – 48 hours, take the chicken out of the fridge. Arrange the thighs in a large saute pan or dutch oven – it is best if they can all lay flat, but if you don’t have a big enough pan for that, get it as close as you can. Pour over the marinade, and set the burner at medium. Watch carefully, and when it starts to boil, turn it down to barely simmering. After 10 minutes, turn each piece carefully, and cook another 10 minutes. Remove from the heat.

Get your grill heated up, and be sure to oil the grates. Once the grill is well heated, place the chicken, skin side down, on the grates. You may have some flare up because the oil is going to drip down some, but a spray bottle of water kept handy will take care of those. Don’t turn the chicken until you can pick it up off the gates without tearing the skin – when it is ready to turn, it will come up easily. This will take around 8 to 10 minutes, depending on your grill. Brush the marinade over the upper side a couple of times during cooking. Turn and grill the second side for another 5 to 8 minutes. If you like, check the internal temperature, which should be about 165 F. Let it rest around 5 minutes before serving.

ENJOY!

to print the recipe, click here

composite

Comments: I made the recipe the first time exactly as written. The flavor was great, and the crispy skin just the way we like it. The apple cider vinegar is the key ingredient, acting as a tenderizer but also imparting subtle acidity. I heard from people who made this recipe several times that leaving in the marinade for 48 is a good idea, but do not go longer than that. I loved the copper color of the skin as it crisped up on the grill…

Grilling

PlatedDinner is served!  Grilled chicken thighs, cauliflower mash, and a fresh salad…
Grab a fork, and dig in! 

As I  mentioned in the beginning of the post, I wanted to get a slightly more tender texture in the meat. So, the second time around I opted to sous-vide the meat in the marinade using water displacement instead of a vacuum-seal, and cooked it as described in this previous post. It all seemed to be going great, but disaster hit:  I was careless while grilling the pieces skin side down, and…. the thighs were charred to death. Black. Burned skin.  I was able to save some pieces for our dinner, but let’s say the looks were definitely not blog-worthy…  Oh, well. Lesson learned. Here’s the plan: repeat this recipe one more time using my favorite method, which is low and slow, then blasting it on a hot oven, or as I intend to do it, on the hot grill. Watching over it as a hawk. A hawk, I tell you!


Red Tailed HawkReady to grill?
(image from this source)

ONE YEAR AGO: Star-Shaped Chocolate Brioche Bread

TWO YEARS AGO: Blueberry-Banana Bread 

THREE YEARS AGO: Into the Light Again

FOUR YEARS AGO: Five Grain Sourdough Bread

FIVE YEARS AGO: The Nano-Kitchen

SIX YEARS AGO: Kaiser Rolls