Best if made in a clay pot, but will work if you adapt the temperature and cooking times for regular roasting. I was intrigued by the use of mace, that ingredient that sits in the pantry feeling neglected until a rare recipe calls for it. It works wonders in this preparation, so consider bringing that little bottle to shine in your kitchen.
CORNISH HENS WITH SPICED YOGURT MARINADE (inspired by 660 Curries)
2 Cornish game hens, cut in half lengthwise ¾ cup plain yogurt ¼ cup slivered blanched almond 2 teaspoons coarse kosher or sea salt ½ teaspoon ground turmeric ¼ teaspoon ground nutmeg ½ teaspoon ground mace ¼ cup finely chopped fresh cilantro leaves (optional, I omitted this time) a few small potatoes
To make the marinade, combine the yogurt, almonds, salt, turmeric, nutmeg, and mace in a blender or food processor. Puree, transfer to a bowl and fold the cilantro leaves. Pour the marinade over the hens, and refrigerate for at least 2 hours or overnight.
Soak your clay pot. Add potatoes to the clay pot then place the hens with a bit of the marinade still clinging to them over the potatoes. Place the covered pot in a cold oven. Turn the oven to 450F.
Roast covered for 1 hour, remove the lid and roast further until the skin is nicely browned. If your oven heats too slowly, roast for 1 hour and 10 minutes covered then remove the lid.
Comments: I’ve made this recipe three times in the past couple of months. Tying the legs together makes for a nicer presentation, but it is optional. The marinade is perfect, and will also work on chicken, either whole or cut in pieces. I’ve been using ground almonds in marinades often, and it does add a nice substance to it. The book 660 Curries is one of my favorites. It is rare that I love a cookbook with no photos, but the narrative and variety of recipes makes up for it. Plus, everything I cooked from it has been fantastic. A great recommendation from my future daughter-in-law, Courtnie.
Full disclosure: I wrote this post and set to publish. Tweaked it 5 or 6 times after that. Before going to bed I decided to take one final look, and there it was, in the very last paragraph:
It is rare that I love a cookbook with no recipes…..
Glad I caught it… but could not resist sharing the boo-boo.
This post makes me thrilled and sad at the same time. Thrilled because I cannot believe that a vegan dessert could taste so good… and sad because I won’t be able to share the full recipe. I did my best to try and get permission from the author, but no luck. If you are truly interested in making this cute dessert your best option is buying her book: Incredible Plant Desserts, by Anthea Cheng. I modified the whipped topping, and will share that component of my version with you.
Simmer 250g (or 1 cup) of soy milk, and sugar until almost boiling. Place the coconut oil and cocoa butter in a Vitamix type blender, add the vanilla, and the hot soy milk over it. Let it all sit together for a minute, then run the blender at high speed for 2 minutes.
Add the rest of the soy milk and blend until incorporated. Refrigerate for 6 hours to be firm enough to whip. When ready to use, sprinkle the xanthan gum on the surface, and then whip with a handheld mixer. It will be ready to pipe or spoon on any dessert you like.
In the recipe devised by Anthea, the topping is the exact same component as the top layer, but whipped into piping consistency. I decided to change it by using a vegan whipped “cream” alternative, and the recipe I found with a quick internet search was a complete winner. Excellent texture, and a taste that mimics real whipped cream surprisingly well. I highly recommend you give it a try. I like the way the topping has a contrasting color with the layer of blueberry mousse below. Everything worked very well together.
This cheesecake is not baked, the bottom layer is made of almonds and dates. Both the lemon and the blueberry mousse are based on cashew cream, coconut oil and cocoa butter. With a bit of maple syrup to sweeten it all up. Truly delicious! Anthea has a very enticing Instagram page, which you can follow with a click here.
I saw this recipe not too long ago at The New York Times and knew I was going to love it… I wasn’t sure how the husband would feel about it, but decided to take my chances. Glad to report he thought it was “totally blog-worthy.”
1 cauliflower, cut into large 2-inch florets grapeseed oil, about 2 tablespoons Kosher salt and black pepper, to taste 1 (15-ounce) can chickpeas, drained 2 tablespoons olive oil 1 shallot, finely diced 3/4 cup vegetable stock 3 tablespoons unsalted butter 2 tablespoons capers, drained Zest and juice of 1 lemon Parsley, chopped
Heat the oven to 425 degrees. Place the cauliflower florets onto a sheet pan and drizzle with 2 tablespoons of grapeseed oil. Season with kosher salt and black pepper, and roast for 25 minutes, add the chickpeas and roast for 5 minutes more. Reserve.
Heat a medium skillet to medium-high. Add 1 tablespoon of olive oil and the shallot, and sauté until soft and fragrant, about 1 minute. Pour the stock into the pan and simmer until reduced by half, about 4 to 5 minutes. Reduce heat to low, then stir in the butter, capers, parsley, lemon zest and juice. Season with 1/2 teaspoon of kosher salt and a few turns of black pepper.
To serve, place the cauliflower and chickpeas on a serving plate. Top with the lemon caper sauce. Serve.
Comments: The preparation of this recipe goes a bit against logic. Why roast the cauliflower until it’s all crispy and brown, and then soak it with sauce? Seems counterproductive. BUT it works. Roasting concentrates the flavors and make the veggies stand better to the luscious lemony sauce. We loved it! For vegetarians, a little couscous on the side would make it a pretty nice meal. We enjoyed it with grilled pork tenderloin and a bit of tahdig rice, made in my favorite, quick way. A great mid-week dinner…
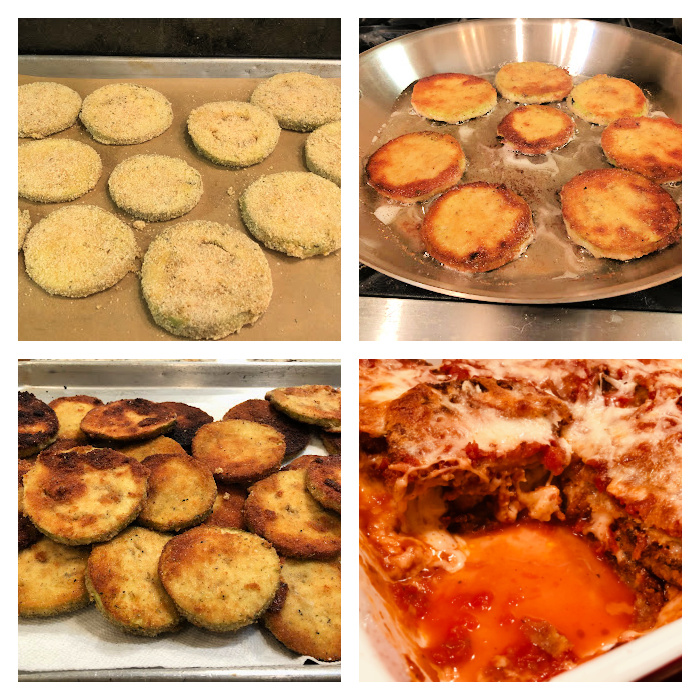
Am I breaking my own rule of never ever stating that a recipe is the best ever? Apologies for the convoluted phrase. But to answer my own question, no I am not. Because I was NOT the one who chose the name. It was published as such in Saveur magazine. You can read the interesting article clicking here. My beloved husband found it, showed it to me and said “we should probably give it a try.” Even though we alternate cooking dinner – one day he cooks, next day I do – he thinks I should be the one venturing in new territories. Which is totally fine with me. The problem with this recipe is that it will have you fry countless slices of breaded eggplant. It seemed like an ordeal and with a high chance of disappointment in the end: a heavy portion of greasy eggplant loaded with cheese. But after reading the article, I decided to humor the husband and give it a go. I tell you one thing: I was wrong. This was one OUTSTANDING eggplant parmigiana, and worth all the work.
For the sauce: 2 (28-oz.) cans plum tomatoes with their juices 3 Tbsp. extra-virgin olive oil 6 large garlic cloves, peeled (I used finely minced celery in its place) Kosher salt Freshly ground black pepper
For the eggplant: 3 large eggs Kosher salt 1¼ cups dried plain fine bread crumbs 1 Tbsp. dried Italian seasoning, or equal parts dried basil, dried rosemary, and dried oregano 3 medium eggplants (about 3 lb. total), mostly peeled except for a few strips of skin, sliced into thin rounds slightly thinner than ¼ in. About 1 cup extra-virgin olive oil 1½ cups (about 10½ oz.) shredded mozzarella cheese (not fresh) 3 Tbsp. finely grated Pecorino Romano
Make the sauce: In a blender, pulse the tomatoes and their juices until just slightly chunky. In a pot over medium-low heat, add the oil and garlic (or celery), and cook, stirring occasionally, for a couple of minutes. Pour in the puréed tomato mixture and season with a generous pinch each of salt and pepper. Bring to a gentle simmer and cook, stirring frequently, until thickened slightly, at least 1 to 1½ hours. The sauce can be cooled and refrigerated for up to 2 days.
Bread the eggplant: In a wide shallow bowl, beat the eggs with 1 tablespoon water. Season with a generous pinch of salt. In a second baking dish or bowl, stir together the bread crumbs, Italian seasoning, and 1⁄2 teaspoon salt. Working with one or two at a time, dredge the eggplant slices in the egg wash and let the excess drip back into the bowl. Transfer to the bread crumbs and coat very lightly on each side. Line a large baking sheet with a few layers of paper towels and set by the stove. In a large high-sided skillet over medium-high heat, heat ½ cup oil until shimmering. Turn the heat down to medium and add some eggplant slices in a single layer until the skillet is full. Cook, turning once, until well browned on each side, about 6 minutes total. Transfer to the prepared baking sheet. Repeat with the remaining eggplant, working in batches as needed and adding a little more oil every other batch, or as needed.
Heat the oven to 400F.
In a 9-by-13-inch baking dish, ladle ½ cup plus 2 tablespoons sauce into the bottom. Cover the sauce with a single layer of eggplant (start with the thickest ones on the bottom and save the prettiest slices for the top). Ladle another ½ cup sauce on top, spreading it evenly. Sprinkle with about 1⁄3 cup plus 2 tablespoons mozzarella and 1 tablespoon Pecorino. Add another layer of eggplant and repeat this process until you’ve reached the final layer of eggplant. Top this layer only with ½ cup sauce, a final thin layer of mozzarella, and some Pecorino. (Reserve any remaining sauce for another use.) At this point, the eggplant parmigiana can be refrigerated, covered, for up to 1 day.
Bake, uncovered, until the cheese is melted and bronzed in places and the sauce is bubbling around the edges, about 20 minutes (add about 10 minutes if your dish was previously assembled and chilled). Remove and let cool slightly. Slice into squares and serve warm.
Comments: I am normally a lot more lax when I follow a recipe, and don’t worry about careful measurements (unless it is baking). But in this particular case I decided to follow it to a T and measured every component. Once the baking dish was fully assembled with the eggplant, sauce and cheese, I was quite skeptical about the outcome, because it did not look luscious enough. But I have to agree, when you follow the recommended amounts of sauce and cheese, and deal with the eggplant slices exactly as advised, the final dish is pretty amazing. The taste of the eggplant comes through without being “suffocated” by sauce and cheese. It is satisfying but not heavy. We are still talking about how good it was. Added bonus: leftovers kept frozen for a week tasted almost better with a slow defrost in the fridge and a brief warming in a low oven…
If you have a vegetarian friend to entertain, look no further. The main dish of your menu is decided!
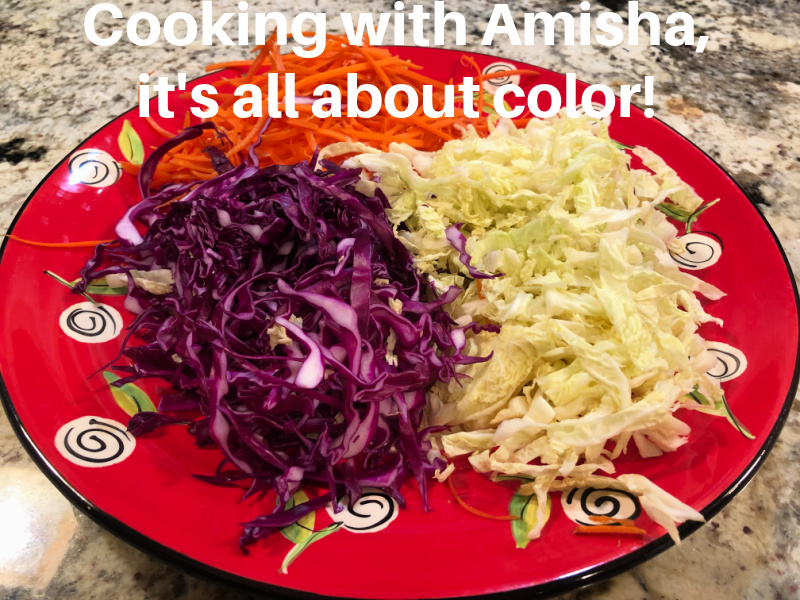
I am not sure how long ago I’ve started following Amisha through her food blog and IG page. But definitely it’s been a long time. She is one of those people who is good at everything, from cooking savory meals to baking spectacular desserts. When I heard she was going to publish a cookbook – Mumbai Modern – I pre-ordered it right away. And today I share a wonderful recipe from her book, a small review and as I always like to do, a teaser recipe with just the photo and a short description. If you are into colors and “fusion cuisine”, this book has your name written on it. Amisha is not only a superb cook, photographer and writer, but one of the sweetest human beings out there! I am thrilled to share this review with you.
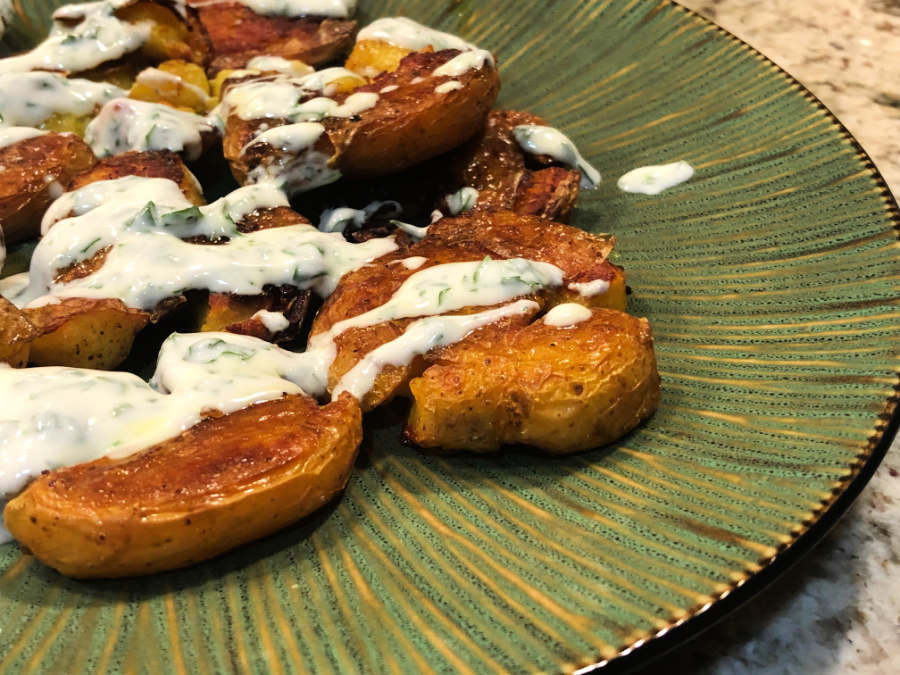
MASALA SMASHED POTATOES (slightly modified from Mumbai Modern)
for yogurt sauce: 1 cup Greek yogurt 1/3 cup fresh cilantro leaves, minced 1 tablespoon finely chopped mint 2 tsp fresh lemon juice 3/4 tsp salt
for Masala potatoes 12 baby potatoes 2 tsp salt 1/2 cup olive oil 1 tsp turmeric 1 tsp red chili powder 1 tsp coriander 1 tsp salt 1 tsp chaat masala
Heat the oven to 400F.
Make the sauce by mixing all ingredients in a high-speed blender. You should have a drizzle consistency. Adjust with a little bit of water, if needed.
Add the potatoes to a pot with water to reaching a level 1 inch higher than the potatoes. Add the 2 tsp salt. Boil for 20 minutes until tender. Drain and reserve to cool so you can handle them for the next step.
Make the olive oil sauce by mixing all the spices into the 1/2 cup oil. Whisk well. When the potatoes are cool enough to handle, add them to a baking sheet sprayed with oil. I used a non-stick aluminum foil to protect the baking sheet. Place the potatoes over and, using a flat-bottomed glass, gently press each potato to flatten until each one is no thicker than 1/2 inch.
Brush each potato generously with the olive oil mixture. Place in the oven and roast for about 25 minutes. I flipped the potatoes and let them roast for 5 minutes longer. Remove and let cool for 5 minutes or so. Serve with the yogurt sauce drizzled all over them.
Comments: These were absolutely WONDERFUL. Hubby said – well, your potatoes stole the show. And that they did. But of course, they were not really “mine”. They were Amisha’s… Nothing else got much attention at the table. I advise you to make more than you think you’ll need… They will be part of our dinner on a regular basis. The mixture of spices is perfect, not too hot, and very complex. If you don’t have chaat masala, add a little amchur powder, which is part of the mix, and will add a bright flavor.
And now for the teaser recipe…
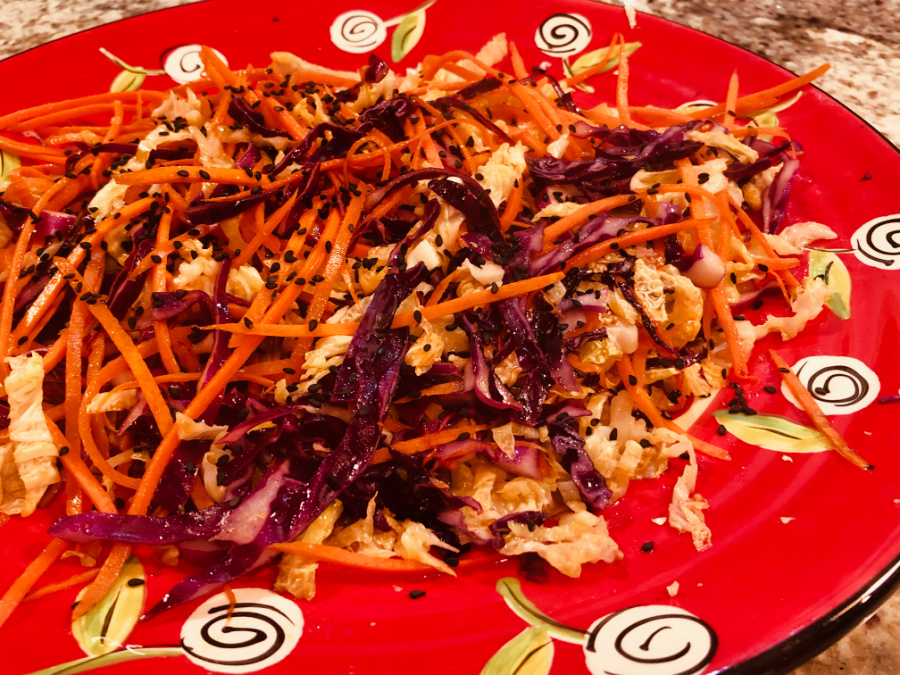
SAMBHAARO Cabbage and Carrot Salad
When I told you that if you like color you will love this book, that’s one tiny example of what you’ll get. I loved this salad so much that I was close to tossing a coin to decide which recipe to feature here. What makes this salad special is that you temper the spices in oil and they VERY briefly toss the veggies in the hot, spicy mixture. It changes their texture, mellows everything considerably. Brilliant!
Without further ado… let’s start a virtual tour of Amisha’s book…
To order the book, visit amazon.com with a click here
The book is organized in 7 chapters.
Pantry and Refrigerator Staples… She shares recipes for goodies that will be part of recipes in other chapters. For instance, her Apricot and Saffron Jam is one of her favorite concoctions, that of course stands on its own, but wait until you see the masterpiece Peacock macarons she fills with that jam… Like jewels, I tell you! I am making her Avocado, Cilantro, and Poblano Pepper Dressing this weekend.
Breakfast… Color opens the chapter: Apple, Fennel and Cardamon Tarts. Her description of being fascinated by things she saw in grocery stores in the US as someone arriving from a foreign country made me smile. I felt EXACTLY the same. My love-affair with TV dinners was something I cannot quite comprehend today. But her fascination with Pop-Tarts led her to make her own version, and that was a perfect outcome. More beautiful color in her Chocolate Cardamon Pastry Cream, Halvah and Pistachio Danish. Exotic (to me) and intriguing Sooji Dhokla (Semolina Savory Spongy Cakes).
Appetizers and Salads… Masala Smashed Potatoes opens this chapter and you know how I feel about them. Sambhaaro follows along. I would love to try the Dahi Wadas (Lentil Fritters in Yogurt Sauce), and her version of Arancini ( Aloo Tikki Arancini). They look amazing! Other serious temptations for me are Corn Mushroom Tomato Chili Cheese Danish, Handvo (Savory Rice-Lentil Vegetable Cake), and Khaman (Chickpea Flour Savory Cake).
Mains… Undhiyoo called my attention right away because it is a vegetable stew that includes bananas, and that of course reminds me of Brazilian cooking. Moqueca is originally made with shrimp and/or fish, but there is a version that uses a particular type of banana, and it is delicious. Vegetable Koftas in Tomato Cashew Curry almost made the cut to be featured, and I intend to make it very soon. Perfect for this time of the year. Same goes for the Ultimate Mumbai-California Veggie Burger. I simply must make it.
Desserts… Let me just say I would like to make them all. Period. Just choosing a few to mention here: Blood Orange and Hibiscus Tart (gorgeous!), Thandai Shortbread Cookies Dipped in White Chocolate with Pistachios and Rose Petals (swoon!), Carrot Halva, Chai Masala Creme Brulee with Cashew Cardamon Shortbread (OMG), Mini Maple Sandwich Cookies with Pear and Spice Buttercream, PEACOCK MACARONS (my heart flipped, I kid you not, they are masterpieces), Coffee Cardamon Mini Cheesecakes, Eggless Chocolate Fudge Cake (worthy of a Parisian boulangerie).
Drinks… Well, I don’t drink, but she has many non-alcoholic options like a Ginger Masala Chai, and Brazilians out there will be pleased with her version of “caipirinha” using Kumquat and Ginger. She also shares shrubs (I am quite fond of those) like one with Nectarine, Star Anise and Ginger. And a version of Turmeric Milk I might try soon: Haldar Nu Doodh.
Accompaniments and Snacks… Pass me the whole lot, and I want to make them all. Just a few to include here: Spinach Puri, Plain Rotli, Triangle Paratha (so so cute), Masala Puri, Masala Potato Chips, and Turmeric Rice (have I mentioned I am a Turmeric Cheerleader?). Chorafali Crackers are also adorably cute and I bet super tasty.
As most people who read my blog should know, I am not vegetarian, but I eat meatless meals often. Amisha’s book is a wonderful source of ideas, whether you are vegetarian or just flirt with that style of cooking sometimes. It is clear she put a ton of love, and attention to every little detail in the making of her book. The photography is outstanding, the tone of the book very conversational, as if she is standing next to you. I love it!
Amisha, thank you for allowing me to publish a recipe in my blog! I wish you all the success in the world, and I hope you already have a second cookbook “in the making”.