

For almost two years now I’ve been baking for weekly homeless meals, in a church-organized project called Common Table. Before pandemic times they had a sit-down dinner in a big room, so I could bake whatever I felt like it, including regular cakes, pies, tarts. With Covid-19 in the equation, everything changed. They show up and grab a bag with their meal, so any sweets must be individually wrapped and packed together with their main meal. This has obviously restricted my choices of things to bake, and I find myself making more cookies and less of everything else. But, there is always a silver lining. Focusing on cookies made me decide to improve my decorating skills, so that sweets could also bring a smile, especially for families with kids. Every week I include about a dozen iced sugar cookies, so that I can practice different styles of decoration, and at the same time not get too overwhelmed by the process. Visiting Youtube University I try to learn from the great cookie decorators out there. In this post I show you a few of my favorite recent adventures and include the video tutorials I followed to make them. The basic cookie recipes were either gingerbread (this post) or variations of my default recipe for sugar cookies.
PENGUIN GINGERBREAD COOKIE

To make these cutie pies I followed Haniela’s tutorial found in this link. Starting with a simple round cookie I drew a heart shape with a food pen. Then I used four different colors of Royal Icing: black and white with flood consistency, and orange and pink with thick consistency. For Royal icing I recommend the wonderful recipe from my tent-baking friend Tanya. All piping was done without icing tips, just bags cut with sharp scissors.
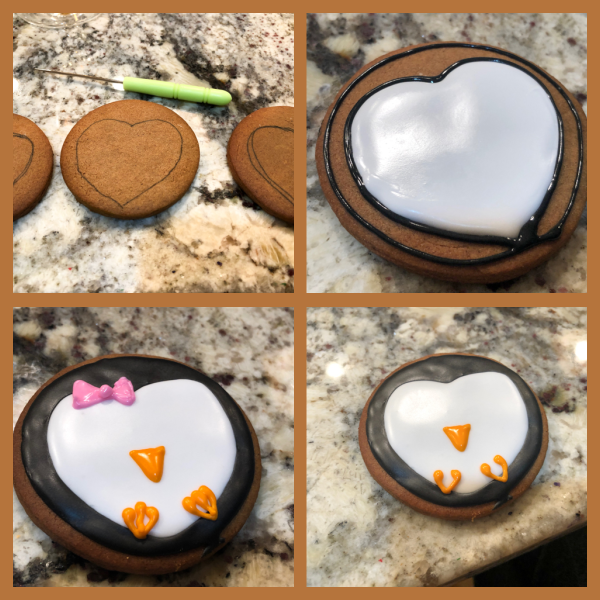
After flooding with white, I waited for it to crust, flooded with black and waited for it to crust also. A couple of hours later I made the details of nose, feet, and the little bow. For the feet, it is better to pipe the two external parts, wait 10 minutes and pipe the central one, so that they don’t join together. Next, just like in the video, I drew the eyes, and added red luster powder to the cheeks with a soft brush. Finally, I piped an outline of white royal icing, and immediately touched the wet surface of the cookie into a plate with black sanding sugar. I love my little penguin girls.

SANTA’S HEAD

To make these sleepy Santas, I followed the tutorial from Little Cookie Co. Just three colors of Royal Icing are needed: white, peach and red. Her tutorial explains it all very well, and I was just a little nervous to make the mustache, because it had to be piped free hand and I have a hard time making things symmetrical. I guess it turned out ok, maybe Santa had a bit too much eggnog the night before, but these are trying times for all.
SNOWGLOBE SUGAR COOKIE

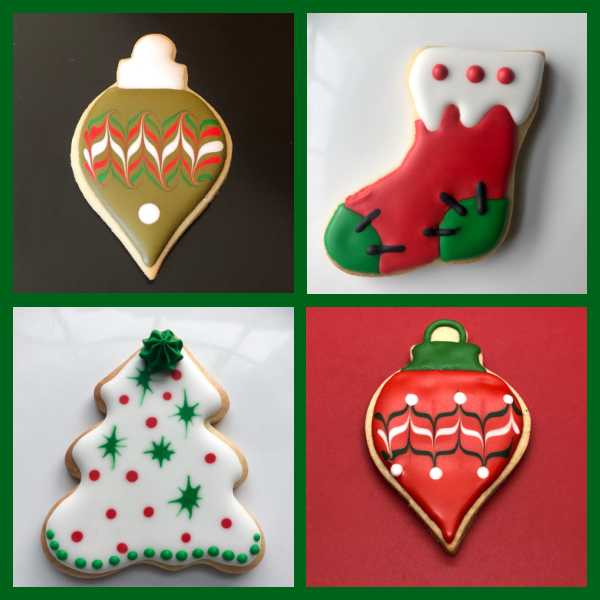
Another wonderful tutorial by Little Cookie Co. I made quite a few of those during the month of December, some smaller containing just a small snowman, some with a Christmas tree as Royal icing transfer (shown in the composite picture that opened this post). If you watch the tutorial, you’ll see she pipes the tree with icing free-hand (check it out at 4 min and 5 seconds), but I simply could not bring myself to even try. This is a more elaborate cookie to make, many layers, a lot of waiting, a work of patience. But I do think the result is pretty nice!
SWAN SUGAR COOKIE

I followed part of the tutorial shown in this link, but added my own feathers… oops my own design of feathers. I am actually featherless. I modified it because I don’t care for the taste (or texture) of fondant, although I admit it looks absolutely stunning. It seems also quite a bit of work, as each feather must be shaped individually using small silicone molds. I decided to just pipe some white Royal Icing and immediately shower it with white sanding sugar.

The cookie is actually quite simple to make. Flood the body with white, let it crust. Add the orange beak leaving a small space between the beak and body. Right away add a small band of black royal icing, and pull with a scribe tool very lightly towards the beak and towards the body. A small dot of black for the eye, and just the tiniest touch of white off center on the eye. It is a small detail that makes eyes look a lot more realistic.

HOT CHOCOLATE MUG COOKIE

To make these cookies I followed the tutorial from this link (at 4 min 20 sec). For the decoration of the mug itself, I opted for three different styles. Two are shown above: royal icing transfer of a snowflake, or wet-on-wet white icing over the basic blue. After the mug crusted, I added the whipped cream part, let that crust and hours later added the white swirls + mandatory sanding sugar coating.
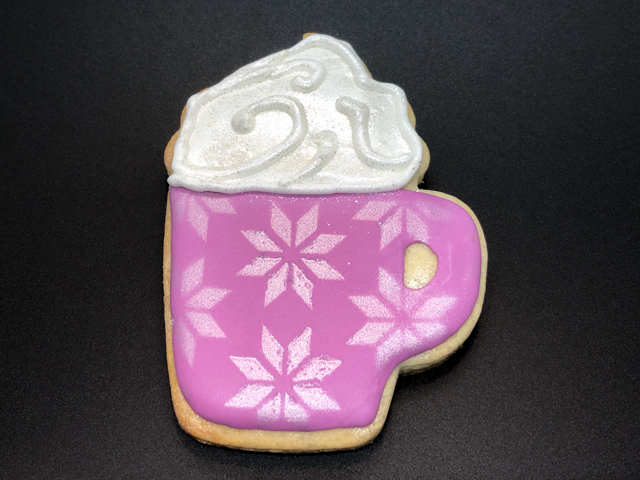
The third style was air-brushing with white pearl dye and a stencil. The top was sprayed with Diamond dust, a product I featured recently on In My Kitchen.
REINDEER LITTLE STAR

For these cookies I did not follow a tutorial, just saw them somewhere in the internet, saved a screenshot and improvised my version. Flooded the white part, waited about 10 minutes, flooded the upper brown, waited a couple of hours and added the triangle white for ears, black for antlers, and red for nose. Next morning it was time to draw the eyes and add red powder dust for the cheeks. Perhaps this was my favorite cookie of this series, although I do love the Penguin Girls…
I tell you one thing, I already miss holiday baking!

ONE YEAR AGO: Pearled Farro with Asparagus Coins
TWO YEARS AGO: Pistachio Caramel and Apple Mousse Cake
THREE YEARS AGO: Someone turns 70 today!
FOUR YEARS AGO: Carioca Cake, the Final Chapter
FIVE YEARS AGO: Duck Confit for a Special Occasion
SIX YEARS AGO: Ken Forkish’s Warm Spot Sourdough
SEVEN YEARS AGO: Bran Muffins, Rainbows, and a wonderful surprise!
EIGHT YEARS AGO: Salmon Wellington
NINE YEARS AGO: The Green Chip Alternative
TEN YEARS AGO: Weekend Pita Project
ELEVEN YEARS AGO: Let it snow, let it snow, eggs in snow
SWAN COOKIES
