THE HOME BAKERS COLLECTIVE: FEBRUARY PROJECT

If you don’t know what the Home Bakers Collective is all about, I invite you to read my post about it with a click here. This month’s challenge was conceived by the one and only Carlos, Tent-Baker-Extraordinaire, Newly-Dad of Franklin Chip, a chocolate lab who is the most adorable thing roaming the planet at the present time. Check him out. Back to the challenge. Methinks Carlos made this one for me. Because, seriously, look at his brief: If you were a macaron, which macaron would you be? Can you imagine my sheer joy?  Of course, I could not wait to bake this batch, although it was not as easy and straightforward to decide what to do. I had two main paths in my mind, one focusing on color, the other on flavor. It was tricky to come up with something that would join both harmoniously. So I went with flavor. Tropical, of course, but with some spice. Swirls and sprinkles, of course. Because by now everybody knows I am a serial sprinkler.

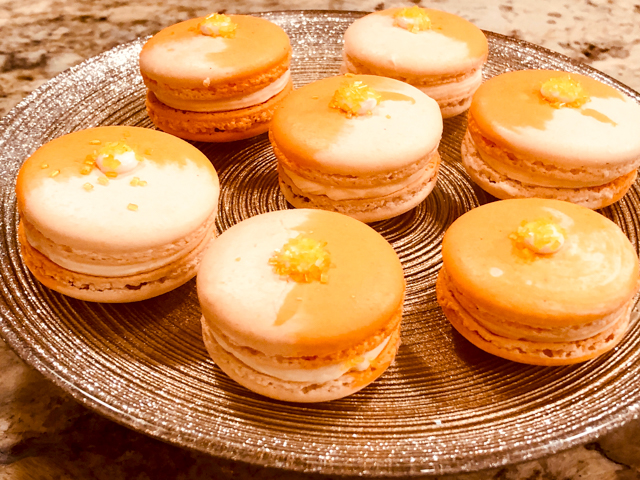
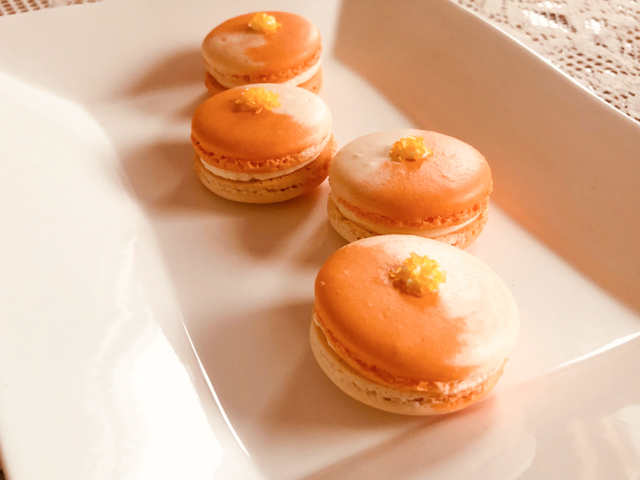
SALLY’S SPICY MANGO AND COCONUT MACARON
(from the Bewitching Kitchen)

for the shells:
200 g powdered sugar
115 g almond meal
115 g egg whites at room temperature
1/8 tsp cream of tartar
100 g superfine sugar
orange gel color from Artisan Accents
2 drops coconut extract

for the mango gelee filling:
2g gelatin (powdered or 1 sheet)
water to bloom gelatin (10 mL if using powdered)
60g sugar
60g water
60g mango puree (I used canned)
2tsp lime juice
1/4 tsp Sarawak pepper, ground
1g agar

for the coconut ganache filling:
4g powdered gelatin (I used Knox)
20g cold water
375g heavy cream
130g white chocolate
1/4 cup shredded coconut, unsweetened
to decorate:
Royal icing or Candy melts + sprinkles (optional)

Line 3 heavy baking sheets with parchment paper or Silpat mats. Layer the powdered sugar and almond meal in a food processor. Pulse until the mixture looks like fine meal, about 15 seconds. Pass through a sieve and transfer to a small bowl. Set aside.

Place the egg whites and pinch of cream of tartar in the bowl of a stand mixer fitted with the whisk attachment. Whip the whites with the cream of tartar until they look like light foam.

Slowly add in the granulated sugar in three to four additions, trying to aim the stream between the whisk and the side of the bowl. Turn the speed up to medium-high. Continue to whip the meringue until it is soft and shiny. It should look like marshmallow creme. Add the gel color and the coconut extract drops. Staying at medium-high speed, whip until firm. Transfer the whites to a medium bowl.

Fold in the almond meal mixture in three increments. Paint the mixture halfway up the side of the bowl, using the flat side of a spatula. Scrape the mixture down to the center of the bowl. Divide in two portions, color one orange, leave the other plain. Proceed with the macaronage, mixing each mixture to the correct texture (molten lava is the term of choice, I like to form a figure 8 with the batter and also check a small amount placed on parchment, the texture should smooth out in 30 seconds or so).  Place both batters inside the same piping bag fitted with an 8mm tip, or any tip you feel comfortable for piping.

Slam each sheet hard four to six times on the counter. Let the unbaked macarons dry until they look dull, about 30 minutes.

While the macarons are drying, heat the oven to 300 F. Bake one sheet at a time on the middle rack. Check in 11 minutes. If the tops slide, then bake for 2 to 3 more minutes. Let the macaroons cool for 10 minutes before removing from the pan.

Make the gelee filling: Bloom the gelatin by submerging it in water until it softens, about 10 minutes.  Combine the 60g water with mango puree, lime, pepper and agar. Bring the mixture to a boil and boil for 1 minute. Remove from heat, add gelatin.  Pour into a baking sheet lined with plastic wrap and place in fridge until set.  Cut small circles that will sit in the center of each shell.

Make the coconut ganache. Place the powdered gelatin into a small saucepan along with the cold water, let it sit for 10 minutes. It will turn into a hard paste.

Add the heavy cream into a saucepan along with the shredded coconut. Simmer until it almost boils, turn the heat off, cover the pan and allow it to sit for 15 minutes. Drain the shredded coconut, bring the weight back to 375g with additional heavy cream. Bring to a simmer, then add to the chocolate. Add the gelatin, and mix well to incorporate everything together and melt the chocolate. Use an immersion blender if desired. Place the mixture in the fridge for a few hours. It is best if made the day before and kept refrigerated. Whip before using.

Assemble the macarons: find two macarons similar in size and add a round of mango gelee in the center. Surround with coconut ganache. Close the shell.

Decorate the tops with swirls and sprinkles. Because, why not?

ENJOY!

to print the recipe, click here


Comments: This was my first time making a double filling for the macarons and there’s definitely a learning curve associated with it. For instance, the agar-layer generates a bit of moisture, so if you are not consuming the macarons within two days, the texture will suffer a bit. I think the issue can be prevented with a very thin layer of melted white chocolate before filling the shells, to form a barrier.  But if you intend to consume the macarons in a couple of days, I would not worry about it.

The pepper. I had several options to try, including Szechuan peppers that would probably be pretty cool to use also. In the end, I sat down with Mr. Pierre Herme’ and he advised me to search for Sarawak pepper. Well, ok, it was not exactly him, flesh and bone (borrowing a Brazilian expression), but his book. Minor detail. So I amazoned the pepper, and used the same amount he did in his Mahogany Macarons, recipe found here. My agar layer is however totally different from his filling, just the pepper in common.


I loved the contrast of mango-gelee and the shell, plus the creaminess of the ganache around it. Infusing the ganache with shredded coconut gave it enough flavor, and more natural than coconut extracts, which often will give that odd sun-tanning lotion aura.

Did I  hit my self-macaron perfectly? Well, it is not as colorful as I could make it, but I think the swirls and sprinkles compensate for the restraint in the color department. The taste is spot on, to quote a certain judge from a certain baking show. What do you think, does it “look” like yours truly?

Carlos, I loved this challenge and I can hardly wait to see what everyone else baked!

To all my readers, make sure to stop by The Home Bakers Collective, and say hi to my friends, each one waiting for you with a very personal macaron in hand. (It might take a few hours after publication of my post for the collective to get updated, so try later if there’s nothing there yet).

ONE YEAR AGO: Bouillabaise for a Chilly Evening

TWO YEARS AGO: Bergamot-Cherry Macarons

THREE YEARS AGO: Roasted Veggies with Queso Cotija Dressing

FOUR YEARS AGO: Creamy Broccoli and Mushroom Casserole

FIVE YEARS AGO: Maple Walnut Biscotti

SIX YEARS AGO: Barley Risotto with Peas

SEVEN YEARS AGO: Oatmeal Fudge Bars

EIGHT YEARS AGO: Cauliflower Steaks

NINE YEARS AGO: Soft Spot for Chevre

TEN YEARS AGO: Quick sun-dried Tomato Crostini


CHOCOLATE CAKE WITH COCONUT BUTTERCREAM

Every Monday I like to take a bake to our department, and try to keep it varied, never the same type of sweet two weeks in a row. I always have too many options in my mind and go into a state of paralysis when the weekend arrives and I need to decide what to make. Last weekend was particularly tough, so I asked the husband to help me out. He did not even blink. Why not a chocolate cake with coconut frosting? And that’s how this cake was born.

CHOCOLATE CAKE WITH COCONUT BUTTERCREAM
(adapted from  Ina Garten and Stella Parks)

for the chocolate cake (make one day in advance):
(after Ina Garten)
228g all-purpose flour
400g sugar
75g unsweetened cocoa powder
2 teaspoons baking soda
1 teaspoon baking powder
1 teaspoon salt
1 cup buttermilk
1/2 cup vegetable oil
2 large eggs
1 teaspoon pure vanilla extract
1 cup freshly brewed hot coffee

for coconut creme patissiere:
1 cup coconut milk
4 large egg yolks
65g granulated sugar
2 + 1/2 tablespoons cornstarch
1/2 teaspoon coconut extract
2 tablespoons unsalted butter
1/2 cup shredded sweetened coconut

for coconut frosting:
(after Stella Parks)
170g egg whites
340g turbinado sugar
1/2 teaspoon kosher salt
1/4 teaspoon cream of tartar
1/2 tsp vanilla paste
450 g butter (4 sticks)  softened to about 65 F
115g virgin coconut oil

for the drip glaze:
113 g semisweet chocolate, coarsely chopped
4 tablespoons unsalted butter, cut into pieces
2 tablespoons light corn syrup

Make the cakes. Heat the oven to 350°. Butter three 7-by-2-inch round cake pans and line them with parchment; butter the paper. Dust the pans with flour, tapping out any excess.

I In a bowl, whisk the buttermilk with the oil, eggs and vanilla. Place the flour, sugar, cocoa powder, both leavening agents and salt in the bowl of a KitchenAid type mixer.  Turn the mixer on, and after a few seconds slowly beat the buttermilk mixture into the dry ingredients until just incorporated.  Slowly pour the warm coffee. Batter will be pretty thin.

Pour the batter into the prepared pans. Bake for 35 minutes, or until a toothpick inserted in the center of each cake comes out clean. Let the cakes cool in the pans for 20 minutes, then invert the cakes onto a rack to cool. Peel off the parchment. When completely cold, refrigerate to finish next day.

Make the creme patissiere (can be made the day before). Bring the coconut milk up to a simmer in a medium saucepan. In a small bowl, whisk the egg yolks, sugar, cornstarch, and extract until pale in color. Slowly pour in the hot coconut milk while whisking continuously. Return the mixture back to the saucepan and whisk over medium-high heat until it boils. Boil for two minutes (important step, to destroy amylases in the egg yolks, that would prevent the cream from setting properly).  Pour the pastry cream through a fine-mesh sieve then stir in the butter. Place a piece of plastic wrap directly on top of the pastry cream, making sure it is touching the surface, and refrigerate until cooled completely. Stir in the shredded coconut when ready to use in the cake.

Make the coconut frosting. Make a Swiss meringue by mixing egg whites, turbinado sugar, cream of tartar, salt and vanilla paste in a large bowl and bringing it to 185F over simmering water, whisking constantly.  Transfer to Kitchen Aid type mixer and whisk at high-speed for about 12 minutes until temperature is around 90F.

Add butter, one tablespoon at a time, then add the coconut oil. Whisk a couple more minutes until fully smooth, and use right away. You can also store it in the fridge, bring it to 70F and whisk again before using.

Make the drip glaze. Warm all ingredients in a bowl over simmering water. Once chocolate is fully melted and incorporated with other ingredients, remove from heat. Cool to around 98F to use.

Assemble the cake. Place one layer over a cake board. Add a layer of coconut frosting, top with a small amount of coconut creme patissier. Add second layer of the cake, repeat filling. Add final third layer, frost top and sides with a crumb coat of frosting. Put in the fridge for 20 minutes.

Add a final coating of the coconut frosting, work with a scraper to the remove a bit from the sides, exposing some of the layers. Place back in the fridge, so that it is very cold before you add the drip glaze.

Add the drip glaze with a spoon, dripping around the sides, then fill the top of the cake with a thin layer. Refrigerate again for 15 minutes or until the drip glaze is set. Add swirls of coconut buttercream, decorate the base with shredded coconut, if so desired.  Sprinkles are optional.

ENJOY!

to print the recipe, click here

Comments: The chocolate cake is a favorite of mine. I’ve used it in the past, and was my cake of choice for a very special celebration back in December.  It is moist, it is intense, it holds well in layers. I was a bit worried that so much chocolate would obliterate the coconut component, but we are talking a duel between Ina and Stella, two Baking Titans. Stella Parks’ coconut frosting rose to the challenge.  I do think my little contribution of the creme pat was also pretty nice, so I discreetly offered myself a pat in the back.

Usually, when we think about chocolate cake with coconut frosting, the first idea that comes to mind is a mountain of white frosting with shredded coconut all over it. I don’t particularly care for the texture of shredded coconut when it is prominent like that. So for my personal taste this version is more appealing. And it does have a touch of elegance, I think.

I loved doing the drip glaze thing. It is not as dramatic as mirror-glazing, in fact it is much more Zen, because you can plan your drips and watch them form. Plan your drips. Yeah, that is one odd statement, but it’s the best I could do. It’s early and coffee has not kicked in yet.

I think this cake goes easily into my top five list. 

ONE YEAR AGO: Berry Rebellion Tarts 

TWO YEARS AGO: Bergamot-Cherry Macarons

THREE YEAR AGO: Roasted Veggies with Queso Cotija Dressing

FOUR YEARS AGO: Creamy Broccoli and Mushroom Casserole

FIVE YEARS AGO: Maple Walnut Biscotti

SIX YEARS AGO: Barley Risotto with Peas

SEVEN YEARS AGO: Oatmeal Fudge Bars

EIGHT YEARS AGO: Cauliflower Steaks

NINE YEARS AGO: Soft Spot for Chevre

TEN YEARS AGO: Quick sun-dried Tomato Crostini


BROWNIES, THREE WAYS

I share with you three takes on a very simple bake, the deliciously humble brownie. What makes a brownie a  brownie? Tough to define precisely because lots of different recipes will take you to that territory. In general, it is a simple cake with just a few ingredients: butter, flour, chocolate, sugar and eggs. But a leavening agent might finds its way there also, in case the baker prefers a more cake-like version. Marriages have been damaged due to brownie divergencies. I advise you to date people who share your passion for fudgy or cakey. Back to what matters. My three versions are right here for you.

BROWNIE, TRADITIONAL

I like it to be dense, creamy, not cakey. I like a brownie with substance, but that melts in the mouth and brings with each bite a moment of introspection because words seem like such a waste.

This recipe, straight from the blog of Helen, my tent-baker friend, checks all the boxes.For the recipe, visit Bakers Anonymous with a click here.

BROWNIE, DRESSED UP

BROWNIE PIE
(from the Bewitching Kitchen)

for the pastry shell:
(makes more than you need, save the rest in the freezer)
310g  all purpose flour
30g powdered sugar
pinch of salt
170g butter (chilled and cut in small cubes)
3 egg yolks mixed with very cold water to make a volume of 6 tablespoons

for the chocolate brownie filling:
100 g coarsely chopped 70% chocolate
10 g  Dutch-process cocoa powder
120 g unsalted butter
180 g whole eggs
130 g granulated sugar
50 g all-purpose flour, sifted
powdered sugar for decoration (optional)

Heat the oven to 375F.

Put the flour, sugar and salt in food processor then add the butter and process until the butter is in small pieces. With the motor running add the mixture of egg yolks and cold water. Stop the mixer before the pastry forms a ball, remove it from the processor and gently bring it all together with your hands over plastic wrap. Shape into a flat disc and leave it in the fridge for 30 minutes.

Roll out the pastry to a thickness of about 3mm. I like to do it in between two plastic sheets (I cut the four sides of a  large ziplock bag leaving just the bottom part attached, open it and roll the pastry inside it). Roll the dough as a circle large enough to cover the pan and leave a little extra around the sides. Place it in an 8-inch tart pan with removable bottom.

Line the surface with plastic wrap and fill with beans. Wrap the plastic over the beans so that it does not touch the metal sides of the pan.  Blind bake for 15 minutes with the beans on, then carefully remove them and place the shell back in the oven for 20 more minutes. Remove and allow it to cool slightly.

Lower the temperature of the oven to 350 F.

Make the brownie filling. Gently melt the chocolate, cocoa powder and butter together in the microwave. In a bowl, lightly whisk the eggs and sugar by hand. Fold in the dark chocolate mixture, followed by the sifted flour. Continue gently folding using a spatula until well combined. Place the finished mixture into the blind-baked tart shell and bake for 15 to 20 minutes, until it is set in the center.

Allow it to cool and decorate with powdered sugar using a stencil, if you like. Refrigerate until serving time.

ENJOY!

to print the recipe, click here

This was decadent. We offered pieces to some bricklayers working in a little project in our home and they were very VERY happy.  This recipe has just enough flour to hold it together, so it is almost like enjoying a piece of ready to  melt chocolate on top of a sweet tart shell. Bliss. 

Am I the only one who sees a cute alien?

Now finally, my third version for you…

BROWNIE BITES, FOR FUN

BROWNIE BITES
(adapted from The Cookery Wife)

95 g all-purpose flour
200 g granulated sugar
75 g cocoa powder (I used natural)
1/4 teaspoon salt
1/2 cup butter, (1 stick, 113 g), room temperature
2 eggs
1 teaspoons vanilla paste
2 Tablespoons full-fat milk (optional)

Heat oven to 350F.

Spray your mini-cake pan with baking spray containing flour.

In the bowl of a stand mixer add dry ingredients: flour, sugar, cocoa, salt. Stir to combine. Next, add eggs, vanilla, butter. Mix on low for 30 seconds, add the milk and mix on medium-high for 2 full minutes. Batter will be very thick. Place it in a piping bag (no need for piping tip). Cut an opening and fill the mini-cakes between 1/2 and 3/4 full.

Using the tip of your finger coated with a bit of butter, press the batter to smooth it out. Bake for 15 minutes until a tooth pick inserted comes out clean. Let cool 10 minutes before removing from pan.

A toothpick can help loosen the sides, but be gentle.  Cool completely over a rack before decorating with powdered sugar.

ENJOY!

to print the recipe, click here

First of all, don’t let the lack of a mini-cute-Bundt pan stop you from making these bites. A mini-muffin alternative will work just as well. But, you know I cannot resist a baking gadget. I was a bit afraid of them sticking to the pan, but most came out just with a gentle flip of the pan (see photo, bottom left). Just a few stayed in, but were also released with a gentle tap, no harm done. I think filling them just a little over half capacity is the ticket. If some of them dome a bit, you can gently shave the bump with a small serrated knife, so they will sit leveled.

They have great flavor and the texture is not dense, even though the batter started so thick. You can decorate them with powdered sugar, a drizzle of caramel, melted chocolate. I happened to have some leftover white chocolate ganache from a macaron adventure, so I added a touch of that to most of them. They are perfect to bring to parties or share with co-workers. I will bake them regularly, my next project will involve a lemon cake. The idea is to avoid cake batters that are too light, you need more substance to get them to unmold nicely and keep the overall design.

ONE YEAR AGO: Berry Rebellion Tarts  (one of my favorite blog posts)

TWO YEAR AGO: Emilie Raffa’s High Hydration Sourdough

THREE YEARS AGO: Short-Ribs with Chickpeas and Chard

FOUR YEARS AGO: Asian-Style Short Ribs 

FIVE YEARS AGO: Herbed Goat Cheese Souffles

SIX YEARS AGO: Barley Risotto with Peas

SEVEN YEARS AGO: Jammin’ Blueberry Sour Milk Pancakes

EIGHT YEARS AGO: Scallops with Black Pasta in Orange Cream Sauce

NINE YEARS AGO: Stir-fried Chicken with Creamed Corn

TEN YEARS AGO: Potato, Cheddar, and Chive Torpedo

SHARING A LITTLE GUEST POST

I love baking, I love exercising, I love my work, but I also have a secret passion for all things language. It gave me a thrill to be invited by the superb linguist Dr. Denise Santos to contribute with a little article to her blog.  If you’d like to see it, jump here.

PICKLING RIBBONS

A couple of weeks ago we went out for dinner and I ordered a salad that  was surprisingly good. I don’t normally expect to be impressed by a salad, but that was the case. What made it so good was a simple ingredient: ribbons of pickled carrots. I got home, took a virtual ride to Google University, and found out I could double the carrot pleasure by using it also in the dressing.  Very pleased with this salad which was hearty enough to almost call it dinner. Almost. Because some boneless chicken breasts were also involved.

CARROT RIBBON SALAD
(inspired by several sources)

for pickled carrot ribbons:
(slightly modified from Chocolate and Zucchini)
2 large carrots
1 tsp grated ginger
120 ml (1/2 cup) apple cider vinegar
1 cup water
1 + 1/2 teaspoons sea salt
1 + 1/2 teaspoons sugar

Peel the carrots and, using the vegetable peeler, cut them into thin ribbons. Place the ribbons in a heatproof bowl.

Combine the ginger, vinegar, salt, sugar, and water in a small saucepan and bring to a boil. When the mixture boils, stir to make sure the sugar and salt are dissolved.

Pour the ginger brine through a sieve and into the bowl of carrots. Make sure the carrots are completely immersed, cover and let cool to room temperature. Transfer to a clean jar, close tightly with the lid and refrigerate for up to 2 weeks.

for carrot dressing:
1/2 cup chopped raw carrots (include leftover from making ribbons)
¼ cup extra-virgin olive oil
2 tablespoons tahini
2 tablespoons lemon juice
1 teaspoon minced ginger 2 tablespoons (30 mL) fresh orange juice
salt and freshly ground black pepper

In a blender, puree the carrots with the olive oil, tahini, lemon juice, and ginger. Thin with a little cold water if too thick. Season with salt and pepper to taste.

for the salad:
(use as much of each ingredient as you like)
baby romaine leaves
slivered almonds, toasted
a couple of avocados, diced

Add the ingredients to a large bowl, add the carrot dressing and mix well, but gently. Drain the pickled carrot ribbons, and place on top.

Serve with your protein of choice, or a bowl of grains if you prefer to go the vegetarian route.

ENJOY!

to print the recipe, click here

I don’t know about you, but at this time of the year, when I just about had it with the weather, a platter of colorful food lifts my mood. Pickled carrots will be here to stay.  I’ve been keeping a small jar in the fridge for my own pleasure. It seems to go well with lots of main dishes, and the texture only gets better with time. Make sure to shave them thin, and probably best to avoid that central harder core. Just turn the carrot around and start from the other side.

I totally forgot to take a picture of the dressing, it ended up with a shockingly bright yellow color, really beautiful. If you like pickled foods, I hope you’ll give this salad a try. Just remember that it is not good manners to steal all the ribbons to your own plate.

ONE  YEAR AGO: Green Beans and Carrots with Spicy Almonds

TWO YEAR AGO: Quiche 101

THREE YEARS AGO: Persian Butternut Squash Soup

FOUR YEARS AGO: Walnut Cranberry Sourdough Bread

FIVE YEARS AGO: Ottolenghi in Brazil?

SIX YEARS AGO: Roasted Winter Vegetables with Miso-Lime Dressing

SEVEN YEARS AGO: 2012 Fitness Report: P90X2

EIGHT YEARS AGO: Caramelized Bananas

NINE YEARS AGO: Roasted Lemon Vinaigrette

TEN YEARS AGO: Whole Wheat Bread