ANOTHER TWISTED SISTER OF THE SHEPHERD’S PIE

Gastronomic heresy alert: I am calling Shepherd’s Pie a concoction made with ground turkey and cauliflower topping. And what’s even worse, I’ve committed this sin before an I am doing it all over again, without a hint of shame.  This preparation is filling but moderately so. It won’t let you go into a state of total lethargy once you move away from the table. It is also low in carbs and saturated fat, in case you worry about those details. I used a trick quite popular in keto-type recipes to give ground turkey a more pleasant texture upon cooking. It involves baking soda and a few minutes of your time. Absolutely worth it. Read on the comments for full explanation on the baking soda trick.

TURKEY SHEPHERD’S PIE
(adapted from several sources)

3 tablespoons olive oil
1 head cauliflower, core removed, florets cut in pieces
½ cup water
Salt and pepper
1 large egg, lightly beaten
1/2 tsp smoked paprika
1 pound 93 percent lean ground turkey
¼ teaspoon baking soda
8 ounces cremini mushrooms, chopped
2 celery ribs, chopped
1 tablespoon harissa
¾ cup homemade or low-sodium chicken broth
2 carrots, peeled and chopped
1 tsp Herbes de Provence
1 tablespoon cornstarch dissolved in 2 tablespoons cold water

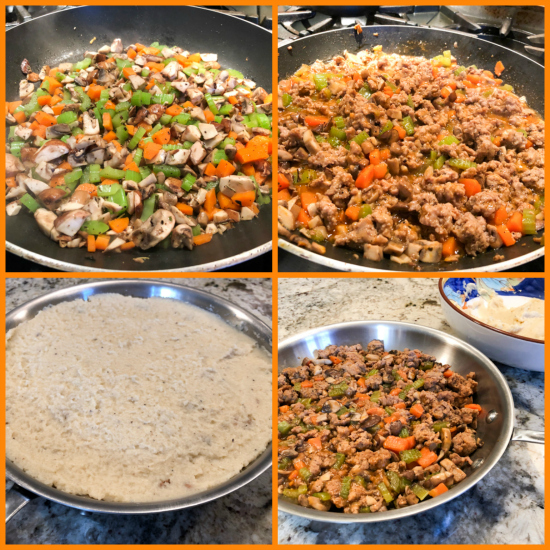
Heat 2 tablespoons oil in a pan until ver hot. Add cauliflower and cook until softened and beginning to brown. Pour 1/2 cup water, season with salt and pepper, cover and cook until the cauliflower is fully tender, about 10 minutes. Transfer to a food processor, and process until smooth. Add the egg and paprika, and process a few more seconds. Reserve.

Prepare the ground turkey: in a bowl, add the meat, one tablespoon water, ¼ teaspoon salt, ¼ teaspoon pepper, and baking soda, mixing everything together. Set aside for 15 minutes. Heat remaining 1 tablespoon oil in a 10-inch skillet over medium heat until shimmering. Make sure to use a skillet that can go under the broiler.  Add mushrooms and celery and cook until no liquid remains.   Stir in harissa and cook for a few more minutes.

Add broth, carrots, and Herbes de Provence,  and bring to a simmer.  Add the turkey meat, breaking it up with a fork.  Cover and cook until turkey is cooked through, about 10 minutes, stirring and breaking up the meat every few minutes. Whisk cornstarch and the 2 tablespoons water together in small bowl, then stir mixture into filling and continue to simmer until thickened, about 1 minute. Adjust seasoning, if necessary.

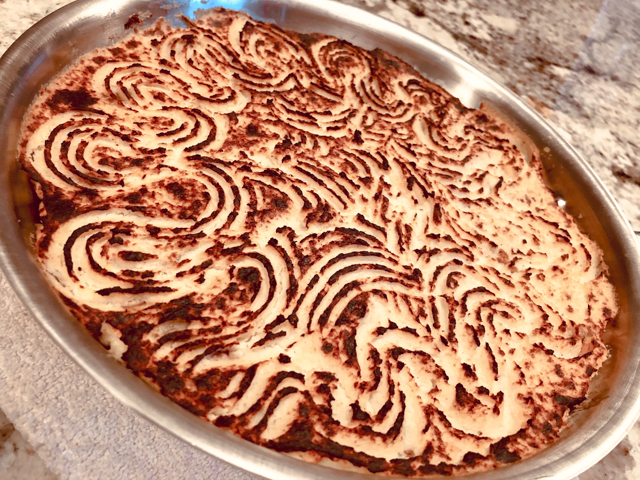
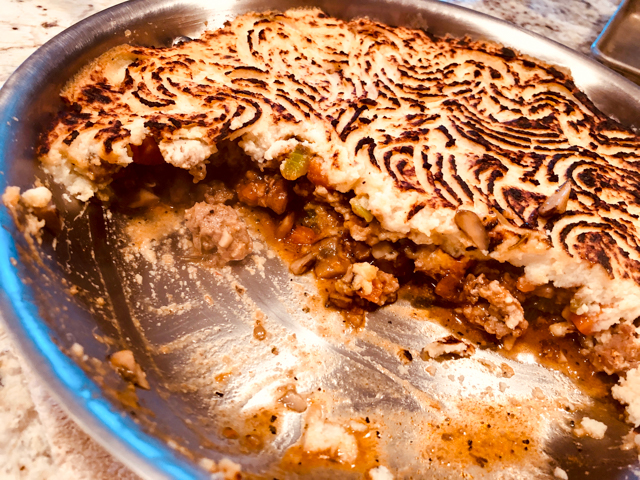
Pat the meat mixture to make it leveled, and spread the cauliflower puree all over the surface.  If you like, use tines of fork to make a pattern of ridges on the surface. Place skillet under the broiler and broil for about 10 minutes, if necessary move the pan around to get homogenous color on the surface.  Allow to sit for a few minutes before serving.

ENJOY!

to print the recipe, click here

Comments: Quite often ground turkey develops a dry, unpleasant texture when cooked, unless you use alternative methods such as pressure cooking, or the crock pot low and slow for a long time. The addition of baking soda changes everything, by raising the pH. This has two benefits: it reduces the interaction between protein molecules in the meat (by a mild denaturing effect) and accelerates browning. Since the proteins are not able to interact with each other very efficiently, they acquire a more tender texture. It is important to not overdo it. You don’t want the meat to get all mushy, it is a delicate balance. In other words, don’t add the baking soda and walk away for a couple of hours.

This recipe can be assembled all the way and kept in the fridge. When it’s time to eat, place it covered in a low oven to warm up, then uncover and run under the broiler.  Leftovers are superb, and as usual, they showed up as my lunch two more times that week.

Note added after publication: a dear friend of mine from UK brought to my attention that a lesser sin would have been to call this a Twisted Sister of the Cottage Pie, as that at least involves other kinds of meat, whereas the Shepherd is always made with ground lamb.  So there you go, a bit more culinary trivia for us all.  I will keep my title, since one sister was already out there… (wink, wink)

Before you leave, grab a pin!

ONE YEAR AGO: Cashew Chicken, My Way

TWO YEARS AGO: Two Deliciously Simple Salads

THREE YEARS AGO: In My Kitchen, April 2016

FOUR YEARS AGO: Spring has Sprung with Suzanne Goin

FIVE YEARS AGO: Chai Brownies

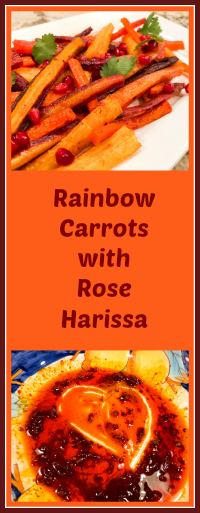
SIX YEARS AGO: Pomegranate-Molasses Glazed Carrots

SEVEN YEARS AGO: Braised Brisket with Bourbon-Peach Glaze

EIGHT YEARS AGO: The Real Vodka Sauce

NINE YEARS AGO: Spring Rolls on a Spring Day

EXTREME CHOCOLATE CUPCAKES

This is chocolate going where no chocolate has gone before. Total cocoa intensity. With each bite of these babies your mind will  buzz a little. A buzz of joy, that only real chocolate lovers will understand. If you join this cake with a good cup of java the world will be yours to conquer. Or at least it will feel like it.

SUPER-MOIST CHOCOLATE CUPCAKES
(slightly modified from Sally’s Baking Addiction)

3/4 cup (95g) all-purpose flour
1/2 cup (42g) natural cocoa powder (not Dutch-processed)
3/4 teaspoon baking powder
1/2 teaspoon baking soda 
1/8 teaspoon salt
2 large eggs at room temperature
1/2 cup (100g) granulated sugar
1/2 cup (100g) light brown sugar
1/3 cup (80ml)  canola oil
2 teaspoons vanilla paste  
1/2 cup (120ml) milk soured with a squirt of lemon juice (or commercial buttermilk)
frosting (recipe follows)
sprinkles to decorate (optional)

Heat the oven to 350°F. Line a 12-cup muffin pan with cupcake liners. If you have a second pan, line two more muffin tins, the recipe will likely make 14 cupcakes.  

Whisk the flour, cocoa powder, baking powder, baking soda, and salt together in a large bowl until thoroughly combined. Set aside. In a medium bowl, whisk the eggs, granulated sugar, brown sugar, oil, and vanilla paste until completely smooth. Pour half of the wet ingredients into the dry ingredients. Then half of the home-made buttermilk. Gently whisk for a few seconds. Repeat with the remaining wet ingredients and buttermilk. Stir until just combined; do not overmix.

Spoon the batter into the liners. Fill only halfway.  Bake for 18-21 minutes, or until a toothpick inserted in the center comes out clean. Allow to cool completely before frosting.

BLACKOUT CHOCOLATE FROSTING
(from Kara’s Couture Cakes)

1/2 cup butter 
2/3 cup black cocoa powder 
3 cups powdered sugar
a little less than 1/2 cup heavy cream
1 teaspoon vanilla paste
black gel food color (I used Chefmaster)

Melt the butter and stir in the cocoa with the paddle attachment on a stand mixer.
Add powdered sugar and mix on low-speed. Start with 1/3 cup heavy cream and add it to the mixer. Increase the mixer speed to medium. Add 2-4 tablespoons more heavy cream till you reach the desired icing consistency.
.
Add vanilla extract and black food color and turn the mixer to medium high and beat for 90 seconds.
.
Ice the cupcakes once they are completely cold. Have fun with sprinkles!
.
ENJOY!

to print the recipes, click here

Comments: Sally’s Baking Addiction is a fantastic site for bakers. I’ve mentioned before that one of my nieces in Brazil is a great cake baker, to the extent that for a while she was doing it professionally. She baked super fancy and decorated cakes for birthday celebrations, in a special-order kind of deal. One day we were talking about blogs and cookbooks, and she mentioned Sally’s blog (not mine, mind you) as one of her favorite sources exactly for the reason that her recipes are so reliable. It was fun to learn that we subscribed and faithfully the same site for years without knowing we both did. But I digress. Sally’s chocolate cupcakes deliver exactly what she promises: moist, decadent, and perfectly shaped little concoctions. The most important instruction in her recipe is to fill the muffin tins only halfway to the top. Not a teaspoon more. It will seem inadequate, but resist the temptation to add more batter.  They will bake perfectly, without a super inflated dome that always sinks in unflattering ways as the cake cools.


The frosting. Normally, I am not wild about American buttercream, but this is not your regular kind. For starters, the black cocoa powder is so intense, that it can stand up to the extra sugar. Also, the addition of heavy cream is a game changer. If you are counting calories or saturated fat, this is not your best option for dessert. But if your life-style allows some room for indulging, this might very well be your best option for dessert.  The cake with the dark cocoa icing is a match that will rock that world you are about to conquer.

I hope this photo conveys how deliciously moist this cupcake turns out. You can pile the icing higher if you dare, but I think a bit of moderation is in order. It is very rich and satisfying. As to decoration, I pretty much opened my box of sprinkles and had a blast with them. The dark background is friendly to so many color combinations! Pure white (those tiny marshmallows looked adorable on the cake), red, pink, coral, bright mixed colors, or you can use a color scheme geared to a particular occasion. Come to think of it, St Patrick’s Day could showcase some of these with green and white sprinkles…

I close this post with a daring statement. Ready? Here we go: these are the best chocolate cupcakes I’ve ever had. There. I said it. You must bake a batch…


ONE YEAR AGO: Sunflower Seed Kamut Sourdough

TWO YEARS AGO: The Joys of Grating Squash

THREE YEARS AGO: Auberge Pecan-Walnut Bread

LENTILS AND RADICCHIO? YES, PLEASE!

I bet many of my readers will consider clicking away from the blog right now, because… lentils? Not the most popular item in the pantry. Radicchio? Not the veggie that jumps into the grocery cart of most shoppers. Both together? Thanks, but no thanks. Can I ask you to trust me on this? Actually it’s not even me you should trust, but someone with a lot more gastronomic fame: Melissa Clark. And credit should actually go to my beloved husband who not only found the recipe but made it for our dinner. So basically I am  giving to charity from other people’s wallets. But hey, I am the resident blogger. So there!

LENTIL SOUP WITH RADICCHIO SLAW
(adapted from Melissa Clark)

for topping:
half a radicchio head, thinly sliced
drizzle of olive oil
lemon juice to taste
1 avocado, diced very small
salt and pepper to taste
for soup:
3 tablespoons olive oil
1 shallot, chopped
1 tablespoon tomato paste
1 teaspoon ground cumin
¼ teaspoon kosher salt, more to taste
¼ teaspoon ground black pepper
1 quart chicken or vegetable broth
2 cups water
1 cup green lentils
1 large carrot, peeled and diced
Juice of 1 lemon, more to taste
3 tablespoons chopped fresh cilantro

Make topping and reserve in fridge by mixing all ingredients together in a small bowl.

Make the soup: In a large pot, heat 3 tablespoons oil over high heat until hot and shimmering. Add onion and garlic, and sauté until golden, about 4 minutes. Stir in tomato paste, cumin, salt, black pepper and sauté for 2 minutes longer.

Add broth, 2 cups water, lentils and carrot. Bring to a simmer, then partially cover pot and turn heat to medium-low. Simmer until lentils are soft, about 30 minutes. Taste and add salt if necessary.  Using an immersion or regular blender or a food processor, purée half the soup then add it back to pot.  

Stir in lemon juice and cilantro. Serve soup and add a generous amount of radicchio slaw on top.

ENJOY!

to print the recipe, click here

Comments: This soup was excellent served with a mixed olive sourdough (recipe published not too long ago in the blog, click here if you’ve missed it). I find it a bit hard to decide if the topping made the soup or if it would shine as brightly on its own. A perfect combination. We had leftover radicchio slaw, and found ourselves munching on small amounts once our bowls of soup were appropriately empty. Next day we improvised a full salad with the other half of the radicchio head, adding a bunch of goodies we had in the fridge.

We mixed radicchio, tomatoes, olives, and avocados together. Dressing was kept simple again, olive oil and lemon juice, right before serving we added a tiny touch of white balsamic vinegar. OMG this was good. Later on we decided that capers would have been perfect, and of course some feta cheese or other sharp cheese of your choice.


Simple dinner… Red snapper, a little rice and this tasty salad… 

The secret with radicchio is to allow it to sit with the dressing for a little while, or warm it up very very briefly to soften the leaves. But that is another method that I intend to share in the near future. The great thing about this preparation is that leftovers keep very well in the fridge for 24 hours. My lunch next day was this salad with a fried egg, sunny side up. I was a happy camper.

ONE YEAR AGO: Tres Leches Cake

TWO YEARS AGO: The Joys of Grating Squash

THREE YEARS AGO: Auberge-Pecan Walnut Bread

FOUR YEARS AGO: Gluten-free and Vegan Raspberry Bars

FIVE YEARS AGO: Lasserre, a French Classic

SIX YEARS AGO: Sourdough Bread with Walnuts and Dates

SEVEN YEARS AGO: Braised Brisket with Bourbon-Apricot Glaze

EIGHT YEARS AGO: The Real Vodka Sauce

NINE YEARS AGO: Pork Tenderloin and Blue Cheese


CARROT CAKE MACARONS

You read that right. Carrot Cake Macarons. I am a member of a Facebook group for Macaron-Baking-Addicts and a couple of months ago a very experienced baker raved about them. I am usually not that wild about store-bought products, but for some reason that recipe intrigued me enough to make me go for it. The product in question is a Carrot Cake Spread by Trader Joe’s. I added it as the main flavoring for a simple Swiss Meringue Buttercream, and that was the filling for coral-tone macarons. Living Coral, the Pantene color of 2019. I had to try and match it, just because macarons are by definition a celebration of color. At least in my mind they are…

CARROT CAKE MACARONS
(from the Bewitching Kitchen)

for the shells:
150 g almond flour
150 g powdered sugar
56 + 56 g egg whites
40 g water
150 g granulated sugar, super fine
1/4 tsp vanilla extract
gel food dye (2 parts red, 1 part yellow, 1 part pink)

for the Swiss meringue buttercream filling:
3 large egg whites, room temperature
1/2 cup sugar
2 sticks unsalted butter, softened but still cool, cut into 1/2-inch pieces
pinch salt
3 to 4 tablespoons carrot cake spread 

Make the shells: Add the almond flour and the powdered sugar to the bowl of a food processor and pulse it 10 to 12 times. You want to have it fine but not allow the oil in the almonds to seep out and turn it into a paste.  Immediately sieve it on a large bowl and reserve.

To a small bowl, add half of the egg whites (56 g), then add the food dyes and vanilla. Mix until it is all well incorporated, the dye sometimes resists mixing homogeneously into the egg white.

Now comes the fun part. You will add the other half of the egg whites to the bowl of a mixer and the granulated sugar and water into a small saucepan. Have an instant thermometer ready. Start beating the egg white in slow-speed, as you turn the heat and start bringing the sugar syrup to a boil, without stirring (this is important, or you risk crystallizing the sugar and having to start all over). When the sugar starts boiling, increase the mixer to medium-speed. You want it to be at the stage of soft peaks by the time the syrup reaches 244 F. Once that happens, slowly drizzle the syrup into the egg white-sugar, as you continue beating. Beat until the temperature cools down to around 115F, no need to bring it down all the way to room temperature. You don’t want to have a very stiff meringue at this point, or it will be too hard to incorporate into the almond flour.

The second fun part starts now, the famous macaronage. Add the dyed egg white and the meringue on top of the almond flour and mix gently but decisively. If you have never made macarons before, I advise you to watch some videos on youtube to familiarize yourself with the proper macaronage. You want the batter to flow from the spatula and form a figure eight on the surface as you allow it to drip, but it should not flow too rapidly. If you spoon some batter on parchment paper, it should smooth out in about 30 seconds or so.  Once you get to the right stage, fill a piping bag fitted with the piping tip of your choice (I like a 1/2 inch opening), and pipe on parchment paper or Silpat.

Bang the baking sheet a few times to release air bubbles, and allow it to dry at room temperature for 30 minutes or until the surface feels dry to the touch.

Bake at 300F for 10 to 12 minutes. Cool before peeling off the baking sheet. Decorate either before filling them or after, depending on the type of decoration you choose. I used an air-brush and stencils (see my composite picture), with the color Sunset Orange from Chefmaster.

 Make the filling. Place the egg whites and the sugar in a large metal mixing bowl set above a pot of simmering water. Whisk the mixture until the sugar melts and the mixture becomes warm and very thin in consistency, reaching a temperature of around 160F. 

Transfer the contents to a Kitchen Aid bowl and whisk on high-speed until stiff peaks form. Now, change the whisk to the paddle beater, add the butter and salt, mixing on low-speed.  Add the butter piece by piece and keep mixing. When the butter seems to be all incorporated, even if it looks a little curdled, increase the speed to high. The mixture will become smooth and totally creamy within a few minutes. 

Add the carrot cake spread and mix on low-speed. Taste and add more if you feel like it. Put the mixture in a piping bag fitted with an open star piping tip and fill your macarons.

Place them in the fridge overnight and bring to room temperature 15 minutes before serving.

ENJOY!

to print the recipe, click here

Comments: If you’ve been following my blog for a while, you know I have a lot of macaron recipes. They always involve the French meringue method because it is so simple and it has always worked for me. I had issues with the Italian meringue and several batches were a failure, but I know that many bakers find them better in terms of texture and reproducibility. Basically because the Italian meringue is much more stable and is less affected by humidity in the environment.

My main goal in macaron baking is maximize the proportion of feet, because I like them with bigger feet and a plump shell, so I like to try different methods and compare how they work for me. The Swiss meringue method should happen eventually, although for the time being I intend to play with the current recipe a few more times.  I am happy that this batch worked perfectly. The main thing I changed was adding the food dye to one half of the egg white component, and add that to the almond flour together with the Italian meringue. In the past, I followed recipes that instructed you to add the egg white to the almond flour first, forming a thick paste and allowing that to sit while the meringue is prepared. I found that this approach makes it pretty tough to incorporate the meringue and probably negatively affected the macaronage step that follows.

The filling. O. M. G. These macarons will be so unique, different from any macaron you’ll ever have, I guarantee it. It is sweet, perhaps sweeter than most fillings I enjoy, but it has that spicy characteristic of carrot cakes, the cinnamon-clove mixture, that breaks the sweetness a bit. If you don’t have a Trader Joe’s around, the product is available through amazon. The texture was perfect, no hollows, and with a nice “macaron-chew.”  I will play with this method on my next mac-adventure, that will involve more than one color of batter. Let’s hope that the stars will align properly at the time…

ONE YEAR AGO: Soup Saturday: Say Goodbye to Winter

TWO YEARS AGO: Manchego and Poblano Soup

THREE YEARS AGO: A Smashing Pair

FOUR YEARS AGO: Spinach and Mushroom Stuffed Pork Tenderloin

FIVE YEARS AGO: Crispy Chickpea and Caper Spaghetti

SIX YEARS AGO: Spring has Sprung!

SEVEN YEARS AGO: Chickpea and Fire Roasted Tomato Soup

EIGHT YEARS AGO: Double Asparagus Delight

NINE YEARS AGO:  Sun-dried Tomato and Feta Cheese Torte


RAINBOW CARROTS WITH ROSE HARISSA

Giving credit where credit is due, I saw this recipe over at Eats Well with Others, and made it that same evening. I did not have pomegranate seeds at the time, so I used diced mango as a sweet component. We loved it so much I made it again a few days later, this time pomegranate seeds were involved, and I can tell they are a must here. Because I used rainbow carrots, there was not that much contrast of color, but their tiny bursts of sharpness and fresh flavor contribute a lot to the sweetness of the carrots. This will certainly be a regular appearance in our meals, at least for as long as I can get my hands on the amazing ingredient that is rose harissa. Thank you, Joanne!

RAINBOW CARROTS WITH ROSE HARISSA
(inspired by Eats Well with Others)

1 pound carrots of several colors
2 tbsp olive oil
2 tbsp rose harissa
1 tbsp pomegranate molasses
1 tsp cumin seeds
1 tsp salt
lemon juice to taste
½ cup pomegranate seeds
fresh cilantro to decorate (optional)

Heat oven to 450F.
.
Peel the carrots and cut into batons. In a large bowl, mix together the olive oil, harissa, cumin, pomegranate molasses, and salt.  Add the carrots to the bowl and toss well to combine. Spread on a parchment-lined baking sheet and roast for 20 minutes, or until starting to caramelize and become tender.

Remove from the oven, add some lemon juice and  sprinkle with pomegranate seeds. Decorate with cilantro leaves, if so desired.

ENJOY!

to print the recipe, click here

Comments: I am absolutely in love with this dish. I had to wait a long time to get rose harissa, since it was shipped all the way from England, so I get very protective of my bottle and always wonder if I should really use it in this or that preparation. Well, this one is definitely worth getting that couple of tablespoons from My Precioussssss.  My love for this sauce should be quite clear from the composite photo above… It is not really hot, it’s intense and complex, with a very subtle floral component from the rose. The more I use it, the more I love it. Which means soon it might be time to cave and place another order for it. Either that or emigrate to UK.

ONE YEAR AGO: Deviled Eggs go Green

TWO YEARS AGO: Tiramisu

THREE YEARS AGO: Pulled Pork, Slow-Cooker version

FOUR YEARS AGO: The Pie of the Century

FIVE YEARS AGO: Bon Bon Chicken

SIX YEARS AGO: Leaving on a Jet Plane

SEVEN YEARS AGO: A Pearfect Drink

EIGHT YEARS AGO: Ming Tsai Under Pressure

NINE YEARS AGO: Paris, je t’aime!