BLUEBERRY CRUMBLE COFFEE CAKE

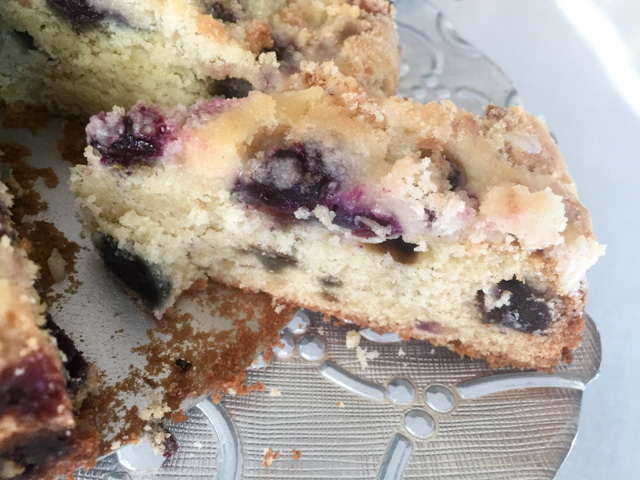
As I mentioned before, one great food blogger I follow is Helen Fletcher. She is an expert baker, and also a natural teacher. Each of her posts is a detailed tutorial that allows even the most insecure baker (Sally raises her hand…)  to feel comfortable to face a little baking challenge. A few months ago she blogged on a Blueberry Coffee Cake that had a nice twist to it, the inclusion of a crumb topping.  I was intrigued. It turned out as a delicious, moist and tender cake, one that prompted Phil to grant me an unexpected compliment: “this is exactly the type of cake my Aunt Mildred would bake and we loved so much!”  Can you grasp the full impact of those simple words put together? Me and his Aunt Mildred, joined in the same level of cake baking.  I had to hold myself on the side of the counter top, my knees went a bit weak as my blood pressure dropped from the sheer shock of it. And then… then I could not stop smiling.

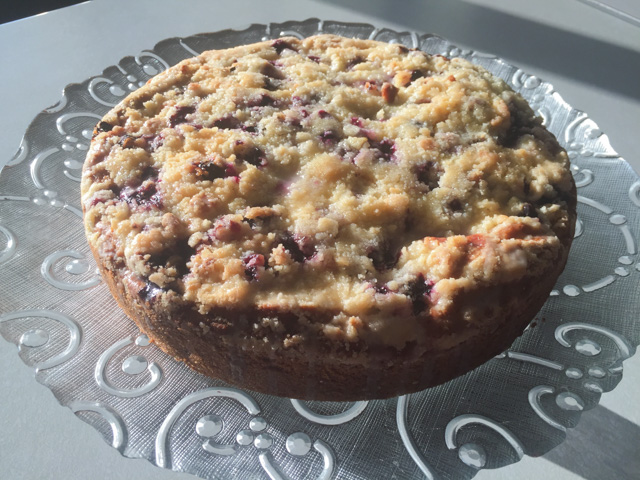
EASY BLUEBERRY CRUMB COFFEE CAKE
(from Pastries Like a Pro)

for the cake:
2 + 1/4 cups all-purpose flour, divided (315 grams)
1 cup sugar (200 grams)
3/4 cup butter, cold (170 grams)
1 teaspoon baking soda
1 egg
1/2 cup buttermilk
9 ounces frozen blueberries (255 grams)
for the lemon glaze:
1 cup powdered sugar (130 grams or 4 1/2 ounces)
3 tablespoons lemon juice (plus more if needed)

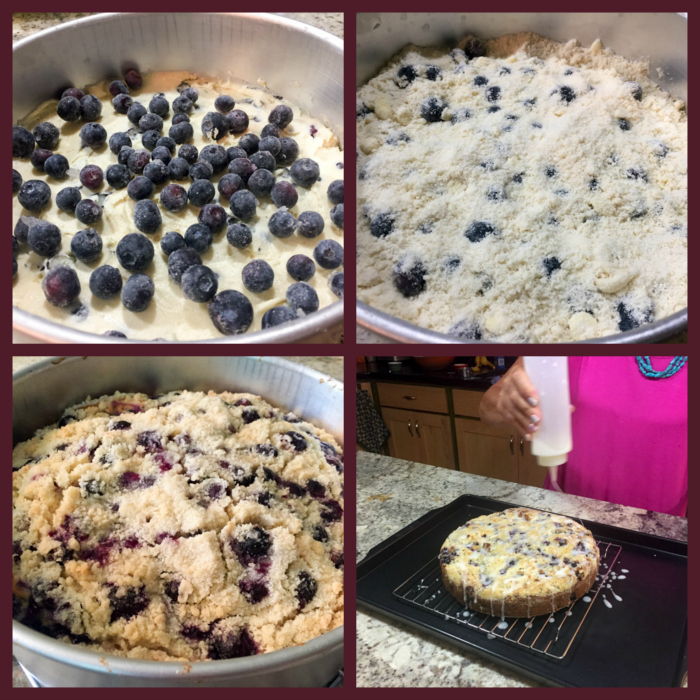
Heat the oven to 350°F. Spray a 9″ cheesecake pan or springform pan and set aside.

Combine 2 cups flour and sugar in the bowl of a mixer. Cut the butter into small pieces and add it to the bowl. Mix on low at first until most of the butter has been cut in. Raise the mixer and continue to mixing until crumbs form. Aim for fine, not large crumbs.

Remove 1/3 of the crumbs (about 210 grams) and set them aside. They will be used for the topping.

Add the remaining 1/4 cup flour, baking soda, egg and buttermilk to the remainder of the crumbs in the bowl. Beat on low to bring it together then on medium to smooth it out. Stir half of the frozen blueberries into the batter. Spread it evenly in the pan.

Place the second half of the blueberries over the top of the batter. Sprinkle the reserved crumbs over the blueberries. Bake for 50 to 55 minutes until a tester comes out clean. The crumbs will be light in color. My cake took a little more than 1 hour in the oven.

Let cool before removing from the pan.

For the glaze, combine the powdered sugar and lemon juice in a bowl and stir until smooth and with the right consistency to be drizzled. Place the cake on a rack over waxed or parchment paper for easy clean up. Drizzle one way,turn the cake and drizzle in the opposite direction. Allow the glaze to set before serving.

ENJOY!

to print the recipe, click here

Comments: for a step by step tutorial, make sure to stop by Helen’s site using the link I provided under the recipe’s title. Once you pour the cake batter in the pan, it will seem as if it’s not enough.  Don’t worry, just go on and follow the recipe as specified. I suppose my glaze could have been slightly thicker so that it would stay more as a drizzle, but even if a bit thin, the taste was not compromised.

As usual, this was shared with our co-workers on a Monday morning. It is one of my favorite things to do, bake something on Sunday and share with our departmental colleagues. The cake was gone before 9:30hs, which is an excellent indication of approval. But, truth is, I could not ask for a better compliment than that of my beloved husband, the resident cake-critic, the one who was raised by bakers probably as talented as… Helen Fletcher!

Helen, thanks so much for another great recipe, I now need to take a deep breath and make your Portokalopita! If anyone is puzzled by the name, go visit her site, it is a cake that uses phyllo dough in the batter!  Can you imagine that?  Mind blowing!

ONE YEAR AGO: Fresh Strawberry Yogurt Bundt Cake

TWO YEARS AGO: Quinoa Salad with Red Grapes and Avocado

THREE YEARS AGO: Strawberry Coffee Cake

FOUR YEARS AGO: Lemon-Poppy Seed Muffins

FIVE YEARS AGO: Mascarpone Brownies

SIX YEARS AGO: Salmon Tacos

SEVEN YEARS AGOCinnamon Turban Bread

EIGHT YEARS AGO: Summertime Gratin


SaveSave

SaveSave

SaveSave

SaveSave

SaveSave

SaveSave

SaveSave

SaveSave

SaveSave

SaveSave

VIETNAMESE-ISH CHICKEN

I am very fond of Vietnamese food, and this is my take on grilled chicken thighs inspired by that cuisine. I took a few liberties with classic versions, by using coconut aminos instead of soy sauce, and omitting garlic, which is always present.  Of course, add all the garlic that pleases you, and go for the traditional soy. I find the flavor of coconut aminos a bit more subtle, allowing other herbs and spices to shine more. I also added Sriracha sauce, a product from Thailand which I happen to be addicted to. So there. As I said, it is “inspired” by Vietnamese cuisine, made by a Brazilian-American with gastronomically-daring tendencies.

VIETNAMESE GRILLED CHICKEN THIGHS
(from the Bewitching Kitchen)

6 boneless, skinless chicken thighs
1 teaspoon kosher salt
1 tablespoon Asian fish sauce
2 tablespoons coconut aminos sauce (or soy sauce)
1 tablespoon dark brown sugar
2 teaspoons peanut oil
1 teaspoon grated ginger
1 teaspoon Sriracha sauce or other hot sauce of your preference
Grated zest and juice of 1 lime
fresh cilantro, for serving

Season the chicken thighs with salt. Make the marinade by whisking all other ingredients (except cilantro) in a bowl.  Add the chicken and mix well to coat. Place in a plastic bag, massage the pieces and place in the fridge for at least one hour, up to overnight.

When ready to cook, remove the pieces from the marinade, and grill the thighs until cooked through, about 7 minutes per side. Serve with fresh cilantro and a sprinkle of fresh lime juice all over the meat.

ENJOY!

to print the recipe, click here

Not much is needed to turn these juicy grilled chicken thighs into a great meal. Green beans with almonds were a very nice complement, but when it’s really hot I think cucumber raita could be even better. Keep in mind I made this recipe back in March, just taking my usual slow-coach approach to share on the blog.

If you are partial to white meat, use the same marinade for chicken breasts, but pound them very thin, and run them on the stupidly hot grill until cooked through. I find it that it is the best approach for that type of meat. Plus, it’s ready in less than 10 minutes. Cannot beat that. The brown sugar in the marinade ensures those gorgeous grill marks even if the grilling time is kept short.

Add to FacebookAdd to DiggAdd to Del.icio.usAdd to StumbleuponAdd to RedditAdd to BlinklistAdd to TwitterAdd to TechnoratiAdd to Yahoo BuzzAdd to Newsvine

ONE YEAR AGO: Rutabagas Anna

TWO YEARS AGO: The Ultimate Raspberry Sorbet

THREE YEARS AGO: Crispy Cornmeal Sweet Potato Fries

FOUR YEARS AGO: Pan-grilled Tilapia with Smoked Paprika & Avocado Cream

FIVE YEARS AGO: Golden Saffron and Fennel Loaf

SIX YEARS AGO: In My Kitchen, July 2011

SEVEN YEARS AGO: Heavenly Homemade Fromage Blanc

EIGHT YEARS AGOA Perfect Sunday Dinner


SaveSave

SaveSave

SaveSave

SaveSave

SaveSave

SaveSave

PATI JINICH’S FLOURLESS CHOCOLATE PECAN CAKE

I started watching Pati’s show on PBS about a year ago. Not only every recipe I made from her show (and cookbook) worked great, but I became more and more fond of her warm personality, authenticity, down to Earth way. The type of person I would not think twice about inviting over for dinner or sitting down at a cafe to shoot the breeze. Her show is always refreshing and fun. In her travels around Mexico she visits interesting spots and focuses on real people, fishermen, cooks on street stands, farmers, I always learn something new. Come to think of it she is the antithesis of Giada in her current show on FoodTV. I keep losing my enthusiasm for Giada, more and more, due to her excessive focus on Hollywood-style glamour. Hosting a fashion dinner on the rooftop of the Prada store in Firenze, with chamber music playing and wearing a Dolce & Gabbana dress?  The whole time acting all matter-of-fact about it?  It’s a bit much for me…  But, back to Pati. This cake is a cinch to make, tastes wonderful, and is superb with a cup of coffee. Try it, and you will love it.

FLOURLESS CHOCOLATE PECAN CAKE
(from Pati Jinich)

1/4 cup  (56 g) unsalted butter plus 1 tablespoon for buttering the pan
6 ounces bittersweet chocolate
1 cup  (125 g) pecans
6 large eggs
1 teaspoon vanilla extract
1 cup (200 g) sugar
Pinch of kosher or coarse sea salt
confectioners’ sugar

Heat oven to 350°F. Butter a 9-inch springform pan and line bottom with parchment paper.

Melt the chocolate and the 1/4 cup butter in a microwave at 50% power for a couple of minutes, stirring after one minute. Set aside to cool.

Using a blender, chop the pecans finely. If you have a Vitamix, it will take about 30 seconds, do not let it turn into pecan butter. Add the eggs, vanilla, sugar, salt and melted chocolate mixture, blending until smooth. Pour the batter into the buttered springform pan and bake until a toothpick inserted in center comes out moist but not wet, about 40 minutes.

Once it has cooled a little, run the tip of a knife around the pan and release the cake from the pan. Invert onto a plate, and then again, or serve directly onto plates if left on bottom part of springform pan. Sprinkle with confectioners’ sugar and serve.

ENJOY!

to print the recipe, click here

Comments: This is by far the easiest cake ever to make. Perfect to bake with kids, since it will be ready in minutes with the help of a blender. Pour the batter into the pan, and you are done. It is very moist, the pecans giving it a perfect additional flavor that matches the chocolate quite well. It has of course the added benefit of being gluten-free, so if you bake for someone with gluten sensitivities, it is a must-have in your repertoire.

I took it to our department and it was a huge hit with everyone who arrived early enough on that Monday to enjoy a piece.  Pati says in her show that she’s been making this cake for many years, it is a favorite with her family. Once you baked it, you’ll see why. Simple, no fuss, sweet but not over the top, rich but not too extravagant. My favorite type of dessert.

ONE YEAR AGO: A Tale of Two Macarons

TWO YEARS AGO: Chocolate Chip Shortbread Cookies

THREE YEARS AGO: Chicken in Green Pipian Sauce, Sous-vide Style

FOUR YEARS AGO: Classic Shrimp Gobernador Tacos

FIVE YEARS AGO: A Walk Towards the Sunset

SIX YEARS AGO: In My Kitchen

SEVEN YEARS AGO:  Heavenly Home-made Fromage Blanc

EIGHT YEARS AGO:  A Perfect Sunday Dinner


SaveSave

SaveSave

SaveSave

SaveSave

SaveSave

SaveSave

SaveSave

SaveSave

SaveSaveSaveSave

SaveSave

SaveSave

MIMI’S STICKY CHICKEN, A CALL FROM MY PAST

Paleo-friendly, low-carb & delicious!

Many years ago I used to visit a cooking forum that is long gone. One recipe was a big hit with many of the members: Mimi’s Sticky Chicken. I admit the name is not very sexy, but once you’d read the many stellar reviews, you’d be inclined to disregard the sticky issue and give it a try. Over the years, that exact recipe has been published in websites everywhere, credit not always given to the author. So, without further ado, here you have the original link. I tried to find out Mimi’s whereabouts, but my search skills returned nothing.  As you can see in the link, she created this recipe in the early 80’s, and asked for full credit whenever someone talked about it. It’s only fair.  I used to make it quite often when I was dating Phil and during the early years of our marriage, as the kids absolutely loved it. For some reason, I forgot all about it. It’s been definitely more than a decade since I last had it on our table. But to compensate, I made it twice in the last month. HA!

MIMI’S STICKY CHICKEN
(modified from the original version found here)

2 teaspoons salt
1 teaspoon paprika
1/2 teaspoon cayenne pepper
1/2 teaspoon onion powder
1/2 teaspoon thyme
1/2 teaspoon black pepper
1/4 teaspoon garlic powder
1 whole roasting chicken, about 3 pounds
1 shallot, cut in half
1 lemon, cut in quarters

Combine all spices  in a small bowl. Dry chicken very well, rub the spice mixture over skin and sprinkle a little inside the cavity.  Place in a bag or in a bowl, covered with plastic wrap, and refrigerate overnight.

Heat the oven to 250F. It is not a typo. It is a very low oven.  When ready to roast, stuff the cavity of the chicken with the shallots and lemon. Place it breast side down in a roasting pan (I like to use a small rack to keep it elevated, spraying the rack with olive oil to prevent the skin from sticking to it).

Cook for about 5 hours, or until the internal temperature reaches 155 F. Baste occasionally after the first two hours, with the liquid that starts to accumulate in the roasting pan.

If you like to crisp up the skin, carve the chicken in pieces and place under the broiler briefly. It will falling apart, so handle it gently.

ENJOY!

to print the recipe, click here

Comments: Amazing how something we loved so much could end up neglected for years. Two things I’d like to bring up: first, if you don’t have time to refrigerate the bird overnight with the spice mixture, don’t worry, just go ahead with it right away. Second, if you are not around to baste the chicken, it won’t be a serious drawback. When ready to serve, baste a little with the roasting liquid, and go for that brief encounter with the broiler. On your first time making this recipe,  it would be nice to check the temperature and see if after 4 hours the meat is already approaching 155F. If it is, don’t leave it all the way to the five-hour mark. Once you get to know how your oven behaves, you can trust the timing a bit more. Make sure to always roast a chicken of similar size.

As I mentioned before, once the meat is cooked, it will be falling apart. Note in the picture below how the bone broke through the skin.


I also like to squeeze the roasted lemon all over the chicken right before serving, and sometimes will grab a fresh one to make sure to get that extra bite of acidity that goes so well with it.


Dinner is served: Mimi’s Sticky Chicken,
Pan-Steamed Broccoli, and Roasted Butternut Squash… 


Add to FacebookAdd to DiggAdd to Del.icio.usAdd to StumbleuponAdd to RedditAdd to BlinklistAdd to TwitterAdd to TechnoratiAdd to Yahoo BuzzAdd to Newsvine

ONE YEAR AGO: Perfect Soy-Grilled Steak

TWO YEARS AGO: The Devil’s Bread

THREE YEARS AGO: Heart of Palm Salad Skewers

FOUR YEARS AGO: Potluck Frittata and Lavoisier

FIVE YEARS AGO: Home-made Corn Tortillas

SIX YEARS AGO: Whole-Wheat Spaghetti with Peanut Sauce

SEVEN YEARS AGO: Brigadeiros: A Brazilian Party!

EIGHT YEARS AGO: Lemony Asparagus


A TRIO OF AIR-FRIED GOODIES

For those who follow my blog for a while, it’s obvious that I love a new gadget. In the kitchen, in the lab, I am always excited to try something new. Then comes the flip side of that coin. The after-taste of guilt after brining a new toy home. “Did I really need that?”  Next, I make solemn promises to never ever fall to temptation again (yeah, right). Lolita, our Philips air-fryer, was no exception, I went through intense mea culpa sessions every time I passed by the laundry room and saw her in all her shiny beauty sitting on the countertop. Ready and waiting. Guilty feelings are not fun, so I fight them with my best weapon: putting Lolita to work as often as possible. You know what? It seems to work. So here I am to share three guilt-removing dishes made in the air-fryer.

GOODIE #1
FRIED MANIOC ROOT, A BRAZILIAN CLASSIC

I’ve published quite a few years ago a full tutorial on how to make “mandioca frita.” You can read it here,  so that you learn how to prepare it. Please, don’t ever try to fry the root without cooking it first.

Once you got your pieces of yucca root cooked, they can sit in the fridge for a few days, or even be frozen. To cook them in the air-fryer, simply coat them with a little olive oil, season with salt, and place in the fryer at 390F for 20 minutes or so.  The time will vary depending on the size of your fries. Watch them as they start to get dark brown, then remove them and salt the pieces before enjoying them.

Just like potato fries and sweet potato fries, there will be a difference in texture, as the fried pieces will not be soaked in oil. That, of course, may turn off some traditionalists, but I find it a brilliant way to reduce the fat content still allowing us to enjoy this delicacy.

GOODIE #2
SWEET POTATO CHIPS

I’ve blogged about sweet potato chips made using the spiralizer. In this simpler version, I cut them by hand and omitted the soaking. The idea was to get them to the table as quickly as possible on a weeknight. I used a mixture of orange and white sweet potatoes, cut them more or less uniformly in 1/4 inch slices, coated them very lightly with salt and into the basket they went. Temperature was set to 390F, which is the highest setting the Philips will go to, and they took about 18 minutes to get brown, shaking the pan every once in a while.  I must say I preferred the batch made with the spiralizer, but if you need to take a simpler, faster route, these are still pretty pretty pretty good (any Curb your Enthusiasm fans out there?).

GOODIE #3
PARSNIP FRIES

These turned out excellent! The only problem with them was the amount. I ended up with a smaller portion than anticipated. It so happened that when I was peeling the parsnips, the largest of all slipped from my hand and fell on the floor. A race took place between Sally and a certain dog that attends by the name of Bogey Quit That. Against all odds, since the cook happened to be closer to the fallen root, BQT won, and thought it was super fun to grab it and run around the house with it, as fast as his powerful legs would allow. There was a bit of profanity involved, some screaming, until he finally dropped the badly mangled veggie on the second floor of our home, near the bed in a guest bedroom. Into the trash it went. Serial killer, folks. As I mentioned many times, I must have been a serial killer in a past life. Eternal karma.

But, back to the recipe. Cut the parsnips as uniformly as possible. Not an easy thing to do, those are creatures shaped in exotic ways. Coat them with a little olive oil, salt, pepper, and then add one to two teaspoons of cornmeal all over, shake gently. Any cornmeal that doesn’t stick, it’s ok, you just want a very subtle coating. Place them in the basket of the air-fryer, and set it to 360F. Cook for 10 minutes, increase the heat to 390F and cook a few more minutes, shaking the pan every once in a while. As they brown, remove them and adjust seasoning with salt if needed. Due to their shape, some bits will be more cooked than others. No big deal, it’s all good. They have this wonderful sharp taste, like fries that had a date with a lemon. Yeah, that’s about right. Love them.

We really love the air-fryer, and I have no regrets about buying it. It makes portions that are perfect for the two of us, it is not too noisy, it doesn’t smoke, it is super easy to clean, and it doesn’t require a lot of time to reach temperature. Two minutes at most, but I don’t even worry about that. I put everything inside, turn it on and add two minutes to the cooking time to compensate for the heating.

Of the three goodies, I think the parsnips were my favorite. I might try to make them in the spiralizer as chips, just for fun. We enjoyed them with a New Mexico Pork Chile, rice, and avocado slices. Simple, but very tasty dinner. Of course, a little more parsnip fries would have been nice… But life with BQT has its complexities…


ONE YEAR AGO: Focaccia with Grapes, Roquefort and Truffled Honey

TWO YEARS AGO: Moroccan Carrot Dip Over Cucumber Slices 

THREE YEARS AGO: White Chocolate Macadamia Nut Cookies

FOUR YEARS AGO: Cilantro-Jalapeno “Hummus”

FIVE YEARS AGO: A Moving Odyssey

EIGHT YEARS AGO:
 Shrimp Moqueca

SaveSave