THE PIE OF THE CENTURY

The number π (pi) is the ratio between the circle’s circumference and its diameter, a value approximated as 3.14159. March 14th, 2015 becomes the closest match to the value of pi so lots of people will be making and/or enjoying some type of pie to celebrate a special day that only happens every 100 years! In my humble opinion, the real day should be celebrated in 2016, as if you were to approximate the value of pi to four decimal points, 3.14159 would turn into 3.1416. But, who am I to swim against such a strong current? I rather join the fun. And maybe have a pi encore next year 😉

We will be enjoying a Cherry Pie made by special friends… sorry, no recipe.

unnamed-10


But to compensate for the lack of recipe, I am sharing a few pies of my past…
ENJOY!

baked1

Carriage House Walnut Apple Pie

pieces

Italian Easter Pie

slicePumpkin Pie

4thofjulypieA Pie for the 4th of July

baked1-2Asparagus Quiche
(
maybe a stretch on the pie concept, but too delicious to pass)

HAVE A WONDERFUL PI DAY!

Add to FacebookAdd to DiggAdd to Del.icio.usAdd to StumbleuponAdd to RedditAdd to BlinklistAdd to TwitterAdd to TechnoratiAdd to Yahoo BuzzAdd to Newsvine

SILKY RUTABAGA PUREE

Many years ago (pre-blogging life) I had an encounter with jicama that left me traumatized.  I sliced it very thin and ate it the way Marcela often recommends it, as a refreshing, light alternative to corn tortillas.  I intensely disliked it, but through a convoluted set of events, a few days later realized that jicama that was not.  I had bought, sliced, and endured a rutabaga. Big oops moment!  I stayed away from both veggies for quite a long time, but finally made peace with them. Jicama does a reasonable job as tortilla-wannabe, and as far as rutabaga goes, it kills me that I took so long to finally cook it. I fell in love with this mashed version at the first spoonful. Creamy, smooth, with a unique flavor, perfect to showcase some Boeuf Bourguignon… or any other type of beef stew that might be calling your name.  Truth is, if you cannot make winter disappear by snapping your fingers, the alternative is to fight it with comfort food. Like this root veggie puree with a touch of coconut milk.  You will love it, I promise!

RutabagaPuree
SILKY RUTABAGA PUREE
(slightly modified from A Calculated Whisk)

3 medium rutabagas, peeled and cut into 1-inch chunks
1 large yam, peeled and cut into 1-inch chunks
1 teaspoon kosher salt
2 tablespoons extra virgin olive oil
1/4 cup coconut milk
salt and freshly ground black pepper, to taste
dash of nutmeg

Place the rutabaga and yam chunks in a saucepan with the salt and water to cover. Bring to a boil, reduce the heat, and simmer, covered, until the veggies are very tender when pierced with a fork, about 20 minutes. Drain, reserving some of the cooking liquid. Place the rutabaga, yam, olive oil, coconut milk. salt, and pepper in a food processor and process until smooth, add the nutmeg and process briefly. Taste and adjust seasonings as desired. If needed, adjust consistency with some of the reserved cooking liquid.

ENJOY!

to print the recipe, click here

served

Comments: This meal was perfect for a snowy Saturday evening.  I cooked the beef stew low and slow for over 4 hours, it was luscious, the red wine mellowed down by the long gentle simmer in the oven.  The rutabaga puree, perhaps an unusual side dish for Bourguignon,  was quite a nice match not only in taste and texture, but also in its color, bright golden.  When we sat down to enjoy our dinner, Phil took a first bite and immediately decided it was worthy of a special bottle of wine, one we bought in France many years ago. That was a great move…  Almost made me forget the snow outside. Almost.

composite

Life is good!

ONE YEAR AGO: Bon Bon Chicken: Light and Spectacular!

TWO YEARS AGO: Seafood Extravaganza Pasta

THREE YEARS AGO: A Pearfect Drink

FOUR YEARS AGO: Ming Tsai Under Pressure

FIVE YEARS AGO: Paris, Je t’aime

ZUCCHISAGNA: A TWIST ON A CLASSIC

I don’t think there is such a thing as a person who doesn’t like lasagna. I may have already mentioned that the technician of the lab where I did my PhD in Brazil did not like chocolate nor french fries. Outrageous! She still loved lasagna, proving the point I just made. I hope you’ll let this stretch in Logic 101 slide… 😉 Anyway, I am a lover of this Italian classic, but it’s one of those dishes that can make you feel super full at the end of the meal, even if you exercise severe portion control. Layers of pasta with bechamel, meat sauce, usually a pound of cheese per square inch…. I never order it in restaurants, and confess to making it at home only once in a blue moon. Using thin slices of veggies to play the role of the pasta lightens things up quite a bit. You can use eggplant, butternut squash (Anne Burrell has a great take on this version, BTW), and of course, zucchini as I did here.  A couple of details are important to keep in mind, though. You must pre-cook the zucchini slices or you’ll run the risk of having a watery, unappetizing concoction in your hands. And use a light hand on the cheese.  The delicious meat sauce should be the center of  your attention. Vegetarians? This dish is not for you, sorry. Primal-afficionados? Grab your forks, and dig in!

Zucchisagna1ZUCCHINI RIBBON LASAGNA
(adapted from Martha Stewart)

1 can (28 ounces) whole peeled plum tomatoes, with juice
2 tablespoons extra-virgin olive oil
1 shallot, finely chopped
1/4 teaspoon red-pepper flakes
12 ounces ground turkey, preferably dark meat
2 teaspoons dried oregano
2 teaspoons salt
5 medium zucchini, trimmed
olive oil and lemon juice for brushing zucchini
1 + 1/2  cups full-fat ricotta cheese
1 egg
1/4 teaspoon extra-virgin olive oil
Freshly ground pepper
1/4 cup grated Parmigiano-Reggiano cheese

Make the sauce: Pulse tomatoes with juice in a food processor until finely chopped. Heat oil in a large skillet over medium heat. Cook shallot and red-pepper flakes, seasoned lightly with salt, stirring occasionally, until shallot is tender. Add turkey; cook, breaking up any large pieces, until browned. Add tomatoes, bring to a boil. Reduce heat; simmer until thick, about 20 minutes. Stir in oregano and 1 teaspoon of salt. Let cool.

Make the lasagna: heat oven to 375 degrees. In a small bowl, mix the ricotta with the egg, season with salt and pepper. Reserve. Slice zucchini lengthwise into thin strips (about 1/8 inch thick) using a mandoline or a sharp knife. Brush each slice with a 1:1 mixture of olive oil and lemon juice, and cook on a griddle or grill pan for a few minutes on each side until the slices get some color. Blot on kitchen paper and let them cool to room temperature. Place 5 or 6 zucchini slices, overlapping slightly, in the bottom of an 8-inch square baking dish. Top with 1 cup sauce. Dot with ricotta. Repeat twice with zucchini, remaining sauce, and ricotta, alternating direction of zucchini at each layer. Finish with a final layer of zucchini, cover the dish with ricotta, sprinkle the Parmigiano on top.

Bake uncovered until lasagna bubbles and top is nicely brown, about 50 minutes. Let stand for at least 10 minutes before slicing.

ENJOY!

to print the recipe, click here

composite1

Comments: As I read the recipe from Martha Stewart’s site, a few things bothered me. First, the use of raw zucchini to assemble the lasagna.  In my opinion, that is asking for trouble. Second, the ingredient lists TWO medium zucchini for the full recipe. Unless their zucchini was treated with massive doses of auxins, two won’t be enough.  I used 4 medium zucchini, 50% more ricotta than called for, and my ingredients were enough to assemble a 7-inch square dish instead of an 8-inch.  Of course, some variation is expected, but overall I think the recipe as published in her site had some issues. My version worked great, this was a delicious meal, satisfying without that feeling of “I am going to explode if I don’t go for a walk” often associated with the real lasagna.  Not that there’s anything wrong with it, but… when you want something lighter, try this version. It won’t disappoint you at all…

served1

Dinner is served: Zucchisagna with Baby Greens in Lemony Dressing

ONE YEAR AGO: Ricotta Meatballs

TWO YEARS AGO: Farro Salad with Roasted Leeks

THREE YEARS AGO: It all started with a roof

FOUR YEARS AGO: Carrot and Sweet Potato Puree

FIVE YEARS AGO: Impromptu Pasta Dinner

MY FIRST FRESH TRUFFLE ADVENTURE: POULET DEMI-DEUIL

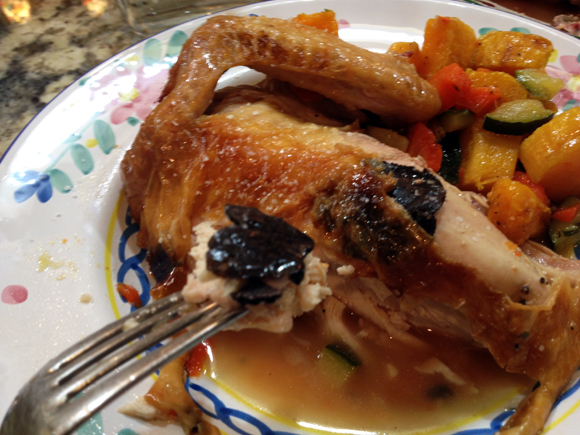
Last month I showed you a gorgeous fresh black truffle received from a special reader of my blog, who prefers to stay anonymous. The package also included the right tool to shave it, and a bonus bottle of white truffle oil. I had to come up with a nice recipe to showcase this once-in-a-lifetime goodie.  After spending hours with cookbooks, magazines, and surfing the net, I finally found the recipe: a classic French dish called “Poulet Demi-Deuil“, which loosely translates as “chicken in half-mourning”. Morbid? Well, not really, the name is associated with the black truffle slices showing through the skin, like a black veil.  Let’s say it’s poetic, ok? Chicken DemiDeuil
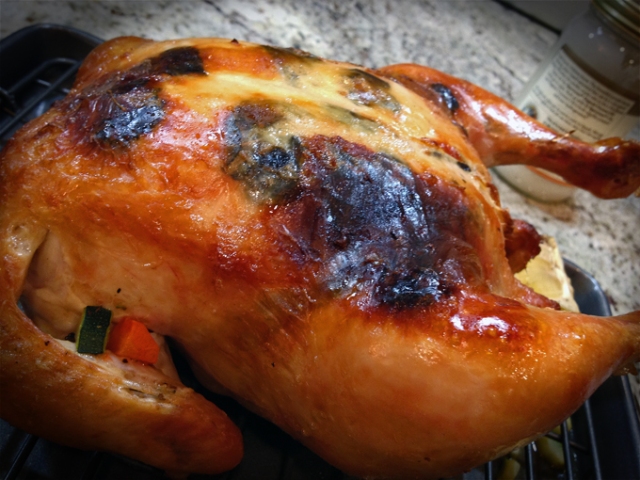
POULET DEMI-DEUIL  (Truffle Braised Chicken)
(adapted from Fine Cooking magazine)

1 oz. fresh black truffle
2 Tbs. Madeira wine; more as needed
One 2-1/2-lb.chicken
Kosher salt
Freshly ground black pepper
2 Tbs. unsalted butter, softened at room temperature
4 cups chicken stock (homemade is best)
2 medium carrots, peeled 2 large leeks (white parts only)
2 medium zucchini
1/4 cup cold unsalted butter, cut into 1/2-inch cubes
1/2 tsp. freshly squeezed lemon juice

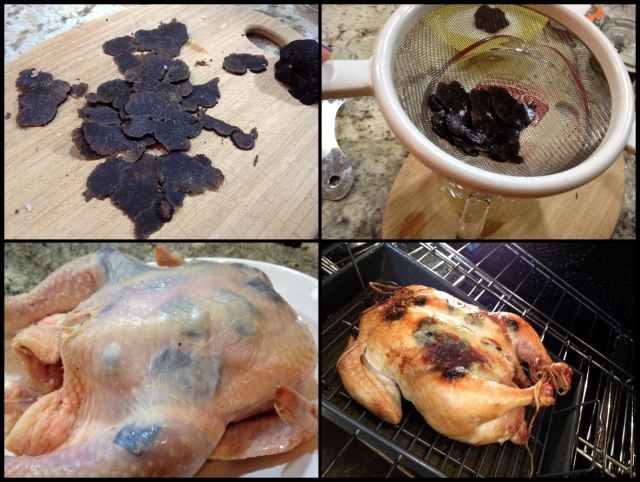
Slice the truffle very thinly using a mandoline or a very sharp, thin-bladed knife and a steady hand. Put the slices in a small bowl, add the Madeira, and let soak briefly to moisten the truffles (making it easier to slide them under the chicken skin and giving them some Madeira flavor).

Strain the truffle in a fine-mesh strainer set over a small bowl. Reserve the liquid. Moisten your hands under cold running water and loosen the skin on the chickens’ breasts and thighs, carefully sliding your hands between the skin and meat.   Slide the truffle slices under the skin of the chicken breasts to cover them, then slide a slice or two under the skin of each thigh. Finely chop the remaining truffle slices and set aside for use in the sauce. Truss the chickens, cover with plastic wrap, and refrigerate overnight to allow the truffles to flavor and perfume the chickens.

Heat the oven to 400°F. Season the chicken generously with salt and pepper, then rub with the softened butter. Set on a rack in a roasting pan and roast for 40 minutes. (The chicken will be underdone.) Pour the stock, reserved chopped truffle, and reserved Madeira into a ovenproof, flameproof casserole large enough to hold the chicken with some room to spare. Bring to a boil, then lower the heat so the liquid is simmering and cook until reduced to about 2 cups;  about 30 minutes.

Meanwhile, cut the carrots and leeks into square segments, keeping them separate. Wash the leeks well. Cut off the ends of the zucchini and cut out the center portion by slicing down its length to remove 4 rounded sides. Discard the rectangular center portion and cut the outer portions into uniformly sized pieces. about 1/4 inch thick. Remove the strings from the chicken and set it in the casserole, breast side up. Add the vegetables, cover and braise at a simmer until fully cooked, about 20 to 30 minutes.

Transfer the chicken to a large serving platter and cover with aluminum foil to keep warm. Raise the heat in the pan with the stock and veggies to high, and cook until the broth has reduced a bit, about 5 minutes. Swirl in the cold butter, one cube at a time, to thicken and enrich it. Taste and adjust the seasoning with salt, pepper, Madeira, and/or lemon juice. Spoon some sauce and vegetables over the chicken on the serving platter and serve.

ENJOY!

to print the recipe, click here

composite1 Comments: My hands were shaking as I started slicing the truffle. In a flash-back, I had this vision of my days as a pos-doc in Stanford, around 1988. At some point I needed to use a special reagent: it was an antibody chemically coupled to a gold particle that could be later visualized under the electron microscope. In those days, such reagents were tremendously expensive, and the P.I. of my lab was definitely not swimming in grant money. So, I knew I had to be VERY careful and not make any mistakes once I opened that tiny little container. My hands were shaking, I was hyperventilating, even feeling a bit queasy.  But, back to the chicken, even though no gold-labeled antibody was involved, I went through similar hyperventilation as I worked to stuff the delicate slices under the skin. skinstuffing 
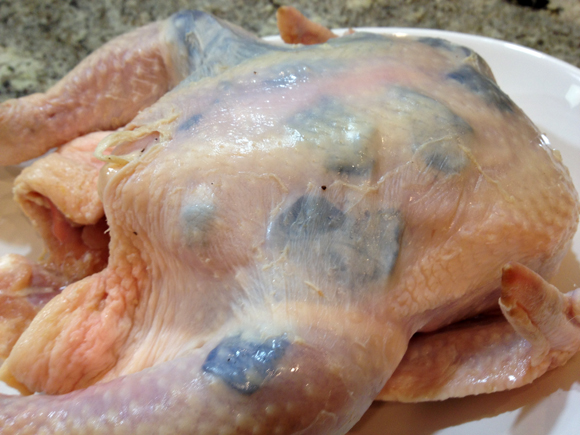
Phil at first was looking over my shoulder, but at some point he said “I think I should leave you alone with the truffle“. Smart man. The soaking of the slices in Madeira wine is a must, not so much for flavor, but to allow the slices to slide easily under the skin. If you don’t do that each slice will crumble in tiny pieces, and that would make a polka-dot instead of a black veil. You don’t want that. composite2
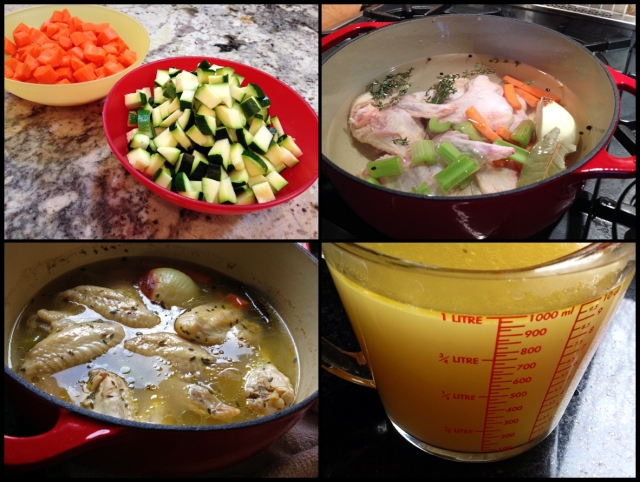
Of course, for such a special recipe, I had to make chicken stock from scratch, and used my favorite method: chicken wings, carrots, celery, onions, some herbs, a smidgen of ginger. In a little over one hour I had a luscious stock, dense with gelatin, intensely flavored.   It would be a crime to join fresh truffles with something poured out of a can, don’t you agree?

Pointers for success:  First, do the truffle stuffing under the skin 24 hours before you plan to make the dish. You get a much more intense flavor of truffle through the meat by doing that. Do not skip this advice.  Second, soak the truffles in Madeira wine for the reasons I specified.  Third, make your own chicken stock.  Those are three simple details that will make this recipe really shine.  And you don’t want to cut corners when dealing with such delicacy…

tastybite
Even though the truffle flavor is present in every bite of the chicken and in the sauce that must be spooned all over your side dish of choice, when you get one of the actual slices in your mouth, it is heavenly! I found it quite interesting that the smell of the fresh truffle, especially as the days went by, was almost unpleasant. Strong, and pungent, like a Pont l’Eveque or a ripe Camembert. But the taste… sublime!

Thank you, thank you, thank you, my secret friend!  In the near future I will share two more recipes using the special gift you were so kind to send me…

ONE  YEAR AGO: My Rio de Janeiro: A cookbook review
TWO YEARS AGO: Hearts of Palm Salad with Cilantro Vinaigrette
THREE YEARS AGO: Watercress Salad
FOUR YEARS AGO: Curried Zucchini Soup
FIVE YEARS AGO: Chocolate Bread
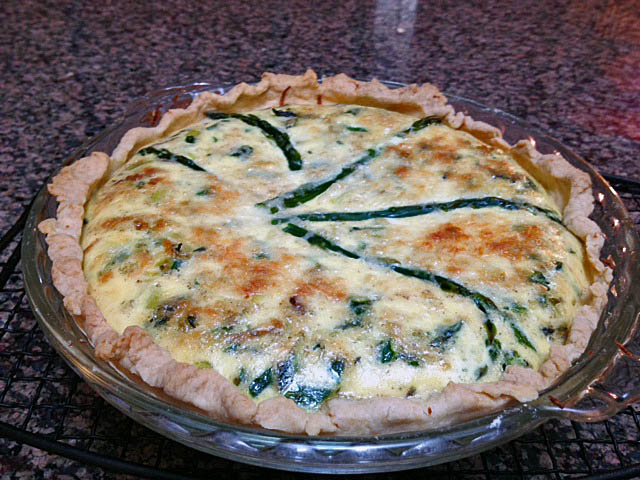
YOU PUT WHAT IN YOUR WHAT?

Criticizing is easy, it comes naturally to most of us, I guess.  I’ve done my share of criticizing The Food TV Network, going on and on about the good old times when their shows were actually about cooking, not endless competitions. One example: Cutthroat Kitchen.  I mean, here we have a guy like Alton Brown, who joined the network with the goal of showing home cooks the science behind food preparation, the tricks of developing a perfect recipe. Now, he hosts a show I find incredibly silly.  And I am not alone. Hummm, did I say I was done with criticism?  Sorry, I got carried away.  I am here to actually praise The Kitchen, a weekly show on FoodTV I enjoy quite a bit. One of the things I like is the sense of spontaneity behind it. Marcela Valladolid is charming, adorable, knowledgeable, and I am a huge fan of Geoffrey Zakarian. Jeff Mauro is witty, and seems like a very genuine person, the more I watch the show, the more I like him. They have features like Tool Takedown, interesting and fun. The whole idea is to test a gadget that is supposed to perform a specific task, say peel apples. One person will use it and another will grab a veggie peeler or a regular knife, and they compete to see who does it better and/or faster. For the most part, they demonstrate that single-use gadgets are a waste of money and storage space. I also love a feature called  “You Put What in your What?”. As the name indicates, it involves unusual additions to recipes, or crazy food combinations.  And that brings me to this post. I hope you’re ready for it.

banner

I know, it scared me too! But, please, don’t run away screaming.  These cookies are delightful, the pictures do absolutely no justice to them.  I baked them early in the morning while the kitchen was still dark and had to take pictures under very unforgiving lights.  You’ll need to make the dough at least 4 hours before baking, the day before is even better, so plan accordingly.  I found the recipe at the The Spice House website. Of course, being the spice cookie lover that I am, and reading the rave reviews of those who made them, I could not wait to bake a batch.

Curry Cardamon Cookies

CURRY CARDAMON COOKIES
(adapted from The Spice House website)

Yields approximately 6 dozen cookies

(I made half the recipe and got 30 cookies)

1 cup butter
2 cups brown sugar
2 eggs, lightly beaten
2 teaspoons vanilla extract
3 cups flour
1 teaspoon baking powder
1/2 teaspoon baking soda
1/2 teaspoon salt
2 teaspoons curry powder
1/2 teaspoon ground cardamom
1 cup walnuts, lightly toasted, chopped

Cream butter and sugar together. Add eggs and vanilla and beat until incorporated. Sift dry ingredients together. Add to creamed mixture, a third at a time. Stir in nuts.

Divide dough into four rolls and wrap each in waxed paper. Refrigerate at least 4 hours (may also be frozen).

Slice into ¼-inch slices and place on an ungreased baking sheet. Bake in preheated 350 degree oven until golden brown, 12-14 minutes. Let cookies cool for 2 minutes on baking sheet, then remove to a rack to cool thoroughly.

ENJOY!

to print the recipe, click here

rolls
I often tell our students to read the protocol carefully before starting a new experiment. Sometimes it would be nice to listen to my own advice.  The bit of “refrigerate the dough for at least 4 hours” caught me unprepared. It was 9 pm and my intention was to bake them before going to sleep. Instead, I had to stick the dough in the fridge and resort to plan B: turn the oven on at 5:30am next day…    Oh, well…

They puff quite a bit while baking and release a fantastic aroma that will fill  your home with joy and tail-wagging dogs.

baking
Can you tell there is curry in them?  I doubt it. Actually Phil could, but I suspect he’s got a mass spectrometer in his nose, that man identify smells like nobody’s business. Our students thought they had ginger. I wish the pictures turned out better, but trust my words: these are GREAT cookies.  You know why I say that? I normally have one cookie of every batch I bake, no matter how tasty.  This was a FOUR COOKIE downfall.  I had four. One at home to make sure they were good enough to share, and the others during our lab meeting. They seem so harmless, but in my opinion they join all goodness a  cookie should have: sweetness that is not cloying, and a peppery, salty, addictive taste that mixed with the walnuts makes you go back for just one more. Maybe three.

cooling

This is another example of a cookie that will not win a beauty contest, I admit. But please, make them, share with friends, and dare them to guess the secret ingredient!

ONE YEAR AGO: In My Kitchen, March 2014

TWO YEARS AGO: The Blogger and the Shrink

THREE YEARS AGO: The Wheat-Berry Transmogrification

FOUR YEARS AGO: Curried Zucchini Soup

FIVE YEARS AGO: Roasted Onion and Asiago Cheese Miche