Beware, this is a long post exclusively about exercise. Stop right here if the subject doesn’t appeal to you. 😉
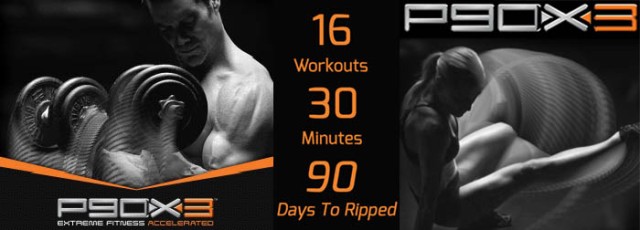
If you have been reading my blog for a while, you know that I am slightly passionate about exercise and fitness. Next month marks my 5th anniversary following the routines designed by Tony Horton, and I’m still having fun after all these years… I already reviewed the original P90X (launched in 2004) and its sequel, P90X2 (released in 2011). At first I had no intention of trying Tony’s new program, but when I heard that each series was only 30 minutes long, I could not resist. I started P90X3 on December 25th, and wrapped it up last month. Now that I “graduated” from this third adventure, I will share with you my review of the system.

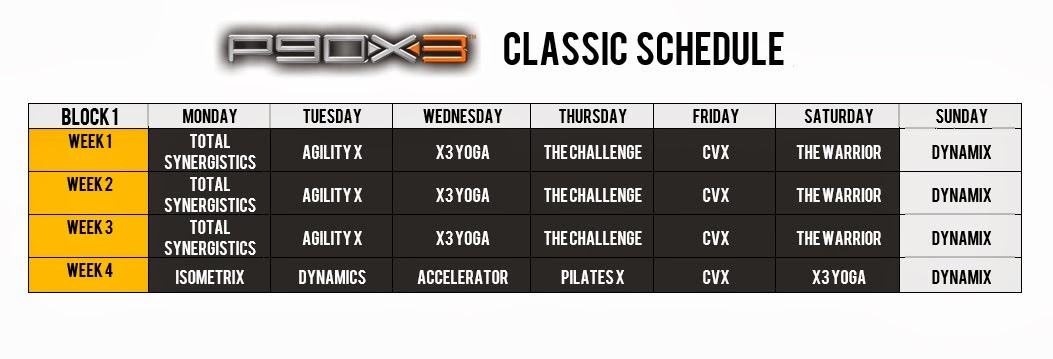
OVERALL ORGANIZATION OF WORKOUTS: In case you don’t know, P90X stands for “Power 90 Extreme”, so all programs are designed to last for 90 days and be very challenging, no matter your initial level of fitness. The workouts are arranged in three phases, each taking 4 weeks to complete. If you follow the program to a T, you will exercise for 6 days in a row, and rest for one day (or do one of the real easy routines, like StretchX, or Dynamix). On the fourth week of each phase, the intensity of the workouts is slightly decreased, so that week acts as a “recovery break” to prepare your body for the following phase. Each block is a little more challenging than the previous one. After the three phases are completed, you will have exercised for 84 days, so a shorter, “Victory Week”, is included in the end, taking you all the way to the finish line, that glorious day 90.
FIRST OBVIOUS QUESTION: Can I do P90X3 if I’ve never done P90X? If you go to Beachbody.com to read about the system, it will be obvious that they want to sell it for as many people as possible, so they insist that anyone can do it. In theory, yes, but in practice you will have to modify many of the exercises because they will be impossible to perform from the get go. Just to give one example of how Tony dialed up a notch in X3, you will be doing single legged squats in Warrior 3 pose for a full minute, changing the position of your arms every 20 seconds, from extended behind you, open on the sides, or extended ahead (obviously the hardest). I found a youtube of a girl demonstrating this particular exercise, you can watch it here. As you can see, it’s all pretty challenging for the legs, back, shoulders and demands excellent balance. I will touch again on the subject of going straight to 90X3 further down in this review.
P90X3 WORKOUTS: The new system resembles the original series quite a bit more than 90X2, but the names of each of the routines are more cryptic. For instance, in 90X, they had “Chest and Back“, “Arms and Shoulders“, “Legs and Back“. Not much left for the imagination, right? Now, take a look at the names of routines for the first phase of P90X3:
 Apart from Yoga and Pilates, not easy to figure out what you will be facing, so let me offer a brief overview of the routines involved in this phase. I will refer to people who have never done P90X as “newbies”, for lack of a better word.
Total Synergistics. That is Tony’s welcome to the program, with a routine that hits pretty much every muscle of your body, abdominal region included. Only two types of pull-ups in this series, but they are killers: a Knee-tuck-pull-up and a Chin-up with Leg Circles (a detailed description of both can be found in this link, exercises #3 and #7). Advanced pull-ups were introduced in P90X2, and at that time I could not do them. Not the case anymore, folks… HA! Bring it, Tony, bring it! Of the 15 exercises of Total Synergistics, I think that 7 will be very hard for newbies. All others will be challenging but doable. An important note about pull-ups: if you don’t have a pull-up bar, or find pull-ups too hard, every one of those exercises can be modified with elastic bands such as these. In each video, there is always someone using the bands to demonstrate proper technique.
Agility X. Think aerobics, but with a lot of moves that require balance and flexibility. Compared to videos like Insanity and Focus T25, Tony is a lot milder in aerobic routines, he is not about making you run out of breath. The only thing you’ll need is a masking tape to mark specific positions on the floor (or carpet). I exercise in our living room on a large rug with a pattern I can use to mark my landing spots. Unless you have a similar type of setting, I advise you to put the tape to use. If you don’t, the natural tendency is to decrease the length of each jump or lunge. Once you get the spots marked, you’ll know exactly where you should be landing. Getting there each time won’t be easy… Newbies might have a little trouble keeping up with the fast pace for 30 minutes, and with moves that require landing in one leg, especially when jumping backwards. But, as Tony puts it “it’s good for you”. 😉
X3 Yoga. In my opinion, no other routine comes close to matching the original YogaX. Yes, it takes too long. Yes, it is hard. But YogaX3 pales by comparison. To squeeze the most relevant poses in 30 minutes, you will be holding each one for a couple of breaths only, not the five deep breaths of YogaX. Bottom line is: I am never sore after YogaX3, but I am always pleasantly beaten after YogaX. My approach during X3 was to do the 45 first minutes of the original YogaX instead of this version, unless I was too pressed for time.

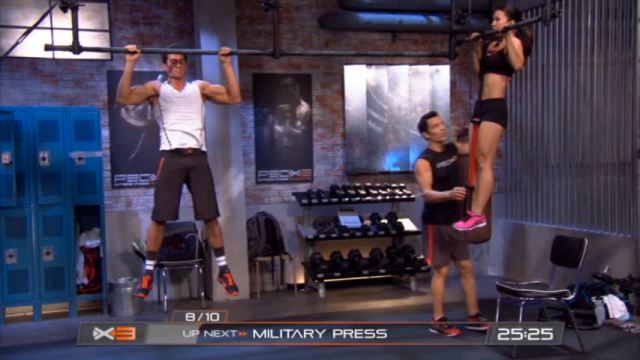
The Challenge. Tony plays a nasty trick on this one. He starts the video by saying “pick a number”. One number for push-ups, one for pull-ups. No more info given at the time. I can do 40 push-ups, so I played conservative and picked 30. Big, huge, painful mistake. I should have paid attention to the fact that in the video, Alice, the Rock-Climber-Tae-Kwon-Do-Black-Belt Goddess (with 10% body fat and abs of steel) picked 20 for her push-ups, but noooooooo, I went with 30. This is Alice, by the way:

She went with 20 push-ups. Yours truly chose 30. See the problem?
For 30 minutes, you will alternate push-ups and pull-ups of 8 different kinds, and each kind should be performed whatever number of times was your goal. Simple math tells me that 8 x 30 = 240. Thank you for being so secretive, Tony! I begged for mercy very quickly. The following week my number was magically reduced to 16, and I barely managed to stick with it. Great news, though: by the end of P90X3 I was able to match Her Goddess at 20, and that put a smile on my face that lasted almost as long as the pain on my back and shoulders. 😉
CVX. Cardio workout with weights. Of all the routines of the first block, I would say this is the easiest for newbies, in part because you can pick a light weight, or even begin with no weight whatsoever. You will still get a good workout that targets almost the whole body. Abs work mostly indirectly by holding your core. I like to use a medicine ball sometimes just to add variety. For classic exercises with weights like Arms and Shoulders, I use 10 to 15 lb dumbbells, but for CVX I hold a maximum of 8 lb, sometimes I go as light as 5 lb. A good, solid workout, not at all gruesome.
The Warrior. It is a total-body workout that requires no equipment, and is based on Tony Horton’s history of working with the US Military on bases around the world. The whole routine can be performed in a very tight space. Probably my favorite of the first phase, some of the exercises will be hard for newbies. One example of those is Elevator Push-ups: imagine that you have three levels of push-ups and you must hold your body at each level for as long as Tony calls it. Upper Level your arms are fully extended; Middle Level you are halfway between the floor and up; Lower Level you go as low as you can possibly go without letting your knees or chest touch the floor. Yes, gruesome. But “it’s good for you“… The Warrior involves some pretty intense cardio, in fact the series closes with 10 Super Burpees. Not for sissies. Don’t believe me? Watch this. I am still working on that back kick. No amount of money would make me post a video of my attempts. Let’s just say it is not pretty, and even the dogs were a bit put off by it. No, Phil has not seen my performance, and if it’s up to me, he never will… 😉
If you are interested in a very detailed review of the whole three phases of P90X3, click here. Each phase ends with a link to the following phase. The guy is hilarious and his views on the system are spot on. Like me, he has no association with Beachbody.com.

HIGHLIGHTS OF PHASES TWO AND THREE
Two of my favorite workouts of phase 2 are Triometrics and MMX. Triometrics is the 90X3 version of jump training (traditionally called plyometrics). It is less high impact, you will be doing each set of moves for 1 minute, but the minute is divided in 3 blocks of 20 seconds each. The intensity of the move (speed, or height of jump) increases every 20 seconds. Warrior 3 squats is part of this series, so as you can see, it’s not just jump training, Tony incorporates strength and core exercises in this routine. It makes it easy to tone the exercise down, if you are not feeling up to the challenge, stay at level 2. Newbies could simply do a full minute on level one until they get used to it. I do think the original Plyometrics is better, but of course that workout is 56 minutes long.
MMX is kickboxing. A version of the original KenpoX on steroids. I love this one! Real challenging, newbies will have a tough time not only with its intensity, but with the overall coordination, particularly until they memorize the names of each move. Tony adds sprawls to boxing moves, so your heart will be racing. Music is great, Alice the Goddess steals the show… Cannot give enough praise to this routine!
My favorite workouts of Phase 3 are Decelerator and Accelerator. In Decelerator you will contract a muscle powerfully and quickly, and then slowly relax it. Most exercises will be ok for newbies, but those in the pull-up bar are tremendously hard. My nemesis? Elevator Pull-ups. Exactly the same principle as I described for Elevator Push-ups, but in this case you are lifting your body up and down three levels on the pull-up bar. I need to get one of the flexible bands to incorporate to our bar like the one the girl is using, because I cannot do Elevator unassisted, I have to dial back to simple pull-ups.
Accelerator is a fun aerobic routine, harder than Triometrics, but with a similar principle: moves get more intense as the minute goes by. Newbies will have no problem by sticking with the intensity they are comfortable with.
My least favorite workout of P90X3? Isometrix. Based on yogic postures, you simply hold each pose for 45 seconds. It is cruel. You will be standing there on the longest 45 seconds of your life, with sweat pouring as if you’re running 10k on the hills of Arizona. I am always super sore next day, even though no weights, no pull-up bars, no jumping were involved. Hate it. But I do it because… “it’s good for you”… yeah, I hear you, Tony….
FINAL THOUGHTS ON THE SYSTEM. Having gone through P90X, P90X2, and P90X3, I must say Tony outdid himself with his latest version. I am absolutely in love with this system, not only for all the variety it provides, but because you are done in 30 minutes flat. If I was asked to play fitness instructor for women over 40, this is what I’d recommend: get the original P90X system, and go through 2 cycles of it. Then move to P90X3, go through it once. After that, follow a mix and match of both systems, tuning it to your personal needs. Don’t bother with 90X2, a few of the routines are pretty amazing, but in my opinion, you will get enough training without it.
The most intimidating aspect of P90X is the idea you must exercise 5 to 6 days per week, and by exercise we are definitely not talking “walk around your block twice“. However, you can take what I already described as a “Zen approach to P90X”.
That’s when you decide that the system will be with you for the long run.
Not 90 days. Not 180. For as long as you are healthy enough to do it. By making this choice, all of a sudden the stress and pressure will be gone. You can exercise 4 days in a row whenever you feel great, you can skip a couple of days and get back to it later.
No one is looking over your shoulder,
your body and your state of mind are your own domain.
Simply follow the order of the exercises so that you’ll target different muscle groups & different types of activities in consecutive days – muscle confusion, a term often used by the exercise geeks at Beachbody.com is a great concept and works: by switching routines around your body never gets quite comfortable with the moves, and you will keep improving your level of fitness.

ARE YOU TEMPTED, BUT A LITTLE INSECURE? I realize that two cycles of 90X + one cycle of 90X3 = more than 1 year of commitment. Keep in mind that the year will pass, no matter what. Imagine that in 1 year you will be able to go through the original 90X as if it’s nothing, and will be getting comfortable with most routines of 90X3.
If the thought of dedicating one full hour for working out is too much, maybe going straight for P90X3 could be a viable option. Yes, you will have to adapt many of the exercises in the beginning until you can perform them, but there’s nothing wrong with that. You will be surprised by how fast your body will respond to the challenge. P90X is fun. It is good for you. It will increase your strength and flexibility, which is definitely something we lose as we age. You will never get bored and you will never regret you started it. Well, sometimes you will, but a couple of Aleve can take care of that. 😉
WHAT TO EXPECT? The answer for this question depends on many factors. Your gender, your age, your health, the stage you are in your life. However, in general terms, I believe that anyone who goes through P90X will notice a profound improvement in the body. In my case, the change was quite dramatic in the upper body and abdominals, and it became more evident during the second cycle of P90X, back in 2010. From reviews online, that seems to be the case for most women, whereas men see a lot of improvement within the first 90 days. Testosterone speaks loud, I suppose… Also, I should add that I never bothered with the nutrition program associated with 90X, it seems that people who need to lose weight benefit from following the recommended diet, and will have better results by doing so.
I hope you enjoyed my review, which might very well be the last one I write on the subject. Even if Tony launches P90X4, I doubt I would go for it (yeah, right… ;-). My personal goal is to reach 10 years of P90X with a minimum of 4 workouts per week. That means I’ve got 5 more years of hard work ahead. Of course, stuff can happen and interfere with this plan, but assuming I won’t have serious health problems (knock on wood), that’s my goal. And then? I’ll cross that bridge when I come to it, hopefully with strong legs, and a positive attitude!

ONE YEAR AGO: Pasta and Mussels in Saffron Broth
TWO YEARS AGO: Triple Chocolate Brownies
THREE YEARS AGO: Shanghai Soup Dumplings
FOUR YEARS AGO: Bite-sized Chocolate Pleasure
Share this: