I grew up enjoying one of my favorite breads, pita, on a weekly basis. In Brazil it’s called “pao sirio” (Syrian bread). As I’ve mentioned before, Middle Eastern food is very popular in Sao Paulo, so my weekends often included visits to a particular spot that sold bags of freshly baked flat bread. It was similar to what we call “pita” here in the US, and usually associate with Greek food. The current bagged stuff at grocery stores pales in comparison to freshly baked pita, and it’s so easy to make that once you master this technique, I doubt you’ll go back to the commercial versions. Unless, of course, you’re lucky enough to have a Middle Eastern bakery right in your neighborhood… 😉
This recipe comes from Dan Lepard, and you can find it by clicking here. You can also read a discussion about it in his forum by following this link.
Dan’s method involves a simple dough (flour, yeast, sugar, olive oil, a little salt) prepared with his minimal kneading procedures, divided into 8 portions, and each one rolled into an oval or circle about 5mm (1/4 inch) thick. The flat breads bake over a blazing-hot baking sheet for a few minutes, until they puff (or not, depending on how well you hit the correct thickness) and acquire a hint of color.
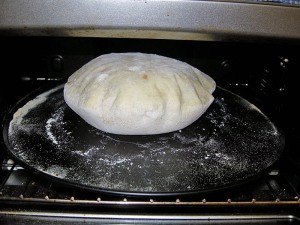
When you hit the jackpot – the slightly elusive, “just-right” thickness, you’ll be rewarded with a beautifully puffed up balloon in your oven!
Comments: Whenever I succeed in baking bread with my electric oven, I wear a smile and walk on top of the world for a few days! Baking 8 pita circles took some patience and fiddling with the oven. Besides baking one at a time, I had to start with the rack in the center, and as the bread puffed up I quickly moved it to the lower position. Against all odds, I didn’t burn myself! It took me more than an hour to bake the full batch, which told me that the dough can sit at room temperature for a long time and still produced great pita! 😉
By the way, if your pita doesn’t inflate as a balloon, it will still be delicious. In fact, I like to roll a few slightly thicker, because they produce a softer bread, with more crumb and a chewy texture. It’s a nice change from the “pocket” version, that also re-heats a little better next day.
I am thrilled to submit this post to Susan’s Yeastspotting, my first this year!
ONE YEAR AGO: Tried and Tasted Round-up


Sally, those look great! It looks like you’ve definitely mastered the art of baking pita bread. I’ve made them a few times, and you are right — they are so much better than anything you can find in the grocery store.
LikeLike
They kept well for 4 days, not bad… warming them up in the oven they are almost as good as in the first day, and still much much better than store bought.
LikeLike
I haven’t tried these Sally, but I’ll go check out Dan’s recipe right now! Thanks…
LikeLike
Celia, I hope you try these, in a “normal” size oven, it will be a breeze! And for you, expert baker you are… even better!
LikeLike
I’m psyched to try this recipe, Sally. I lived in Israel for 6 months in my youth and came to appreciate freshly made pita. And we have a luscious Turkish restaurant in our town now, and their fresh pita is the highlight of any meal there.
I’ll make a batch this week and let you know how it goes!
LikeLike
Nice to “see” you, Paula!
Yes, definitely try this recipe, and I hope it will be as good as the bread you enjoyed in Israel. Sometimes it’s hard to mimic stuff from our past, though – you know, memories are always so special!
LikeLike
You can’t keep a good baker down! Float on air, after the challenge of doing those one at a time under arduous conditions – Well done that baker!!!
LikeLike
Still floating on air… but, trying to come up with a “next bread project”, and not sure what to do…. gosh, this nano-kitchen is a challenge! 😦
LikeLike
Sally..they look great..I would love to try them!! What is meant by strong white flour?? Thanks. Barv
LikeLike
Barb, strong white flour is just what in the US we call “bread flour” – quite often recipes by Lepard and other bakers call for a mixture of bread flour and all purpose in certain proportions, trying to mimic European flours that may not be available everywhere.
LikeLike
Great looking pitas
LikeLike
in the second photo, where can you purchase the cooking ; dome, sphere i do not know what to call it that is in the oven?
LikeLike
Oh, that is just the pita itself all ballooned up – I baked it on a circular baking sheet, non-stick – if you roll it with the right thickness, it really turns into a huge ball as it baked, then it flattens out
very cool to see it!
LikeLike