KLEBBA HOUSE ROLLS

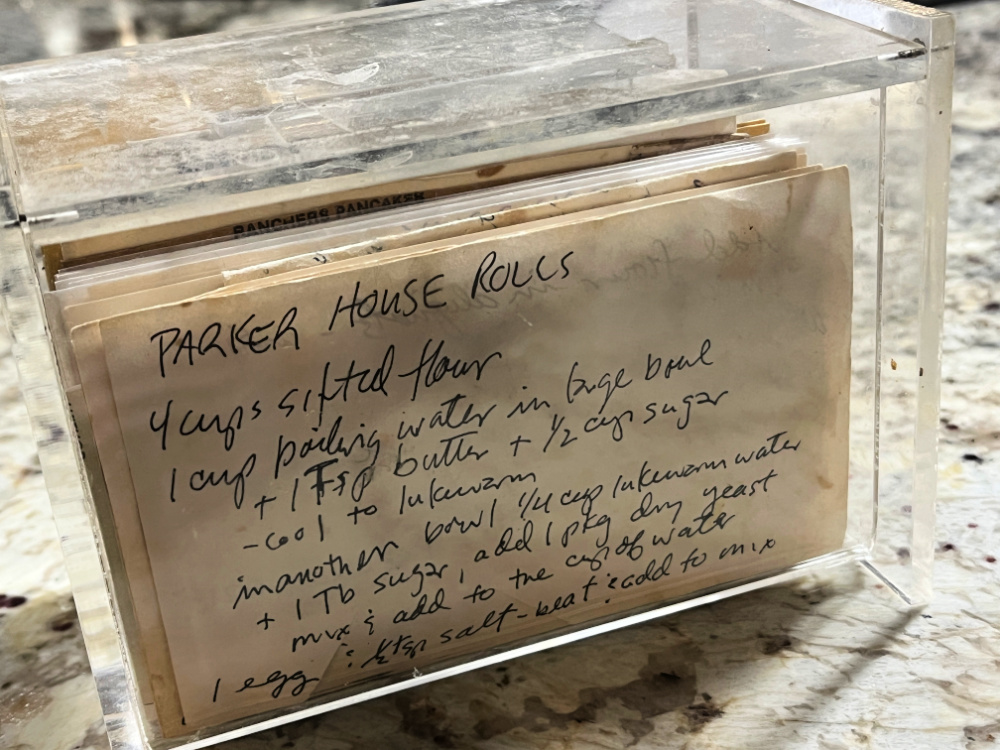
Inspired by the traditional Parker House Rolls, this is the recipe Phil’s Mom used to make every Thanksgiving. Phil keeps a bunch of recipes handwritten in small cards, held inside an acrylic box that is very likely older than his grownup kids. I learned to love and cherish that little box of recipes because they were all part of his childhood, teenage, and hippie years. His past.
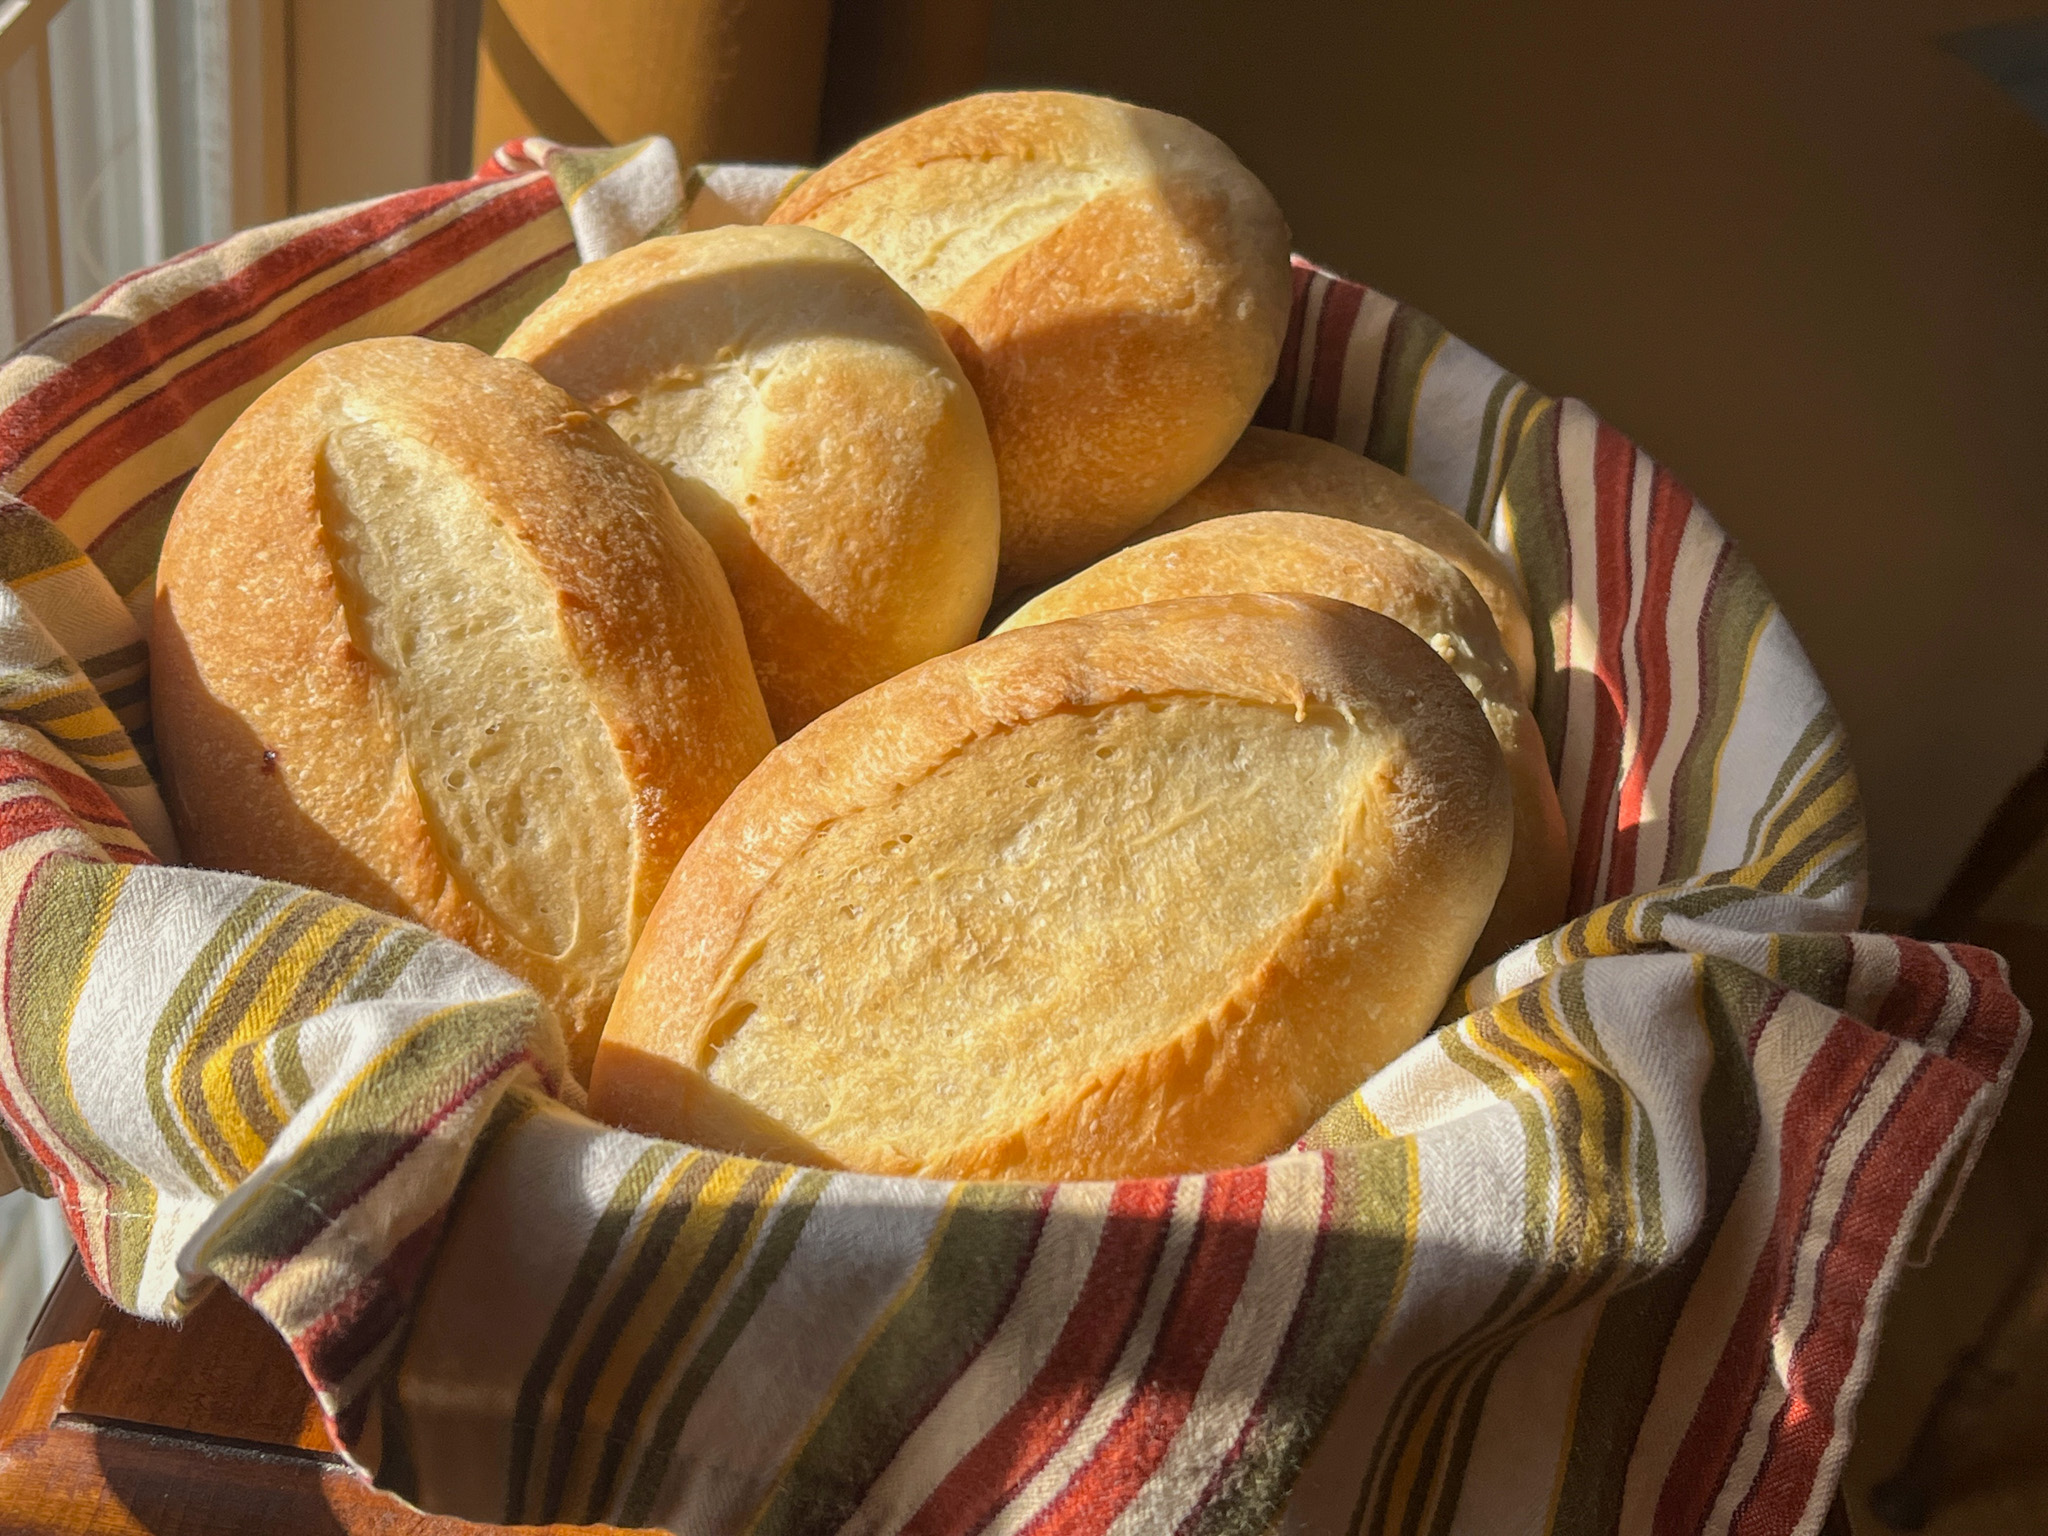
KLEBBA HOUSE ROLLS
(from Louise Wilhelmina Klebba)

One 1/4-ounce package active dry yeast
1 + 1/4 cup warm water
1/2 cup sugar
4 tbs unsalted butter, melted and cooled
1 large egg, lightly beaten
1/2 tsp salt
4 cups all-purpose flour, or more if needed

Make the dough. In a stand mixer mix the yeast with the water, sugar, butter, egg and salt.

Fit it with the dough hook, and add the flour in two increments, kneading it at low-speed. Knead the dough for about 4 minutes, until smooth. Remove from the mixer, transfer to a buttered bowl, cover and let it rise until doubled, about 2 hours.

Roll the dough with a rolling pin, cut in circles with a 3-inch biscuit cutter. Place over a baking sheet lined with parchment paper and let it rise again for 1 to 1.5 hours. Brush with melted butter before baking at 375F for 15 minutes or until golden. Brush again with butter as soon as they are out of the oven.

ENJOY!

to print the recipe, click here

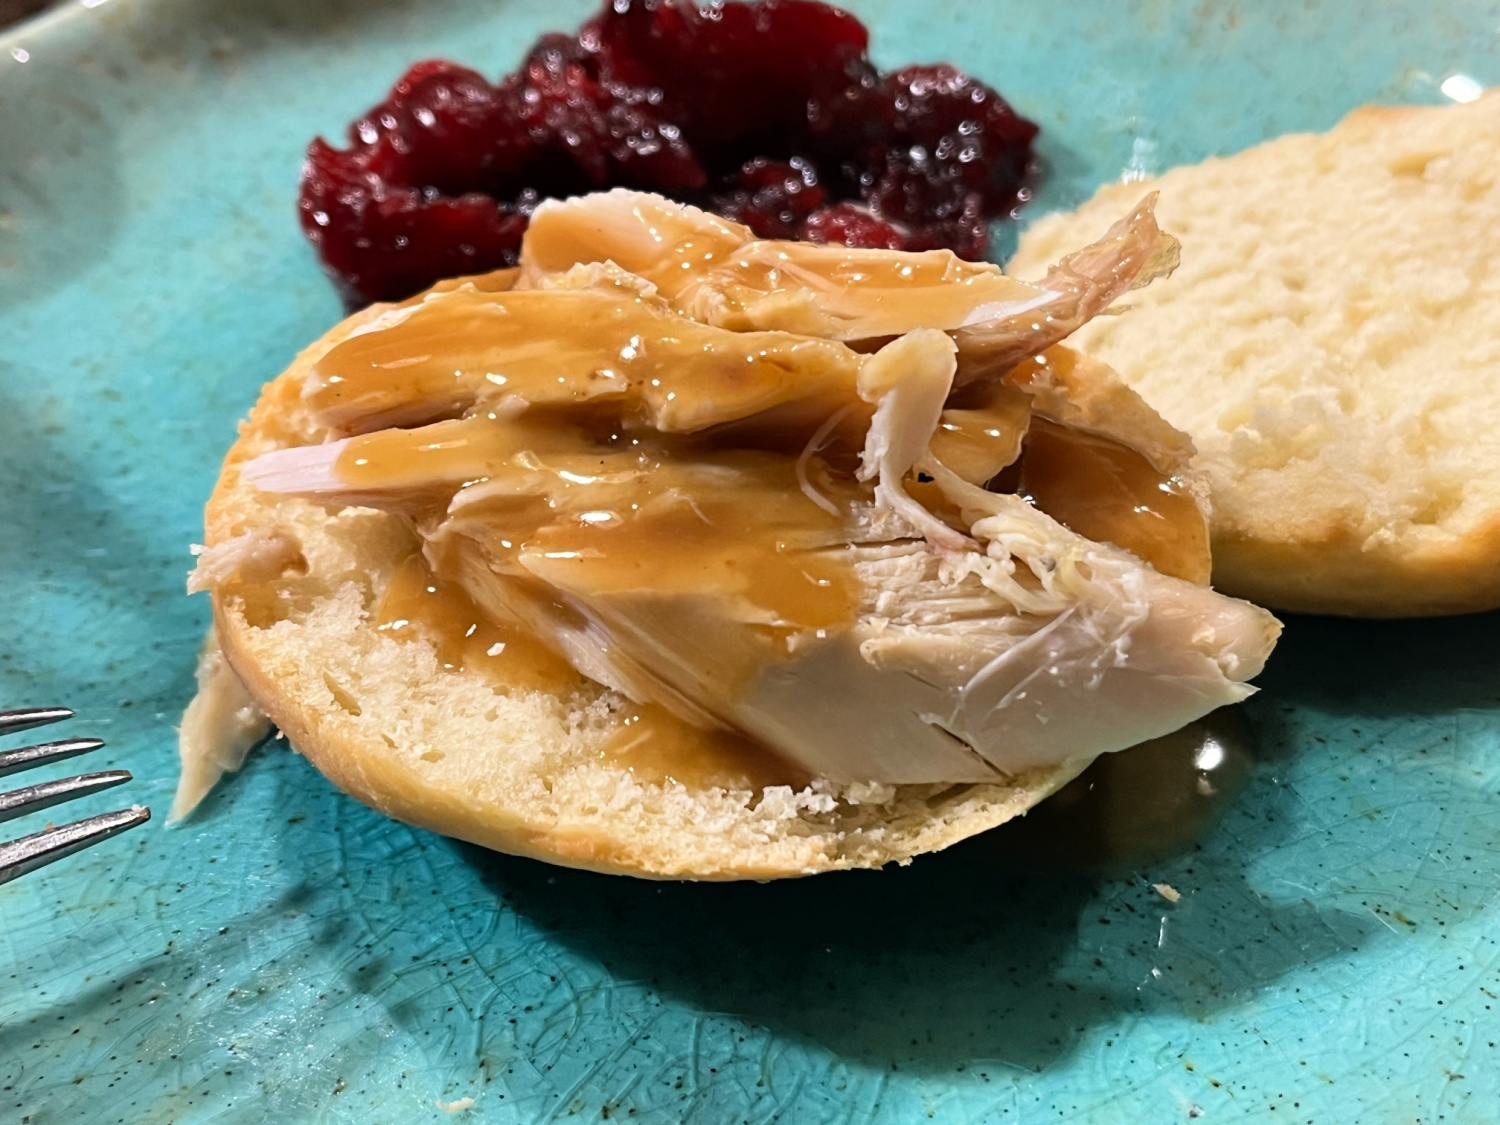
Comments: The traditional Parker House Rolls are shaped differently, they are shaped as rounds, then flattened and folded. I used the method that Phil’s Mom used, which is different, so if you want to check how it was originally made, read this article. I am so glad I made them with very minor modifications from Phil’s family recipe. In those days there was no instant yeast, so the whole method was slightly more convoluted. Most important thing, our Thanksgiving meal this year had a touch of loving memories from a distant past. And that made me very very happy.

ONE YEAR AGO: Root Vegetable Clafoutis

TWO YEARS AGO: Oreos Dressed for the Holiday Season

THREE YEARS AGO: Peppermint Wreath Macarons

FOUR YEARSAGO: Cornish Hens with Yogurt-Mace Marinade

FIVE YEARS AGO: Cookies for the Holidays – Gingerbread

SIX YEARS AGO: Incredibly Simple Times Four

SEVEN YEARS AGO: White Chocolate and Raspberry Mousse Cake

EIGHT YEAR AGO: Panettone Time!

NINE YEARS AGO: Pistachio Creme Brulee

TEN YEARS AGO: Fast and Furious Bison Chili

ELEVEN YEARS AGO: In My Kitchen, December 2014

TWELVE YEARS AGO: Braised Fennel with Saffron and Tomato

THIRTEEN YEARS AGO: Revenge of the Two Derelicts

FOURTEEN YEARS AGO: Grilling Ribbons

FIFTEEN YEARS AGO: Peppery Cashew Crunch

SIXTEEN YEARS AGO: Baked Shrimp and Feta Pasta

MEXICAN CONCHAS

This recipe has been waiting for a long time in that list of “To Make Soon”. Better late than never, I actually made it twice, because I wasn’t totally happy with my first attempt. This is a classic Mexican sweet bread, with a colorful coating that is sweet and addictive…

for the concha press I used, click here


MEXICAN CONCHAS
(from The Bewitching Kitchen)

makes 8 large conchas

4 cups (550g) all-purpose flour
1/2 cup (100g) sugar
2 tsp ground cinnamon
1 tbsp instant yeast
1/4 tsp salt
6 tbsp (85g) butter at room temperature
3 eggs at room temperature
1 tbsp vanilla extract
3/4 cup warm milk


Topping
1 1/2 cups (185g) all purpose flour
1 1/2 cup (180g) powdered sugar
1 cup butter, softened
1 tbsp vanilla extract
1 tbsp coco powder
1 tsp freeze dried strawberries, ground
Food coloring (optional)

In the bowl of a KitchenAid type mixer, add the flour, sugar, cinnamon, salt, yeast, and butter cut into pieces. Using the hook, mix for a few minutes until the butter is fully incorporated. Add one egg at a time, mixing for a minute after addition. Slowly add the milk, and once the mixture is smooth, knead it for a full 15 minutes, until the dough is super smooth and elastic.

Transfer to a buttered bowl, and let it rise until doubled. About 2 hours.

Make the topping by kneading (by hand is fine) flour, powdered sugar and butter until a dough is formed. Divide it in four pieces, add cocoa powder to one of them fourths, strawberry powder to the second half, vanilla to the remaining pieces. Add food color of your choice, if so desired. You can leave one of the vanilla pieces plain. Place in the fridge to set while the dough rises.

Punch the risen dough down, divide in 8 pieces and form little balls. Place them over parchment paper, four per baking sheet. Divide the colored dough into two, so you have a total of 8 pieces, 2 of each color. Use a tortilla press to roll them out, placing parchment paper squares on top and bottom to make it easy to move the dough around. Place the dough over the little rolls, and cut around to make it neat. Use the concha press to make the design on top. Cover, let them rise for 30 minutes and bake at 350F for about 25 minutes. Add a baking sheet with ice at the bottom of the oven to generate steam. You can also spray some water lightly over the dough after 2 minutes during baking.

Cool on a rack before eating.

ENJOY!

to print the recipe, click here

Comments: Talk about a fun baking project, this is definitely it! When I made it the first time, I did not cover the breads fully with the colored dough, and later learned that the traditional way covers them fully. They get a more polished look that way. Below you see my first attempt, I used a heavier hand with the colors also…

When I make them again, I will either make half the recipe and form 6 little breads, or make the full recipe and shape 12 because I think these turned out slightly too big. Also, I think it would be fun to gather the different colors of topping and knead them slightly together to make a fun marbled topping. I just love the look of the bread as it goes through the final proofing.

I donated the whole batch, but of course had to ‘test taste” one. Love the cinnamon flavor, the bread is soft, tender, moist. And the topping, yes, addictive!

ONE YEAR AGO: Red Velvet Sugar Cookies, Three Ways

TWO YEARS AGO: Lemon Macarons

THREE YEARS AGO: Thai Chicken with Peanut Sauce

FOUR YEARS AGO: Baharat Flower Sourdough

FIVE YEARS AGO: Biscoitinhos de Canela

SIX YEARS AGO: Salmon Tacos

SEVEN YEARS AGO: The Chignon

EIGHT YEARS AGO: Rack of Lamb Sous-Vide with Couscous Salad

NINE YEARS AGO: Focaccia with Grapes, Roquefort and Truffled Honey

TEN YEARS AGO: Moroccan Carrot Dip over Cucumber Slices

ELEVEN YEARS AGO: White Chocolate Macadamia Nut Cookies

TWELVE YEARS AGO: Cilantro-Jalapeno “Hummus”

THIRTEEN YEARS AGO:A Moving Odyssey

FOURTEEN YEARS AGO:Hoegaarden Beer Bread

FIFTEEN YEARS AGO:
 
Ancho-Chile Marinade: Pleased to Meat you!


MEXICAN BOLILLOS

Super excited to share these! Hubby loves them and always gets a bag at the grocery store, so I was tempted to bake them from scratch. My first attempt got over-baked and the crust was not as soft as the commercially available, but my second batch was pretty close to perfect, even if I say so myself… This is a very easy bread, made with instant yeast. From start to finish, about 3 hours.

MEXICAN BOLILLOS
(adapted from this post)

1 ½ cups warm water, plus more for steam baking
2 ¼ teaspoons active dry yeast (1 package)
1 tablespoon granulated sugar
500g all-purpose flour (about 4 cups)
2 teaspoons salt
2 tablespoons avocado oil (or another neutral oil)
vegetable oil spray (I used olive oil)

Prepare the yeast. Mix the water and sugar with the instant yeast. Let it stand for 5 minutes until it gets foamy. Prepare the dough. In the bowl of a stand mixer whisk together the all-purpose flour and salt.

Attach the dough hook to the mixer. Drizzle the oil over the yeast-water mixture, whisk a bit and with the machine running in low-speed, add the whole mixture to the bowl. Knead on the same low-speed for 7 minutes.  The dough will be slightly sticky. If it seems too sticky, knead in 1 tablespoon of additional flour at a time until smooth and elastic. If it’s too dry, add a little water and keep kneading for another minute.

Place the dough in a slightly oiled bowl and cover with plastic wrap. Proof at room temperature for about 90 minutes, when it should double in size. Line a large baking sheet with parchment paper. Divide the dough in 6 equal pieces (I used a scale, they were about 148 g each), shape each as a little oblong bread, trying to mimic the shape of the bolillo as you form it.

Spray the surface lightly with olive oil. Cover with plastic loosely and let it rise for 45 minutes at room temperature. Meanwhile, heat the oven to 420F and 15 minutes before you bake the rolls, place a 9 x 13 pan in the bottom rack and add 10 cups of hot water inside. That will generate steam for the baking.

Slit the dough in the center, spray the rolls with a little water and bake for about 30 minutes. If they are darkening too much, reduce the temperature to 400F and cover the surface with foil. Bread is baked if internal temperature reaches 205F.

Let them cool for at least 20 minutes before serving.

ENJOY!

to print the recipe, click here

Comments: Such a fun little bread to make! Just make sure to not bake them too long, because the crust will get very dark and hard if you do. It is still great but not like the original. Here you see my first bake maybe you can tell the crust got a little too baked, but the crumb was still very nice, just a bit harder than the second batch.

I urge you to make these, they go well with so many fillings, and even just a smear of olive oil and balsamic if you like to keep it simple. I know I will keep making batches to have some in the freezer at all times, just like I do regularly with sourdough. It is just a different style of bread.

ONE YEAR AGO: Brazilian Style Banana Cake

TWO YEARS AGO: Tiger Shrimp in Chili Sauce

THREE YEARS AGO: Tangzhong Hamburger Buns

FOUR YEARS AGO: Potato Soup with Spicy Shrimp

FIVE YEARS AGO: Rose-Harissa Chicken Thighs

SIX YEARS AGO: Caramel-Chocolate Tartlets

SEVEN YEARS AGO: Chicken Korma-ish

EIGHT YEARS AGO: Sunday Gravy with Braciola

NINE YEARS AGO: In My Kitchen, February 2015

TEN YEARS AGO: Avocado and Orange Salad with Charred Jalapeno Dressing

ELEVEN YEARS AGO: Green Olive, Walnuts and Pomegranate Salad

TWELVE YEARS AGO: Romanian Flatbreads

THIRTEEN YEARS AGO: Ziti with Artichokes and Meyer Lemon Sauce

FOURTEEN YEARS AGO: Blasted Broccoli, Stove-top version

PUMPKIN SHAPED SOFT PRETZEL ROLLS

The cuteness factor of these is huge! They are adorable and so simple to make that you can plan to bake it with kids. The only messy (and potentially dangerous) part is the mandatory boiling in alkaline water so that you get the right texture and amazing color, but you can take charge of that step and let the kids get involved with all else. The recipe is from Haniela’s blog, she is not only a fantastic cookie artist, but a great cook too…

PUMPKIN SHAPED SOFT PRETZEL ROLLS
(from Haniela’s blog)

for the dough:
1 + 1/2 cup warm water
1tsp honey
1 package dry yeast (2 + 1/4 tsp)

2 cups (260g) all-purpose flour
2 + 1/2 cups (325g) bread flour (divided)
1tbs kosher salt
6tbs melted butter

For the alkaline solution:
5 cups water
1/3 cup baking soda

for brushing the rolls:
egg yolk
1 tbs water
pretzel salt (available here)

cashews (or other nuts) for stems

Pour warm water into the bowl of your mixer, add honey and stir in the yeast. Let stand for 5 minutes, until foamy.

Add 2 cups of all purpose flour, 2 cups (260g) of bread flour, melted butter and salt into the bowl with yeast and knead using the dough hook attachment. If dough is too sticky add additional 1/2 cup (65g) of bread flour. Knead for 5 minutes, or until the dough turns into a smooth ball. Lightly coat a large bowl with oil and put the dough into the bowl.Cover the bowl with plastic wrap and let rise in a warm place for one hour.

Invert the dough onto a clean work surface but do not use any additional flour. Roll the dough into a rectangle and using a knife or pizza cutter cut the dough into squares. The size is not important, just make them very small if you like to have tiny little rolls, or bigger. I divided my dough in about 25 portions. Using both hands, pull the dough together, form a ball from each square.

Bring 5 cups of water to boil, add 1/3 cup baking soda. Stir well until baking soda is dissolved.”Blanch” the pretzel rolls in the baking soda bath for 30 seconds. Remove from the solution onto a tray or bare baking sheet and continue with remaining rolls. Transfer pretzels onto a sheet lined with parchment paper, using kitchen shears, hold pretzel roll in your hand and using shears cut total of 8 cuts through the dough, all around, keeping the center of the roll intact. Then using a wooden spoon handle press deeply into the center of the roll, leaving a small dimple.

Whisk together egg yolk and water, strain through a small sieve. Brush sparingly tops of the pretzel pumpkins, sprinkle with pretzel salt. Bake pretzels at 450F for about 10-12 minutes, until golden brown.
Push a cashew into the center, into the dimple while still warm from the oven.

ENJOY!

to print the recipe, click here

Comments: The dough is a total pleasure to work with, soft, smooth, and the intense color when it bakes due to the alkalization of the surface is gorgeous. Some of my rolls got only six slits around, make sure you go for eight, it gives a better pumpkin impression. You will need the special salt to get the right pretzel experience, so I recommend you bite the bullet and order some.

A little mustard, a little ham, and that was a super tasty lunch, even after cutting my finger on a sharp ceramic knife…. Clumsy, who, moi?

ONE YEAR AGO: Cod Coconut Curry

TWO YEARS AGO: The Best Ever Eggplant Parmigiana

THREE YEARS AGO: Roasted Butternut Squash and Grapes with Maple Pomegranate Glaze

FOUR YEARS AGO: A Really Big Announcement

FIVE YEARS AGO: Stir-Fried Chicken in Sesame-Orange Sauce

SIX YEARS AGO: Monday Blues

SEVEN YEARS AGO: A New Way to Roast Veggies

EIGHT YEARS AGO: Two Takes on Raspberries

NINE YEARS AGO: Spice Cake with Blackberry Puree

TEN YEARS AGO: Own Your Kitchen with Cappuccino Panna Cotta

ELEVEN YEARS AGO: Chicken Parmigiana, the Thriller

TWELVE YEARS AGO: Wild Mushroom Risotto

THIRTEEN YEARS AGO: Tartine Bread:  Basic Country Loaf 

FOURTEEN YEARS AGO:  Pugliese Bread

BRITISH BAPS, A TECHNICAL CHALLENGE

Baps. Very popular in the UK, these are what on this side of the pond we know as rolls or buns. When I was in London, I realized that breakfast baps are all the rage, you slice one of these babies, and add the usual suspects: bacon & eggs, sausage, ham & cheese, or whatever you crave early in the morning. I don’t eat breakfast, but had to try one of these classics at lunch during my visit. Soft, delicate, quite delicious. And as you can see from this post, pretty simple to make.  I modified a bit a recipe from Paul Hollywood to add a touch of whole wheat. Just because. These were the technical challenge last week in the Great British Bake Off. Some of the contestants committed the shameful sins of underbaking or underproofing, but most did pretty good. They also had to make a veggie burger pattie to go with the buns, so the challenge also involved sizing baps and filling appropriately. That is not as easy as one might think, as the patties had to be made while the dough was proofing. Great fun was had by all. Or almost all…

BRITISH BAPS
(adapted from Easy Online Baking Lessons)

350 g bread flour
25 g whole-wheat flour
7 g salt
7 g fast-acting yeast
30 g sugar
30 g butter
250 mL water (I used a little less)

Add all ingredients (but hold back a bit of the water, maybe 25 mL or so) to the bowl of a Kitchen Aid type mixer and knead on low-speed for about 8 minutes. If needed, add the rest of the water.

Place in a large oiled bowl and ferment at room temperature for about 90 minutes.

Punch the dough down (delicately) and divide it in 8 equal portions (about 85 g each). Roll each as a tight little bun. Place each roll on a mat lightly coated with flour and flatten it in one direction with a rolling pin, making it into an oval shape. Turn it 90 degrees and do the same. You will end up with a round, more flat type of roll.  Do the same for all other buns, then place at room temperature covered with a cloth for 30 to 45 minutes, while you heat the oven to 425 F.

Coat the buns lightly with flour, bake for 12 to 15 minutes. Remove to a rack to cool completely.

ENJOY!

to print the recipe, click here

Comments: Even if you are not comfortable baking bread, I think this would be a very nice recipe to try. Yes, it was a technical in the GBBO, but a lot of the complexity in the show has to do with timing (pretty tight) and the preparation of the veggie burger component plus toppings as the dough rises. If you just tackle the bread and don’ worry about a timed deadline, it’s quite doable.

The bread has a tight but moist crumb, if made with white flour only will be even softer, but I like the more assertive taste that the whole-wheat offers. They freeze well, and defrost quickly, so it’s the perfect type of bread to have around.

ONE YEAR AGO: Japanese-Style Cupcakes with Cherry Blossom Icing

TWO YEARS AGO: Quick Weeknight Soups

THREE YEARS AGO: Sourdough Loaf with Cranberries and Walnuts

FOUR YEARS AGO: Sichuan Pork Stir-Fry in Garlic Sauce

FIVE YEARS AGO: Our Green Trip to Colorado

SIX YEARS AGO: Ditalini Pasta Salad

SEVEN YEARS AGO: Celebrate Wednesday with a Thai Seafood Curry

EIGHT YEARS AGO:  Post-workout Breakfast

NINE YEARS AGO: Semolina Barbecue Buns

TEN YEARS AGO: Lavash Crackers