

I love a simple loaf of bread, mostly white flour, a touch of whole-wheat, good crust and crumb, nothing necessarily fancy. But I am always fascinated by what I call exotic bakes. Things that demand a little more attention, a little more work, and often a lot more patience. One site that never fails to amaze me is BakeStreet. Not only they show unusual, unique recipes, but they might include videos of the entire process, particularly when shaping is more elaborate. A couple of weeks ago I stumbled on their blog post on Pan Shibari. They designed a bread recipe inspired by a classic Japanese knot (shibari is Japanese for knot). The knot is quite an important symbol in Japan, and it’s easy to see why. It joins things, it carries a sort of sensual connotation, and it can be very artistic. I confess I was so mesmerized by that bread, I could not wait to try it myself. It was not easy. But, I’m happy with the way it turned out. My very first Shibari Bread!
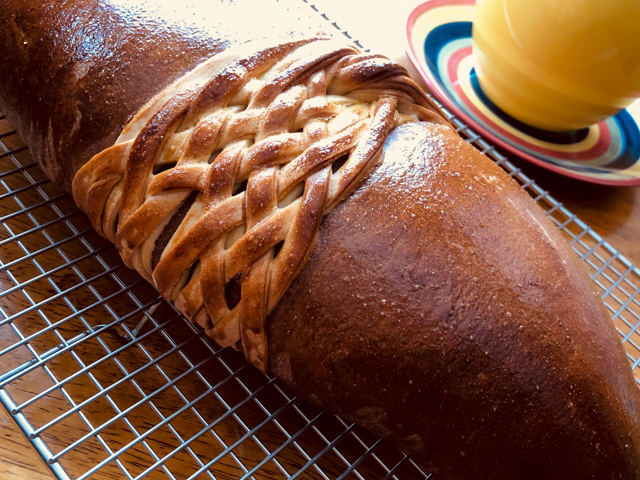
SHIBARI BREAD
(slightly modified from BakeStreet)
600 g of all-purpose flour
300 g of whole milk at room temperature
36 g of cocoa powder + 45 g of whole milk
5 g of instant yeast
1 egg L (55 g)
75 g of unsalted butter at room temperature
40 g of honey
3/4 teaspoon of natural chocolate extract
10 g of salt
olive oil for brushing bread
1 egg yolk
2 tsp milk
pinch of salt
Make the dough. In the bowl of a Kitchen Aid mix the flour along with the milk, the egg and the dry yeast. Mix with the kneading hook for 5 minutes on low-speed, until it is homogeneous.
Add the honey and salt, continue mixing for at least 5 more minutes, until very smooth and silky. Add the butter little by little, in small pieces, waiting for each piece to be incorporated before you add more. Continue kneading the dough until gluten development is complete (it will not tear when you stretch a small portion of the dough, instead it will form a thin membrane).
Divide the dough in two pieces, a small one with 200g, and a second one with the remaining portion, around 870g. Shape the small portion as a ball and place inside an oiled container. Cover and reserve. To the second portion, add the cocoa powder with the milk and chocolate extract. Knead to incorporate them well, and make a dough with homogeneous color. I find it easier to place back in the Kitchen Aid and let the machine do some of the work, then finish it by hand. Form as a ball and place in a second oiled container. Proof the two balls of dough for about 3 hours at room temperature. It should double in size.
Now is the perfect moment to swallow that Prozac.
Shape the bigger ball of dough as a batard, after de-gassing it lightly. Reserve, covered with plastic film as you work on the other ball of dough. Roll the smaller ball as a rectangle of approximately 14 by 10 inches. Cut parallel strips with a thickness of 0.4 inches (1 cm). You will need 15 strips, but you will have more than that, which is good, in case you get in trouble.
Place 3 strips laying horizontally on the center of the bread, as shown in the composite picture. Place 6 strips laying on top, forming a C shape facing one side of the bread. Use other 6 strips to form a bundle held in the center by the C-shaped group of strips you just placed. Braid according to the video. Start all over if necessary. Who am I kidding? It will be necessary. Several times. Keep calm (HA!), and braid on. Once the braiding is done…
stop sobbing, regain your composure…
and brush the surface of the bread with olive oil. Cover with plastic film and let it proof at room temperature for 2 to 3 hours. It will almost double in size. Meanwhile set the oven to 350 F.
When ready to bake, brush the surface with egg yolk whisked with milk and salt. Make sure to cover all the parts of the bread. Bake for 40 to 45 minutes, until internal temperature is about 195 F.
Cool yourself completely and also the bread before slicing (slicing applies to the bread only).
Pat yourself on the back. You’ve done it!
ENJOY!
to print the recipe (without jokes), click here

Comments: Having recently made panettone, I can tell you that the dough for shibari bread has some similarities: inclusion of egg, milk and honey, and the butter being added at the end, after the dough is almost fully developed. The main bread takes quite a bit of cocoa powder, which gives it almost the feeling of a German rye bread. Quite interesting, when you consider that the formula involves exclusively white flour.
The braiding. Not. For. Sissies. Keep in mind, there were no written instructions or diagrams. Just a video. The woman knows what she’s doing, and she moves fast. One piece of advice, keep track of the time it takes you to braid, and take that as part of the proofing. It took us 45 minutes to wrap this baby up in strands. Don’t judge us. Thank you.

I don’t know how many times I watched the video (it is mesmerizing), made drawings trying to number the strands and figure out which one is moved when and how. At some point I thought I “got” it, and said to myself, this will be totally doable. Famous. Last. Words. When I had the actual strands of dough and the shaped bread in front of me, things got very nasty very quickly. Luckily, I made it on a holiday in which we were home, snowed-in. Hubby to the rescue. He had the video going, stopping at every step and guiding me. Still we had to start over four times, if you can believe it. All that as the shaped bread was rising right in front of my scared eyes. Strangely enough, we managed to do it, and what is even more amazing, we are still married. I recall the phrase “You are just impossible!” being used more than once. I tell you, if your marriage can take the The Elusive Shibari Test, you are tied for eternity. I am counting on it.

I think this basic method has a ton of potential. The double-color dough is very elegant, but one could just use a single dough and make the same braid on top. Or switch things around and make the braid with the cocoa-tinted dough, and keep the main loaf underneath as a white bread. I also envision a savory type of bread, with sun-dried tomatoes and basil, for instance. The thing to keep in mind is that the bread must have a gentle rise in the oven, and the dough used for the braid must have a similar formula so that both components rise at compatible speeds. That all points in the direction of enriched breads, since they tend to have a more gentle oven rise. But I am speaking from intuition and could be totally mistaken. Worth a few experiments, I think…
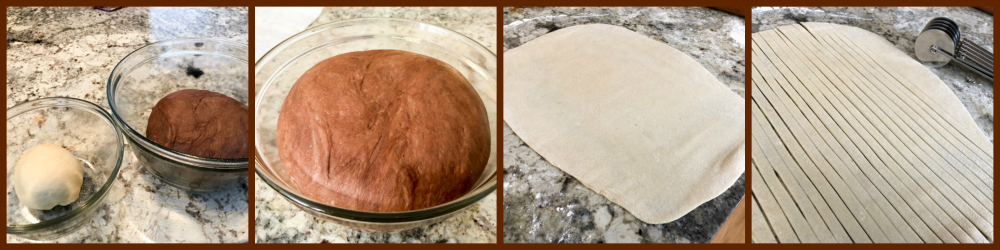
To make the dough strands I used my set of rolling cutters closed down to the tightest level. In that configuration they generate strands with almost exactly 1cm wide, and they end up quite uniform. In the video, the Bread Goddess does all the cutting free-hand, but if I tried to do that, I am not sure our marriage would survive. It would be a 50:50 thing, maybe. Perhaps 25:75. Hard to tell.

So there you have, the mandatory crumb shot. It is a moist and delicate crumb, but with a very assertive flavor coming from the cocoa powder. It pairs well with jams, but also with a nice slice of ham or a Roquefort type cheese. I hope you enjoyed the post, and please take a look at that video. The real “fun” part starts at 3 minutes and 50 seconds, in case you are interested in the braiding process. I had that song as an ear worm for a while… Maybe I still do! 🙂

ONE YEAR AGO: Incredibly Simple Times Four – January 2018
TWO YEARS AGO: Two Salads and a Blog Award!
THREE YEARS AGO: When Three is Better than Two
FOUR YEARS AGO: Somebody Stop Me!
FIVE YEARS AGO: Zucchini Pasta with Cilantro-Cashew Pesto
SIX YEARS AGO: Bran Muffins, Take Two
SEVEN YEARS AGO: Brown Butter Chocolate Chip Cookies
EIGHT YEARS AGO: Mogo Mojo
NINE YEARS AGO: Slow-Roasted Chicken Thighs: an Ice-Breaker
