CROISSANTS: PARIS AT HOME ON A SPECIAL DAY

Today is our 10th wedding anniversary, so to start the day on a wonderful note, I decided to bring a little bit of Paris – the place where we met and later lived for a year – to our home. Even if croissants are not originally from France, they convey its image with every delicious bite. When we lived in Paris, we used to go for long runs on Saturdays that always ended with a “pain au chocolat pour le monsieur, croissant pur beurre pour madame“. With the mandatory coffee or hot chocolate, depending on the weather, and our mood… Wonderful memories!

CROISSANTS DU BOULANGER
(original recipe from The Baker’s Companion, adapted by Ford, from The Fresh Loaf website)

for the dough

2 large eggs plus scalded low fat milk cooled to 90°F to make 2 cups (16 oz.)
1 tsp sugar for unsweetened dough
5 1/2 to 6 cups (23.3 to 25.5 oz.) all purpose unbleached flour
2 1/4 tsp (7 g) instant yeast
2 tsp salt
2 Tbs. (1 oz.) melted butter

for the butter
3 + 3/4 sticks (15 oz.) unsalted butter
1/2 cup (2.1 oz.) unbleached flour
flour for sprinkling

Beat the eggs and milk and 1 tsp 1 tsp of sugar. Beat in the yeast and 3 cups of flour until all is well blended. Cover and let stand at room temperature for an hour or so. In a separate bowl blend the salt, and 2 1/2 cup of flour. Hold until the yeast mixture has doubled in size.

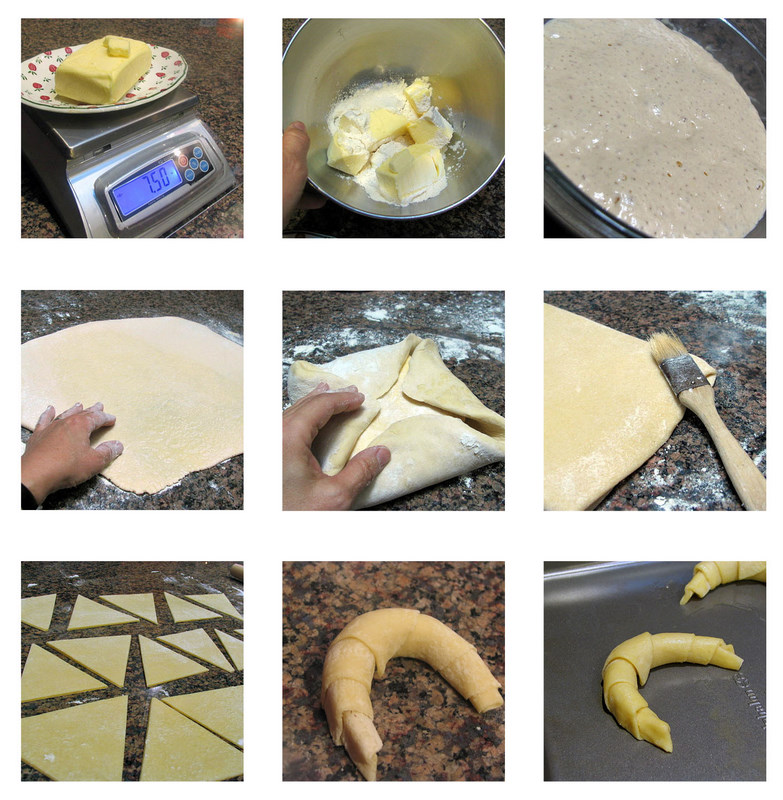
Blend the 3 + 3/4 sticks of butter and the 1/2 cup of flour. Lightly flour a piece of plastic wrap and place the butter mixture on it. Shape the butter into an 8” x 8” square. Wrap it and place it into the refrigerator until the dough is ready.

Back to the dough, add the melted butter and beat well. Add in the flour mixture and mix well to form a rough ball, then knead for 8 to 10 minutes on a lightly floured surface, or knead in an electric mixer, using a dough hook. Cover the dough and place it in the refrigerator for an hour.

Rolling & Folding: Remove the dough from the refrigerator and put it on a lightly floured surface. Gently roll it into a square about 12 inches on a side. No need to obsess about the dimensions, just try to be close. Put the butter square in the center of the dough square but turn it so that the corners of the butter square point toward the sides of the dough square. Fold the corners of the dough over the butter until they meet in the middle. Pinch and seal the edges of the dough together.

Turn the square over and tap it gently with your rolling pin or by hand into a rectangular shape. Make sure everything is still completely, but lightly, floured. Begin rolling the dough from the center, away from and towards you, into a larger rectangle 20 inches long and 10 inches wide. Puncture any air bubble with a toothpick. Keep the dough, the work surface, and the rolling pin well dusted with flour.

When the dough is the right size, fold the bottom third of the dough up beyond the center and the top third over (like a business letter) and turn the dough package a quarter turn to the right so it looks like a book ready to be opened. If the dough is still cold and still relaxed, do another rolling and turning as before. If it begins to feel too soft or wants to resist being rolled, cover it, put it on a small baking sheet, and refrigerate it for 15 minutes or longer (even a day) to chill and relax.

If you’ve successfully rolled it out and folded it twice, you’ve completed two turns. Classic puff pastry gets six; and puffed dough gets four. Continue refrigerating it after each two turns, or more often if necessary, until four turns are completed. Refrigerate the dough for at least two hours or preferably overnight. One recipe is adequate for two dozen croissants.

Making the croissants…

1 recipe of dough above
egg wash

Preheat the oven to 400°F.

Cut the chilled puff dough in half. On a lightly floured surface, roll one half of the dough to a 12” x 18” rectangle. Trim the edges, using a very sharp knife or a pizza-cutting wheel. This removes the folded edges that would inhibit the puffing of the dough.

Cut the dough into three strips lengthwise, 4” x 18”. Then cut these strips in half to give six rectangles 4” x 9”. Make a diagonal cut on each of these rectangles to give a total of twelve triangles. Make a 1” cut in the 4” base of one of the triangle. If you desire to fill the croissant, place a small amount of filling along the base before rolling it. Pull this base slightly stretching it, and then roll the dough toward the apex. Tuck the point on the bottom and bend the ends to make a crescent. Repeat with the other eleven triangles.

Place the croissants on a lightly greased, parchment-lined baking sheet about a half-inch apart. Cover with a greased plastic sheet, and allow to rise until doubled. When fully proofed, about 45 to 60 minutes, brush the croissants with the egg wash. Bake in the 400°F oven until deep golden brown, about 20 minutes. The interior temperature should be 195 to 200°F. Cool the rolls on a wire rack, before eating or storing.

Repeat with the other half of the dough or store it in the refrigerator or freezer for later.
jump for more

IMPROMPTU PASTA DINNER

It was a dark and stormy night… no, not really, but it was a busy day at work and we wanted to go home, get some comfy clothes, kick back and relax.  My night to cook: I pulled out a cookbook, but even browsing for recipes seemed like an herculean effort, so I opened the fridge searching for inspiration. Voila’: half a bunch of asparagus! In the pantry, I spotted a can of Muir fire-roasted tomatoes (love that stuff!).  It was all that I needed.  Dinner took shape in less than 20 min, resulting in two happy humans and an enjoyable evening ahead of us.

PASTA WITH ASPARAGUS COINS and TOMATOES
(from the Bewitching Kitchen)

1 shallot
1 T olive oil
fresh asparagus
1 small can Muir fire-roasted tomatoes
salt and pepper
grated parmiggiano-reggiano cheese
pasta of your preference

Set a large pot with salted water to boil.

Using a sharp knife, cut the asparagus into small coins, trying to get them in similar sizes, about 1/4 inch thick.  Dice the shallot.  Open the can of tomatoes.

Heat the olive oil in a large skillet, saute the shallots until translucent, immediately add the asparagus coins, and cook them in medium-high heat, moving them around. Season with salt and pepper, and try a bite after a couple of minutes.  They should be still very firm.   Add the tomatoes, cook for a few more minutes, adjust seasoning.

Meanwhile, cook the pasta until al dente.  Drain and add to the skillet with the asparagus/tomato sauce.  Cook them together for a minute or so, add parmiggiano on top and serve.

ENJOY!

to print the recipe, click here

Comments: Slicing asparagus in little coins is a fun way to enjoy it.  In Secrets of a Restaurant Chef, Anne Burrell made a salad of raw asparagus cut this way – I’ve been saving the recipe to try it when Spring comes.  Time for a little disclaimer:  we understand that buying asparagus in mid-winter is politically incorrect.  Yes, they traveled a long distance.  But, we needed an asparagus-fix. It might even speed the arrival of Spring!   😉

MOROCCAN COOKED CARROT SALAD

Simple. Quick. Delicious.  From a cookbook that I highly recommend, Mediterranean Fresh, by Joyce Goldstein.   The secret is in the dressing, that pairs citrus and cumin, giving the carrots a very subtle background of heat.   Do not skip toasting the cumin seeds.  In recipes with so few ingredients, you need to bring out the best in each of them, and toasting spices does just that, makes them talk to you loud and clear.


MOROCCAN COOKED CARROT SALAD

(adapted from Mediterranean Fresh)

1/2 cup mixed citrus dressing (recipe follows)
1/8 tsp cayenne pepper
1/2 tsp toasted cumin seed, ground
2 Tbs sugar
1 pound carrots
salt to taste
fresh parsley, minced

Mixed citrus dressing
Whisk together all these ingredients:
1/2 cup olive oil
zest of 1 orange
1/4 cup freshly squeezed orange juice
2 Tbs fresh lemon juice
1/2 tsp sugar, if needed (I omitted)
salt and pepper

Toast whole cumin seeds using a small non-stick skillet over medium heat, moving them constantly to avoid burning. Let them cool slightly, and grind them. Mix the citrus dressing with the spices and sugar.

Peel the carrots and cut in thin slices. Cook in boiling salted water for 5 minutes, or until they start to get tender, but do not overcook. Drain and toss with the dressing. Adjust the seasoning, and add minced parsley just before serving.   Serve warm or at room temperature.

ENJOY!

to print the recipe, click here

Comments: If this salad does not appeal to you because you are not fond of carrots, consider making the dressing, because it will go quite well on many veggies as well as composed salads. I can envision my default method to cook asparagus getting a boost from this mixed citrus dressing at the end. The original recipe called for three tablespoons of sugar, I used only two, as carrots are naturally sweet already.

The recipe serves 4 to 6 people, I scaled it down for the two of us, but next time I’ll make a full batch to have leftovers. We had just a tiny bit left, which was still wonderful next day, but left me craving for more.

TORTA DI ZUCCHINI

I sincerely hope that I’m below the radar of the food-blog-police, or I may be in trouble for posting too many zucchini recipes.  Without a doubt, to my mom’s shock and disbelief, zucchini is one of my favorite vegetables. While growing up I wouldn’t even try it, little did I know my how much my tastes would change!

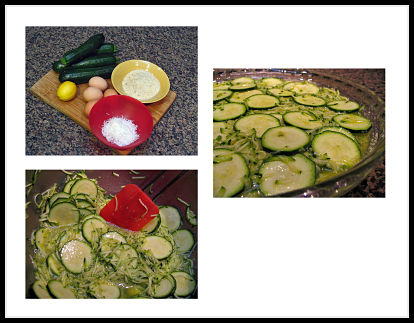
The first time I tried this recipe was more than 20 years ago; it comes from an old, out of print cookbook by Giuliano Bugialli.   It’s unusual because this “torta”  takes no flour.  It also contains zucchini cut in two different ways: grated and sliced.  The grated component becomes creamy during baking, surrounding the more defined slices to form a light, refreshing, sort of crust-less quiche. By skipping the breadcrumbs, this recipe is also low in carbohydrates, for those who are counting.

TORTA DI ZUCCHINI
(from Giuliano Buggiali)

1 pound zucchini (2 medium-size), grated
1 pound zucchini, sliced thin
4 eggs, beaten
zest of 1 lemon
1/4 cup grated parmiggiano cheese
salt and pepper
fresh parsley, minced
fresh bread crumbs (about 1/2 cup)

Grease a pyrex pie dish with butter. Sprinkle some bread crumbs to coat.

Mix the beaten eggs with the lemon zest, parmiggiano cheese, 1/4 cup of bread crumbs, parsley, salt and pepper.  In another bowl, place the grated and sliced zucchini. Shake the dish carefully to distribute the slices more or less evenly. Add the egg mixture to it, mix gently, and pour into the prepared pie dish.  Sprinkle the remaining 1/4 cup of bread crumbs on top, forming a very light coating.

Bake in a 375F until set and golden on top.   Allow it to cool for at least 15 minutes before serving.   Serve warm or at room temperature.

ENJOY!

to print the recipe, click here


Comments: This “torta”  makes a nice light meal, possibly served with soup or a salad.  In the summer I like to match it with tomatoes from the garden or from the farmer’s market.   Leftovers are best re-heated in the oven, because microwaving tends to make it watery.

On a side note… in Brazilian Portuguese, if someone says things that make no sense, either because they are wrong or have no relevance whatsoever,  the favorite expression is “to talk zucchini”  (falar abobrinhas).   I have absolutely no idea where the expression comes from, but maybe it helped shape my negative childhood view of zucchini.   Glad I got over it.   😉

BRAZILIAN PAO DE QUEIJO: Love at first bite!

cheesebread1

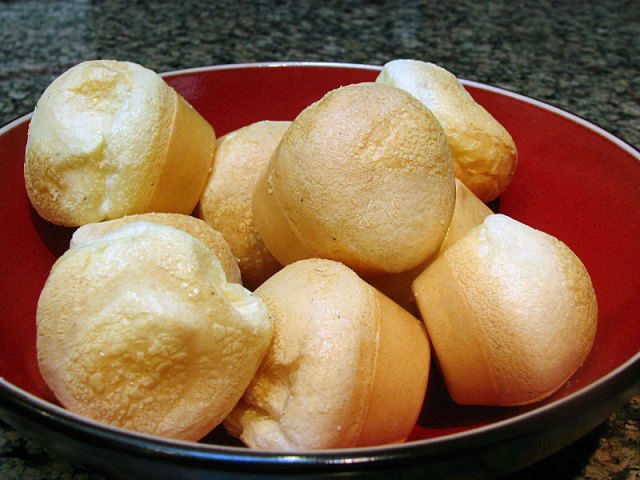
If you happen to know any Brazilians leaving abroad, ask them to name the five foods that they miss the most. I’m willing to bet that “pao de queijo” (little cheese bread) makes the list. Some might even shed a tear or two thinking about it.


Originally from the beautiful state of Minas Gerais, they are made with a farmer’s type cheese, quite unique (Minas’ cheese, read about it here).   Brazilian cheese bread  is so popular that nowadays you can buy it in stores all over the country called ‘Casa do Pao de Queijo” (Home of the Cheese Bread),  or as a dry mix, in colorful bags available at most grocery stores. I’ve lost track of how many such bags we’ve stuffed in our luggage coming back from annual trips to visit family and friends.

Last year I found a recipe for pao de queijo  published by Fer,  in her blog Chucrute com Salsicha. She is  a  Brazilian-American like myself, and she raved about them. When things like pao de queijo are on the line, Brazilians attentively listen to each other… At least three Brazilian bloggers back this recipe.  Try it, you’ll love it

BRAZILIAN CHEESE BREAD
(adapted from Fer, original recipe from Neide)

1/2 cup milk
1/4 cup vegetable oil
1 egg
1 cup tapioca starch
1/4 cup farmer’s cheese (see comments)
1 T Parmigiano Reggiano cheese, grated
1/2 tsp salt

for topping (optional)
fresh rosemary leaves, chopped
kosher salt

Add all ingredients, except those for the topping, into a blender.  Blend very well at full speed, stopping a couple of times to scrape the surface of the blender’s cup, making sure no bits of tapioca starch are left unmixed.

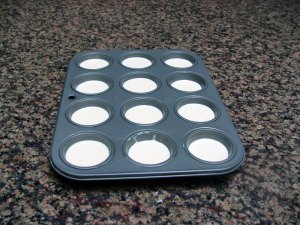
The mixture will be a little thinner than pancake batter.  Pour the batter in mini-muffin tins, to no more than  3/4 of their capacity,  as shown here.  The recipe makes 24 little cheese breads.

tray

Add a little bit of salt and rosemary on top, place in a 400F oven, and cook for 20 minutes.

outofoven

Most will come out right away without sticking.  If some stick slightly, allow them to cool for a few minutes and probe them out gently with the tip of a knife.

ENJOY!


to print the recipe, click here


Comments: In the original recipe, Neide was trying to mimic little cheese breads she had at a restaurant in Rio de Janeiro. She used exclusively Parmigiano cheese in the batter.   I’ve  made this recipe many times,  and now settled on a combination of two cheeses: a melting type, preferably Mexican, and a small amount of Parmigiano to sharpen the taste.  Of course, depending on the type of cheese, adjust the salt.  In this batch I did not add any rosemary, but please do so, it is perfect with it.

They resemble popovers in texture, but are gluten-free, so folks with gluten allergies can still enjoy them!

Now, allow me to share a couple of photos sent by Mia, a reader of my blog who just made a batch!  In her version, the mixture ended up with a firmer texture, so she was able to roll them as little balls, which I must say made them a lot more “authentic-looking”.   Awesome job!

image

image-2

Mia, thanks so much for trying one of my favorite Brazilian recipes, and for sending the photos and allowing me to publish them…   Now I am craving “pão de queijo” again…..