SPIRALIZER FUN

In five years of blogging, I probably mentioned this before once or twice: I am not too wild about cooking fads, and usually avoid them.  For instance, that one from years ago, foams.  You could not go to a restaurant that considered itself slightly upscale without foams bubbling around your plate.  Then we have the more recent bacon-mania. Because 90% of humans adore bacon, all of a sudden bacon started popping up in every single culinary item.  Chocolate-covered bacon?  Yes, it is out there!  Bacon ice cream?  Why not? Well, if I have to explain it, I guess we are from different planets. And let’s not get me started on the fried egg topping everything lately. I guess this fad is still in its exponentially growing phase. Having said all that, I am heavily into the spiral cutter thing. And I insist, this is not a fad. It is a nice way to treat vegetables, easy to use, fast to prepare, and a ton of fun to eat.  Zucchini is by far my favorite target,  and I’ve shared one of the ways we enjoy it almost weekly, uncooked, bright and fresh. Strands of zucchini can get mushy very quickly when cooked, but now I think I hit the perfect method to deal with them.

ZucchiniPasta1
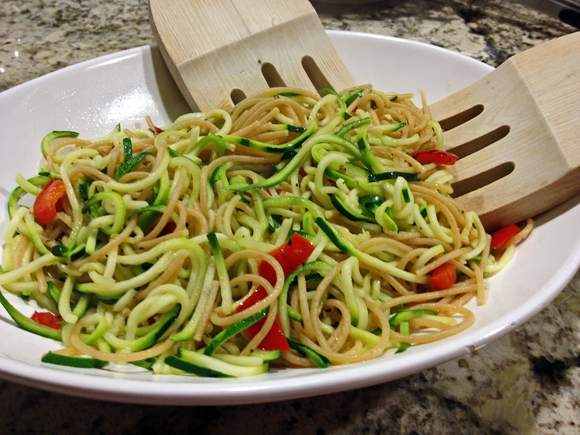
LEMONY ZUCCHINI NOODLES & WHOLE-WHEAT SPAGHETTI
(from the Bewitching Kitchen)

Whole-wheat spaghetti (1/3 of your regular portion)
3 medium zucchini, ends removed, cut in a spiral cutter
1 Tbsp olive oil
1 shallot, minced
1/2 red bell pepper, diced (substitute tomatoes, spinach, anything you feel like)
lemon juice and zest
salt and pepper to taste

Cook the pasta in plenty of salted boiling water. As the pasta cooks, heat the olive oil, saute the shallot and red bell pepper until the shallots are translucent and with a little bit of color, and the red bell pepper starts to soften. Season lightly with salt, add the zest of the lemon on top of the warm mixture, cover the pan and let it rest while you finish dealing with the pasta.

Ten seconds before the end of cooking time, add the zucchini strands to the pot.  Time ten seconds and immediately drain it, reserving a little of the cooking water.  Return it to the hot, empty pot, add the sautéed shallots and red bell pepper, squeeze a little lemon juice,  toss it all gently, and adjust with pasta cooking water if necessary.   Taste for seasoning, adding ground black pepper if you like.

ENJOY!

to print the recipe, click here

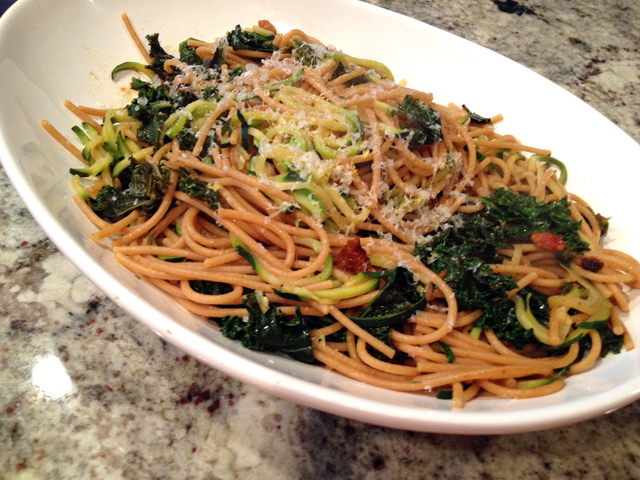
One of the things I love about this type of recipe is that you can vary the amount of pasta in it according to your mood or goals.  In the recipe I shared today, zucchini was prominent, pasta played a secondary role.  The resulting meal felt light and bright. A few weeks ago, I went the opposite way, and made the zucchini stay in the background. At that time I added wilted kale and sun-dried tomatoes to the dish. It was slightly heavier, and quite appropriate for the sorry evenings ahead, when the temperature will fall below 90 F, and I will go through a few boxes of Kleenex to deal with it.

zucchinikalepasta

If you are over the fence about getting a spiralizer, jump to the right side, the side where I am ready to play with you. You will not regret it, especially if you have kids who are over the fence about eating their veggies.  They might profess zoodles – like this tasty version from Mike’s blog –  their favorite dish ever!

ONE YEAR AGO: Beer-Marinated Grilled Skirt Steak

TWO YEARS AGO:  Secret Recipe Club: Corn Chowda

THREE YEARS AGO: Page-A-Day Calendar (Pits and Chief 5 minutes of fame…)

FOUR YEARS AGO: Home Sweet Home (our beloved Pits in one of his last photos)

FIVE YEARS AGO: Marbled Rye

THE COUSCOUS THAT WASN’T

I am quite slow when it comes to following cooking trends. Chia seeds? Haven’t used them yet, although I do own a bag and lovingly glance at it from time to time. Then, there is cauliflower in its unexpected uses, like the super popular pizza crust and processed versions that mimic rice.  The only non-traditional preparation I embraced long ago was mashed cauliflower for a low-carb take on mashed potatoes. It turns out I am so fond of it, that the real thing almost never finds its way into our kitchen. It is a bit puzzling that I ignored all other “out-there” uses for cauliflower. Better late than never, I now profess my newest found love: cauli-couscous.  Please, if you haven’t tried it yet, do not twist your nose at it. The tiny bits of cauliflower end up with a texture very similar to its semolina cousin, and seem to absorb flavors even more efficiently.  A very versatile dish, you can take it in many different directions by changing the veggies, the spices, herbs, and the cooking liquid. Just as you would with… couscous!  😉

CauliCouscous
MEDITERRANEAN STYLE CAULIFLOWER COUSCOUS

(from the Bewitching Kitchen, inspired by many sources)

1 head of cauliflower, broken into florets
1 Tablespoon grapeseed oil + drizzle for chickpeas
1 can of chickpeas, drained and well rinsed
1/4 teaspoon ground cumin
3/4 teaspoon salt, divided (1/4 + 1/2 tsp)
pinch of cayenne pepper
juice of 1 lemon mixed with 1/4 cup water
8 cherry tomatoes, quartered
1 English cucumber, diced
1/4 cup slivered almonds, toasted
fresh parsley, minced (to taste)

Prepare the chickpeas: Warm a dry skillet over medium-high heat and toss chickpeas in warmed skillet for about two minutes to remove any residual moisture. Be sure to shake the pan and/or stir the chickpeas. Sprinkle the chickpeas with cumin, salt, and cayenne pepper.  Drizzle a little grapeseed oil over the seasoned chickpeas and toss to combine. Keep stirring the chickpeas and adjust seasonings as desired. When the chickpeas are well saturated with flavor, remove from heat and reserve.

Place the cauliflower florets in the bowl of a food processor. Pulse until the cauliflower reaches the desired consistency, not too fine, not too coarse.  You will need to stop the processor a few times and move the large pieces around.  Transfer to a bowl, and marvel at how beautiful your fake couscous looks.

Heat 1 Tablespoon of grapeseed oil,  add the cauliflower, and saute until it starts to get some color. Add the water and lemon juice, cover the pan and simmer just for a few minutes.  Add the tomatoes, cucumber, almonds, adjust seasoning with salt. Add the reserved chickpeas, toss gently to combine using low heat. Remove from heat, add the fresh parsley, and serve.

ENJOY!

to print the recipe, click here

 I was surprised by the amount of “couscous” the single head of cauliflower produced. Isn’t that beautiful?

RicedCauliflower

Once more I used the skillet dried chickpeas “invented” by Kelly, from Inspired Edibles. I did not want them to get soggy, so they were added in the final moments of cooking, right before serving. Still, even next day after a brief torture in the microwave, the chickpeas were very tasty.  Maybe  a little less crunchy, but nothing to be disappointed at.

On a side note, whenever I say “invented” I think about one of Seinfeld’s classic episodes… Merlot? Never heard of it. Did they just invent it?”  😉

ingredients

I decided to call this recipe “Mediterranean” because it does have a lot of the usual suspects in that style of cooking. Plus, Mediterranean has a nice gastronomic reputation. Everybody loves it.  😉

Before I leave you, I’d like to share a list of very creative uses for cauliflower, some will surprise you, I am sure. Did you know you can use it for a fake bechamel-style sauce?  And that’s just the tip of the iceberg…

For the basic crust: The Best Cauliflower Pizza Crust, from Lucky Penny Blog

For a gorgeous example of the cauli-pizza:  Roasted Pear and Caramelized Onion Pizza, from Inspired Edibles

Cauliflower Crust Calzone, from The Iron You

Cauliflower Crust Stromboli, from The Iron You

Paleo Moussaka, from The Iron You (Mike, aka Cauliflower Overlord, is a cauliflower magician, and in this post he uses it in a very interesting bechamel type sauce)

Cauliflower Fried Rice, from Skinnytaste

Spicy Buffalo Cauliflower “Wings”, from Inspired Edibles

Cauliflower Pancakes, from Healthy Recipes

Cauliflower Gnocchi, from The Food in my Beard

Ricotta and Cauliflower Gnocchi, from Divalicious Recipes in the City

Cauliflower Pesto, from Vintage Cooking Notes, tried and loved by yours truly

 and if you thought sweets are off-limits, think again 

Cauliflower and Chocolate Ice Lollies with Pistachio Dust, from Veggie Desserts

Cauliflower Chocolate Cake, from Divalicious Recipes in the City

Chocolate Chip Banana Cauliflower Muffin, from Once Upon a Gourmet Gin

 I hope I convinced  you to give cauliflower couscous a try, I am definitely in the mood for a cauliflower pizza crust, just for the fun of it…

ONE  YEAR AGO: Tlayuda, a Mexican Pizza

TWO YEARS AGO: Paradise Revisited

THREE YEARS AGO: Feijoada, the Ultimate Brazilian Feast

FOUR YEARS AGO: Vegetable Milhojas

FIVE YEARS AGO: Italian Bread

CRISPY CORNMEAL SWEET POTATO FRIES

I am not quite sure how many recipes for oven-fried sweet potatoes I’ve tried in the past few years in a quest for the right amount of crunch outside, and a creamy, perfectly cooked interior. It’s not easy to get this combination. All my previous attempts failed to impress us, but this version was definitely blog-worthy.

Cornmeal Crusted Sweet Potatoes
(made on May 09th; blogged on July 24th)

CRISPY CORNMEAL SWEET POTATO FRIES
(adapted from My New Roots)

2 – 3 large sweet potatoes
2 Tbsp. melted coconut oil
4 Tbsp. cornmeal
1 tsp. sea salt
1 tsp paprika (sweet, hot or smoked)
.
Scrub the sweet potatoes well under running water. Slice them into long sticks (thinner than 1/2 inch). Place them in a bowl of water, swish around a few times, then drain. Lay them on a clean tea towel and dry thoroughly. Let them air dry completely.
.
Heat the oven to 400°F/200°C. On low heat, melt coconut oil in a small saucepan. Place cut potatoes in a plastic bag, seal and shake the bag vigorously to coat (this can also be done on a baking sheet, drizzle the oil over and toss very well to coat). Add cornmeal, salt, and smoked paprika to the bag and toss well to coat.
.
Place potatoes on a lined baking sheet, making sure that they are not overlapping.
.
Bake for 30-40 minutes until golden brown and crisp.

ENJOY!

to print the recipe, click here

composite

We are not too wild about buying frozen food, but Alexis frozen sweet potato fries are the exception to this rule. I have no idea what they do to make their sweet potatoes so crisp, without any apparent coating. Still, I am glad this recipe gave us a nice alternative, with the added bonus of being able to season them according to our mood, or what we are having as a main dish. In this particular evening, we had open-faced cheeseburgers with slices of avocado and tomatoes.  The sweet potatoes with the amazing paprika our friend brought all the way from Slovakia were perfect alongside.

dinnerDinner is served!


ONE YEAR AGO:
Pan-grilled Tilapia with Smoked Paprika & Avocado Cream

TWO YEARS AGO: Golden Saffron and Fennel Loaf

THREE YEARS AGO: In My Kitchen, July 2011

FOUR YEARS AGO: Heavenly Homemade Fromage Blanc

FIVE YEARS AGOA Perfect Sunday Dinner

THE HEART OF BRAZILIAN COOKING

Heart of palm (palmito) is perhaps not appreciated enough outside Brazil, but back home people love it in many types of preparations: pies, pastéis, filling for pasta, and in its purest form: “salada de palmito“.  Let’s practice those words now, by repeating after me four or five times. Ready?   😉
.

.
I’ve always been quite fond of a simple salad along the lines of this one pairing fresh, juicy tomatoes with slices of heart of palm, often adding black olives for color contrast and that boost of brine flavor.  But, a few weeks ago Denise, a Brazilian blogger who lives in the US shared her take on salada de palmito, and I knew I had to make it right away.  Denise blogs exclusively on Brazilian recipes, so if you want to learn more about my home country cooking, stop by her blog, and enjoy the tropical ride!

HeartsPalmSalad


HEART OF PALM SALAD SKEWERS
(adapted from Denise’s blog, From Brazil to You)

for the skewers:
6 heart of palm stalks, cut each stalk in half or thirds
8 grape tomatoes
Arugula or spring mix leaves, or any green of your choice
fresh parsley leaves for decoration

for the Lemon-Za’tar Dressing:
2 tablespoons extra-virgin olive oil
2 tablespoons fresh lemon juice
½ teaspoon agave nectar
a good pinch of za’tar
salt and pepper to taste

To prepare the salad, assemble 4 salad skewers by inserting and alternating heart of palm chunks, grape tomatoes, salad greens of your choice.

Once skewers are assembled, chill in refrigerator for about 30 minutes, covered with a wet paper towel. Meanwhile, prepare the dressing. In a small bowl, whisk all the ingredients together well until obtaining a thick and homogeneous dressing.

Drizzle the heart of palm salad skewers with the dressing, and serve sprinkling parsley leaves on top.

ENJOY!

to print the recipe, click here

A little trivia about this post: recipe found on May 14th; enjoyed on May 17th; blogged on July 17th. 

Comments:  This was such a fun way to serve heart of palm! You can change it around in many ways, adding red onion chunks (like Denise recommends in her post), or black olives, maybe roasted zucchini slices. I can even envision some grilled halloumi cheese, making it a “Brazil meets Greece” version.

The lemony, acidic flavor of za’tar makes it a great addition to salad dressings. I added a touch of agave nectar to mellow things a little, but you should play with this basic vinaigrette idea and change it to suit your taste.

Denise, thanks for keeping Brazilian food always in my mind, every new post brings a smile to my face, and a sense of nostalgia for foods of my childhood.

+++++++++++++++++++

 This post had been scheduled for a while, but just a couple of days before going live, I learned that Denise got a very well-deserved prize: her blog was chosen as one of 50 of the best Mom-blogs!  You can read all about it here.  Denise, you deserve all the recognition, I am thrilled for you!

+++++++++++++++++++

ONE YEAR AGO: Potluck Frittata and Lavoisier

TWO YEARS AGO: Home-made Corn Tortillas

THREE YEARS AGO: Whole-Wheat Spaghetti with Peanut Sauce

FOUR YEARS AGO: Brigadeiros: A Brazilian Party!

FIVE YEARS AGO: Lemony Asparagus


BLACK BEAN & PEPPER JACK BURGER

If you’ve been around the Bewitching Kitchen for a while you know that I eat quite a bit of meat, enjoy eggs, dairy, grains, regular pasta, whole-wheat pasta, sushi, oysters, sweets, there’s basically no category of food I refrain from eating.  So, when you see me rave about a veggie burger, rest assured: I rave from the perspective of a content omnivore. I love what tastes great. Period. If you are a vegetarian, you will flip for these. If you are not, be ready to flip too.  These are spectacular.

BlackBeanBurgersServed

BLACK BEAN AND PEPPER JACK BURGERS
(from Fine Cooking Magazine)

1/2 cup rolled oats
1 15.5-oz. can black beans, rinsed and drained
1 large egg
1 tsp. ground cumin
Kosher salt
2 oz. finely grated pepper Jack cheese (1/2 cup)
1 large scallion, minced
2 Tbs. chopped fresh cilantro
1 Tbs. olive oil; more for the plate
4 whole-wheat hamburger buns, toasted
Jarred salsa, for serving
Sliced avocado, for serving

Put the oats in a food processor and pulse three times to roughly chop. Add half of the beans and pulse into a coarse paste, about 6 pulses. Add the egg, cumin, and 1/2 tsp. salt and process to mix well, about 1 minute. Transfer the bean mixture to a large bowl. Stir in the remaining beans, the cheese, scallion, and cilantro.

With wet hands, form the bean mixture into four 1/2-inch-thick patties and transfer to a lightly oiled plate. Refrigerate for 10 to 15 minutes to let the burgers set up.

Heat a large heavy-duty skillet (preferably cast iron) on high heat until very hot; add the oil and swirl the pan to coat the bottom. Cook the burgers until browned, with a good crust, 2 to 3 minutes; then carefully flip and cook, flipping again if necessary, until the burgers feel firm when pressed with a fingertip, another 3 to 5 minutes. Serve the burgers in the buns, topped with the salsa and avocado.

ENJOY!

to print the recipe, click here

composite
I saw this recipe in one of the recent issues of Fine Cooking, but did not think much of it. Then, a member of a cooking forum (Cook’s Talk) raved about them. She said that her husband and son, who would normally twist their noses at any burger made with less than 99% beef,  loved them too.  With that endorsement, I was powerless to resist.

Just remember that the patties need to sit in the fridge for a little while to firm up, other than that, a very simple and weeknight-friendly recipe.   They taste amazing, their texture is obviously more crumbly than that of a meat burger, but I don’t see this type of preparation as a substitute for the real thing, it’s just a fun recipe to open your gastronomic horizons.

Before you ask, I did not make the sweet potato fries, they were frozen entities by the brand Alexis, which we find quite tasty.  However, I did make the hamburger buns: a Wheat Berry Caraway bread that turned out as a great partner for these tasty burgers. Recipe shall be on the blog in the near future.

Seriously: try these black bean cuties soon… you will thank me, I am sure. No matter how much you love sinking your teeth into a medium-rare beef burger…   😉

CloseUP


ONE YEAR AGO: Carrot and Sesame Sandwich Loaf

TWO YEARS AGO: Border Grill Margaritas

THREE YEARS AGO: Goodbye L.A.

FOUR YEARS AGO: Vermont Sourdough