
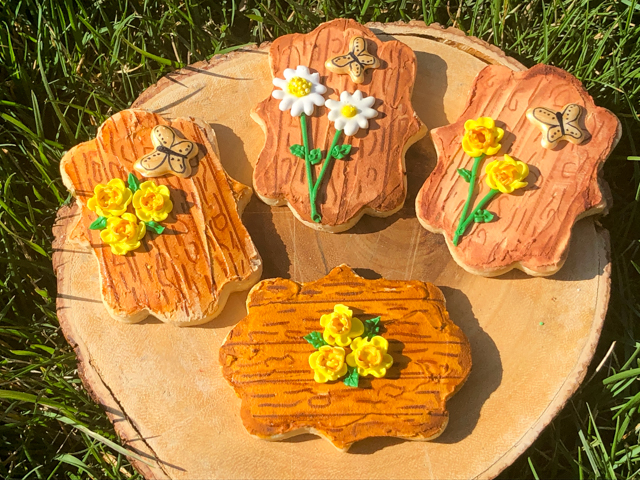
My cookie-baking adventures go on and on. So many different techniques to try, sometimes I am not sure which one to go for next. But the moment I saw my tent-baking friend Tanya sharing her method to make wood plank cookies, I dropped all other projects that were waiting, and jumped on it, like a Jack Russell on a snake. Or Oscar on an ankle (missed the story? click here). She shared a blog post and three tutorials to come up with a showstopper production, involving a bunny rabbit and gorgeous tulips. I confess that the skill to pipe the rabbit on the cookie is beyond my reach, so I opted to let the bunny go and bring butterflies, made as Royal icing transfers. A lot less stressful. I’m quite pleased with the way they turned out…
CHERRY-ALMOND SUGAR COOKIES
(from The Bewitching Kitchen)
1 cup (227g) unsalted butter,cubed, cold
1 cup (200g) granulated sugar
zest of half an orange
2 eggs
3 1/2 cups (420g) all-purpose flour
1/2 cup (60g) cornstarch
1/2 teaspoon kosher salt
1/4 tsp baking powder
1/2 teaspoon cherry extract (Olive Nation)
1/2 teaspoon almond extract (Olive Nation)
to decorate:
your favorite recipe of Royal Icing (I use Tanya’s)
royal icing transfers (butterflies and flowers)
food-safe pen
Heat the oven to 350 F and line baking sheets with parchment. Sift the flour, cornstarch and salt, and set aside. Mix the sugar with the zest rubbing it well to release the oils. Cream the butter with the flavored sugar, just until smooth and combined.
Mix in the eggs and flavoring extracts until incorporated. Add the flour mixture on low-speed, in three portions. The mixture will seem very dry and sandy at first, but after a couple of minutes the mixer it will start to pull away from the sides of the bowl.
Remove the dough from the bowl, cut in two pieces and wrap one in plastic. Roll the second piece of dough out between 2 sheets of parchment paper, to a thickness of 1/4 inch. Cut into rounds, press a detail flower using another type of cutter, and freeze for 10 minutes. Bake for 10 to 15 minutes, depending on the size of the cookie. I like to have a slight golden tone at the edges.
Cool on a rack and decorate as desired. For the bee decoration you’ll need thick consistency Royal icing in cream color for the background, and leaf green for details. A brown food pen with reasonably fine tip, food gel dye in caramel or brown color, vodka, and royal icing transfers of the decorations you feel like adding to the plank.
ENJOY!
to print the recipe, click here
Comments: To see Tanya’s gorgeous cookies visit her site with a click here. Those who have been following my blog for a while know that I’ve never been into cookie decorating, and Royal icing scared every cell of my body. My approach for a decade had been “thanks, but no thanks.” Being part of the Great American Baking Show forced me to deal with the issue. Although I never got as far as making decorated cookies in the tent, I admit that what I had planned for that particular episode was not that great. Once the show was over, I set as a goal for myself to improve, and ended up following the footsteps of Tanya in her online tutorials. She literally turned me into a cookie addict. Cookie making, that is. So, if you suffer from the same problem I used to, check her blog. Consider also supporting her through Patreon (or offering a subscription to someone you love).
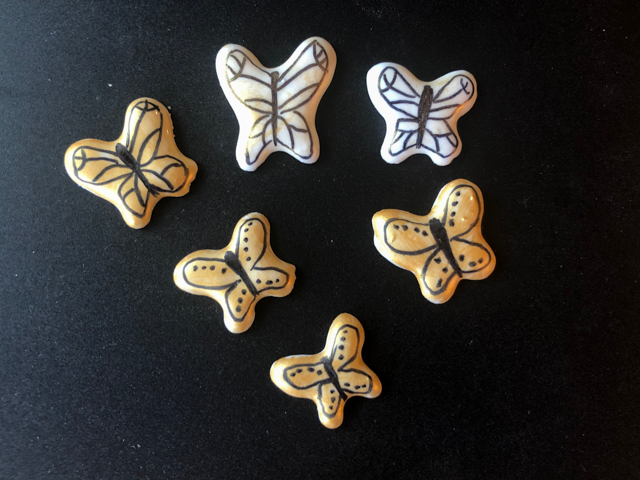
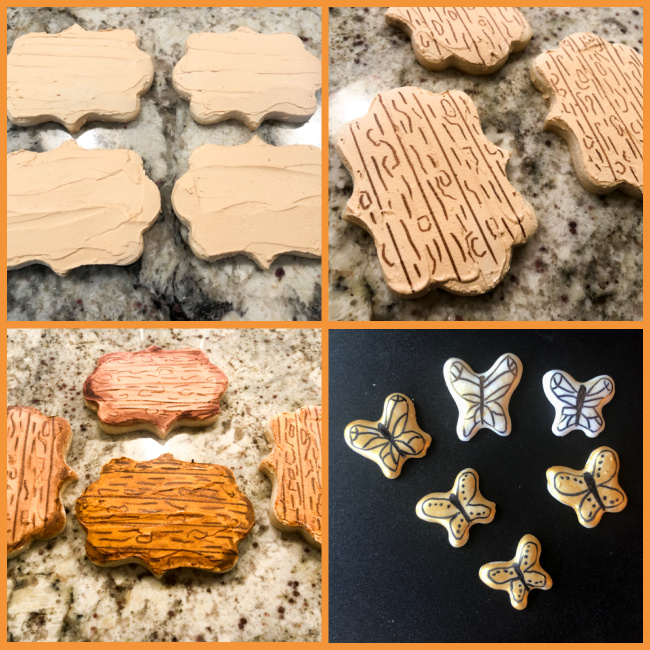
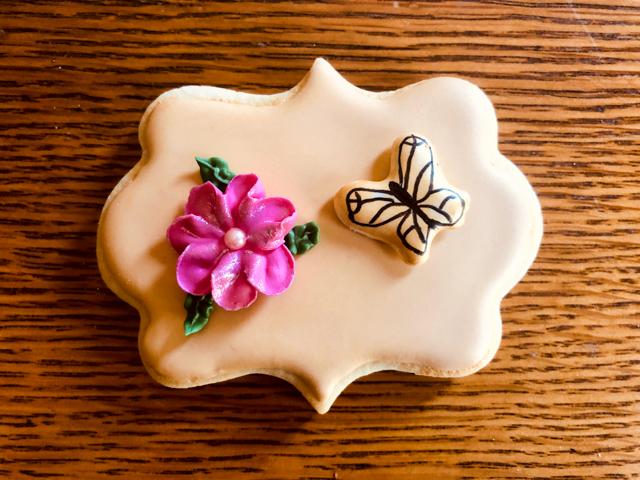
There are several ways to generate a wood appearance on cookies, but I like Tanya’s method because it minimizes the amount of icing you’ll need. She lays a background color with a spatula, gives it a little texture, draws the veins of the wood with a pen and goes over it all with diluted food dye. It is all very carefully detailed in her tutorial, step by step. For my decorations, I made small butterflies with Royal Icing. I drew templates by hand with a very loose butterfly format, and piped white icing. For transfers, you want icing that flows smoothly from the tip of your bag (I use tipless bags for that), or from the icing tip. But, it needs to be thick enough to hold it’s shape. I’d say about 20 seconds is what you want. For the base and the leaves and stems, you’ll need thicker than that. Once the butterflies dried completely (overnight is best), I painted them with luster gold and drew a pattern with a fine tip black food pen.
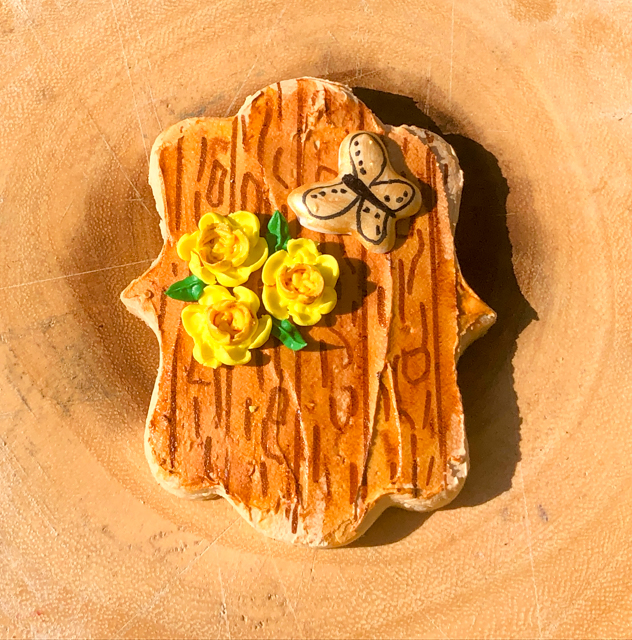
The daffodils were made according to a tutorial from Haniela which you can find here.
The plank is a very nice background to add to several shapes of cookies, and compatible with many different additions: birds, flowers, animals, butterflies, or even a simple monogram. And the plaque shape is also quite interesting to play with, even if you decide to go with a simple, solid color background.
ONE YEAR AGO: OMG Spinach Pies
TWO YEARS AGO: Avgolemono Soup, My Way
THREE YEARS AGO: Sourdough Chocolate Twist Bread
FOUR YEARS AGO: Dan Lepard Times Three
FIVE YEARS AGO: Turkey Portobello Burger
SIX YEARS AGO: Raspberry Ricotta Cake
SEVEN YEARS AGO: In My Kitchen, April 2014
EIGHT YEARS AGO: Whole-Wheat Pasta with Lemony Tomatoes and Spinach
NINE YEARS AGO: Blood Orange Duck: A work in progress
TEN YEARS AGO: Grilled Mahi-mahi with citrus marinade
ELEVEN YEARS AGO: Memories of Pastéis\

Ohmygosh those are so beautiful!!!! I’ve never seen anything like that in my life so if I saw them in a shop I would buy a box. You could sell those! I will jump over to see the master, Tanya’s cookies, too.
LikeLiked by 2 people
So glad you enjoyed them! I loved making these…
LikeLiked by 2 people
Your cookie decorating skills keep getting better and better.
LikeLiked by 1 person