
If you don’t live in the UK, the idea of mincemeat pie as a dessert item sounds very unappealing, to put it mildly. The thought of having ground meat encased in pastry after dinner? Or with your afternoon tea? But, of course, we should all know better. Mincemeat, a delicacy that dates back to the 15th century is a mixture of dried fruits, spices, some alcohol like wine or brandy, and traditionally beef suet or venison. Modern versions use other types of fat, I made mine with butter. Since I had never tried or even seen a mincemeat pie in person, I was a bit nervous about making them, but decided to take it as a technical challenge. Then I proceeded to bake one catastrophic batch, one reasonably ok but not great, and finally a third version that I was happy with. No, not all in the same day, I have not fully lost it yet. I share what I learned from this self-imposed challenge in the comments.

MINCEMEAT PIES
(adapted from Irish Times and Nancy Birtwhistle)
Makes 10 to 12 little pies, depending on how thin you are able to roll the pastry.
Prepare your muffin pan: place a thin strip of parchment paper inside each hole, to facilitate removal of the pies after baking).
for the mincemeat filling:
200g raisins
50g dried apricots, finely diced
50g dried cherries, finely diced
120g brown sugar
120g unsalted butter
70ml sherry
Finely grated zest of 1 large orange
1 tsp cinnamon
1/8 tsp nutmeg
pinch of ground cloves
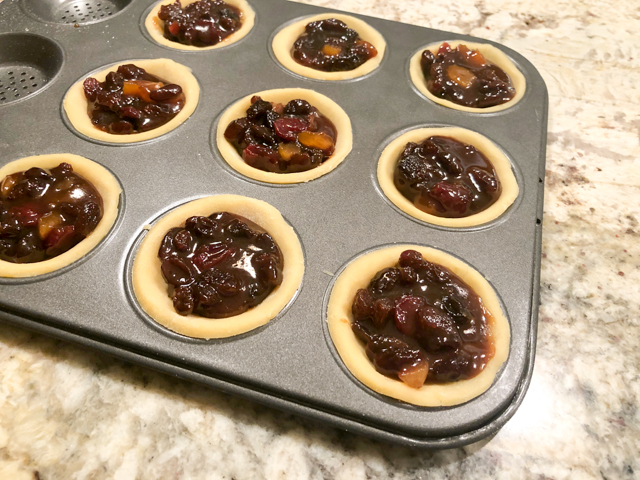
Combine the fruit with the sugar, butter, sherry, orange zest, and spices in a saucepan and put on a gentle heat for a few minutes until the butter melts and the fruit softens slightly in the buttery syrup. Bring to a gentle simmer and simmer until it gets thick, with not much liquid floating in the surface. Cool and use to fill the little pies.
for the pastry:
310g all purpose flour
30g powdered sugar
pinch of salt
170g butter (chilled and cut in small cubes)
3 egg yolks mixed with very cold water to make a volume of 6 tablespoons
Heat the oven to 375F.
Put the flour, sugar and salt in food processor then add the butter and process until the butter is in small pieces. With the motor running add the mixture of egg yolks and cold water. Stop the mixer before the pastry forms a ball, remove it from the processor and gently bring it all together with your hands over plastic wrap. Shape into a flat disc and leave it in the fridge for 30 minutes.
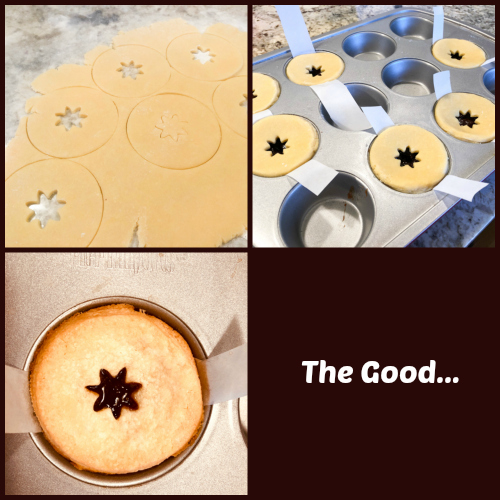
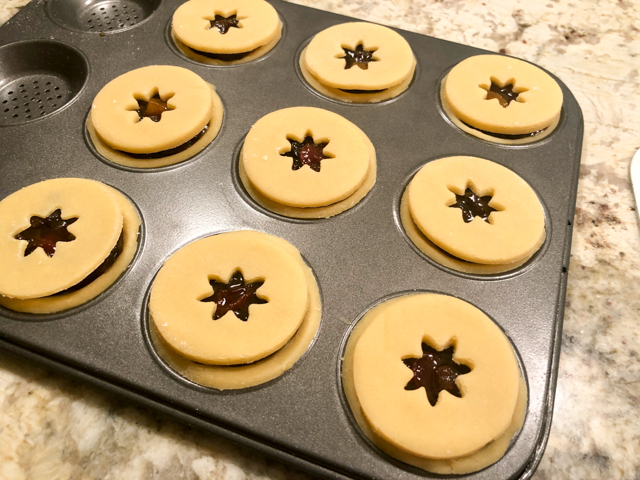
Roll out the pastry to a thickness of about 3mm. I like to do it in between two plastic sheets (I cut the four sides of a large ziplock bag leaving just the bottom part attached, open it and roll the pastry inside it). Cut out circles with a 9 cm (about 3.5 inches) round cookie cutter. Place them carefully inside the prepared muffin cups. Cut out 7 cm (a little less than 3 inches) lids which should fit right over the top. Use a small star shaped or round cookie cutter to make a hole in the middle of the pastry lids.
Fill each base with the mincemeat, brush a little water on the edges of the pastry and gently lay the top over. No need to apply pressure, and no need to brush the top with egg wash. Bake for about 25 minutes until the mince pies are light golden. Allow to cool slightly before removing them from the muffin cups. Dust the mince pies with icing sugar.
ENJOY!
to print the recipe, click here
Comments: The mincemeat. You can find it in jars, and you can find it in little boxes to be reconstituted with water. I bought a small box, followed the instructions to bring it to life, and tried a taste. No way I would add that to my pies. Maybe the brand was not the greatest? I don’t know. But I advise you to make your own or get a brand that is recommended by some very experienced mincemeat pie baker. If you make the filling, keep in mind that you’ll need to simmer it down to the point that it gets thick, with not too much liquid floating around. And that each little pie should not be filled to the top. Which brings me to mistake #1.
The picture above shows my very first batch in the making. Instead of a muffin tin, I used a little tart pan, with a very small volume, which I filled to the top. Not a wise move. But then, there was also mistake #2.
I added the top, and it was not the right size, it should have been slightly bigger in diameter to fully cover the bottom. I won’t share a picture of these babies after baking, because not only the filling exploded through the edges and the top, but the mismatch between pastry bottom and top made them quite sad to look at. Paul Hollywood would have dragged me out of the tent while mumbling “how could you? how could you?” Undeterred, next day I rolled my sleeves up and tried again.

My second batch seemed quite a bit more promising. I matched bottoms and tops with the precision of a NASA engineer, but still committed two major sins. First, the filling was obviously too liquid so it bubbled all over the top. Second, I forgot to add paper strips to the bottom of the muffin tin, which made removing them from the pan a real nail-bitter of a task. One broke into pieces right in front of my eyes. Much to the delight of certain pups that happened to be circling around the kitchen. Mincemeat? Did you say mincemeat?
I cannot bring myself to show you what the pies looked like after baking – the best way to describe is a micemeat crime scene – even after a dust storm of powdered sugar, you can see the stains of filling over the top.

Chef Sherry Yard was right when she kept telling us that powdered sugar covers a multitude of sins, but still, I wanted to get it right. Next day I took a deep breath and started by simmering down the mincemeat filling, until it was really thick and luscious. Cooled it down, made more pastry dough, and baked them at a lower temperature, 375F. Worked like a charm!

They baked perfectly in about 25 minutes, no bubbling over, and the paper strip trick (thank you, Nancy) worked like a dream, I could remove them one at a time without any problem.
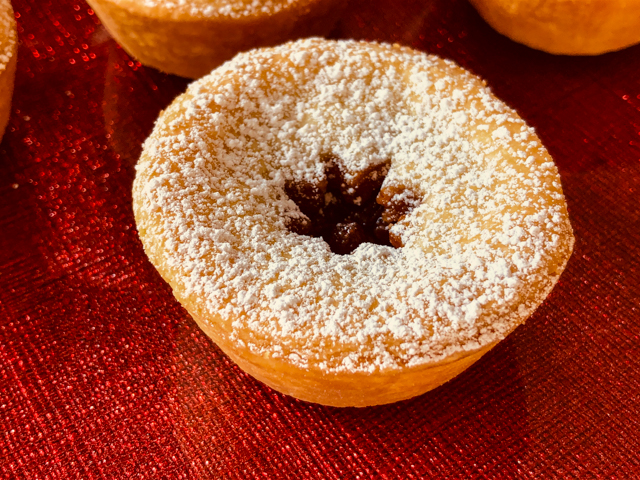
Of course, a little powdered sugar makes a little pie even nicer!
So there you have it, my friends. It took me three attempts to get this bake right, but I am glad I kept trying, because it is much easier to tweak things when you have all the issues fresh in your mind. I loved the filling and the texture of the pastry, which was also very easy to work with. Can I say one more time thank you, Nancy? Since on my third attempt I made just a few pies, I used the leftover dough to make a chocolate tart, and it turned out quite tasty too. You will see it in the blog soon, I promise. 
ONE YEAR AGO: Shibari Bread]
TWO YEARS AGO: Incredibly Simple Times Four – January 2018
THREE YEARS AGO: Two Salads and a Blog Award!
FOUR YEARS AGO: When Three is Better than Two
FIVE YEARS AGO: Somebody Stop Me!
SIX YEARS AGO: Zucchini Pasta with Cilantro-Cashew Pesto
SEVEN YEARS AGO: Bran Muffins, Take Two
EIGHT YEARS AGO: Brown Butter Chocolate Chip Cookies
NINE YEARS AGO: Mogo Mojo
TEN YEARS AGO: Slow-Roasted Chicken Thighs: an Ice-Breaker
