
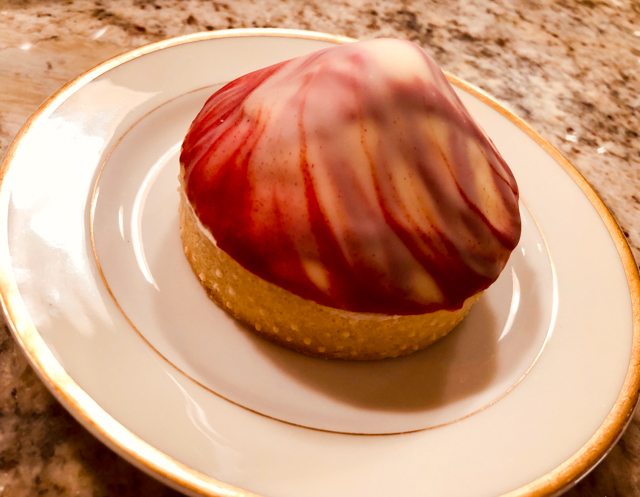
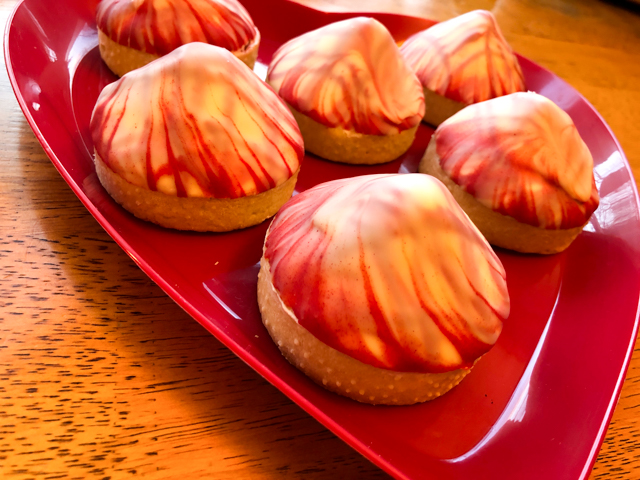
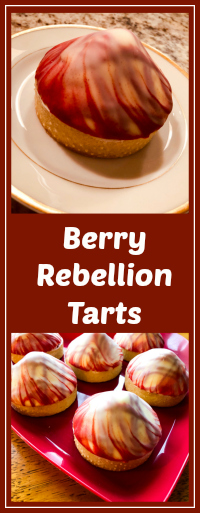
Fantastic, terrific, outstanding, phenomenal, impressive, superb. Those are some of the adjectives I must use to express how I feel about Savour online classes, particularly those taught by the founder of the site, Kirsten Tibballs. I found Savour by accident about 6 months ago, and decided that a monthly subscription to have access to the hundreds of patisserie videos (260 at the present time) was more than worthy it. They add new videos on a regular basis, but in my opinion, even if they did not, the material already available is mind-blowing. Yes, yet another adjective joined my party. Kirsten Tibballs’ CV is quite impressive, you can read about her in this recent interview. Plus, she is a perfect teacher, going over every detail in the recipe, making sure you know what is absolutely important to pay attention to and why. I learn a lot watching her classes. And the icing on the cake? She always has a nice smile and a calm, serene demeanor that makes even the most complex recipes seem doable. Well, except when she performs her magic tricks with tempered chocolate. The doable component goes out of the window, and it goes real fast. Today I share a recipe she offered on her youtube channel, and show you another tart (without the recipe) that is part of the Savour school. They were both spectacular, but I am particularly thrilled by the first one: Berry Rebellion Tarts. We had them for our Valentine’s dinner dessert, and they closed the evening with a golden key. Maybe it was more a ruby-red key?
VALENTINE’S BERRY REBELLION TARTS
(slightly modified from Kirsten Tibballs youtube channel)
For the pastry shells:
225g all-purpose flour
125g unsalted butter
75g superfine granulated sugar
1 egg (about 60g)
2 teaspoons of water
Heat the oven to 350F. Combine the sifted flour and butter to form a crumb; you can do this either in a stand mixer with the paddle attachment, food processor or rub the butter into the flour by hand. It is important that you do not over mix at this stage and ensure that all the butter is combined without forming a paste.
Combine the sugar, water and egg in a bowl, stop the mixer and add this to the crumb mixture. Mix until it just comes together as a dough. Press the dough into a flat square, cover in plastic wrap and rest in the fridge for 1 hour. Once the dough is firm, remove from the fridge and cut in half. Roll the pastry out to 3mm thick on a surface lightly dusted with flour. Cut out discs slightly larger than the tart rings (mine are 8cm in diameter). Place the rings on a lined baking tray and line them with the pastry. Place the tarts in the fridge and repeat the process with the remaining dough.
When the pastry has firmed up, trim the edges with a small sharp knife. Cover the tarts with plastic wrap, fill the tarts with uncooked beans or rice, pressing them into the base firmly to make sure it is filling all the corners. Bake for approximately 10 minutes, remove the rice and plastic lining and bake for a further 4-6 minutes or until a light golden brown colour. Remove the rings while the tarts are warm and allow to cool.
For the crunchy layer:
20g freeze-dried strawberries
13g puffed rice cereal
62g white chocolate
20g grapeseed oil
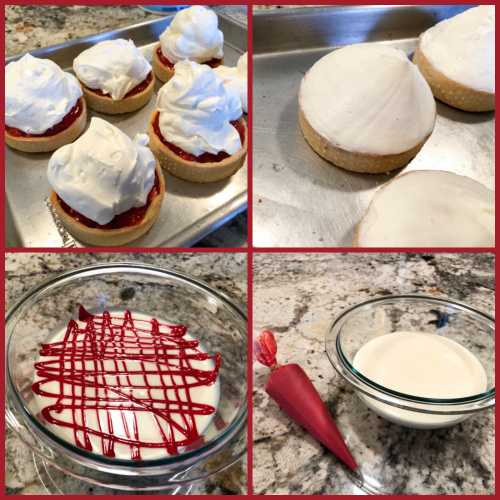
Melt the white chocolate in a plastic bowl in the microwave for 30 seconds at a time on high until it is half melted. Stir vigorously to melt all the chocolate and add in the oil. Mix to combine then add the strawberries and rice bubbles and stir. Spoon a thin layer onto the tart shells, followed by a thin layer of compote, made as described below.
For the strawberry compote:
200g strawberries, hulled and cut in pieces
50 g granulated sugar
1 tablespoon cornstarch
1 tablespoon lemon juice
120 mL water (about 1/2 cup)
pinch of salt
Place strawberries in a saucepan with sugar, lemon juice, and salt. Divide the water into two – pour half with the fruit and combine the other half into the cornstarch.
Heat the fruit on low to medium until sugar is dissolved shaking the pan to cook evenly. Add the well-mixed cornstarch mixture into the bubbling fruit. Continue to cook on low – the mixture will thicken and looks glossy. When thick enough to coat the back of a wooden spoon or spatula it’s ready. Let cool completely. It can be prepared a couple of days in advance.
For the Chantilly topping:
150 ml fresh cream 35% fat (A)
15g liquid glucose
1 teaspoon of vanilla bean paste
105g good quality white chocolate
220 ml fresh cream 35% fat (B)
Boil the cream (A), glucose and vanilla in a saucepan. Pour the boiling mixture over the white chocolate in a bowl and whisk together by hand. Add in the cream (B) and whisk again. Place in the fridge for 6 hours prior to whipping. To whip, whisk it in a stand mixer or by hand to a piping consistency.
Place a generous spoonful of the white chocolate Chantilly cream on top and smooth into a dome shape with a knife. Freeze for 1 hour minimum. Proceed to make the chocolate coating.
For the chocolate coating:
500g white chocolate
50g grapeseed oil
10g red oil soluble colour (I used only 4g)
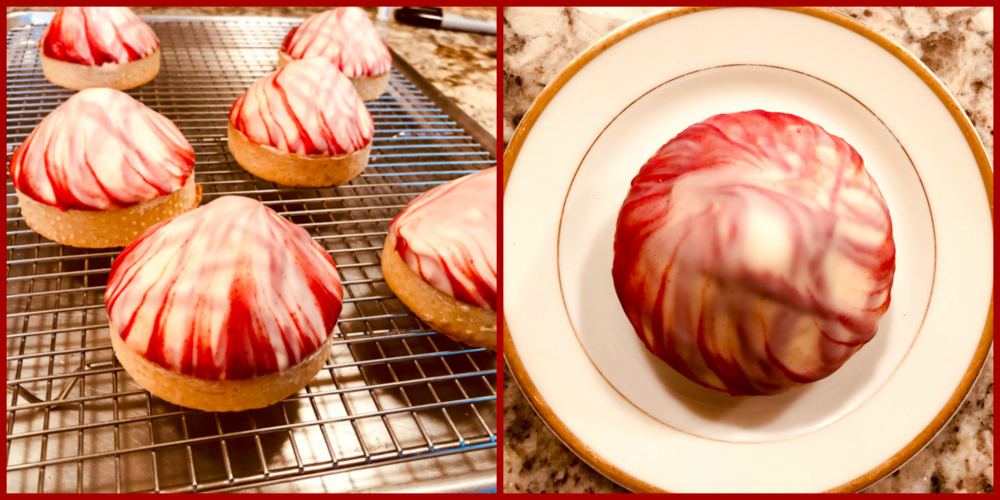
Temper the white chocolate by melting it in the microwave for 30 seconds at a time until half melted. Add in the grapeseed oil and combine. Portion out one-third of the chocolate and sieve in the red colour. Stir to combine then fill a paper piping bag halfway with the chocolate. Place the white chocolate in a smaller bowl and pipe the red chocolate in a grid pattern on top. Holding the tart shell, dip the cream coating into the chocolate and twist the tart as you remove it. Let it drip for a few seconds before turning it upwards and leave at room temperature to set. Pipe red chocolate over the grid pattern each time you dip a new tart, until you coat the six of them.
Allow them to fully set, place in the fridge to defrost for at least one hour before serving.
ENJOY!
to print the recipe, click here
Comments: When I coated the tarts and placed them on the rack to set, I said to myself “did I make these? did I really make these?” Nothing beats the thrill of pulling a recipe that seems a bit too complex and that takes me out of my comfort zone. More often than not, I have small issues with it, but not this time. They turned out better than I expected. I spread the preparation over three days, because with Valentine’s falling on a Thursday I had no choice. The tartlets were made on Tuesday evening, the compote on Wednesday evening.
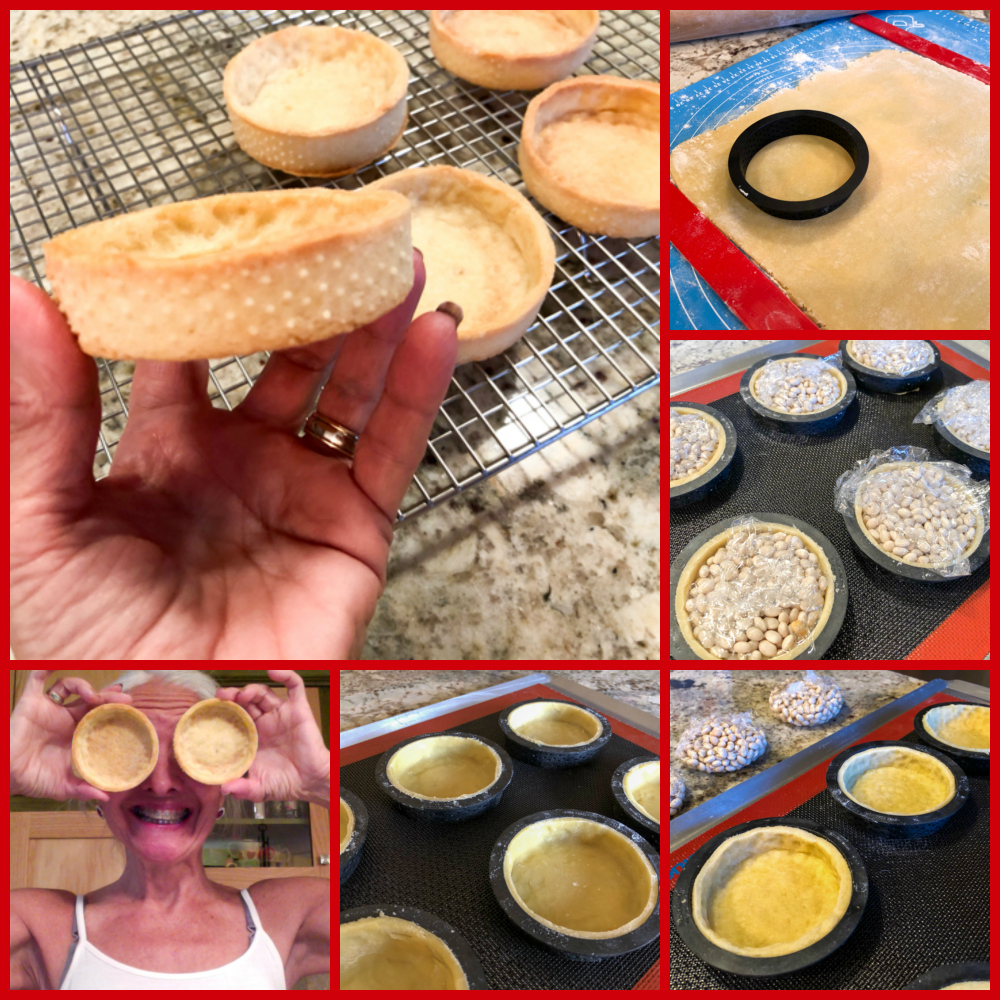
I urge you to watch Kirsten video on youtube. Her method to shape the dough in the tart rings is wonderful and if you follow it closely you’ll have tartlets with a perfect sharp angle at the bottom, instead of a rounded-up edge that makes spreading the filling a bit tricky. Small details matter. The addition of a tiny amount of water in the dough makes it easier to roll out. A pleasure to work with. I used regular saran wrap to cover the tarts before filling with beans (or rice, if you prefer that). Just make sure to crumble the plastic on top, so that it dos not touch the ring during baking. Once the tarts are cool, you are ready to move on to the two-component filling…
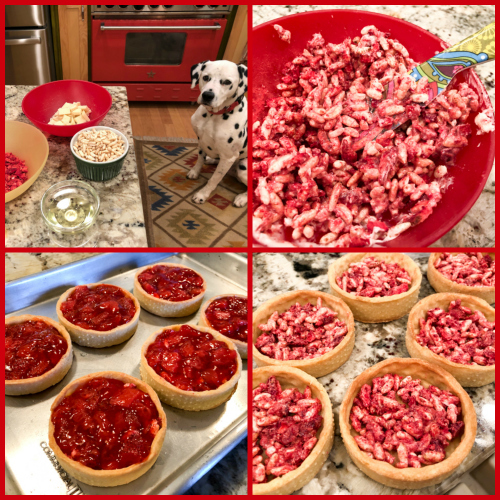
Mis-en-place is everything, and BogeyQT™ definitely approved the way I handled that step. A crusty base with puffed rice cereal, freeze-dried strawberries and white chocolate gives these babies intense flavor and a perfect contrast to the creamy topping that is added later. I changed the recipe for the strawberry compote, because I felt that just simmering the fruit in water and sugar resulted in a very loose mixture. I was afraid it would leak all over the place when I cut the tart. So I used a strawberry compote slightly thickened with cornstarch. It maybe depends on the fruit available to you, Kirsten made them in Australia at the peak of the summer. Lucky lucky woman, I am in the desolate tundra of Kansas freezing my tropical bones. Once the compote is added, all you have to do is crown it with some seriously awesome white chocolate Chantilly cream.
Not to repeat myself, but still doing it, you MUST watch her youtube video for this step (around minute 18). I was a bit worried about sculpting the top in a nice mountain-shape, Chantilly is not the most forgiving substance in patisserie world. But Kirsten, knowing that this step has the potential to induce hyperventilation, holds her spatula and with a very sweet smile says, eyes straight to the camera: I know you can do it! I got faith on you…. Well, let’s say I would not allow cameras to show my performance, but somehow I managed to do it, a few blobs of cream finding the counter top, but not really that bad. And that final step? Swirling the top of the frozen tartlets in the white chocolate pool? That is THE coolest thing ever! Dip it right to the level of the tart shell, and then control your nerves and lift it as you turn. Don’t over-think it. Go for it. I tell you, it was almost as much of a thrill as crossing the finish line of a marathon back in 1986. Yeah, that’s about right.
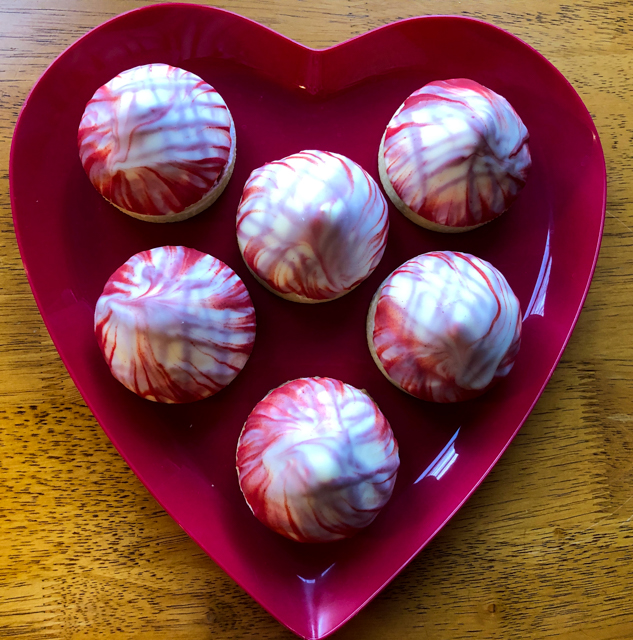
The tart is simply amazing. The white chocolate-Chantilly cream is quite likely one of the most luscious toppings I’ve ever made, and all the components work together well: the extra crunchy layer with the freeze-dried strawberries is full of flavor, the compote sweet-and-tart, and then the creamy top. OMG-type of dessert. Trust me. You could change the color of the swirl component, maybe even add two different colors for a cool effect, adapting it to Easter, Christmas, Mardi Gras… One of the tastiest things I’ve made in a long time.

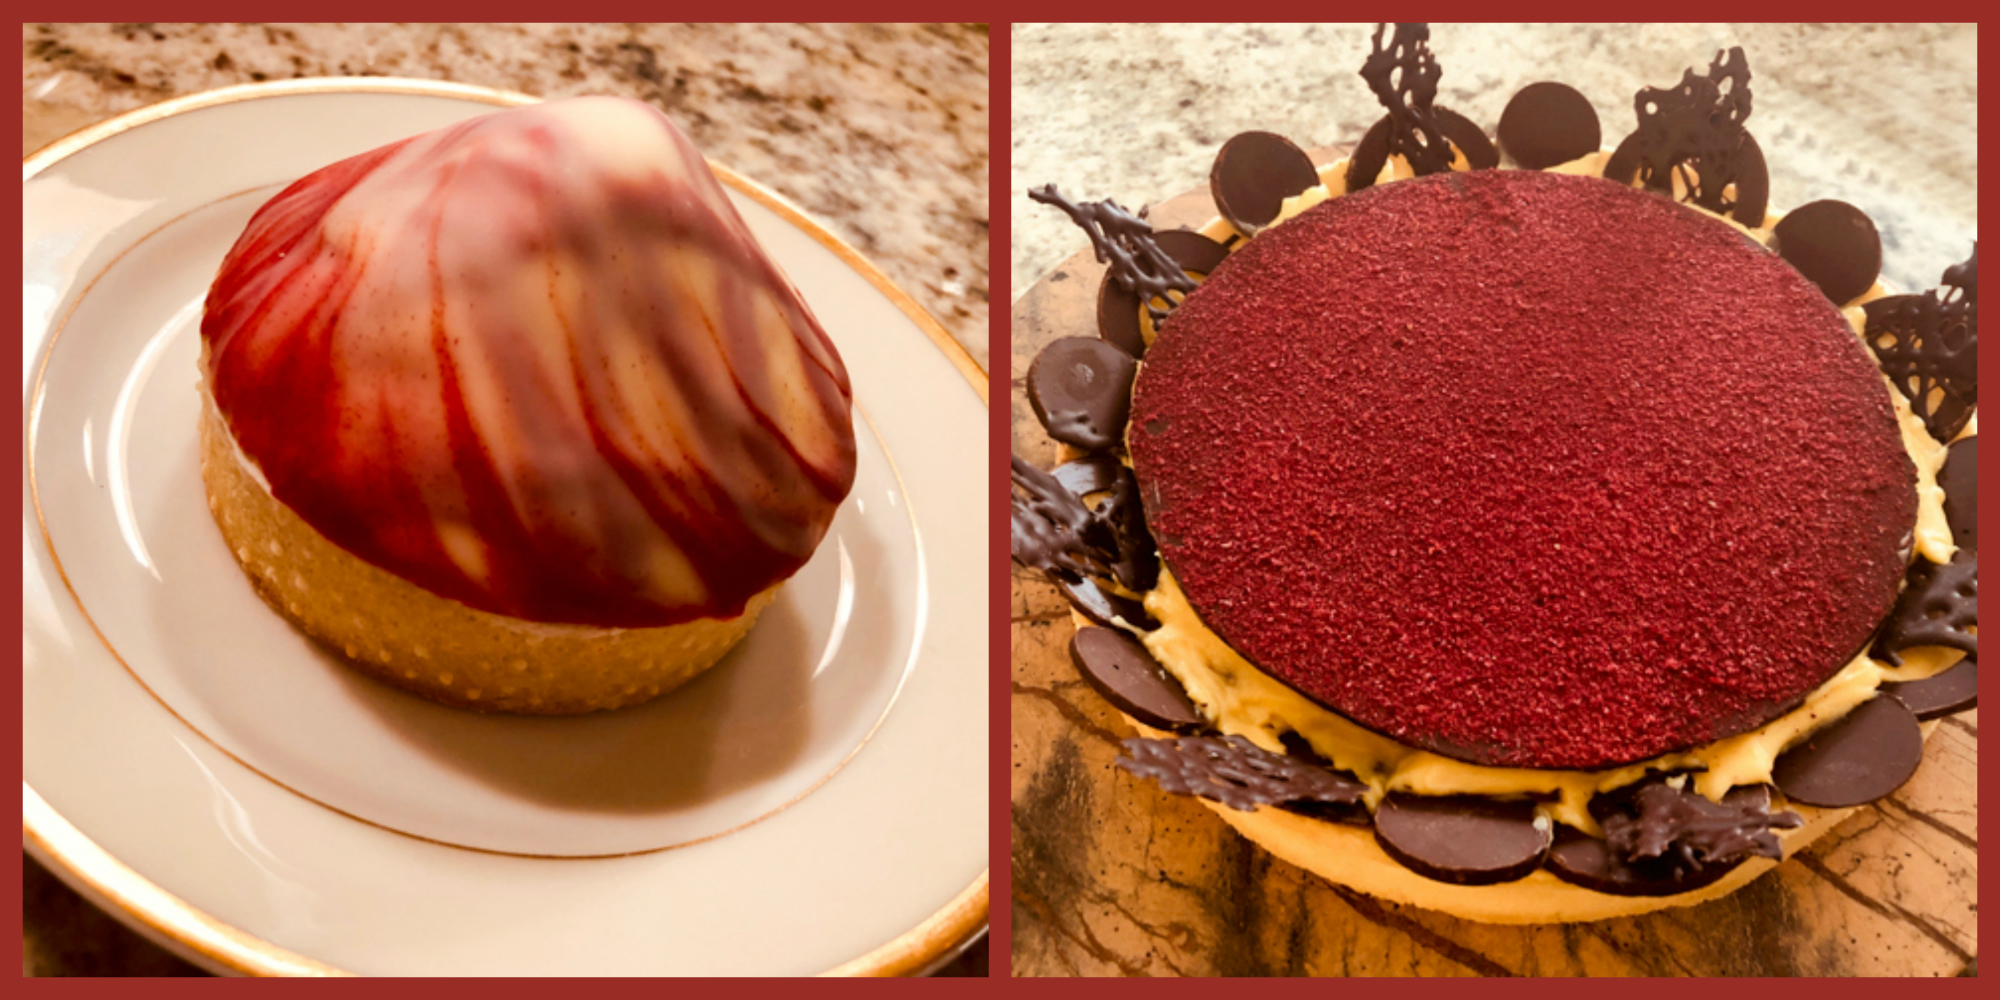
Now, time for a teaser recipe, which you can find at Savour.com. Kirsten’s Crown of Savour is a single tart with some similarities to the Berry Rebellion. A tart base (slightly different recipe), a crusty layer made with pistachios, slivered almonds, puffed rice and white chocolate. Fresh raspberries spread on top, all covered with a superb vanilla cream perfumed with rose-water. To crown it, a disc of tempered chocolate showered with a dust of freeze-dried raspberries. It was a labor of love, but worth the effort.

I think the trickiest component of this tart was the tempered chocolate disc. Kirsten is undoubtedly the Queen of Chocolate. She is able to spread the tempered suspension super thin, so the result is a much more delicate topping. The decoration she chose for the tart is also totally different, she baked little sticks with meringue and stuck them in a nice pattern all around. You can marvel at it here. I could not bring myself to go for those, as all my energy had been depleted in a certain chocolate tempering adventure. I decorated the edges with pieces of tempered chocolate I had played with. Kirsten’s Crown of Savour is a real masterpiece of patisserie.
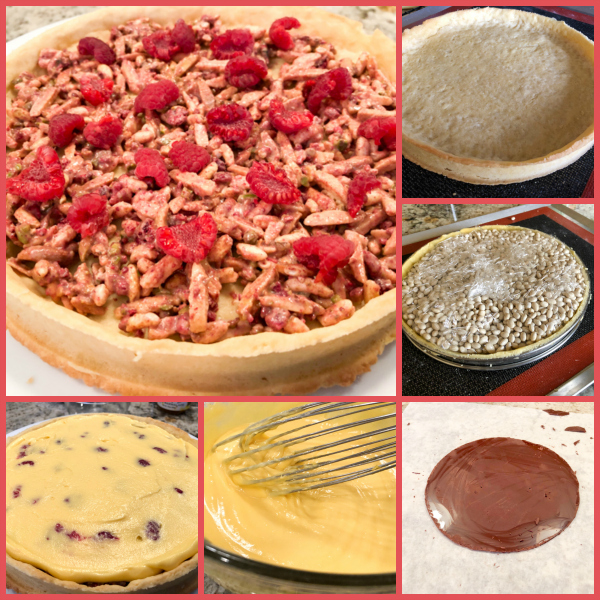
The flavors of this tart were also quite amazing, Kirsten is big on contrasting textures. In the video, she points out that you can potentially simplify things by omitting the crunchy layer on top of the crust, but I do think it adds a lot to the dessert. If you spread preparation over a couple of days, it’s all pretty doable. Of course, the chocolate component a bit of a challenge. Savour has a few tutorials on tempering chocolate using different methods like tabling and microwave, so it’s actually all there for you to learn. I need a lot more practice, my chocolate decorations are always a bit “heavy”, not enough finesse, because evidently I don’t have the “chocolate skill.” Not yet, that is…
As I mentioned, Savour right now has 260 videos. Most are 20 to 40 minutes long, some are shorter, some slightly longer. They show every single step to make the desserts, no matter how complex. You have access to the full recipe, as well as links to special items used (baking pans, silicone molds, piping gadgets). Finally, you also have access to a forum to ask questions to moderators and other bakers. If you’ve been following my blog, you know that I only recommend things I love, and never accept any requests to review books or products. I am absolutely in love with Savour and feel that anyone with a passion for patisserie will profit from their online classes.
Chef Kirsten, thank you so much for making classes available to home bakers like me, who live so far away from Australia and can only dream of taking a hands-on class from you.
ONE YEAR AGO: Emilie Raffa’s High Hydration Sourdough
TWO YEARS AGO: Short-Ribs with Chickpeas and Chard
THREE YEARS AGO: Asian-Style Short Ribs
FOUR YEARS AGO: Herbed Goat Cheese Souffles
FIVE YEARS AGO: Barley Risotto with Peas
SIX YEARS AGO: Jammin’ Blueberry Sour Milk Pancakes
SEVEN YEARS AGO: Scallops with Black Pasta in Orange Cream Sauce
EIGHT YEARS AGO: Stir-fried Chicken with Creamed Corn
NNE YEARS AGO: Potato, Cheddar, and Chive Torpedo
