LUSCIOUS CHICKEN NOODLE SOUP

Perhaps you would think that the time for blogging about soup is pretty much over. But two facts conspired to bring it to our table. First, Phil got a little cold, and second, the weather turned pretty nasty. Forecast for Saturday and Sunday: chilly and full-time rain. Great combination for a rotten weekend. I will disclose to you that we do resort to Campbell’s canned soup sometimes. Yes, it’s not that great, but whenever we feel like we might be getting a bit sick, we buy a couple of cans and call them dinner. I squirt a little lemon juice over my bowl, freshly ground black pepper, and it does a reasonably ok job. But, this time I decided to take this classic soup medicine into my own hands. I would start by making my own chicken broth and use that to cook chicken thighs until  fork-tender. I won’t be humble. This was one spectacular chicken noodle soup. Even if for my bowl I used zoodles instead.

CHICKEN NOODLE SOUP
(from the Bewitching Kitchen)

A pressure cooker is preferred, but not mandatory

for the chicken stock:
2 pounds of chicken wings
2 carrots, cut in chunks
1 celery rib, cub in chunks
1/2 large onion
10 whole peppercorns
1 piece of ginger, about 1/2 inch
1 piece of kombu, about 3 inches long
1 bay leaf
7 cups of water

for the soup:
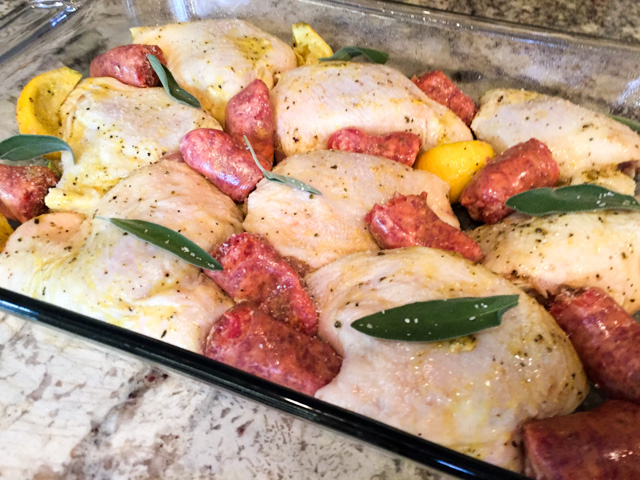
6 chicken thighs, skinless, with bone-in
4 medium carrots, diced
2 ribs celery, diced
chicken broth, as much as needed
salt and pepper to taste
fresh lemon juice to taste
cooked noodles or zoodles

Start by making the chicken broth. Mix all ingredients in a large stockpot or pressure cooker. If using a pressure cooker, cook for 40 minutes under pressure, release steam, open the pan, strain the stock. If using a regular pan, simmer for at least one hour, preferable an hour and a half.

Return about 2 cups of broth and 1 cup of water to the pressure cooker, add the chicken pieces seasoned with salt and pepper. Cook under pressure for 20 minutes. Alternatively, simmer in a regular pan until the meat is very tender. Remove the pieces of chicken to a bowl, allow it to cool until you can handle it.

As the chicken cools, return the pressure cooker to the stove, add the carrots, celery, cook under pressure for 5 minutes, or in a regular pan until the veggies are tender. The base of the soup is now ready.  Shred the chicken with a fork or your fingers. Reserve.

When it’s time to enjoy the soup, cook some noodles (or zoodles) in boiling salted water.  Re-warm the soup by mixing the soup base, the reserved chicken meat, and any reserved stock until the consistency is the way you like. Squirt fresh lemon juice, adjust seasoning if needed with salt and pepper. Place some cooked noodles in your serving bowl, ladle the soup over, and…

ENJOY!

to print the recipe, click here

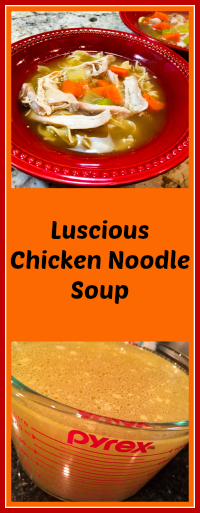
Comments: I got the inspiration for this soup from a couple of sources. For instance, the use of kombu in the chicken stock came from the book The Longevity Kitchen. It is an interesting ingredient, one that I advise you to use just like you would fish sauce. Don’t sniff it. Big turn off. But it does a great job, not only nutritionally speaking, but in terms of flavor. The stock made with chicken wings has been my method of choice for years now, after a basic recipe found in one of my favorite cookbooks  Simple to Spectacular. I pumped it up by using the pressure cooker, and it does a great job extracting all flavors and goodies from the wings. In the composite photo you can see the color of the stock (upper left), no photoshopping was involved.

You will notice that I used the pressure cooker three times in a row, but you can do it all in a regular pan. Make sure to allow the wings to simmer for one full hour at least, and the chicken thighs until very tender. I’ve seen recipes recommending a 10 minute simmer, and I have no idea what those people are talking about. You would have to pretty much wrestle the meat off the bone with such a quick cooking.

All in all, this was so good that I had to blog right away. Contrary to what normally happens, you are reading on Wednesday a recipe we enjoyed only three days earlier. Also contrary to my principles, with this post I line two articles in a row involving chicken. Oh, well. That shows you how much I enjoyed this recipe, I simply could not wait to share.  I hope you’ll give it a try if you are headed to winter where you live, or if someone is feeling lousy with a cold. Heck, try it if you simply love chicken noodle soup. No other reason needed!

Add to FacebookAdd to DiggAdd to Del.icio.usAdd to StumbleuponAdd to RedditAdd to BlinklistAdd to TwitterAdd to TechnoratiAdd to Yahoo BuzzAdd to Newsvine

ONE YEAR AGO: Orange Mini-Cakes and a Bonus Recipe

TWO YEARS AGO: In My Kitchen, May 2015

THREE YEARS AGO: Chestnut Brownies and a Blog Award!

FOUR YEARS AGO: Quinoa with Cider-Glazed Carrots

FIVE YEARS AGO: Celebrate Wednesday: Heirloom Tomatoes Steal the Show

SIX YEARS AGO: Pain de Provence

SEVEN YEARS AGO: Golspie Loaf, from the Scottish Highlands


FIRST MONDAY FAVORITE: MAY 2017

Could someone tell 2017 that it is NOT a race to get to December?
Thanks.

Anyway, today is the First Monday of the month, so it’s time to showcase my favorite post of April. Easy job for me, very very easy, I do have a favorite, and it should not come as a surprise.

BLACK SESAME MACARONS!

Loved to design them, loved to make them, loved to share them with our departmental colleagues.  If you’d like to see the full recipe, click here

Thank you Sid, for organizing the First Monday Favorite!  
If you are a food blogger and would like to participate, drop Sid a line.

To see the contributions from my virtual friends, click on the link below

(comments are shutdown for this post)

https://static.inlinkz.com/cs2.js

NIGELLA LAWSON IN THE BEWITCHING KITCHEN

Did I get your attention? Well, unfortunately she was not here in person. I would love to have her over for dinner, but this time it was just virtually through one of her tasty recipes.  Nigella is clearly a person who is happy in her own skin,  someone who enjoys life to the fullest. Watching her cooking shows brings me that “I’ll have what she’s having” feeling… And, to make things even better, her recipes are never too fussy.  I have several of her cookbooks, but for some reason forgot all about them for a long time. The other day, talking to my friend Denise, she reminded me of one of Nigella’s recipes, a favorite of hers. A chicken and sausage one pan kind of deal. I immediately remembered making it years ago, before my blogging life started. Got this absurd craving for it, made it next day (!!!), fell in love with it all over again.  Sent a picture to Denise, and that’s when we realized we were talking about two different recipes.  Obviously, I now have another one to try. They both join poultry with sausage, but one takes Italian sausage, the other chorizo. One has potatoes, the other doesn’t. And a few more departures on the overall flavor. Anyway, I sense a Nigella-phase in our kitchen.  Yeah, I must have what she’s having…

ROAST CHICKEN THIGHS WITH SAGE AND SAUSAGE
(modified from Nigella Lawson)

1 medium shallot
1/3 cup olive oil
2 teaspoons English mustard
1 tablespoon dried sage
Freshly ground black pepper
1 tablespoon Worcestershire sauce
2 lemons
8 chicken thighs, bone and skin in
6 Italian sausages
salt to taste
2 tablespoons fresh sage leaves

Peel and cut the shallot into four pieces, and put into a freezer bag with the oil, mustard, dried sage, a good grinding of pepper, and Worcestershire sauce. Cut lemons in half, squeeze juice into bag, and then cut the halves into eighths and add them. Squeeze everything around to mix, then add the chicken pieces. Leave to marinade in the refrigerator for a few hours (overnight is perfect).

Heat oven to 325 degrees F. Allow the chicken to come to room temperature in its marinade. Arrange the chicken pieces in a roasting tin skin side up with the marinade, including all the bits and pieces, and tuck the sausages around them. Season with salt. Sprinkle the fresh sage leaves over the chicken and sausages and then put the pan into the oven, covered with aluminum foil for  to cook for 1 hour. Remove the foil, increase heat to 425 F and keep roasting until the skin turns golden brown and starts to crisp up.

ENJOY!

to print the recipe, click here

Comments: This is such an easy recipe to put together! It is originally from her cookbook Feast, but she featured the recipe in one of her shows back in the good old times of FoodTV Network. I modified it quite a bit not so much in terms of ingredients, but cooking method, because as I’ve mentioned a few times in the past, I think nothing beats the texture of chicken that starts cooking low and slow. For weeknights this would be a bit tricky, this is the type of cooking I reserve for weekends.

Phil loved this so much that he started getting nervous about the possibility of not enjoying it again for another 8 years. He kept dropping hints:  ” I would not mind having this chicken every couple of weeks… Actually, you “could” make it weekly, you know?”  So there you have it, it’s really a wonderful way to enjoy chicken, with the spicy tasty bits of sausage, and the flavors of sage and lemon. A keeper.

Dinner is served!
A little pasta with olive oil and grated cheese was all we needed…

Add to FacebookAdd to DiggAdd to Del.icio.usAdd to StumbleuponAdd to RedditAdd to BlinklistAdd to TwitterAdd to TechnoratiAdd to Yahoo BuzzAdd to Newsvine

ONE YEAR AGO: Walnut-Raisin Bran Muffins

TWO YEARS AGO: Gingersnaps with White Chocolate Chips

THREE YEARS AGO: Turkey Chili with Almond Butter

FOUR YEARS AGO: Secret Recipe Club: Leek and Cheese Tart

FIVE YEARS AGO: Secret Recipe Club; Triple Chocolate Brownies

SIX YEARS AGO: Shaved Asparagus Salad

SEVEN YEARS AGO: Indonesian Ginger Chicken

Save

Save

Save

Save

MISSISSIPPI ROAST AND THE OPEN MIND

As I’ve mentioned before, I am a huge fan of FoodTV’s The Kitchen. The crowd brings a mixture of different types of talent and cooking styles, they are funny, witty, it’s a great way to spend an hour on Saturday mornings. Often they will have guests, but for the most part I don’t care that much for them. Usually they are hosts from other cooking shows in need to advertise their cookbook, some are so in love with themselves that they get me into that state of non-stop eye-roll.  A particular OMG-We-ARE-So-Cool American-Italian couple comes to mind. I had to fast-forward that one, I have my limits. A few months ago they featured Robin Chapman, a nice older woman to share her recipe for a slow-cooker concoction called Mississippi Roast. I know, roast in the slow-cooker seems like a contradiction in terms, but that’s how the recipe goes. Anyway, apparently Mississippi Roast got stellar reviews all over the internet, went fully viral on Pinterest, to the point of calling the attention of Sam Sifton from The New York Times. He went searching for the original author. And that’s how she ended up at FoodTV. As I watched her preparing it, my shock and horror kept growing. I could not picture myself making it for us. A real dump and forget approach to the slow-cooker, involving a bag of powdered ranch dressing to make things more “interesting.”  The fun part was watching Geoffrey Zakarian trying to keep his cool. I would love to know his real thoughts as the cooking went on. Of course, I promptly removed the recipe from my mind. Then, one day I got notification of a new post by Mike, the blogger behind The Iron You. My chin dropped. He made it. He raved about it. He tweaked it with a few modifications (taking it on the same path Sam Sifton suggested), which definitely improved the recipe. No more powdered ranch (wink, wink). I caved. I made it. I absolutely loved it. Have already made it three more times. If you are a meat lover, grab your slow-cooker, and try this one.

MISSISSIPPI ROAST
(slightly modified from The Iron You)

3 lbs boneless chuck roast or top or bottom round roast
2 teaspoons fine grain salt
1 teaspoon ground black pepper
3 tablespoons grapeseed oil
3 tablespoons butter
8 pepperoncini peppers (I used jarred)
2 tablespoons mayonnaise
2 teaspoons apple cider vinegar
1 tablespoon chopped fresh dill
¼ teaspoon sweet paprika

Rub salt and pepper all over the roast.

Heat oil in a large pan over high heat until it is shimmering and almost starts smoking. Place the roast in the pan and brown on all sides, about 4 to 5 minutes per side, to create a crust. Remove roast from the pan and place it in the insert of the crock pot.

Make the ranch dressing by mixing mayonnaise, vinegar, dill and paprika. Whisk well to emulsify.  To the meat in the crock pot add butter, pepperoncini, and the ranch dressing. Cook on low for 6 to 8 hours.

Using two forks, shred the meat and mix it with the gravy surrounding it.

ENJOY!

to print the recipe, click here


Comments: This was scrumptious. As usual, brown food is pure ordeal to get a nice picture, so you better trust my words. I had never tried pepperoncini and was not sure what kind of flavor they would contribute. It is a very nice pepper, mild, almost lemony. One of the changes I made from Mike’s version was to omit the cornstarch coating of the meat. My sauce turned out a bit thin, but we don’t mind that. I served this “roast” with mashed cauliflower (shown in the picture). with spaghetti squash the second time around, and with rice and beans on the third. Leftovers were always consumed with corn tortillas for a Tex-Mex version. Some Cotija cheese crumbled on top, a little guacamole and we were all set. The original version from Robin Chapman uses a full stick of butter on top of the meat. To me, that is overkill, but if you’d like to try it as initially conceived, jump to the FoodTV link and check it out.

I am very fond of any type of meat that you can shred with a fork, to me it says comfort food right away, and holds the promise of many tasty meals ahead.

So there you have it. I learned a lesson with this one. Don’t twist your nose at something just because it’s not exactly your style of cooking. A few tweaks here and there, and you might end up with a recipe that will win a spot in your regular rotation.  Of course, now I’m wondering if there’s really anything to be said for ham braised in Coca-Cola. Hey, I’m not making that up. It is a real thing!

😉

Add to FacebookAdd to DiggAdd to Del.icio.usAdd to StumbleuponAdd to RedditAdd to BlinklistAdd to TwitterAdd to TechnoratiAdd to Yahoo BuzzAdd to Newsvine

ONE YEAR AGO: Walnut-Raisin Bran Muffins

TWO YEARS AGO: A Star is Born!

THREE YEARS AGO: Chestnut Flour Sourdough Bread

FOUR YEARS AGO: Kinpira Gobo and Japanese Home Cooking

FIVE YEARS AGO: Walnut Sourdough

SIX YEARS AGO: Thai Chicken Curry

SEVEN YEARS AGO: Zen and the art of risotto

BLACK SESAME MACARONS

My macaron obsession goes on and on. I would love to bake a batch each weekend, but must keep in mind that even the most understanding departmental colleagues might say enough is enough. Plus, if I only make macarons…  brownies, cakes, and cookies will get jealous. So here I am to share with you a batch I am quite proud of: Black Sesame Macarons. Because, although I’m addicted to colors, we all know that black is beautiful…


BLACK SESAME MACARONS
(from the Bewitching Kitchen)

for the shells:
198 g powdered sugar
100 g almond meal
15 g black sesame powder (or you can grind black sesame seeds to a powder)
113 g egg whites (aged for three days)
1 g or a pinch of cream of tartar
100 g granulated sugar
Black Gel color  (about 1/2 teaspoon, add 1/4 to start and adjust as you mix)
for the filling:
8oz (227g) cream cheese
⅔ cup (134g) brown sugar
1 tsp (5g) vanilla extract
½ cup (122g) heavy whipping cream

Line 2 or 3 heavy baking sheets with parchment paper or Silpat mats. Layer the powdered sugar, almond meal and black sesame powder in a food processor or mini processor. Pulse until the mixture looks like fine meal, about 15 seconds. Pass through a sieve and transfer to a small bowl. Set aside.

Place the egg whites and pinch of cream of tartar in the bowl of a stand mixer fitted with the whisk attachment. Make sure that the bowl and the whisk are impeccably clean. Starting on medium speed, whip the whites with the cream of tartar until they look like light foam. The whites should not appear liquid. The foam will be light and should not have any structure.

Slowly rain in the granulated sugar, trying to aim the stream between the whisk and the side of the bowl. Turn the speed up to medium-high. Continue to whip the meringue until it is soft and shiny. It should look like marshmallow creme. Add the gel color and the vanilla. Staying at medium-high speed, whip the egg whites until the mixture begins to dull and the lines of the whisk are visible on the surface of the meringue. Transfer the whites to a medium bowl.

Fold in the almond meal mixture in three increments. Paint the mixture halfway up the side of the bowl, using the flat side of a spatula. Scrape the mixture down to the center of the bowl. Repeat two or three times, then check to see if the mixture slides slowly down the side of the bowl. Put the mixture in a piping bag fitted with one of the tips listed above. Pipe on the prepared baking sheets.

Slam each sheet hard four to six times on the counter. Then fist bump each end of the sheet’s underside twice. Let the unbaked macarons dry until they look dull but not overly dry. Drying time depends on humidity. In a dry climate, the macarons can dry in 15 to 20 minutes; in a humid climate, it can take 35 to 40 minutes.

While the macarons are drying, heat the oven to 330 F (170 C). Bake one sheet at a time on the middle rack. Check in 11 minutes. If the tops slide, then bake for 2 to 3 more minutes. The macarons should release without sticking. Check one or two. If they stick, put them back in the oven for 1 to 2 more minutes. Let the macaroons cool for 10 minutes before removing from the pan.

Make the filling:Whip the cream in a clean bowl till stiff peaks. In another bowl, whip the cream cheese, sugar, and vanilla extract.   Gently fold in the whipped cream into the bowl until well combined. Reserve.

Assemble the macarons: find two macarons similar in size and add a good amount of filling to the bottom of one of them. Place the other on top and squeeze gently to take the filling all the way to the edge.  Ideally, store in the fridge for 24 hours before digging in…

ENJOY!

to print the recipe, click here


Comments:  I am definitely not the first person to bake black macarons. A quick google expedition will show you a few other examples. Some recipes go to extent of using exclusively powdered sesame seeds as you would use almond meal for the shells. I did not want to do that, fearing that the change would be too much of a departure from the classic. So I used a small amount of black sesame powder (15 g in 115 g total seed/nut component). We could definitely taste it in the final product and I thought it was just right. More could have been overpowering.  My intention was to use a white chocolate filling, but I ran into problems and my filling never set enough to use. White chocolate is a temperamental creature. So I quickly whipped up (literally) a vanilla cream cheese filling and used it instead. It complemented well the sesame flavor of the shells, and the slight hint of caramel color given by the brown sugar looked good with the black surrounding it.

I was very happy with the way these turned out. Not a single shell cracked during baking, and the surface was for the most part pretty smooth. Beautiful, well-formed feet, and the black food coloring rose to the challenge. I am almost to the point of trying the Italian  meringue method, but want to tackle this simpler version a few more times. You know, build confidence first before facing the combination of hot syrup with egg whites.


I have yet another macaron post for you, shockingly green…  Stay tuned!

Add to FacebookAdd to DiggAdd to Del.icio.usAdd to StumbleuponAdd to RedditAdd to BlinklistAdd to TwitterAdd to TechnoratiAdd to Yahoo BuzzAdd to Newsvine

ONE YEAR AGO: Fine Tuning Thomas Keller

TWO YEARS AGO: Cauliflower Tortillas

THREE YEARS AGO: Majestic Sedona, Take Two

FOUR YEARS AGO: Secret Ingredient Turkey Meatballs

FIVE YEARS AGO: Swedish Meatballs and Egg Noodles

SIX YEARS AGO: Italian Easter Pie

SEVEN YEARS AGO: Black Olive Bialy