SALMON AND BABY BOK CHOY OVER SUSHI RICE

I am often inspired by Molly Yeh and her fun show Girl Meets Farm on FoodTV Network. This is dinner in a single pan, filling and nutritious. I made the salmon in two different ways, as the husband prefers a simpler seasoning for his fish. See the comments for what I would change next time.

SALMON AND BABY BOK CHOY OVER SUSHI RICE
(adapted from Molly Yeh’s recipe)

1 + 1/2 cups sushi rice
4 small heads of baby bok choy, halved
1 tablespoon grapeseed oil
1 tablespoon toasted sesame oil
2 tablespoons grated fresh ginger
1 limes, zested and halved
2 teaspoons kosher salt plus more for seasoning the salmon
2 + 3/4 cups water
2 tablespoons light miso paste
2 tablespoons Japanese mayonnaise
4 skinless center cut salmon fillets
Sriracha, for drizzling

Heat the oven to 425 degrees F.

Put the rice in a fine strainer and rinse until the water runs clear. Drain well and spread in a braiser. Lay the bok choy in an even layer over top. Drizzle with the neutral oil, sesame oil, ginger, lime zest, and salt. Drizzle the water into the braiser. Bring to a boil.

Cover tightly with a lid and bake for 15 minutes.

While the rice and bok choy bakes, stir together the miso and Japanese mayonnaise. Season the salmon lightly with salt and brush with the miso sauce.
After 15 minutes, carefully uncover the braiser and lay the salmon pieces over the rice and bok choy. Cover again and continue to bake until the rice is tender and the salmon is just cooked through, about 15 minutes more.

Uncover the braiser and broil on the top rack just until the top of the salmon is nicely glazed, about 1 minute. Squeeze the halved lime over top. Serve with a drizzle of Sriracha.

ENJOY!

to print the recipe, click here

Comments: First things first, I really loved the Japanese mayo-based topping for the filets. It is salty, a tad sweet, super flavorful. But the husband was happier with the more austere version I made for him, just olive oil, lemon juice, salt and Herbes de Provence. Do what suits you best. The rice was perfectly cooked using the timing suggested by Molly. Now, comes the full disclosure: the bok-choy disappointed us. It turned mushy and not at all the type of veggie we enjoy as a side dish. It is a nice idea to have everything in a single pan, but next time I will keep just the rice and salmon, and cook whatever veggie separately. Sautéed, air-fried, roasted. Anything to give it better texture.

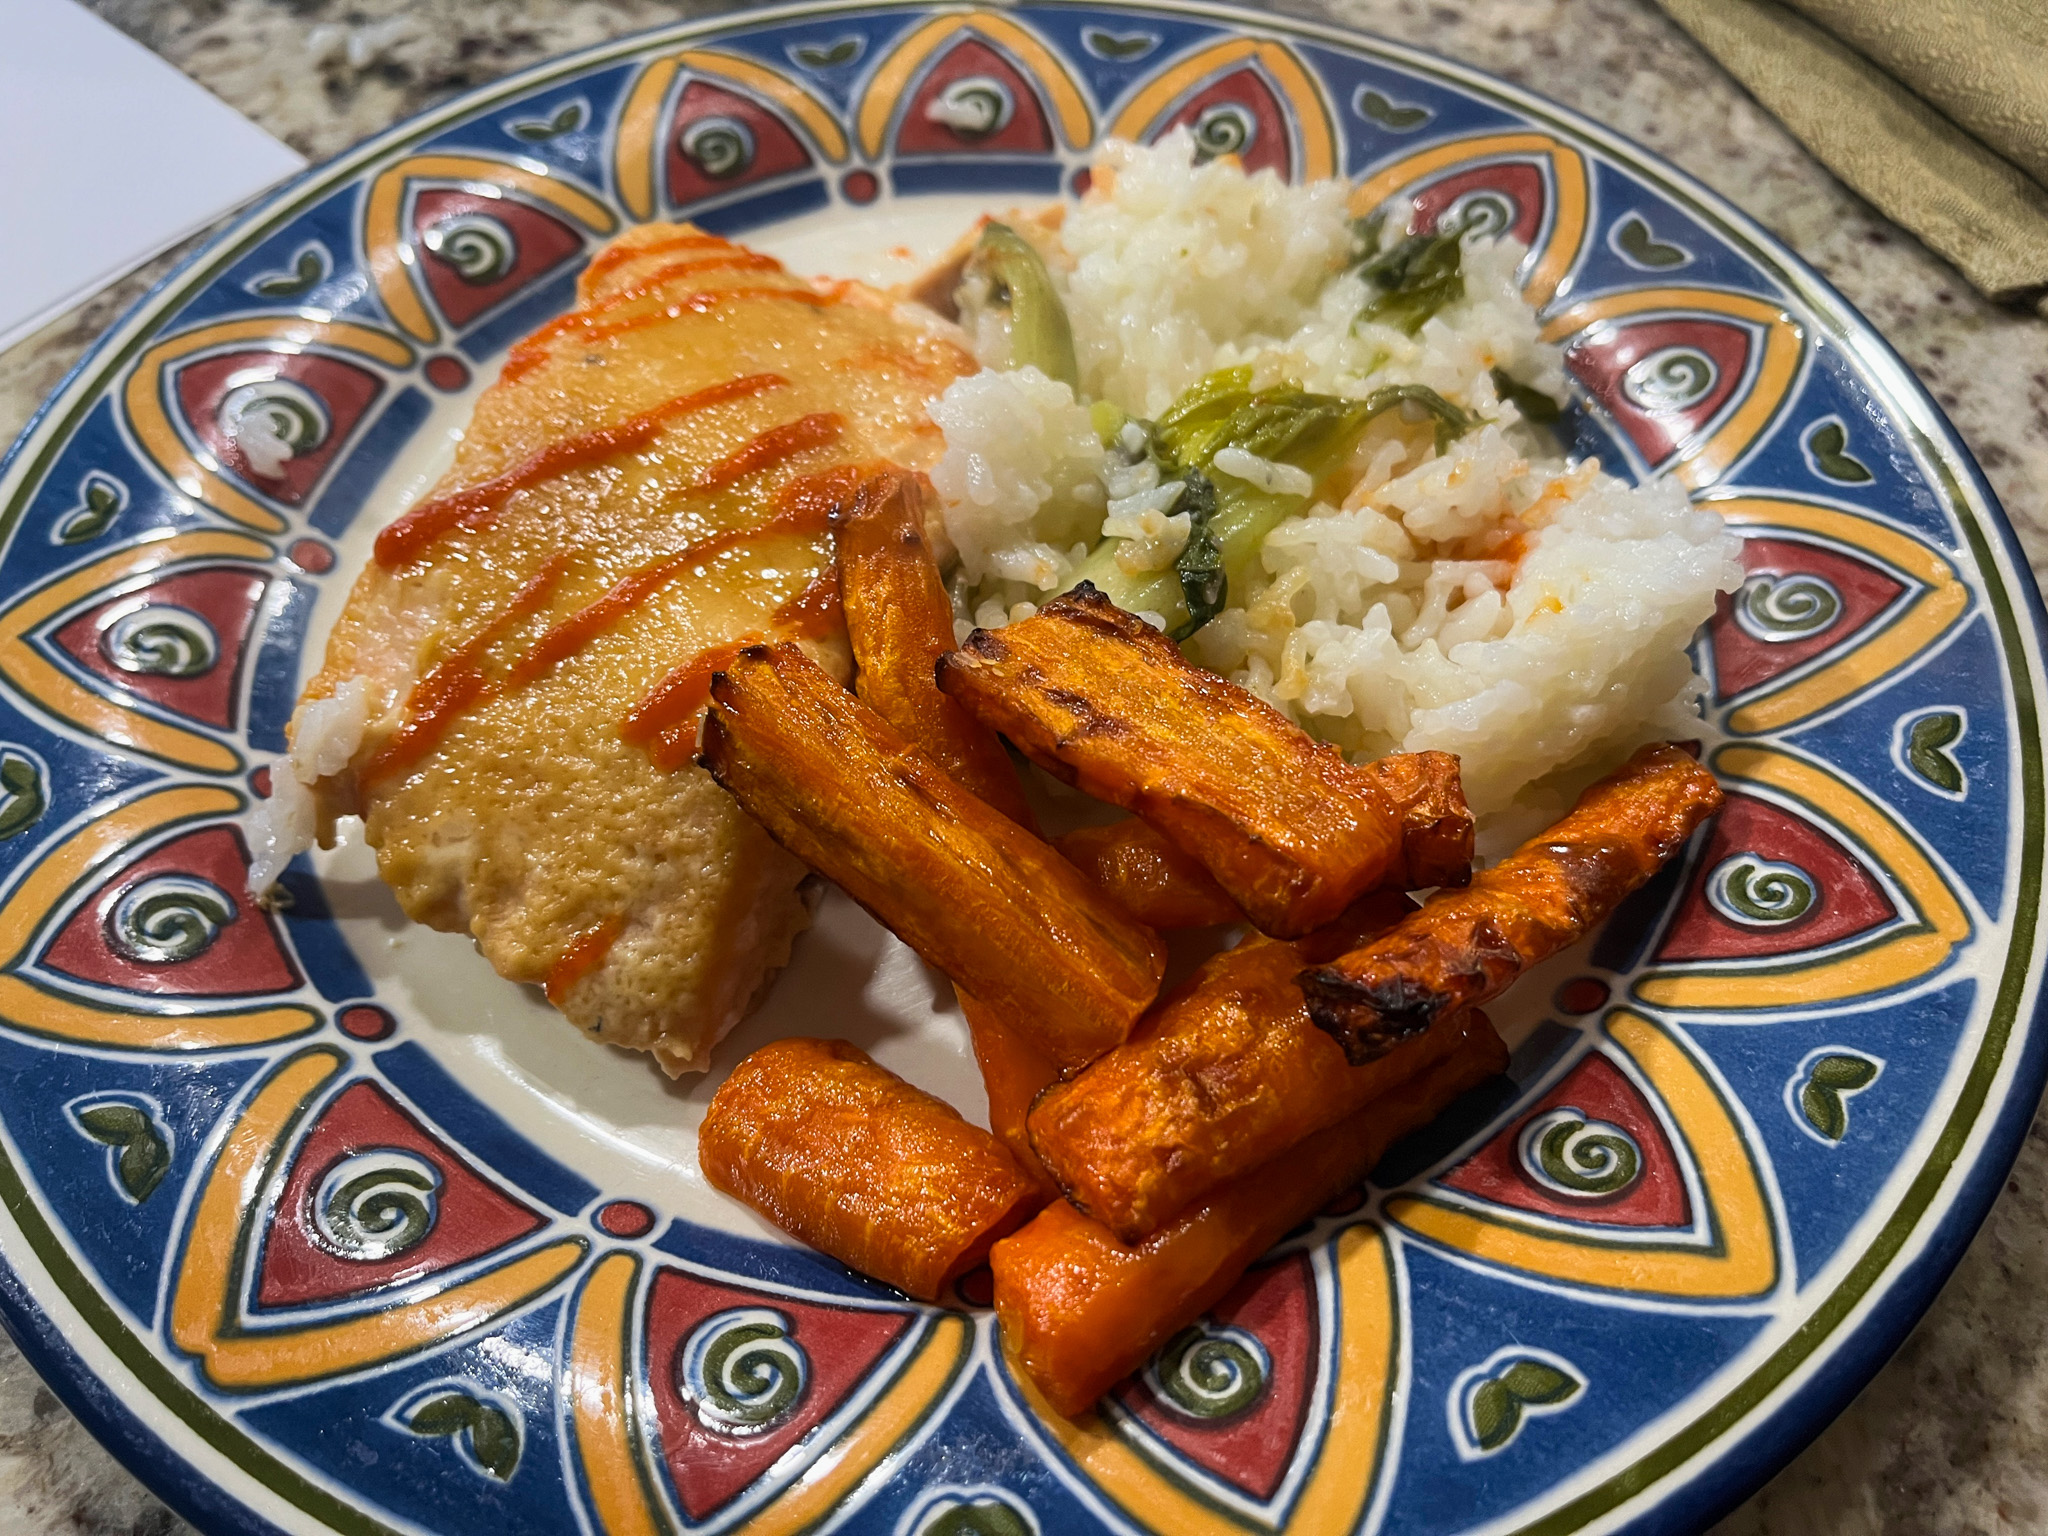
We enjoyed it with air-fried carrots, so in the end it was a super nice meal for a Saturday night…

ONE YEAR AGO: The Pizzsalad

TWO YEARS AGO: Prosciutto-Wrapped Chicken Breasts with Pickled Jalapeños

THREE YEARS AGO: Dressing Up the Roll Cakes

FOUR YEARS AGO: Roasted Carrot and Barley Salad

FIVE YEARS AGO: Ode to Halva

SIX YEARS AGO: Brazilian Pao de Queijo (re-blogged)

SEVEN YEARS AGO: Apricot Linzer Torte

EIGHT YEARS AGO: A Trio of Air-Fried Goodies

NINE YEARS AGO: Focaccia with Grapes, Roquefort and Truffled Honey

TEN YEARS AGO: Moroccan Carrot Dip Over Cucumber Slices 

ELEVEN YEARS AGO: White Chocolate Macadamia Nut Cookies

TWELVE YEARS AGO: Cilantro-Jalapeno “Hummus”

THIRTEEN YEARS AGO:A Moving Odyssey

FOURTEEN YEARS AGO:
Hoegaarden Beer Bread

FIFTEEN YEARS AGO:
 Ancho-Chile Marinade: Pleased to Meat you!


SIXTEEN YEARS AGO:
 Shrimp Moqueca

PASTA WITH SHRIMP IN CASHEW CREAM SAUCE

Alfredo sauce is luscious, absolutely delicious but a real saturated fat bomb, which we tend to avoid when cooking at home. Going to a restaurant is a different thing, sometimes excesses while eating out are part of the equation. Embrace it and move on. But this is a great option for a meal that will have the same type of vibe, but is considerably lighter. If you want to make it vegetarian, omit the shrimp, add another veggie, maybe a little butternut squash or mushrooms.

PASTA WITH SHRIMP IN CASHEW CREAM SAUCE
(from The Bewitching Kitchen)

For the sauce:
1 cup raw cashews soaked overnight and drained
¾ cup water
2 teaspoon lemon juice
1 teaspoon fine sea salt
½ teaspoon black pepper

For the pasta:
pasta of your choice
2 tablespoons olive oil
3 cups broccoli florets (or amount to taste)
1 (12 oz) bag shrimp peeled and deveined
salt and pepper to taste

Combine all of the sauce ingredients in a blender and blend on high until smooth. Set aside.

Steam the broccoli in the microwave with just a sprinkle of water for 2 minutes. Reserve. Start cooking the pasta in salted boiling water.

To a skillet, add the olive oil, once hot add the shrimp and sautee until opaque, season with salt and pepper. When the shrimp is almost fully cooked, add the steamed broccoli. Keep covered at a low-simmer. When the pasta is ready, reserve 1 cup of the cooking water, drain the pasta, and add to the skillet with the shrimp and broccoli. Pour most of the reserved water, stir, and add the amount of cashew cream you like, if needed thin the sauce with additional water until you are happy with the consistency. Serve right away.

ENJOY!

to print the recipe, click here

Comments: For this meal, I chose a pasta shape we had never had before, called “Rustiche”. Phil found it at Marshall’s and it was perfect for this type of cream sauce with the bits of broccoli and the shrimp. I did not use the whole amount of the sauce made but it sits in the fridge for a few days without problem and also freezes quite well. Cashew cream is a definite keeper!

ONE YEAR AGO: Crab Cakes go Light

TWO YEARS AGO: Accordion Potatoes

THREE YEARS AGO: Braised Lamb Shanks in Clay Pot

FOUR YEAR AGO: Cookies with a Smile

FIVE YEARS AGO: Pearled Farro with Asparagus Coins

SIX YEARS AGO: Pistachio Caramel and Apple Mousse Cake

SEVEN YEARS AGO: Someone turns 70 today!

EIGHT YEARS AGO: Carioca Cake, the Final Chapter

NINE YEARS AGO: Duck Confit for a Special Occasion

TEN YEARS AGO: Ken Forkish’s Warm Spot Sourdough 

ELEVEN YEARS AGO: Bran Muffins, Rainbows, and a wonderful surprise!

TWELVE YEARS AGO: Salmon Wellington

THIRTEEN YEARS AGO: The Green Chip Alternative

FOURTEEN YEARS AGO: Weekend Pita Project

FIFTEEN YEARS AGO: Let it snow, let it snow, eggs in snow

INCREDIBLY SIMPLE: AIR-FRIED SALMON BITES

Normally, when I share a recipe that uses the air-fryer, I offer alternative ways to make it, in case you do not own one. For this recipe, however, I have to say that the air-fryer method is a must. You simply cannot get the same results without it. Credit for finding the basic method goes to the husband. He often finds things for me to try and his intuition is pretty awesome. All recipes he picks turn out excellent. This was the most recent example.


AIR-FRIED SALMON BITES
(adapted from Wholesome Yum)

24 oz salmon fillets (cut into 1-inch pieces)
3/4 tsp salt
1/4 tsp black pepper
3 tbsp honey
2 tbsp tamari sauce (or soy sauce, but reduce the salt slightly)
1 tbsp olive oil
1/2 tsp hot paprika

In a large bowl, whisk together the honey, tamari, paprika, salt, and pepper. Add the salmon pieces to the bowl and mix well to coat. Marinate for 1 hour. When time is up, turn the salmon pieces in the marinade again to coat well.

Turn the fryer to 400 degrees F. Place the salmon bites in the air fryer basket in a single layer, with some space between the pieces. Air fry for about 7 minutes, check the cooking by removing a piece and cutting through it. It should flake easily and the internal temperature should be around 140F.

ENJOY!

to print the recipe, click here

Comments: This was soooo easy and soooo delicious! Plus, contrary to baking in the oven or using the stovetop, there was NO smell. Not sure how that magic works but I am sold. We only cook salmon by grilling it outside, as I have a serious problem with smells that linger in the kitchen. This was a winner in that aspect.

The meat flakes beautifully, and the marinade was perfect with it. A little sweet, a little spicy… I intend to play with different flavors soon, but the basic approach will be unchanged. I urge you to give this a try. If you are into bowls, Oriental style, this would be a great way to deal with the protein component.

ONE YEAR AGO: Chocolate-Covered Oreos

TWO YEARS AGO: Pan-Steamed Broccoli with Miso Vinaigrette

THREE YEARS AGO: Cookies and Rubber Stamps

FOUR YEARS AGO: Macarons for all Seasons and Reasons

FIVE YEARS AGO: Lentils and Radicchio? Yes, please!

SIX YEAR AGO: Tres Leches Cake

SEVEN YEARS AGO: The Joys of Grating Squash

EIGHT YEARS AGO: Auberge-Pecan Walnut Bread

NINE YEARS AGO: Gluten-free and Vegan Raspberry Bars

TEN YEARS AGO: Lasserre, a French Classic

ELEVEN YEARS AGO: Sourdough Bread with Walnuts and Dates

TWELVE YEARS AGO: Braised Brisket with Bourbon-Apricot Glaze

THIRTEEN YEARS AGO: The Real Vodka Sauce

FOURTEEN YEARS AGO: Pork Tenderloin and Blue Cheese

CRAB CAKES GO LIGHT

We love crab cakes but they can be pretty heavy, not only for the components but the fact they are deep fried. This version is substantially lighter and it is baked in the oven. We truly loved them, so don’t let the “light” label turn you off.

CRAB CAKES
(adapted from Recipe Girl)

12 square saltine (soda) crackers, crushed into crumbs
⅓ cup chopped fresh parsley
2 tablespoons low fat plain yogurt
⅓ cup chopped roasted red pepper (store-bought is fine)
1 tablespoon water
1 tablespoon freshly squeezed lime juice
2 to 3 dashes Sriracha sauce or more to taste
salt, to taste
1 pound fresh crab meat, picked over for shells and cartilage (I used 3/4 pound)
2 large egg whites

Heat the oven to 425°F, and line a large baking sheet with non-stick aluminum foil or parchment paper.

In a large mixing bowl, combine the saltine crumbs and parsley. Stir all the ingredients except the egg whites together, mixing them gently but well. Lightly whisk the egg whites in a small bowl, then add to the mixture, incorporating it well.

Form small crab cakes and arrange them 1-inch apart on the prepared baking sheet. Bake for 10 to 12 minutes, turning the crab cakes with a spatula after 6 minutes. The crab cakes are done when they are browned and cooked through.

ENJOY!

to print the recipe, click here

Comments: We served crab legs for our Christmas dinner, and had a few leftover. After my beloved husband processed it all for me, we had 3/4 pound and I went with that amount, keeping all other ingredients the same. Worked well, no issues forming the cakes or baking them. They were superb! A little arugula salad seasoned with just lemon and olive oil was the perfect match. A light meal that was more than welcome for the two of us, when the guest had left us and the normal routine started to set in.

ONE YEAR AGO: Accordion Potatoes

TWO YEARS AGO: Braised Lamb Shanks in Clay Pot

THREE YEAR AGO: Cookies with a Smile

FOUR YEARS AGO: Pearled Farro with Asparagus Coins

FIVE YEARS AGO: Pistachio Caramel and Apple Mousse Cake

SIX YEARS AGO: Someone turns 70 today!

SEVEN YEARS AGO: Carioca Cake, the Final Chapter

EIGHT YEARS AGO: Duck Confit for a Special Occasion

NINE YEARS AGO: Ken Forkish’s Warm Spot Sourdough 

TEN YEARS AGO: Bran Muffins, Rainbows, and a wonderful surprise!

ELEVEN YEARS AGO: Salmon Wellington

TWELVE YEARS AGO: The Green Chip Alternative

THIRTEEN YEARS AGO: Weekend Pita Project

FOURTEEN YEARS AGO: Let it snow, let it snow, eggs in snow

KAREN’S SAUTEED SHRIMP WITH CAPERS AND OLIVES

If you need a great dinner that will be ready in less than 30 minutes, look no further… I have actually made this recipe several times after Karen published it in her blog, and I bet it will become a favorite with your family too. Something about capers and black olives together makes my mouth water.


SAUTEED SHRIMP WITH CAPERS AND OLIVES
(slightly modified from Karen Kitchen Stories)

1/4 cup olive oil
1/2 cup chopped, pitted black olives
2 tablespoons capers
1 + 1/2 pounds peeled and deveined extra large or jumbo shrimp
1 (14 oz) can chopped tomatoes (I used fire roasted)
Salt and pepper to taste

In a large skillet, heat the olive oil over medium low heat. Add the olives and capers, and cook for another minute or two.Add the shrimp and tomatoes to the pan, and sauté until the shrimp turns pink, about 5 minutes. Season with salt and pepper to taste and serve immediately.

ENJOY!

to print the recipe, click here

Comments: I really think the best way to serve this seafood preparation is over pasta, in this case just a simple spaghetti with fresh lemon and olive oil. Normally I brine the shrimp before sautéing but this time I skipped that step and just made sure not to cook it for too long. It is ready super fast, and all flavors go wonderfully together. Give it a try and then go thank Karen for it!

ONE YEAR AGO: Kashmiri Chicken Thighs

TWO YEARS AGO:  A Vegan Trilogy

THREE YEARS AGO: The Mystifying Hurricane Roll

FOUR YEARS AGO: Pop-Tarts with Strawberry Balsamic Jam

FIVE YEARS AGO: Ptichye Moloko, a Russian Dessert

SIX YEARS AGO: Cheesy Low-Carb Zucchini Tarts

SEVEN YEARS AGO: Blogging Hiatus

EIGHT YEARS AGO: Apricots, Three Ways

NINE YEARS AGO: Up Close and Personal with Kale

TEN YEARS AGOBlack Berry Cherry Sorbet

ELEVEN YEARS AGO: Asparagus Pesto

TWELVE YEARS AGO: Chocolate and Chestnut Terrine

THIRTEEN YEARS AGO: Under the spell of lemongrass

FOURTEEN YEARS AGO: Greens + Grapefruit + Shrimp = Great Salad!