CELEBRATE WEDNESDAY WITH PROSCIUTTO-WRAPPED SHRIMP SKEWERS

This is one of those super simple recipes that deliver a ton of flavor, turning a mid-week dinner into a special event.  Since seafood in general doesn’t need to be marinated for a long time, you can do the whole prep after arriving home from work.  But, if you want to make things even easier, make the marinade, clean the shrimp early in the morning, and keep both items in the fridge until showtime.  Since we have the luxury of coming home for lunch every day, that’s when I normally get this type of prep work done.  A small investment of time at noon, and voilà: painless dinner later in the evening.

ProsciuttoShrimp (Cooked: June 4th – Blogged  Oct 1st)

PROSCIUTTO-WRAPPED SHRIMP SKEWERS
(slightly adapted from a recipe by Rachael Ray)

3 tablespoons olive oil
4 scallions, white parts finely chopped and green parts thinly sliced on an angle, divided
1 teaspoon Hungarian red pepper (or 1/2 teaspoon red pepper flakes)
Juice of 1/2 lemon
Kosher salt and freshly ground black pepper
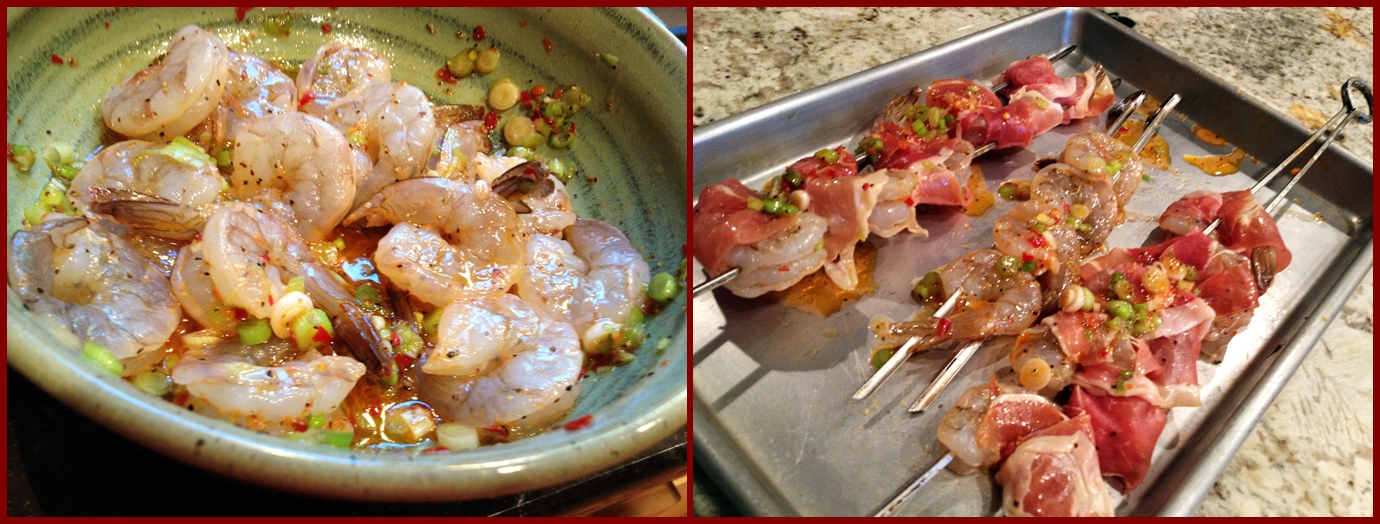
12 jumbo shrimp, tails on and deveined
12 slices prosciutto

Combine the olive oil, scallion whites, red pepper and lemon juice in a medium size bowl. Season the shrimp lightly with salt and pepper, add to the marinade.  Toss to coat, and leave for 30 minutes in the fridge. Wrap each shrimp with a slice of prosciutto and thread onto a metal skewer. If using wood skewers, soak them in water for a few hours.

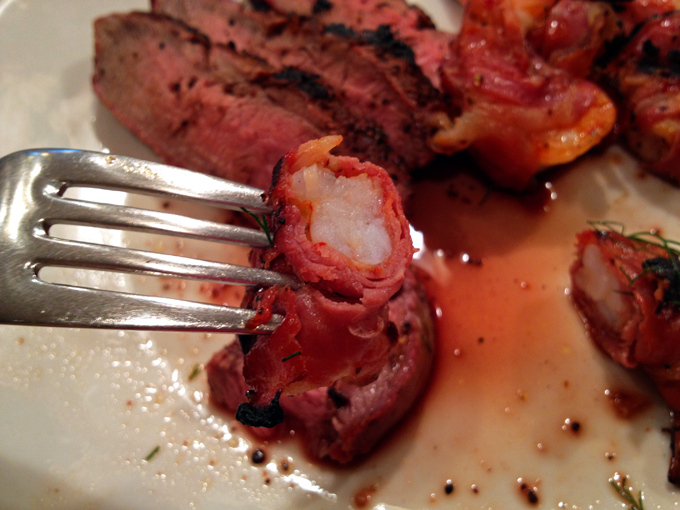
Grill the shrimp until firm and opaque, about 3 minutes per side. Transfer to a serving plate and decorate with sliced scallions, if you like.  I had some fennel fronds in the fridge, that’s what I added.

ENJOY!

to print the recipe, click here


composite1
Comments:  The Hungarian pepper I used for this marinade was a gift I mentioned in this post. I love its complex flavor and mild level of heat.  I searched and it is available on amazon.com, but the price made me hyperventilate a little.  Lucky me, I do have very nice friends… Red pepper flakes (or fresh Fresno peppers) can be used instead, of course.

My package of prosciutto came with only 10 slices, so some of the shrimp (I actually cooked 14) went to the grill naked. They did not seem to mind, and we definitely did not mind either.  I grilled those for about 30 seconds less on each side. I also like to use a double skewer, a trick that prevents the shrimp from spinning around and makes flipping a lot easier.

Most recipes would call for bacon instead of prosciutto, but I don’t quite get that.  By the time the bacon is properly cooked, seafood will be severely over-done.  I find that prosciutto works much better, as all you need is to get some grill marks on it, so the timing can agree with the seafood wrapped inside it. Alternatively, if you prefer the flavor of bacon, you can pre-cook before wrapping delicate seafood with it. Check Melissa’s method with a click here.

Our dinner that evening was a nice take on surf-and-turf…  Juicy shrimp, and deliciously grilled hanger steak. Light, flavorful, and a breeze to prepare!  Cannot beat that.

ShrimpDetail

ONE YEAR AGO: Linguine with Cauliflower Pesto

TWO  YEARS AGO: Secret Recipe Club: A Tribute to Daniel

THREE YEARS AGO: Nutella Drop Cookies

FOUR YEARS AGO:  Dreaming of butternut squash

FIVE YEARS AGO: Simply Elegant: Salmon Curry (one of my very favorite dishes!)

SECRET RECIPE CLUB: PORTOBELLO CAPS STUFFED WITH GOAT CHEESE AND PROSCIUTTO

servedThe month of March brought a little too much snow and cold to The Little Apple, but we escaped to warmer weather for a week, arriving from Brazil right before the last Monday of the month.  Why is the last Monday of the month so important in the food blogging world?  Well, by now you should  know it’s The Secret Recipe Club Reveal Day!  This month, with all our activities and travel, it was a bit of a stretch to participate, but I’m very glad I did.  I was paired with a blog I had not visited before, The Saturday Evening Pot.   The host is a trained chef, and that immediately got the adrenaline pumping in my system as I browsed his site in search of recipes.  He cooks for a family of four: himself, his wife, and two kids, but to make things a lot more interesting they have food sensitivities that need to be taken in account. Not an easy task.  He does so beautifully, though, and in his site you will find extensive nutritional information for all recipes and plenty of advice for adapting recipes in case you face similar issues.  I highly recommend a visit to The Saturday Evening Pot.   It did not take me very long to choose a recipe, because I’ve been thinking of trying stuffed Portobello mushrooms for quite some time.  Great opportunity to go for it, wouldn’t you say?

served2
PORTOBELLO MUSHROOM CAPS STUFFED WITH GOAT CHEESE AND PROSCIUTTO
(from The Saturday Evening Pot)

3-4 large Portobello mushroom caps
olive oil
balsamic vinegar
4-6 ounces crumbled goat cheese
3-4 slices prosciutto

Heat oven to 350 degrees. Using a small dinner spoon, remove stems from mushroom caps and scrape out brown ribbing on underside of mushroom caps. Lay mushroom caps, stem side up, on sheet pan.  Brush each lightly with olive oil. Bake approximately 10 minutes or until mushroom browns lightly.

While mushrooms are baking, take each slice of prosciutto and cut using a chiffonade pattern.  Set aside.

Remove mushrooms from oven and turn oven setting to broil. Drizzle each mushroom cap with a small amount (approximately 1/4 teaspoon) of balsamic vinegar.  Spread vinegar evenly with the back of a spoon over inside of mushroom cap. Place one slice shredded prosciutto in each mushroom cap and sprinkle goat cheese on top of prosciutto. Place sheet pan under broiler and melt cheese until lightly browned.  Remove and serve immediately.

ENJOY!

to print the recipe, click here

cleanprepared

Delicious recipe, we will definitely be making this over and over and over, adding all kinds of goodies on the Portobello base.  My only modification was to use fig balsamic vinegar, but other than that, I followed his recipe to a T. Three mushrooms were more than enough for Phil and I, we even had half of the small one leftover.  We enjoyed them as our main dish, next to a little spaghetti with olive oil and lemon zest.  You may notice there is no salt in the recipe. Both goat cheese and prosciutto can be very salty, particularly when you roast them, so make it as written and see how you like it.  I love salt, but did not miss it.  For a full vegetarian version, sun-dried tomatoes could replace the prosciutto, or a mixture of black olives, roasted red bell peppers…  this is a nice basic method to improvise according to your mood.

If you want to see the other recipes made by friends in my group, click on the blue frog that is smiling at you at the bottom of the post.

ONE YEAR AGO:  Orange and Rosemary Pork Tenderloin

TWO YEARS AGO: Pistachio-Walnut Sourdough Bread

THREE YEARS AGO: Cottage Loaf and Yeasty Dogs


GRILLING RIBBONS

We use our outdoor grill pretty much the whole year, as even during the winter we’ll have nice breaks in the weather, with temps reaching the mid 60’s.  Grilling brings a glimpse  of summer into the kitchen, and that is a feeling any Brazilian-American always appreciate!

I found this recipe in a Food and Wine magazine, and the first thing that called my attention was the way it treated the squash:  thinly cut as ribbons, then threaded into skewers.  The photo in the magazine was quite gorgeous, evidently some practice is needed to cut the squash in the perfect thickness and grill them carefully enough to preserve a nice shape.  Let’s say my technique needs to be improved before serving this dish to guests…   But even if you don’t hit the jackpot with your technique, this is a fabulous side dish.  Don’t omit the prosciutto, it is a key component.

GRILLED SQUASH RIBBONS AND PROSCIUTTO WITH MINT DRESSING
(adapted from Food and Wine magazine)

1 teaspoon lime zest
1/4 cup fresh lime juice
1/4 cup chopped mint
1/4 cup extra-virgin olive oil + more for brushing veggies
Salt and freshly ground pepper
2 medium zucchini, very thinly sliced lengthwise
2 medium yellow squash, very thinly sliced lengthwise
6 ounces sliced prosciutto

Prepare a gas or charcoal grill, brushing or spraying the grids with a little olive oil.  In a small bowl, combine the lime zest and juice with the mint, and the   olive oil. Season with salt and pepper.Alternately thread the zucchini, yellow squash and prosciutto onto 4 pairs of 12-inch bamboo or metal skewers (soak the bamboo skewers in water to prevent them from burning).  Lightly spray the vegetables and prosciutto with olive oil and season with salt and pepper.Grill the skewers over high heat until the zucchini and yellow squash are lightly charred, maximum of 2 minutes per side. Serve the mint dressing on the side (it is great for salads too).

ENJOY!

to print the recipe, click here

Comments:   I suppose the same recipe would work without going through the trouble of making the ribbons, but they do add a lot of charm to the dish.  I wasn’t sure about grilling the prosciutto, as it is a bit dry to start with, but it turned out as a great match for the squash ribbons.  Salty and chewy, it gave that extra bite to the veggies, just like croutons on a Caesar salad. We both loved everything about this recipe, a real winner!

Food & Wine suggests using these veggies + dressing as a “sauce” for pasta.  Simply cook the pasta al dente, and slide the veggies off the skewers, mixing with the pasta while it’s still very hot. Add some of the dressing, adjust the consistency if needed with the pasta cooking water, and voila’:  heaven on a plate!

ONE YEAR AGO: Peppery Cashew Crunch
TWO YEARS AGO: Ossobuco Milanese (a GREAT dish!)
.

Add to FacebookAdd to DiggAdd to Del.icio.usAdd to StumbleuponAdd to RedditAdd to BlinklistAdd to TwitterAdd to TechnoratiAdd to Yahoo BuzzAdd to Newsvine

TWO-STAGE RISOTTO

Risotto is one of my favorite dishes,  but I refrain from making it for dinner parties because it does require some loving attention. No way to entertain your guests when risotto is on the menu, unless they don’t mind standing next to the stove with you, sipping wine and watching the rice gently bubbling away.

I’ve read a few articles describing how restaurants do it, though.  Obviously the customer cannot wait for 30 minutes as the kitchen staff prepares each plate to order, so they resort to a method said to work like a charm: the rice is cooked almost all the way through, then spread on a baking sheet to cool down.  Once the order comes in,  they spoon out a single serving, and finish it quickly on top of the stove.

I would be a bit insecure to try this approach for the first time on guests, but Phil and I were perfect guinea pigs for this experiment.  I  adapted a recipe for pea risotto from a recent issue of Food and Wine, and put the method to test.

TWO-STAGE PEA AND PROSCIUTTO RISOTTO
(adapted from Food and Wine, May 2011)

3 slices of prosciutto, cut in small pieces (use scissors)
1 cup frozen peas, thawed
1 Tbs olive oil
1 small shallot, finely diced
1 cup arborio rice
1/4 cup dry white wine
4 – 5 cups chicken stock, warm (you won’t use it all)
1 Tbs butter
1/4 cup Parmiggiano cheese
salt and pepper to taste
a nice squeeze of lemon juice
1 cup pea shoots, very loosely packed

Heat the chicken stock in a saucepan, and keep on very low heat. Using a blender or the food processor, puree half the peas in 1/2 cup of chicken stock.  Reserve. Heat the olive oil in a large skillet, cook the prosciutto until it starts to get crisp. Remove the pieces and place over kitchen paper, reserve.

In the same skillet, cook the shallots seasoned lightly with salt and pepper, until soft and fragrant.  If necessary, add a little more oil, then the rice and cook stirring often until all grains are well coated.  Add the wine and simmer until absorbed, about 3 minutes.

Add enough hot chicken stock to cover the rice, and cook over medium heat, stirring often.  Keep adding stock, one ladle at a time,  until the rice is about 75% cooked through (taste it, it should feel still hard at the center; it took me about 25 minutes).  Remove from the stove and immediately transfer it to a baking sheet in a layer.   Place it in the fridge until time to serve the dish (several hours won’t harm it).

When it’s time to finish the risotto, heat 1 cup of the remaining chicken stock in  the skillet, add the rice, cook for a couple of minutes, then add the reserved pea puree (warm it briefly in the microwave).  When the rice is done, nicely al dente, add the peas, the prosciutto, the  grated cheese, the butter, and a squeeze of lemon juice.  Season with salt and pepper, add the pea shoots right before serving, and

ENJOY!

to print the recipe, click here

Comments: This is definitely the solution to the “risotto for guests”  puzzle.  It tastes exactly as if it was prepared all the way through, and it takes literally minutes to serve.  The other detail in this recipe that won me over: the pea puree.  I’ve made plenty of pea risottos before, they are always delicious, but turning part of the pea in a puree raises the dish to a new high.  I think many types of risotto will benefit from this approach, so that’s something to experiment with in the future.    My husband suggested  the addition of chevre cheese instead of Parmiggiano, and I bet it will be a  delicious variation.

Remember: if you love risotto and want to include it in your next dinner party menu, don’t be afraid of the two-stage method!

ONE YEAR AGO: Life is a matter of taste (a small tribute to David Rosengarten)

Add to FacebookAdd to DiggAdd to Del.icio.usAdd to StumbleuponAdd to RedditAdd to BlinklistAdd to TwitterAdd to TechnoratiAdd to Yahoo BuzzAdd to Newsvine