One more take on my ongoing obsession… But first, a relevant question: how far can we stretch the boundaries of these adorable cookies and still be comfortable calling them macarons? Apparently the boundaries are very blurry. From colors, types of fillings, decorations on top of the shells, we see endless variations. I cannot call myself a purist, as I am often taking liberties with classics, but I think my standards would be: macarons must be prepared with almond flour as the main component. If other ground nuts are added, let them be a very minor player. Must contain a meringue incorporated with the flour by the macaronage method. Must have discernible feet. Other than those three requirements, I’ll accept anything. Savory fillings, neon-like colors, cute alternative shapes. For this batch, I experimented with a color effect. Some newbie errors took place, but I still performed better than I do at the golf course. Much, much better.

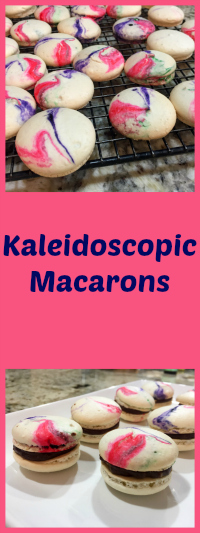
KALEIDOSCOPIC MACARONS
(from the Bewitching Kitchen, slightly adapted from Craftsy.com,
Yield: About 72 shells; 36 assembled macarons
for the shells:
198 g powdered sugar
113 g almond meal
1/8 teaspoon dried lavender
113 g egg whites (I aged mine for three days)
1 g or a pinch of cream of tartar
100 g granulated sugar
Purple Gel color from AmeriColor
2 drops vanilla extract
for the filling:
chocolate ganache with finely chopped hazelnuts
recipe in this post
Line 2 or 3 heavy baking sheets with parchment paper or Silpat mats. Layer the powdered sugar, almond meal and lavender in a food processor or mini processor. Pulse until the mixture looks like fine meal, about 15 seconds. Pass through a sieve and transfer to a small bowl. Set aside.
Place the egg whites and pinch of cream of tartar in the bowl of a stand mixer fitted with the whisk attachment. Make sure that the bowl and the whisk are impeccably clean. Starting on medium speed, whip the whites with the cream of tartar until they look like light foam. The whites should not appear liquid. The foam will be light and should not have any structure.
Slowly rain in the granulated sugar, trying to aim the stream between the whisk and the side of the bowl. Turn the speed up to medium-high. Continue to whip the meringue until it is soft and shiny. It should look like marshmallow creme. Add the gel color and the vanilla. Staying at medium-high speed, whip the egg whites until the mixture begins to dull and the lines of the whisk are visible on the surface of the meringue. Bet until firm peaks form. Transfer the whites to a medium bowl.
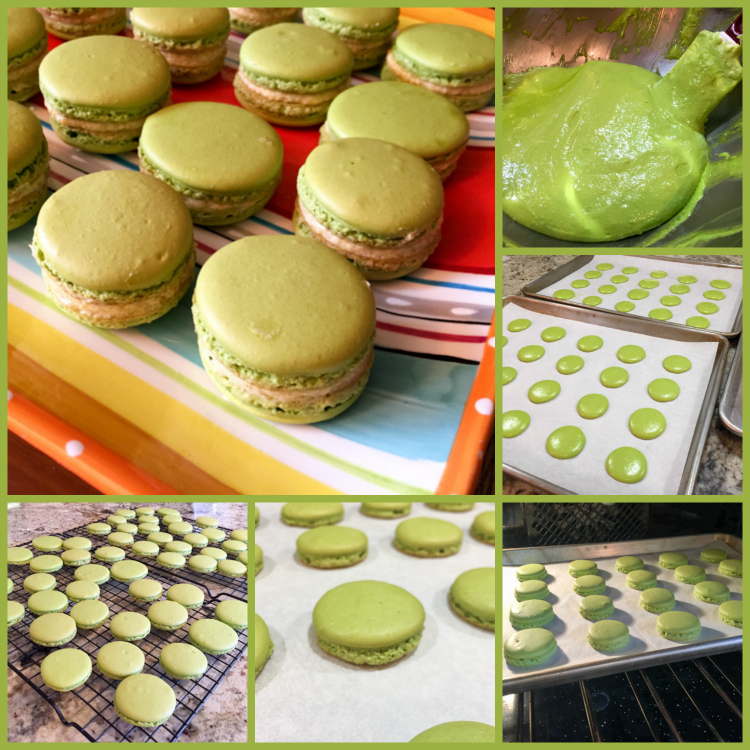
Fold in the almond meal mixture in three increments. Paint the mixture halfway up the side of the bowl, using the flat side of a spatula. Scrape the mixture down to the center of the bowl. Repeat two or three times, then check to see if the mixture slides slowly down the side of the bowl. Open a plastic wrap on the counter, paint three lines of gel color of your choice separated by one inch. Pour the dough on top, wrap the plastic around, and insert the whole thing in a piping bag, making sure to have an opening in the wrap connected to the piping tip. Pipe shells on the prepared baking sheets.
Slam each sheet hard four to six times on the counter. Then fist bump each end of the sheet’s underside twice. Let the unbaked macarons dry until they look dull but not overly dry. Drying time depends on humidity. Ina dry climate, the macarons can dry in 15 to 20 minutes; in a humid climate, it can take 35 to 40 minutes.
While the macarons are drying, heat the oven to 330 F (170 C/gas mark 3). Bake one sheet at a time on the middle rack. Check in 11 minutes. If the tops slide, then bake for 2 to 3 more minutes. The macarons should release without sticking. Check one or two. If they stick, put them back in the oven for 1 to 2 more minutes. Let the macaroons cool for 10 minutes before removing from the pan.
Assemble the macarons: find two macarons similar in size and add a good amount of ganache to the bottom of one of them. Place the other on top and squeeze gently to take the filling all the way to the edge. Ideally, store in the fridge for 24 hours for best texture.
ENJOY!
to print the recipe, click here
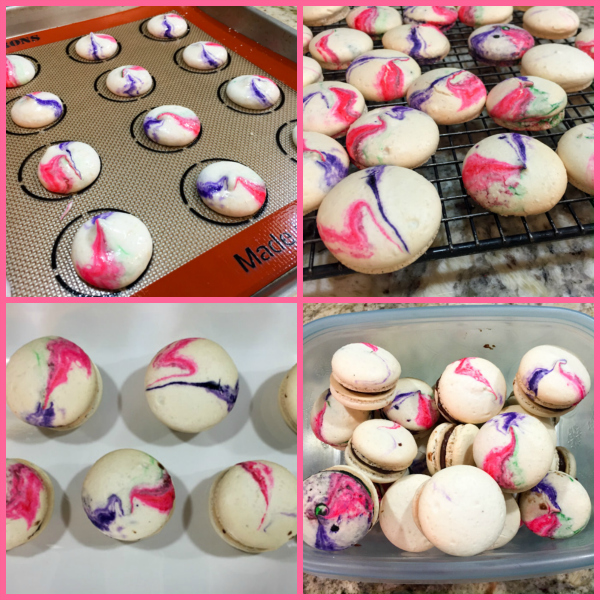
Comments: I know it’s hard to believe but I used three different colors for the shells, the green is barely noticeable, only in a few of them. Many of the shells got zero color. Puzzling? Read on, and the mystery will be solved. There are essentially two types of strategies to get more than one color in the macaron shell. You can make the dough, divide it in two (or three) portions, color each one separately, add them to the piping bag and allow them to mix during piping. I decided not to do it, because I was a bit insecure as to when to divide the dough, and maybe deflate it too much when mixing with the colors. I normally add the color very early in the process. That brings me to method number two, which gives a very interesting marbled effect, when done correctly. You start by opening a plastic wrap over your counter. Then, you paint two or three solid lines of gel color over the plastic. Pour your dough with the optimal lava consistency over the plastic, wrap it around, and insert the whole thing inside a piping bag. See the photo below.

I realize it’s hard to see the lines of gel color on the first picture, but trust me, they are there. To my disappointment, the first 20 or so shells I piped were totally white! The reason is, when painting the lines they must go all the way to the icing tip, otherwise obviously you’ll get no color until the dough moves through and gets in touch with the gel. Alternatively, you can use a long brush and paint the inside of the piping bag itself, making sure to reach down all the way to the tip. I must re-visit this technique and get the effect I was hoping for. It was quite frustrating to keep piping shell after shell, with no color, and then a little bit here and there. But hopefully practice makes perfect, and I will succeed next time.
As I mentioned before, the parallels between making macarons and golf are truly amazing! Once you take that golf club back, it’s over. For macarons, a little misjudgment and you don’t get what you want. The Macaron Gods are not very forgiving. And I’ve probably been extra naughty lately. You’d think?

Almond flour: $9.99
12 eggs: $3.50
Powdered sugar: $2.50
Matching outfit to macarons: Priceless!


ONE YEAR AGO: Zucchini Noodles with Sun-dried Tomato Pesto
TWO YEARS AGO: In My Kitchen, July 2015
THREE YEARS AGO: Sous-vide Pork Chops with Roasted Poblano Butter
FOUR YEARS AGO: Roasted Strawberry-Buttermilk Sherbet
FIVE YEARS AGO: Amazing Ribs for the 4th of July!
SIX YEARS AGO: Baby Back Ribs on the 4th of July
SEVEN YEARS AGO: Blueberry Muffins
EIGHT YEARS AGO: A Pie for your 4th of July