BRIOCHE PEPIN

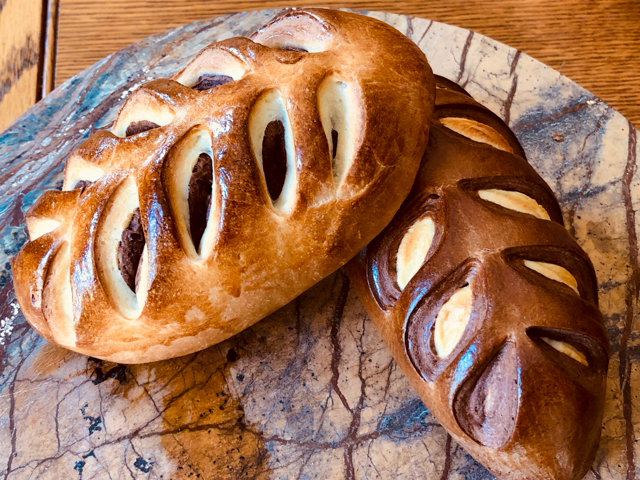
Brioche + Pastry Cream + Chocolate. Do I need to say anything else? This is the stuff that dreams are made of. And we all need good dreams at the moment. Rich, decadent, but pretty straightforward to bake, I promise you. My recipe is a slight modification of the one from a book I adore: Duchess Bake Shop. Make the dough and the pastry cream the evening before you want to bake them, for a super easy baking day, with almost no work involved.

BRIOCHE PEPIN
(slightly modified from Duchess Bake Shop)

for the brioche dough:
9g osmo-tolerant yeast (or regular yeast)
30g whole milk, slightly warm
280g all-purpose flour
30g sugar
1 tsp salt
3 large eggs
140g unsalted butter at room temperature

for pastry cream:
370g whole milk
1/2 tsp vanilla paste
80g sugar
80g egg yolks
15g cornstarch
1/4 tsp salt
30g unsalted butter

to finish:
1 cup mini-chocolate chips
1 egg yolk

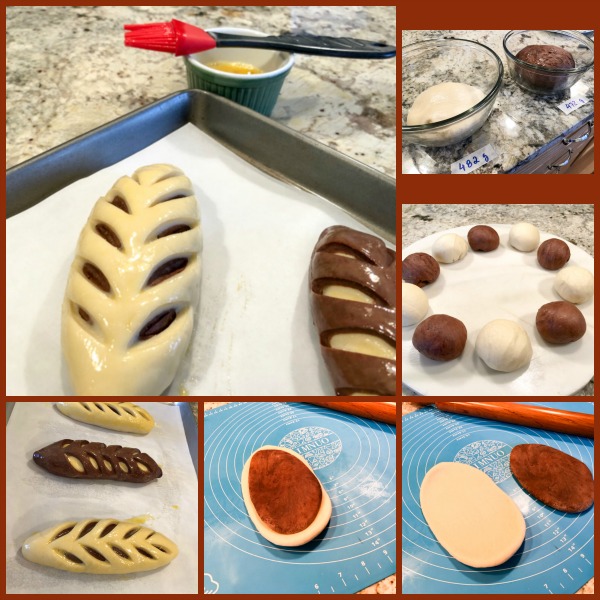
The day before… Make the brioche dough. Dissolve the yeast in warm milk. Add all ingredients except butter to the bowl of a Kitchen Aid mixer, and knead with the dough hook for about 4 minutes, until smooth. Add the butter in small pieces, kneading in low-speed, and waiting until each added piece is incorporated before adding more. Once all butter is added, knead until very elastic and smooth, about 15 minutes, always at low-speed.  Place the dough in a bowl coated with oil, leave at room temperature for 90 minutes, then transfer to the fridge overnight.

Make the pastry cream. Heat the milk and vanilla paste in a saucepan until small bubbles form around the edge of the liquid. As the  milk heats, vigorously whisk the egg yolks with sugar in a bowl. Add the cornstarch and salt and continue whisking until there are no lumps.  Slowly add the hot milk/vanilla mixture, tempering the yolks. Once all the liquid is added, transfer it back to the saucepan and bring to a boil. Boil for about 5 minutes, in low-heat, whisking constantly and removing the pan from the heat if it starts to thicken and bubble too furiously. Pass the mixture through a fine sieve, add the butter, and place a plastic film on the surface. Refrigerate overnight.

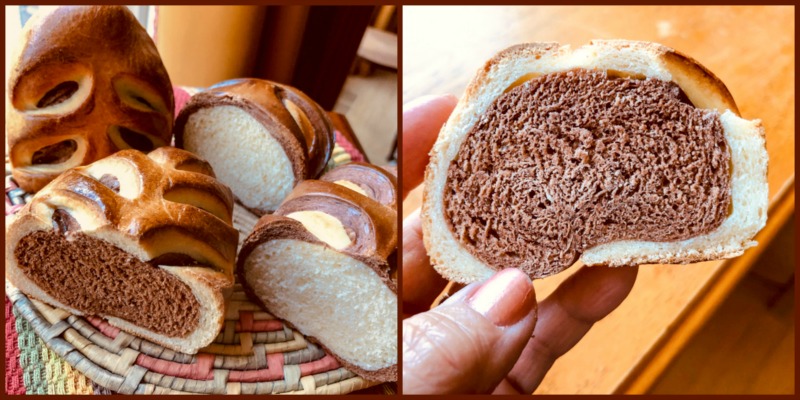
On the following day. Roll out the dough. Remove the dough from the fridge and allow to sit at room temperature for about 30 minutes. Roll it out on a lightly floured surface to a rectangle measuring about 20 x 10 inches. Add the whole amount of pastry cream on the surface of the dough, spreading it uniformly. Sprinkle chocolate chips all over. Fold both long sides of the rectangle to meet in the center (see composite photo of my post). Cut the dough in half lengthwise exactly where the edges meet. You will end up with two long and thin rectangles about 20 x 5 inches.  Cut each of those in 8 pieces, so that you have a total of 16 small pieces.  Place them over parchment paper and cover with a light cloth. Proof at room temperature for 1 hour or until doubled in size.

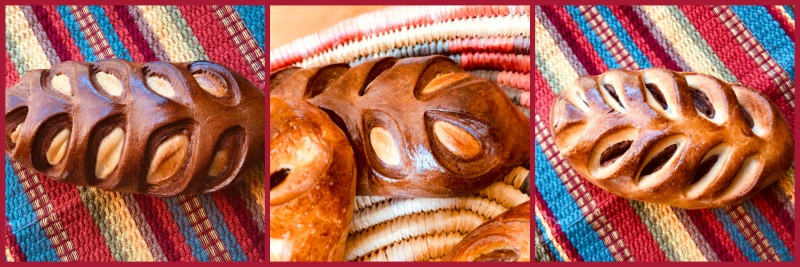
Heat the oven to 380F. Brush each brioche with egg yolk and bake for about 20 minutes, until golden brown. Some filling might spill to the sides, just clean it up after baking.
.
ENJOY!

to print the recipe, click here

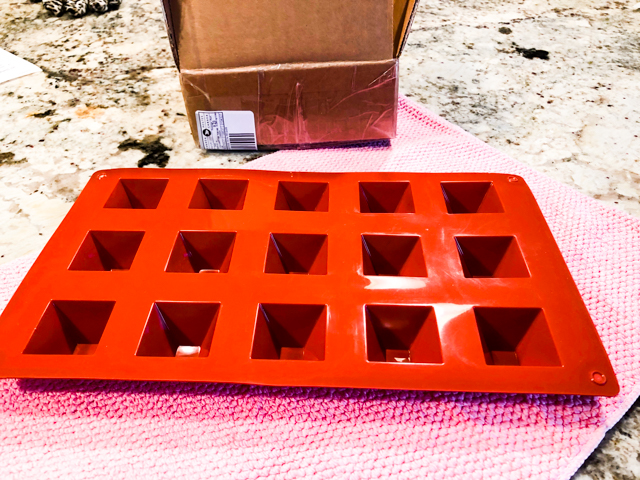
Comments: I was inspired by my friend Nancy (the one who gave me the pyramid shaped mold) to make these babies. She baked a batch last week and raved about them. I can see why. Truly delicious, although I must confess we just shared a very small one for quality control. The whole batch went to the project Common Table (meals for homeless). They are having a tough time now, instead of a sit-down dinner it is take-out. Everything has to be individually wrapped and a volunteer comes to our door and picks up the stuff I bake, so we have no direct contact. Odd times. Scary times.

Anyway, this was a fun bake. I wanted to make as many as possible from a single batch, so I changed the way the dough is shaped and cut. I managed to have 16 little brioches instead of only 8 bigger ones. To that I added two batches of a Chai Tea cake, and hopefully they had enough to share.

Brioche is a dough I would not attempt without a KitchenAid, because you must knead it extensively. I like to add all ingredients except the butter, work the dough until it starts to get smooth, then add the butter little by little. Once all the butter is in, take your time and let the machine work its magic at low-speed, until the dough is smooth, and if you pull it, it does not rip apart, instead it stretches beautifully. If you pay attention to this simple rule, you will have perfect brioche buns.

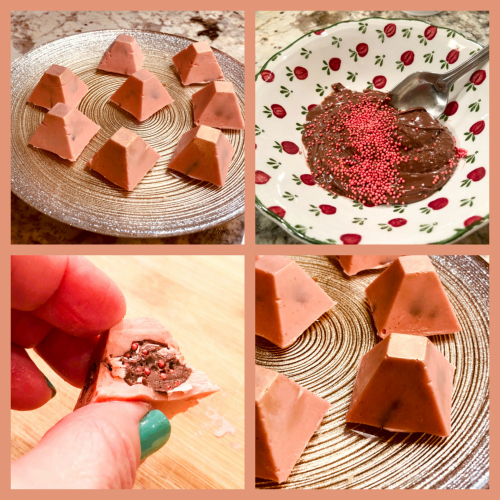
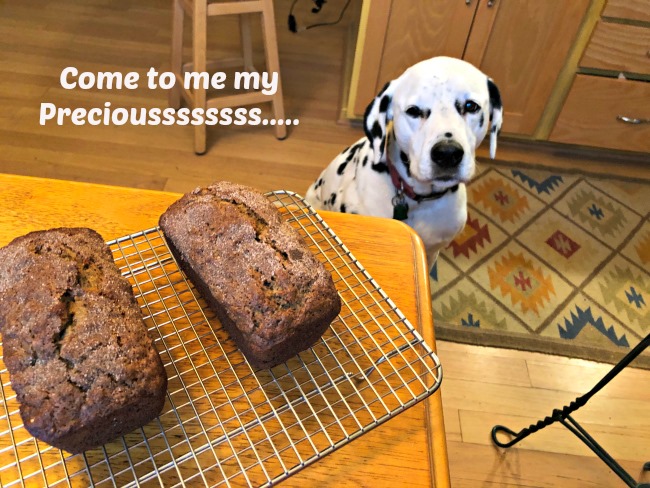
As the brioche baked, some filling oozed out from most of them. The same happened to Nancy, and I am not sure you can avoid it, although if some of my reader have experience with it, please leave me a comment. When leakage takes place, that stuff can be scraped gently and placed on a spoon. I advise waiting a few minutes to avoid burning your mouth. And pups cannot have it, no matter how pretty they stay sitting, like angels, because… chocolate.

ONE YEAR AGO: Sakura Buche du Printempts

TWO YEARS AGO: Clay Pot Roast Chicken

THREE YEARS AGO: In My Kitchen, April 2017

FOUR YEARS AGO: Secret Recipe Club: Chicken Korma and a Bonus Recipe

FIVE YEARS AGO: Josey Baker’s Olive Bread

SIX YEARS AGO: Almonds, A Cookbook Review

SEVEN YEARS AGO: Pomegranate-Molasses Glazed Carrots

EIGHT YEARS AGO: Codruta’s Rolled Oat Sourdough Bread

NINE YEARS AGO: Roasted Corn and Tomato Risotto

TEN YEARS AGO: Light Rye Bread


IN MY KITCHEN: APRIL 2020

Staying safe in Corona virus time: read the guest blog post by Phillip Klebba here. A video summarizing important tips can be found here

It is time to invite you all for a walk around our kitchen. In My Kitchen posts started many years ago with Celia and is now hosted by Sherry, from  Sherry’s Pickings. If you read my blog regularly, you know that I like to start this type of post with gifts, and there are quite a few to share (including the orchid from the picture, a gift from our good friends Lorne and Wasu, the last people we had over at our home before social isolation).

And now to the many gifts that landed in my kitchen in the past three months


From our dear friends from California, Marie Louise and Rocky, dried persimmon slices from a farmers market they visit weekly. These are just amazing, soft, sweet but not overly so. We loved them… diced and served with yogurt and some cereal or even to nibble before going to bed with a cup of tea. Delicious

From my friend Nancy, a fantastic patissier from Canada, a double gift: a pyramid-shaped silicone mold and a miracle-cloth that does wonders to clean countertops. She knows me well… The mold is so cool, I envision plenty of desserts using it.


From my friend Margie, who also coached me when I made Springerlee cookies for the first time (still need to blog about that!), these gorgeous wooden molds, carefully crafted. Aren’t they works of art?  I can tell you one thing, I won’t be waiting for the holiday season to bake a batch.

From Phil, the Ebay Scavenger Extraordinaire, two plates from Anthropologie, which I believe have my name all over them…  He always surprises me with the coolest stuff.

From Carlos, my tent-baker friend… a gorgeous Bundt pan. Carlos recently moved and decided to reduce his number of baking gadgets, so I gladly took this beauty out of his hands. I love the design, and already have one particular cake in my mind to put this baby to use.  Thank you, Carlos!

Now, let me go over a few things that you might enjoy and were recent acquisitions to the Bewitching Kitchen

In our kitchen…

A little cookie cutter set with a bit of an unusual shape, I have a specific bake in mind for them, but it will have to wait until this coronavirus nightmare passes by.

In our kitchen…

A herb-stripper. At first I was not sure if I would like it and use it, but I tell you, it’s pretty amazing, particularly for thyme, but also works very well for parsley. You just get the proper opening size and run them through. Leaves get nicely removed, and you are left with the stem to discard, compost or save to use in stocks.

In our kitchen…

Pistachio butter. This stuff is very very good. I know I can make my own, and have done so for bakes in the past, but this saves a lot of extra work and it’s by far the best I’ve tasted of all commercial products I tried.


In our kitchen…


Speaking of pistachios… I show you one typical lunch from the man I married. He calls it a gourmet toast. I call it the reason why I need to buy pistachio paste, because no matter how many bags of pistachios I buy, they are always almost empty when I need them (sigh).

In our kitchen…

I put Nancy’s gift to use, in a very simple way, just tempered white chocolate, dyed it pink and poured into the mold, which I painted with gold luster dust.  Instead of a complicated filling, I just mixed slightly warmed up Nutella with some sprinkles and added a tiny amount to each cavity. Of course this was not a real bonbon, the chocolate shell is very thick, it was more like a bar of chocolate with filling, but I must say it turned out very delicious.

In our kitchen…

Virginia Gourmet peanuts… My gosh, these are amazing!  Phil found them at Marshalls, and he immediately went back to the store and bought one more can (they are huge). They are the best peanuts ever.  Not sure what they mean by “hand cooked”, but whatever they did, I embrace it.

In our kitchen…

or should I say in our basement?

A lot of organization took place. We have the same metal shelves in our lab, they are sturdy and neat. I got a lot of plastic containers to store stuff and also made a complete inventory of what we have. Feels good.


I have now lists of baking gadgets, baking ingredients, silicone molds in a document in the computer. Oddly enough, it all started before the coronavirus hit.

In our kitchen…

We win some, we lose some. I fell in love with this teacup and bought it. Yes, it looks beautiful, and it does work wonders to brew using loose tea. However, the design makes it pretty obvious why classic tea cups have…. handles!  It is simply impossible to hold the cup because it gets unbearably hot. So it’s frustrating that if I use it to brew tea, I then need to pour the tea into a proper tea cup so I can sip it. No bueno.

In our kitchen…

On the subject of tea, this White Ambrosia a recent passion of mine. I learned about it not too long ago in a magazine called Tea Time, and ordered some to try. I love it, and intend to use it in baking in the near future.

In our kitchen…

We made Fiori di Sicilia flavored sugar cookies for our grand daughter’s 5th Bday… and included a few that depicted some of the pups… BogeyQuitThat, Buck and Fendi (one of their pups).

In our kitchen…


Polycarbonate chocolate molds. As  we face isolation, one of the things I decided was to learn a new skill, and making bonbons seemed like a good idea. I will share my adventures with you soon.

This pandemic is turning everyone’s life upside down. We are all scared and with good reason. Staying at home is what we can and must do to contain the spread of this nasty virus. Home we are, and some furry friends seem quite ok with this Sunday-Day that never ends. Let’s see what they’ve been up to….


The year started with the celebration of BogeyQT™ 11th Bday. He got special goodies and a festive hat, which we think complemented well his elegantly black spotted handsomeness…

As we were admiring the photos and deciding which one should be kept to share with his huge crowd of fans (I know nobody reads this piece because of my chocolate molds), Oscar had different ideas.


So you got a sissy hat for the Big Annoying One. Pitiful. Here, get a load of my displeasure with it. First I stole it, then I dealt with it properly. And since we are talking about annoying situations…. me and brother have another grievance to share with OUR readers…


FAKE NEWS!!!! These accusations have no basis in reality. I do love sushi and may or may not have inhaled a couple of pieces, but prefer concoctions with a higher amount of sugar, like freshly baked banana bread.

We have to admit that this big boy enjoys food. Any food. His tombstone could read: “He died doing what he loved most, wolfing down a bowl of chow”

Both Oscar and Buck think they got a lot more class and beauty….


Although we all know some sides of Osky’s persona that leave a lot to be desired as far as beauty is concerned….


That is his personal favorite position to sleep, just looking at him my neck hurts.

The pups have a final message for all of you….

And above all…

This too shall pass…. 

I hope to see you in 3 months for another In My Kitchen tour. I hope the world will be a better place then. I hope nights in which I wake up afraid of dying will be fewer and fewer. I hope we don’t lose loved ones. I hope you don’t either. I hope. I will always hope for the light in the end of the tunnel.  Until then, be vigilant. Be safe. Stay home.

ONE YEAR AGO:  In My Kitchen, April 2019

TWO YEARS AGO: In My Kitchen, April 2018

THREE YEARS AGO: First Monday Favorite

FOUR YEARS AGO: In My Kitchen, April 2016

FIVE YEARS AGO: Spring has Sprung with Suzanne Goin

SIX YEARS AGO: Chai Brownies

SEVEN YEARS AGO: Pomegranate-Molasses Glazed Carrots

EIGHT YEARS AGO: Braised Brisket with Bourbon-Peach Glaze

NINE YEARS AGO: The Real Vodka Sauce

TEN YEARS AGO: Spring Rolls on a Spring Day


THE HOME BAKERS COLLECTIVE: MARCH PROJECT

If you don’t know what the Home Bakers Collective is all about, please read my post about it with a click here. This month’s challenge was… surprise surprise…. conceived by yours truly! In case you did not notice, we are following the painful path of elimination through the Great American Baking Show that aired in December. Seems like ages ago, as we face  difficult, truly stressful times. At some point I did not know if we could even meet this challenge. Things degenerated too quickly, nobody could find flour and many other baking ingredients were scarce (and still are), but my baking  buddies stood up to the task and here we are. The brief is: bake a pie to say goodbye to winter, dedicated or inspired by someone you miss. Mine is a Blueberry Pie, and I dedicate it to my stepson Alex. More about it on comments after the recipe.

Note added after publication: our next challenge, designed by Tanya, will be…. DONUTS!  Any shape, any kind… If you’d like to join, bake some and we’ll soon figure out a way to share them all…

BLUEBERRY-BERGAMOT PIE
(from the Bewitching Kitchen, inspired by several sources)

for pie crust:
200 g cold, unsalted butter
1 large egg
1 teaspoon white wine vinegar
85 g ice-cold water
350 g all-purpose flour
1/2 teaspoon sea salt
1 teaspoon granulated sugar
egg wash (1 egg beaten with a teaspoon of water)

for the filling:
3 pints fresh blueberries.
Finely grated zest of 1 orange, plus 1 tablespoon fresh orange juice.
1/2 cup sugar
2 tablespoons honey
3 tablespoons cornstarch.
1/4 teaspoon salt
1/4 teaspoon ground cinnamon.
1 drop food-grade bergamot essential oil (optional)

Make the pie crust. Mix the water, egg and vinegar in a bowl, reserve in the fridge. Add the flour, salt and sugar to the bowl of a food processor. Pulse a few seconds to mix, but just a few seconds, you do not want to heat up the ingredients.

Add the very cold butter in pieces and pulse briefly to form clumps of butter the size of peas. Turn the processor on and add the cold water/egg mixture through the opening of the lid. Process until the dough starts to come together, then stop immediately.  Grab the dough and press it as a disk over plastic wrap.  Reserve in the fridge for one hour.

Divide the dough in two parts, one slightly bigger than the other (to form the bottom crust). Roll the bigger portion as a round with about 3mm in thickness. Drape it over the pan and reserve in the fridge while you prepare the filling. Roll the second portion in the same thickness to cover the top. Using small cookie cutters make a design on the top if desired, and cut decorations from the same piece of dough. Place them in the freezer.

Heat the oven to 350F.

Make the filling. In a medium bowl, gently toss together blueberries, orange zest and juice, sugar, cornstarch, salt, cinnamon, and bergamot oil.  Pour the  mixture over the bottom crust, dot with butter and cover with the frozen disk. Brush the surface with egg wash.

Bake until the filling begins to bubble out of the vents and the top crust is golden brown, about 45 minutes. Remove from the oven and cool for 1 to 2 hours to let the filling set before serving.

ENJOY!

to print the recipe, click here

Comments: I had a lot of fun making this pie, even if compared to the fancy designs made by serious pie artists, mine was pretty amateurish. I dedicated this pie to my stepson Alex. There are two food items that I will always associate with him, because he loves them so much. Blueberries and crab. No, not together, he is a man of fine taste… 😉  When he lived with us as a young teenager and blueberries were in season, we always kept many little containers in the fridge, so that he could have his blueberry fix with every meal. Steamed crab legs were another favorite of his, our dinners would take a long time, as the three of us went through an impressive number of crab legs. Unfortunately, we don’t see him as often as we would like. He is a physician in New York, a resident in Interventional Radiology working right in the center of the coronavirus pandemic. We wish we lived closer and that he could have enjoyed this pie, sitting right at our table with his adorable partner Courtnie…

Please make sure to stop by The Bakers Collective to see what my fellow tent-bakers did for this challenge. Not everyone could join, for obvious reasons. Life has been stressful for the whole human population. It is a strange way to feel connected to the whole world, and I hope that this nightmare will have a happy ending soon. Be well, be safe, be healthy and STAY HOME.

ONE YEAR AGO: Another Twisted Sister of the Shepherd’s Pie

TWO YEARS AGO: Cashew Chicken, My Way

THREE YEARS AGO: Two Deliciously Simple Salads

FOUR YEARS AGO: In My Kitchen, April 2016

FIVE YEARS AGO: Spring has Sprung with Suzanne Goin

SIX YEARS AGO: Chai Brownies

SEVEN YEARS AGO: Pomegranate-Molasses Glazed Carrots

EIGHT YEARS AGO: Braised Brisket with Bourbon-Peach Glaze

NINE YEARS AGO: The Real Vodka Sauce

TEN YEARS AGO: Spring Rolls on a Spring Day


MOROCCAN TURKEY PIE WITH OLIVE OIL CRUST

Staying safe in Corona virus time: read the guest blog post by Phillip Klebba here. A video summarizing important tips can be found here

We don’t eat sweets that much. I bake a lot but it all goes to departmental colleagues, senior citizens at our town center, and homeless meals. What is a baker to do, when a pandemic forces everyone into isolation and she has very limited outlets to share sweets?  She bakes savory stuff, that is. Like this crazy departure on Shepherd’s Pie, made lighter because the topping is cauliflower-based. The lightness is immediately neutralized by enclosing it in a pie crust. It all balanced out beautifully,  and we were both quite pleased with our dinner. Normally I would make a salad to go with it, but it felt like a complete meal without it.


MOROCCAN TURKEY PIE WITH OLIVE OIL CRUST
(from the Bewitching Kitchen, inspired by many sources)

for the pie crust:
250g all-purpose flour (260 grams)
1/8 teaspoon salt
50g olive oil (50 grams)
125 g cold water

Whisk together the flour and salt in a large bowl, then add the olive oil, stir with a fork until the flour gets coated with it, forming a crumbly ness. Slowly add cold water and knead gently just until the dough starts to comes together.  Wrap the dough in plastic and refrigerate one hour before using.

Roll it over plastic wrap lightly coated with flour, then use it to cover a 9-inch pie pan of your choice. Freeze for 10 minutes. Meanwhile, heat the oven to 400F. Remove crust from the freezer, cover with saran wrap or parchment paper and add weights. Bake for 10 minutes. Cool completely before filling.

for the filling:
3 tablespoons olive oil, divided
1 + 1/2 pounds ground turkey
2 large carrots, cut in pieces
8 oz mushrooms cut in pieces
2 celery ribs, minced
1 + 1/2 tsp salt
1 shallot, minced
1/2 tsp ground ginger
1/2 tsp ground cinnamon
1/4 tsp ground turmeric
1/4 tsp ground cumin
1 tablespoon harissa, or to taste

Brown the ground turkey in a large skillet using 2 tablespoons of olive oil, and seasoning with 1 tsp salt. Once the meat is brown, transfer to a bowl. Add one more tablespoon of olive oil and saute the carrots, shallot and mushrooms, sprinkling all the spices and the final 1/2 tsp salt over the veggies as they cook. Once the veggies start to get some color, add the harissa, the ground turkey reserved, and mix everything gently. Reduce the heat, cover and simmer 5 minutes. Transfer to a bowl and cool it completely.

for the topping:
1 large head cauliflower, cut into florets
70g raw almonds
2 tablespoons olive oil
2 tablespoons nutritional yeast
½ teaspoon salt
1/2 tsp paprika

Arrange the cauliflower florets in a steamer basket, cover, and steam for 15 minutes, until the cauliflower is tender. Check after 12 minutes, if a fork goes through easily, stop the steaming.

Put the almonds, olive oil, nutritional yeast, salt and paprika in a Vitamix type blender (or food processor) and add the steamed cauliflower. Blend, increasing the power until it gets very smooth and thickens a little.  Remove from the blender and reserve until ready to top the pie. Can be made a day in advance, keep it in the fridge.

Assemble the pie. Heat the oven to 400F. Add the turkey filling to the crust, spoon the cauliflower topping. If desired, add a pattern using the tines of a fork.

Bake for 30 minutes. If you like a darker topping run it under a broiler protecting the edges of the pie crust. Allow the pie to cool for 15 minutes before slicing.

ENJOY!

to print the recipe, click here

Comments: If you omit the pie crust, this would turn into a pretty low-carb meal, that will still be quite satisfying. Keep that option in mind, although then I think a small salad could be a nice touch. Just lightly coat a Pyrex pie dish with olive oil and add the cooled turkey mixture, spread the cauliflower topping and bake. Some grated cheese could be very nice, we usually opt for a meal that is low in saturated fat, so we skip it.

I am very pleased with the olive oil crust. There are many recipes in cookbooks and websites, some will instruct you to do it as a press-on crust, but I did not like that at all. I adjusted the amount of flour and fat to produce a dough with good consistency for rolling. As a general rule, olive oil crusts need to bake for 35 to 40 minutes total, so depending on the type of filling you have, how moist it is, you can blind bake it for 10 minutes as I did, or skip it all together. Make sure the total baking time does not go over 40 minutes, or the crust might get too tough. It is a nice option for those avoiding dairy or trying to reduce the level of saturated fat.


ONE YEAR AGO: Another Twisted Sister of the Shepherd’s Pie (what a nice coincidence!)

TWO YEARS AGO: Cashew Chicken, My Way

THREE YEARS AGO: Two Deliciously Simple Salads

FOUR YEARS AGO: In My Kitchen, April 2016

FIVE YEARS AGO: Spring has Sprung with Suzanne Goin

SIX YEARS AGO: Chai Brownies

SEVEN YEARS AGO: Pomegranate-Molasses Glazed Carrots

EIGHT YEARS AGO: Braised Brisket with Bourbon-Peach Glaze

NINE YEARS AGO: The Real Vodka Sauce

TEN YEARS AGO: Spring Rolls on a Spring Day


YIN & YANG VIENNOISE BREAD

Staying safe in Corona virus time: read the guest blog post by Phillip Klebba here

During difficult times we often see the best coming out of people. Acts of kindness, generosity, and love try to counteract the fear and uncertainties that surround us. This bread, with its dual nature of darkness and lightness brings this image to my mind. I enjoyed the process of making it, and hope you consider baking a batch in your kitchen, trying to focus on all the positive things we do have.


YIN & YANG VIENNOISE BREAD
(slightly modified from Bake-Street)

300 g bread flour
200 g all purpose flour
3 g osmo-tolerant yeast (or regular instant dry)
255 g milk
40 g egg (whisk one egg and weigh the amount needed)
50 g granulated sugar
75 g butter, at room temperature
10 g salt
20 g cocoa powder + 15 g brown sugar
1 egg, beaten + pinch of salt

Add the flours, yeast, egg, salt, and 3/4 of the milk to a KitchenAid type bowl.  Using the dough hook, mix until the ingredients are incorporated, then decide if you need to add the rest of the milk. Once the milk is added, with the machine still running, add the sugar in two additions. Knead for about 4 minutes at low-speed, then add the butter, one tablespoon or so at a time.  Wait until each  piece disappears into the dough before adding more butter. Knead until you get good gluten development, probably 4 to 5 minutes longer. The dough should stretch smoothly without tearing.

Divide the dough in two portions, one weighing 40 g less than the other. To the smaller batch, add the cocoa powder and brown sugar and knead by hand or in the machine until the cocoa is fully distributed. It will take a little time and effort. Place both balls of dough in separate oiled bowls, and allow them to proof at room temperature for 2 and a half hours.

Divide each dough in five portions, each between 90 and 95g. Form each as a little ball and let rest for 10 minutes. Roll each as a long oblong shape about 4mm thick. Place different colors of dough on top and bottom, form as little loaves, seam at the bottom.  Use a very sharp blade to make slashes on the surface, being very determinate. Any hesitation and the cut won’t be sharp enough. You need to see the different color of dough showing underneath. Place the shaped and cut loaves over parchment paper and let them proof at room temperature for 1 hour and 15 minutes.

Heat the oven to 400F.  Paint each loaf with an egg wash, and bake for about 16 minutes. Cool completely on a rack before slicing.

ENJOY!

to print the recipe, click here

Comments: The most interesting aspect of this bread is how the cocoa powder affects texture and resulting oven spring. The white dough is very smooth, stretches easily, and wraps around the dark dough like a soft blanket. The cocoa-containing dough resists rolling a lot more and has a dry feel to it. When it is inside, it will have less oven spring, so the outer dough is not going to open as dramatically as when the dough placement is reversed. As far as taste goes, it will depend on your goal for the bread. If you will enjoy it plain or with a little butter, the light dough inside is the way to go. But if you toast it and enjoy it with jam (orange jam would be awesome according to Eva from Bake-Street), the cocoa kind will be hard to beat.


Yin and Yang. Focus on the positive. We know how to deal with this pandemic. Imagine what it was like on the times of the Black Death, when not only people were dying left and right, but nobody knew why. Nobody knew what to do. Focus on the positive. Do everything you can to maintain social distance and to keep your personal environment clean.

The bread is soft, the cocoa crust slightly harder than the lighter version, but not much. These little loaves would be perfect for a brunch on a Sunday morning, or with a nice cup of tea as the sun sets. Focus on the positive, we will beat this.

I am very fond of Eva’s blog Bake-Street, having made quite a few of her recipe over the past few years, they are very detailed and always work as expected. Make sure to stop by and subscribe, you will be glad you did!

ONE YEAR AGO: Extreme Chocolate Cupcakes

TWO YEARS AGO: Sunflower Seed Kamut Sourdough

THREE YEARS AGO: The Joys of Grating Squash

FOUR YEARS AGO: Auberge Pecan-Walnut Bread